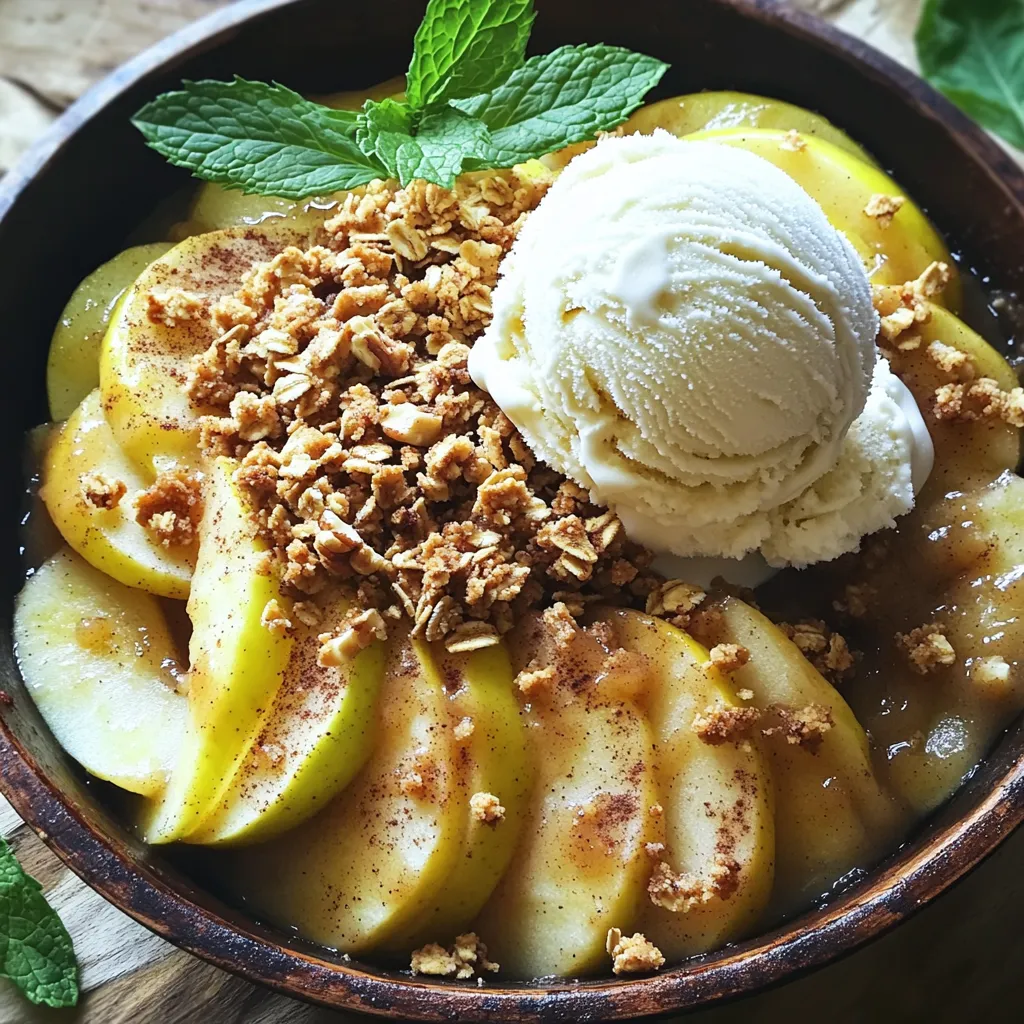
Apple Crisp Skillet with Vanilla Ice Cream Delight
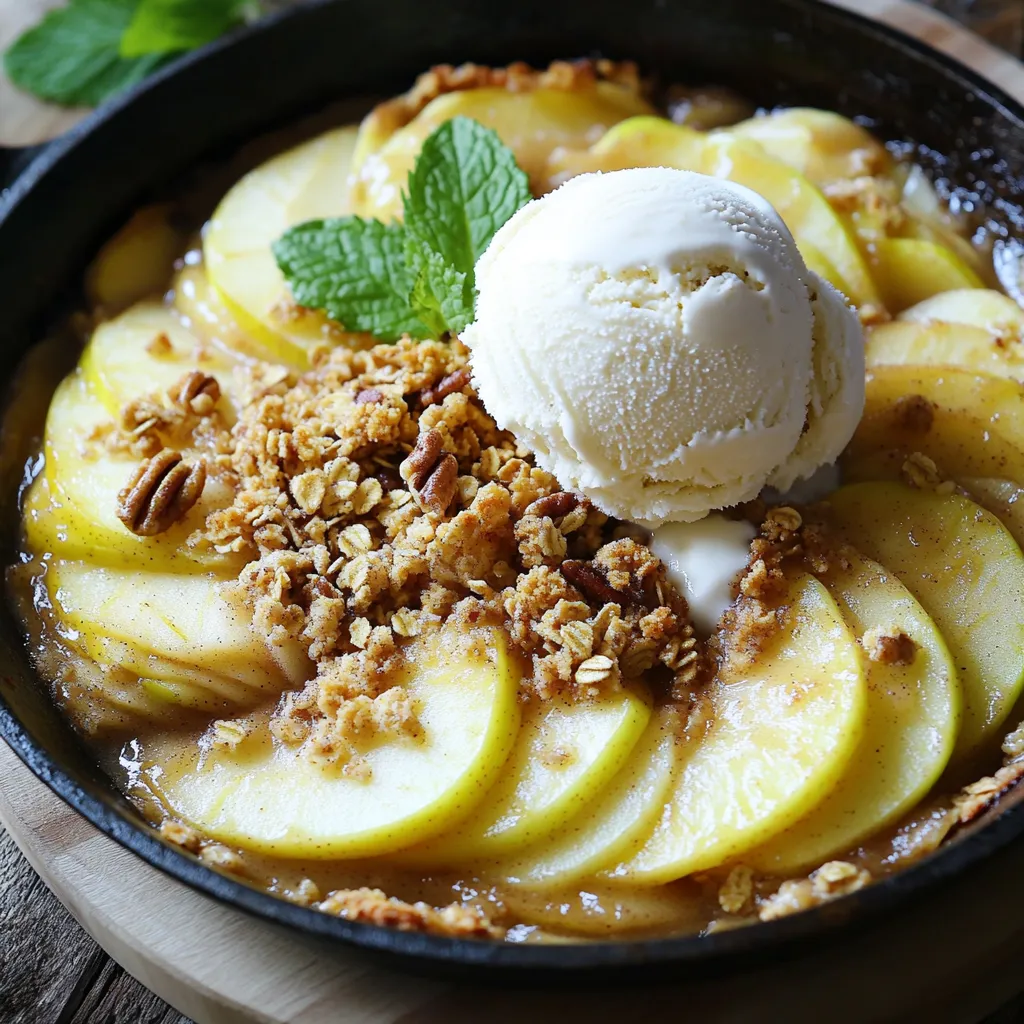
Are you ready to create a warm, mouthwatering dessert that will impress everyone? This Apple Crisp Skillet with Vanilla Ice Cream is simple yet delicious. Imagine warm, spiced apples topped with a crunchy oat topping, all served with a scoop of creamy vanilla ice cream. Whether for a cozy night in or a gathering with friends, this recipe is sure to delight. Let’s dive into the ingredients and get cooking!
Ingredients
To make the Apple Crisp Skillet with Vanilla Ice Cream, gather these simple ingredients:
- 4 large apples (Granny Smith or Honeycrisp)
- 1 cup rolled oats
- 1/2 cup brown sugar
- 1/2 cup all-purpose flour
- 1/3 cup unsalted butter (melted)
- 1 teaspoon ground cinnamon
- 1/2 teaspoon ground nutmeg
- 1/4 teaspoon salt
- 1 teaspoon vanilla extract
- 1 cup chopped nuts (walnuts or pecans)
- Creamy vanilla ice cream for serving
Using fresh apples is key to great flavor. Granny Smith apples bring a nice tartness. Honeycrisp apples add a sweet crunch. The mix of oats, brown sugar, and nuts creates a perfect topping. The butter helps bind it all together and adds richness. Vanilla extract enhances the dish with a warm aroma.
Chopped nuts give a delightful crunch. You can choose walnuts or pecans for added flavor. Last but not least, creamy vanilla ice cream makes this dessert special. It melts beautifully over the warm crisp, adding a cool contrast.
Now that you have the ingredients, you’re ready to create a warm, cozy dessert that everyone will love.
Step-by-Step Instructions
Preparation
- Preheating the Oven
First, you need to preheat your oven to 350°F (175°C). This step is key for even baking.
- Preparing the Skillet
Next, take a large, oven-safe skillet. Lightly grease it with non-stick spray. This makes cleanup much easier.
- Coating the Apples
In a bowl, combine your sliced apples with ground cinnamon, nutmeg, salt, and vanilla extract. Toss well to coat all the apple slices. This adds great flavor to the apples.
Mixing Toppings
- Combining Dry Ingredients
In another bowl, mix the rolled oats, brown sugar, flour, and chopped nuts. Stir these dry ingredients until they blend well together.
- Adding Melted Butter
Now, pour melted butter over the oat mixture. Use a fork or your fingers to mix until it becomes crumbly. This topping will give your crisp a nice texture.
Baking Instructions
- Arranging in Skillet
Spread the apple mixture evenly in the greased skillet. Ensure the apples lie flat for even cooking.
- Baking Time and Temperature
Bake the skillet in your preheated oven for about 30-35 minutes. Look for the apples to soften and the topping to turn golden brown.
- Cooling Period for Serving
Once baked, remove the skillet from the oven. Let it cool for about 10 minutes. This cooling time helps the crisp set, making it easier to serve.
Tips & Tricks
Perfecting the Crisp
Choosing the Right Apples
When you pick apples for this dish, go for Granny Smith or Honeycrisp. These apples give a nice sweet and tart flavor. They hold their shape well, so they won’t turn mushy. Always choose firm apples. Most grocery stores carry these varieties. If you want a sweeter crisp, mix in some Fuji or Gala apples too. This blend adds depth to the taste.
Tips for Crumbly Topping
To make your topping crumbly, use cold butter. Melted butter helps, but cold gives a better texture. Mix your dry ingredients well. This includes oats, sugar, flour, and nuts. When you add the butter, mix by hand. This keeps the topping from getting too mushy. The goal is to have small clumps that will bake into a crispy layer. Don’t skip the nuts; they add crunch and flavor.
Serving Suggestions
Plating the Dessert
Serve your crisp right from the skillet for a rustic look. This adds charm and warmth. Use a large spoon or spatula to scoop out portions. A scoop of vanilla ice cream on top is a must. The warm crisp and cold ice cream make a great pair. For a pop of color, garnish with fresh mint leaves. It makes the dish look even more inviting.
Enhancements like Caramel Sauce
For a sweet upgrade, drizzle caramel sauce over the ice cream. This adds richness and a nice touch of sweetness. You can heat the caramel slightly before drizzling. This makes it easier to pour. If you want to impress, sprinkle some sea salt on top. This balances the sweetness and creates a delightful flavor contrast.
Variations
Nut Alternatives
You can change the nuts in your crisp. Try walnuts or pecans for a new taste. Each nut adds its own flavor. If you want a nut-free option, skip the nuts. You can use more oats instead. This swap gives the crisp a chewy texture.
Flavor Additions
Adding dried fruits can make your crisp special. Consider raisins, cranberries, or apricots. These fruits add sweetness and chewiness. You can also try spices like ginger or cloves. These spices add warmth and depth. A pinch of nutmeg or a dash of allspice can work wonders too.
Variation in Presentation
Serving your crisp is fun and creative. You can scoop individual portions into small bowls. This makes it easy for guests to enjoy. Or, serve it straight from the skillet. This rustic look brings a cozy feel to the table. You could even add whipped cream or a drizzle of caramel for extra flair.
Storage Info
Leftover Storage
- Best Practices for Refrigeration
Store any leftover apple crisp in an airtight container. Keep it in the fridge. It stays fresh for up to three days. Make sure it cools to room temperature before sealing it. This helps keep it from getting soggy.
- Reheating Tips
To reheat, place your apple crisp in an oven-safe dish. Heat it at 350°F (175°C) for about 15 minutes. You can also use the microwave. Heat it in 30-second bursts. This way, you warm it without overcooking it.
Freezing Instructions
- How to Freeze Apple Crisp
To freeze, let the apple crisp cool completely. Place it in a freezer-safe container. Wrap it tightly in plastic wrap and then foil. This helps prevent freezer burn. It can last up to three months in the freezer.
- Thawing and Reheating
When you want to enjoy your frozen apple crisp, take it out of the freezer. Let it thaw in the fridge overnight. Once thawed, reheat it as mentioned above for the best taste. Enjoy every bite of this delicious treat!
FAQs
Can I make this recipe gluten-free?
Yes, you can make this recipe gluten-free. Just swap out the all-purpose flour for gluten-free flour. Use certified gluten-free oats as well. This way, you can enjoy the apple crisp without gluten.
What type of ice cream pairs best with apple crisp?
Creamy vanilla ice cream is the classic choice. Its rich flavor complements the warm apples and spices. You might also try caramel or cinnamon ice cream for extra flavor. Each adds a lovely twist to your dessert.
How do I know when the apple crisp is done baking?
Look for a golden brown topping and soft apples. The crisp should bubble slightly around the edges. If the topping is golden and the apples are tender, it is ready to come out of the oven.
Can I use other fruits in this crisp recipe?
Absolutely! You can use berries, pears, or peaches. Each fruit brings its own unique flavor. Just adjust the spices to match the fruit you choose. For example, add a touch of lemon zest for a citrusy twist.
How long can I store leftover apple crisp?
You can store leftover apple crisp for about 3 to 4 days in the fridge. Make sure to cover it well to keep it fresh. You can also freeze it for up to 3 months. Just reheat it in the oven when you’re ready to enjoy it again.
We covered how to make a delicious apple crisp with simple steps and tasty ingredients. You learned about the right apples, the best nuts, and how to serve it. Always remember to let it cool before enjoying. For a twist, try different nuts or add spices to suit your taste. This dish is perfect for any gathering or a cozy night in. Enjoy your homemade apple crisp, and let your creativity shine in the kitchen!

![- 1/2 cup rolled oats - 1 tablespoon cocoa powder - 1 tablespoon peanut butter - 1 cup almond milk - 1 tablespoon maple syrup - 1/2 teaspoon vanilla extract - A pinch of salt To create a bowl of chocolate peanut butter overnight oats, you need simple ingredients. Start with rolled oats; they act as the base. Cocoa powder adds rich chocolate flavor. Peanut butter gives a smooth, nutty taste. Use almond milk as a creamy liquid. Maple syrup sweetens the dish naturally. A touch of vanilla extract enhances the flavors. Finally, a pinch of salt brings everything together. - Sliced bananas - Chocolate chips - Crushed peanuts - Assorted fresh berries You can elevate your oats with fun toppings. Sliced bananas add sweetness and texture. Chocolate chips bring extra chocolate goodness. Crushed peanuts offer a nice crunch. Fresh berries brighten the dish with color and flavor. Choose your favorites or mix them up for a tasty treat. For the complete recipe, check out the [Full Recipe]. - Step 1: Combine dry ingredients in a bowl. In a medium mixing bowl, add 1/2 cup rolled oats and 1 tablespoon cocoa powder. Stir these together. This mix gives your oats a deep chocolate flavor. - Step 2: Whisk together wet ingredients separately. In another bowl, mix 1 cup almond milk, 1 tablespoon peanut butter, 1 tablespoon maple syrup, 1/2 teaspoon vanilla extract, and a pinch of salt. Make sure the peanut butter blends in well. - Step 3: Mix dry and wet ingredients thoroughly. Pour the wet mix over the dry oats. Stir with a spoon until every oat is coated. This step ensures creamy and rich oats. - Step 4: Transfer mixture to a jar or container. Carefully spoon the mixed oats into a clean jar. Choose a jar with a lid for best results. - Step 5: Seal and refrigerate overnight. Close the lid tightly. Place the jar in the fridge. Let it chill overnight or for at least 4 hours. The oats will soak up the flavors and soften. - Step 6: Stir before serving. When you’re ready to eat, take the jar out of the fridge. Stir the oats well. If they seem thick, add a little more milk to loosen them up. - Step 7: Add your choice of toppings. Top your oats with sliced bananas, chocolate chips, crushed peanuts, or fresh berries. These toppings add fun flavors and textures to your dish. Enjoy your creamy, chocolatey breakfast! For the full recipe, check out the complete guide. - For creamier oats, use whole milk or a milk alternative. - Allow oats to soak longer for a softer texture. Using whole milk adds richness. If you prefer a lighter option, almond or oat milk works well too. The key is to find what you love. Soaking longer lets the oats absorb more liquid. This makes them softer and more enjoyable to eat. - Try different nut butters like almond or cashew. - Experiment with sweeteners like agave or stevia. Feel free to swap peanut butter with almond or cashew butter for new flavors. Each nut butter brings its own taste. Use different sweeteners to find your perfect balance. Agave has a light flavor, while stevia is sugar-free. - Serve in a clear jar for visual appeal. - Drizzle extra peanut butter on top. Serving in a clear jar lets everyone see those delicious layers. It makes your dish look fancy! A drizzle of peanut butter on top adds a nice touch. It makes it more inviting and tasty. For an added twist, include colorful toppings like fresh berries or chocolate chips. Enjoy crafting your perfect chocolate peanut butter overnight oats! For the complete recipe, check the Full Recipe section. {{image_4}} You can switch up your chocolate peanut butter overnight oats with fun flavors. - Chocolate Banana Overnight Oats: Mash a ripe banana into the mix. The banana adds natural sweetness and a creamy texture. - Mocha Peanut Butter Overnight Oats: Add a teaspoon of instant coffee or espresso powder. This gives your oats a rich coffee flavor. Got dietary needs? No problem! You can easily modify this recipe. - Gluten-free option: Use certified gluten-free oats. This way, everyone can enjoy a tasty breakfast. - Vegan alternative: Swap regular milk for almond milk or oat milk. Use maple syrup or agave for sweetness. Change your oats with the seasons for exciting new tastes. - Adding pumpkin spice for fall: Mix in a teaspoon of pumpkin spice. This brings warmth and a cozy flavor to your oats. - Incorporating fresh berries in summer: Toss in some strawberries or blueberries. Fresh fruit brightens up your oats and adds nutrients. These variations keep your breakfast fun and exciting! You can find the full recipe here to make your own delicious creation. To keep your chocolate peanut butter overnight oats fresh, use an airtight container. This helps prevent moisture and odors from mixing in. Store the container in the refrigerator. Your oats will stay good for up to 5 days. This means you can make a batch and enjoy it throughout the week. Can you freeze overnight oats? Yes, you can freeze them! Freezing is a great way to save extra servings. Just make sure to use a freezer-safe container. How to thaw overnight oats for future use: To thaw, move the container to the fridge the night before you want to eat them. This will help them thaw slowly and evenly. You can also use the microwave if you’re in a hurry. Just heat it in short bursts, stirring in between. Best methods to reheat if desired: If you prefer warm oats, reheat them in the microwave. Place your oats in a microwave-safe bowl and cover it. Heat for 30 seconds, then stir. Repeat until warm enough. You can also reheat on the stove. Just add a splash of milk to a saucepan and warm it over low heat, stirring often. Enjoy your delicious oats however you like! What is the texture of overnight oats supposed to be? Overnight oats should be creamy and thick. They absorb the liquid overnight. This makes them soft but not mushy. You want a nice balance. If they seem too watery, add less milk next time. Can I use steel-cut oats instead of rolled oats? Yes, but steel-cut oats will need more time to soak. They take longer to soften. I recommend soaking them overnight to get a good texture. You may need to adjust the liquid and soaking time. How can I make my overnight oats thicker or creamier? To make your oats thicker, use less milk. You can also add chia seeds. They help absorb liquid and add fiber. Another tip is to let them sit longer in the fridge. Are overnight oats healthy? Yes, overnight oats are very healthy. They offer fiber and protein. This can help keep you full. They also provide vitamins and minerals. Plus, they are low in sugar if you control the toppings. What are the nutritional benefits of using peanut butter? Peanut butter adds healthy fats and protein. It helps keep your energy up. It also has vitamins like E and B. Just make sure to choose a natural peanut butter with no added sugar. What to pair with chocolate peanut butter overnight oats? You can pair them with fresh fruit. Bananas and berries taste great. Nuts or seeds also add a nice crunch. For extra sweetness, consider a drizzle of honey or maple syrup. Can overnight oats be eaten warm? Yes, you can eat them warm if you like. Just heat them gently in the microwave. Add a splash of milk to keep them creamy. Enjoy your warm treat any time of the day! You can create tasty and healthy overnight oats with simple ingredients. We discussed the main ingredients, preparation steps, and optional toppings. You learned tips for customization, serving, and storing your oats. Remember, you can adjust flavors and textures to suit your taste. Try different ingredients and enjoy your meals. Keep experimenting with toppings and variations. This way, overnight oats will always feel new and exciting. Enjoy every delicious bite and make it your own!](https://dishtreats.com/wp-content/uploads/2025/07/90d151b9-6d0c-4c1c-ba31-37512e57091e-768x768.webp)