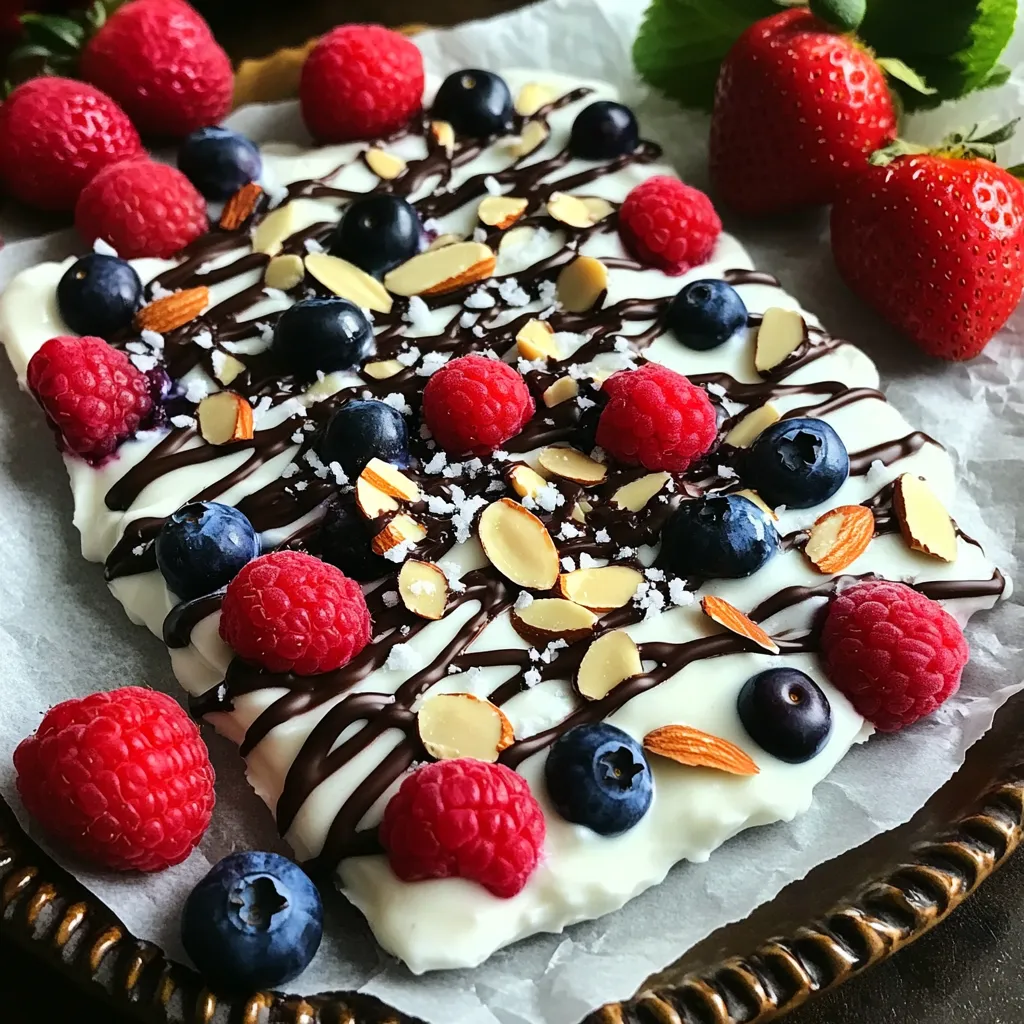
Frozen Yogurt Berry Bark Delicious and Healthy Treat
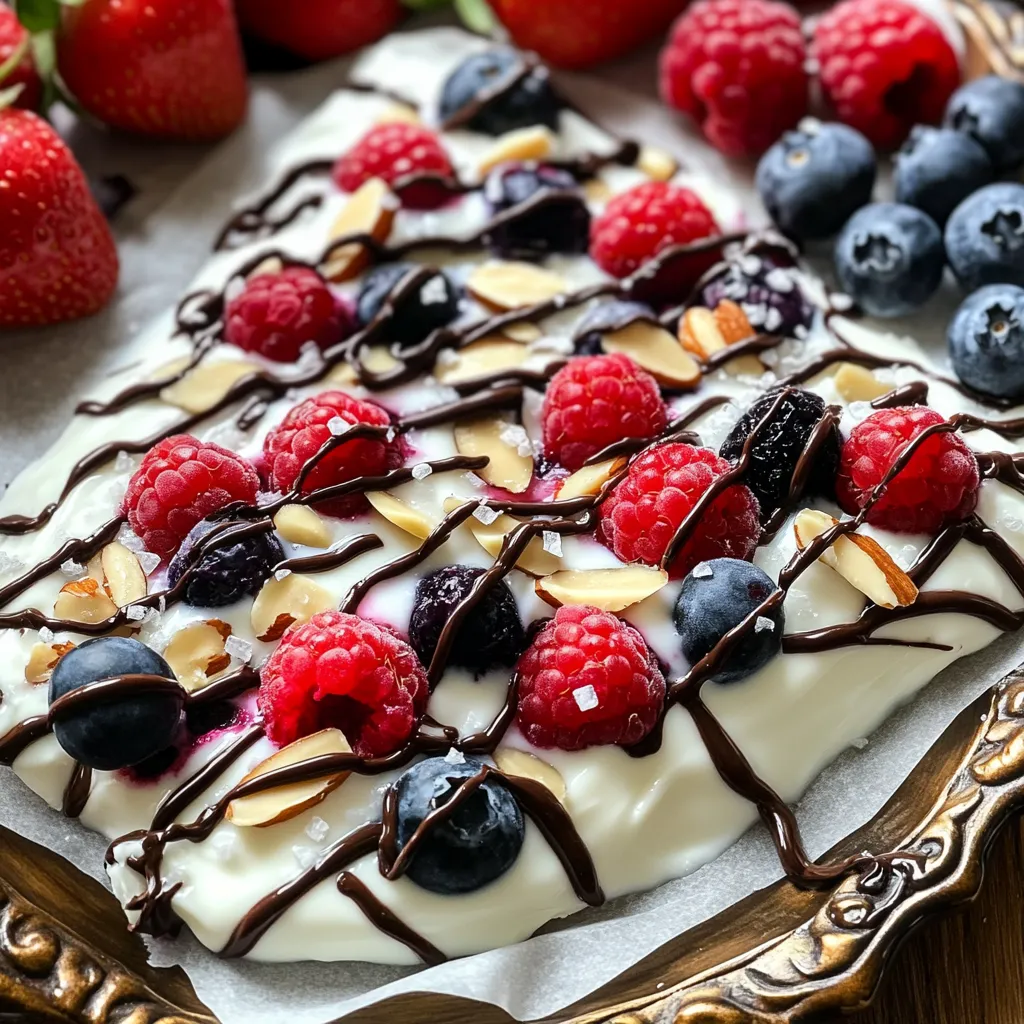
Craving a sweet treat that won’t wreck your healthy eating plans? Look no further! This Frozen Yogurt Berry Bark is not only delicious but also packed with good nutrients. Using Greek yogurt, fresh berries, and a drizzle of dark chocolate, it’s easy to make and even easier to enjoy. Join me on this fun adventure of flavor and creativity, and let’s whip up a snack that everyone will love!
Ingredients
Main Ingredients List
- 2 cups Greek yogurt (plain or vanilla)
- 2 tablespoons honey or maple syrup
- 1 cup mixed berries (strawberries, blueberries, raspberries)
Toppings
- 1/2 cup dark chocolate chips
- 1/4 cup sliced almonds (optional)
- Pinch of sea salt
Gathering these ingredients is easy and fun. Greek yogurt gives a creamy base. Choose plain or vanilla for flavor. Honey or maple syrup adds natural sweetness. You can mix in any berries you like. Strawberries, blueberries, and raspberries work great together.
For toppings, dark chocolate chips add a rich taste. If you want crunch, sliced almonds are a perfect choice. A pinch of sea salt brings out all the flavors. This simple list makes it a breeze to create your Frozen Yogurt Berry Bark.
Step-by-Step Instructions
Preparing the Yogurt Mixture
To make a tasty yogurt mix, start with Greek yogurt. You can use plain or vanilla yogurt. In a big bowl, add 2 cups of yogurt. Next, pour in 2 tablespoons of honey or maple syrup for sweetness. Mix them together well. Stir until the mix is smooth and creamy. You want no lumps!
Layering and Assembling
Now, let’s get your baking sheet ready! Line it with parchment paper. Make sure to cover the whole sheet. Pour the yogurt mix onto this paper. Use a spatula to spread it out evenly. Aim for about a 1/2 inch thick layer.
Next, take your mixed berries. You will need 1 cup of strawberries, blueberries, and raspberries. Spread the berries evenly on top of the yogurt. Press them gently into the yogurt so they stick.
Now for the fun part! Melt 1/2 cup of dark chocolate chips in a microwave-safe bowl. Heat them for 30 seconds at a time. Stir between each time until the chocolate is smooth. Drizzle this melted chocolate over the yogurt and berries. This adds a nice touch!
If you like, sprinkle some sliced almonds on top. You can add a pinch of sea salt to enhance the flavor.
Freezing and Serving
Carefully place the baking sheet in the freezer. Let it freeze for at least 3-4 hours. You want it to be completely solid.
Once frozen, take it out. Remove the yogurt bark from the baking sheet. Break it into pieces that you like. For serving, place the pieces on a nice platter. You can add fresh berries around the bark for color. If you want, drizzle more melted chocolate on top before serving. Enjoy your tasty treat!
Tips & Tricks
How to Make It Low Sugar
To lower sugar in your Frozen Yogurt Berry Bark, swap honey or maple syrup for stevia or erythritol. These natural sweeteners give the same sweetness without the extra sugar. You can also use mashed bananas or unsweetened applesauce for added flavor and sweetness. They keep the bark tasty and healthy!
Ensuring a Creamy Texture
To avoid ice crystals in your yogurt bark, use full-fat Greek yogurt. This yogurt has less water, which helps it freeze smoother. Mix the yogurt well with your sweetener until it is creamy. This step is key to a rich texture.
Aesthetic Presentation Tips
Serve your Frozen Yogurt Berry Bark on a colorful platter to make it pop. To make it extra special, add fresh berries around the edges. Drizzle extra melted chocolate on top just before serving. This adds a nice touch and makes it look fancy for guests!
Variations
Flavor Combinations
You can switch up the berries in your bark. Try using blackberries or cherries for a fun twist. You can also mix in bananas or peaches. Want to add a boost of flavor? Use extracts like vanilla or almond. Just a few drops will make a big difference in taste.
Dietary Adjustments
If you’re vegan, swap Greek yogurt for coconut yogurt. Use maple syrup for sweetness. This way, you still get a creamy treat without dairy. For nut-free options, skip the sliced almonds. You can use seeds like pumpkin or sunflower seeds instead. They add crunch and keep it safe for everyone.
Seasonal Twists
Summer calls for fresh berries. Use bright strawberries and blueberries for a colorful bark. In autumn, try adding pumpkin pie spice. You can also mix in fall fruits like apples or pears. For the holidays, make festive shapes. Use cookie cutters to create fun designs. Drizzle with white chocolate for a snowy look.
Storage Info
Best Practices for Freezing
To keep your Frozen Yogurt Berry Bark fresh, store it properly. Wrap each piece in plastic wrap or foil. Place them in an airtight container. This will help prevent freezer burn. Freezer burn can ruin the taste and texture of your treat.
For best quality, consume within two weeks. It will stay tasty for up to a month if stored well.
Thawing Tips
When you’re ready to enjoy your bark, thaw it slowly. Place it in the fridge for 30 minutes. This keeps the texture smooth and creamy. You can also let it sit at room temperature for 10 minutes.
Serve your thawed bark on a nice plate. Add fresh berries or a drizzle of melted chocolate to make it look fancy.
Reusing Ingredients
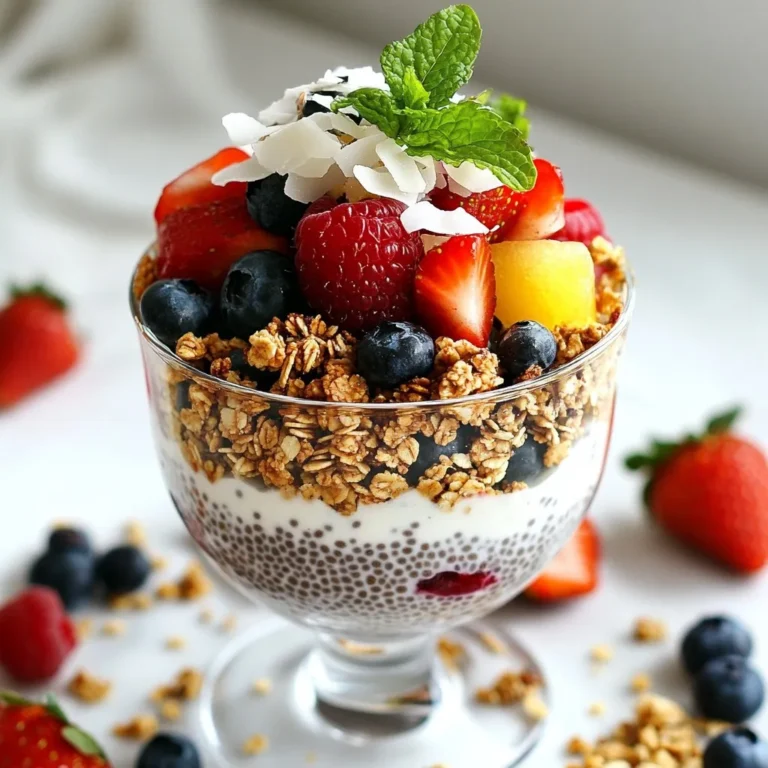
If you have leftover ingredients, don’t waste them! Use extra berries in smoothies or salads. You can mix leftover yogurt into your morning oatmeal.
Consider making a yogurt parfait with layers of yogurt, berries, and granola. This way, you can enjoy every last bit of your ingredients!
FAQs
Can I use non-dairy yogurt for this recipe?
Yes! You can use non-dairy yogurt. It’s great for lactose intolerance. Look for almond, coconut, or soy yogurt. They all work well and taste good. Just make sure they are plain or vanilla flavored. This way, you keep the sweetness and taste balanced.
How long does the Frozen Yogurt Berry Bark last in the freezer?
Your Frozen Yogurt Berry Bark lasts about 2 to 3 months in the freezer. To keep it fresh, wrap it tightly in plastic wrap. You can also use an airtight container. This helps prevent freezer burn and keeps it tasty.
What variations can I try with the yogurt bark?
You can get creative with the yogurt bark! Try using different fruits like mango or kiwi. You can also mix in nuts or seeds for extra flavor. Adding a splash of vanilla or almond extract gives a nice twist too. Don’t be afraid to experiment!
Can I add other toppings to my bark?
Absolutely! Add toppings for more crunch and flavor. Chopped nuts like walnuts or pecans work well. You can also sprinkle granola or add shredded coconut. For a fun twist, try mini marshmallows or crushed cookies. The options are endless!
You now know how to make Frozen Yogurt Berry Bark. We covered the key ingredients like Greek yogurt, mixed berries, and toppings. I shared step-by-step instructions for preparation, freezing, and serving. You can customize your bark with tips for low sugar, texture, and seasonal flavors. Remember, storing your bark properly will keep it fresh longer. Be creative with variations and enjoy this tasty treat with different toppings. Now, grab your ingredients and start making your own fun frozen dessert!

![To make classic chocolate brownies, you need the following ingredients: - 1 cup (2 sticks) unsalted butter - 2 cups granulated sugar - 4 large eggs, at room temperature - 1 teaspoon pure vanilla extract - 1 cup all-purpose flour - 1 cup unsweetened cocoa powder - ½ teaspoon baking powder - ½ teaspoon sea salt - 1 cup semi-sweet chocolate chips - Optional: ½ cup chopped walnuts or pecans for added crunch You can use margarine if you need a butter alternative. For a deeper flavor, try using dark cocoa powder instead of regular cocoa. If you want to make this recipe gluten-free, swap the all-purpose flour with a gluten-free blend. Feel free to customize your brownies with these fun ideas: - Nuts: Consider using walnuts or pecans for extra texture. Almonds also work great. - Chocolate types: Mix semi-sweet and dark chocolate chips for rich flavor. - Flavor variations: Add a teaspoon of mint extract or some orange zest for a twist. These add-ins can enhance the taste and make your brownies unique. Mixing flavors can lead to exciting new experiences in every bite. To make the brownie batter, follow these steps: 1. Melt the butter: Start by melting 1 cup of unsalted butter in a medium saucepan over low heat. Stir often until it’s fully melted. 2. Add sugar: Once the butter is melted, remove it from the heat. Stir in 2 cups of granulated sugar until it looks smooth. 3. Add eggs: Crack 4 large eggs into the butter-sugar mix. Add them one at a time. Mix well after each egg, so the batter combines nicely. 4. Mix in vanilla: Add 1 teaspoon of pure vanilla extract. This gives the brownies a nice flavor. 5. Combine dry ingredients: In another bowl, sift together 1 cup of all-purpose flour, 1 cup of unsweetened cocoa powder, ½ teaspoon of baking powder, and ½ teaspoon of sea salt. This helps mix the dry ingredients well. 6. Fold dry into wet: Gently fold the dry mix into the wet mix. Use a spatula to combine until just mixed. Do not overmix, or the brownies won’t be fudgy. 7. Add chocolate chips: Toss in 1 cup of semi-sweet chocolate chips. If you like, add ½ cup of chopped walnuts or pecans for crunch. Mix until they are spread evenly in the batter. 8. Prepare the pan: Grease a 9x13-inch baking pan or line it with parchment paper. This makes it easy to remove the brownies later. 9. Pour batter: Pour the brownie batter into the pan. Use a spatula to spread it evenly. Now, it’s time to bake! 1. Preheat oven: Set your oven to 350°F (175°C). This ensures even baking. 2. Bake brownies: Place the pan in the oven. Bake for 30 to 35 minutes. 3. Check for doneness: To check, insert a toothpick into the center. It should come out with a few moist crumbs. If it’s wet, bake a little longer. Avoid overbaking for that perfect fudgy texture. After baking, let’s cool and cut the brownies. 1. Cool in the pan: Allow the brownies to cool in the pan for at least 15 minutes. This helps them firm up. 2. Transfer to wire rack: After 15 minutes, move the brownies to a wire rack. Let them cool completely before cutting. 3. Cutting tips: Use a sharp knife for clean cuts. Wipe the knife after each cut for neat squares. 4. Serving size: Cut into generous squares. Each piece should be a lovely bite of fudgy goodness. For a special touch, dust the brownies with powdered sugar before serving. Enjoy these delightful treats with a scoop of vanilla ice cream for extra indulgence. For the complete recipe, refer to the Full Recipe. To make the best fudgy brownies, focus on mixing. After melting the butter, stir in the sugar until smooth. Add eggs one at a time. Mix well after each egg. This helps create a rich texture. Don't overmix the dry and wet ingredients. Fold them gently just until combined. Common mistakes include overbaking and using too much flour. Overbaking leads to dry brownies. Aim for a toothpick with few moist crumbs. If you use too much flour, your brownies will be cake-like. Measure carefully for the best results. Brownies keep well at room temperature. Store them in an airtight container for up to five days. If you want to keep them longer, the fridge is a good option. Just remember, cold brownies can lose some flavor. To revive leftovers, warm them in the microwave for 10-15 seconds. This restores their fudgy goodness. You can also serve them with a scoop of ice cream for a tasty treat. For the full recipe, check out the [Full Recipe]. {{image_4}} For a gluten-free treat, try flourless brownies. You can use almond flour or ground oats instead of regular flour. These options add a nice texture and flavor. You should also reduce baking time. Check them after 25 minutes to avoid dryness. If you want a lighter version, use less sugar. You can swap half of the sugar with unsweetened applesauce. This keeps the brownies moist. For fats, use avocado or coconut oil. These substitutes make the brownies healthier but still tasty. To spice things up, add a dash of coffee or a pinch of sea salt. These flavors enhance the chocolate taste. You can also use extracts like almond or orange for a lovely twist. Just a little goes a long way in changing the flavor profile. Serving classic chocolate brownies is easy and fun. You can serve them warm with a scoop of ice cream. Vanilla ice cream works great, but try mint or coffee flavors for a twist. You can also top brownies with whipped cream. A sprinkle of chocolate shavings adds a nice touch. For a beautiful presentation, cut the brownies into squares. Place them on a decorative plate. Dust with powdered sugar for a fancy look. Add fresh berries or a sprig of mint beside each brownie. These details make the dish more appealing. Brownies are versatile and can be served in many ways. One fun idea is a brownie sundae. Start with a warm brownie, add a scoop of ice cream, and drizzle chocolate sauce on top. Finish with whipped cream and a cherry for a delightful treat. You can pair brownies with drinks too. A strong cup of coffee complements the rich chocolate flavor. Hot cocoa or milk also works well. For a unique twist, serve brownies with a side of fresh fruit. The sweetness of the fruit balances the rich brownies. For more ideas, check out the Full Recipe to explore all the delicious details! To check if your brownies are done, look for a few signs. The top should look set and slightly shiny. When you insert a toothpick in the center, it should come out with a few moist crumbs. This means your brownies are fudgy and perfect. If the toothpick comes out with wet batter, they need more time. Keep a close watch in the last few minutes of baking to avoid overbaking. Yes, you can freeze brownies! To freeze them, let them cool completely first. Cut your brownies into squares, then wrap each piece in plastic wrap. Place them in a freezer bag or container. They can last up to three months in the freezer. When you're ready to eat them, thaw them in the fridge overnight or at room temperature for a few hours. For neat cuts, use a sharp knife. First, let the brownies cool completely in the pan. For even cleaner cuts, wipe the knife with a damp cloth after each cut. This way, you have smooth edges. You can also use a pizza cutter for quick slicing. If you want, line your baking pan with parchment paper. This makes it easy to lift out the brownies for cutting. You’ve learned how to make classic chocolate brownies, from ingredients to serving tips. Whether you prefer fudgy or flourless, options abound to suit your taste. Remember, small changes can create big flavors. Experiment with add-ins or healthier swaps to make them your own. With these steps, you can enjoy delicious brownies any time. Happy baking!](https://dishtreats.com/wp-content/uploads/2025/07/8475203d-ada8-4920-a61c-065e4c50bd3f-768x768.webp)