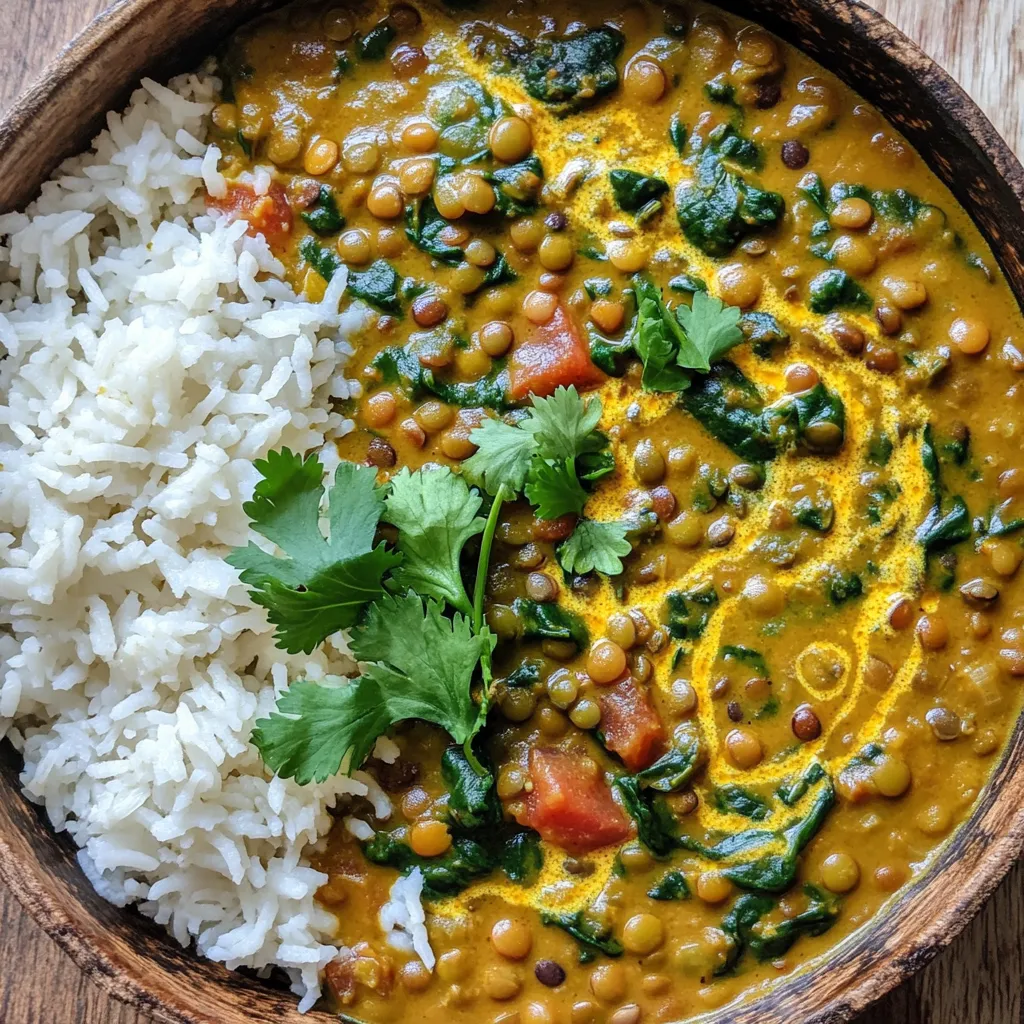
Slow Cooker Creamy Coconut Lentil Curry Delight

Looking for a warm, cozy dish that’s easy to make? You’re in for a treat with this Slow Cooker Creamy Coconut Lentil Curry Delight! Packed with lentils, rich coconut milk, and spices, this recipe brings hearty flavors straight to your bowl. Best of all, you can set it and forget it while your slow cooker does the work. Let’s dive into the delicious details and create a meal that will wow your taste buds!
Ingredients
Main Ingredients
- 1 cup green or brown lentils
- 1 can (14 oz) full-fat coconut milk
- 3 cups low-sodium vegetable broth
Additional Flavor Components
- 1 medium onion
- 3 cloves garlic
- 1 tablespoon fresh ginger
Spices and Seasonings
- 2 medium tomatoes
- 2 cups fresh spinach
- 1 tablespoon curry powder
- 1 teaspoon cumin
- 1 teaspoon turmeric
- 1 teaspoon chili powder
When you gather your ingredients, start with the lentils. I love using green or brown lentils. They hold their shape well and add great texture. Next, grab a can of full-fat coconut milk. This will give your curry a rich, creamy base.
For liquid, use low-sodium vegetable broth. It adds depth without being too salty.
Now, let’s talk about flavor. You’ll need one onion, three garlic cloves, and a tablespoon of fresh ginger. These aromatics make the dish smell amazing.
Don’t forget the tomatoes! Two medium ones will add freshness. You’ll also want two cups of fresh spinach. It wilts down nicely and gives a pop of green.
Finally, the spices! You’ll need a tablespoon of curry powder, plus cumin, turmeric, and chili powder. Each brings its own unique taste, making your curry flavor-packed.
Once you have everything ready, you’re set to make a delightful meal.
Step-by-Step Instructions
Preparation and Sautéing
- Step 1: Sauté onions, garlic, and ginger
First, heat 2 tablespoons of olive oil in a medium skillet over medium heat. Add 1 medium onion, finely chopped. Cook for about 5 minutes. The onion should be soft and clear. Next, add 3 cloves of minced garlic and 1 tablespoon of finely grated ginger. Stir for 1-2 minutes until it smells great.
- Step 2: Add to the slow cooker
Once the onion mix is ready, move it to your slow cooker.
Combining Ingredients
- Step 3: Transfer ingredients to the slow cooker
Now, add 1 cup of rinsed green or brown lentils. Pour in 1 can of full-fat coconut milk and 3 cups of low-sodium vegetable broth. Also, toss in 2 medium diced tomatoes.
- Step 4: Mixing in spices and seasonings
Sprinkle 1 tablespoon of curry powder, 1 teaspoon of ground cumin, 1 teaspoon of turmeric, and 1 teaspoon of chili powder into the pot. Add a pinch of salt and black pepper. Mix everything well to blend the flavors.
Slow Cooking Process
- Step 5: Set cooking time and heat
Cover the slow cooker. Set it to cook on low for 6-8 hours or on high for 3-4 hours. The dish is ready when the lentils are soft and flavorful.
- Step 6: Incorporate spinach before serving
About 30 minutes before serving, mix in 2 cups of roughly chopped fresh spinach. It will wilt nicely into the curry. Before you serve, taste the dish and adjust the salt and pepper if needed. Enjoy this creamy delight!
Tips & Tricks
Achieving Creaminess
To get that rich, creamy texture, use full-fat coconut milk. This type of coconut milk adds depth and smoothness to your curry. It makes every bite feel indulgent. Sautéing the aromatics is also key. When you cook the onion, garlic, and ginger first, you unlock their full flavor. This step enhances the overall taste of your dish.
Flavor Enhancements
Before serving, always taste the curry. Adjust the seasoning as needed. Adding more salt or pepper can really make a difference. You can also try other spices to boost flavor. A pinch of cinnamon or a dash of cayenne can add a unique twist. Experimenting with spices keeps your curry exciting each time you make it.
Perfect Texture
For the best texture, follow the cooking time closely. On low heat, let it cook for 6-8 hours. If you set it on high, aim for 3-4 hours. Your lentils should be tender but not mushy. To ensure this, check them near the end of the cooking time. If they need more time, let them cook a bit longer.
Variations
Ingredient Swaps
You can change lentils if you want. Try red lentils for a softer texture. Split peas work too and add a nice twist. If you need dairy-free options, use coconut milk. It gives creaminess without dairy. You can also add almond milk for a lighter touch.
Different Flavor Profiles
Want to change up the taste? Add veggies like bell peppers or carrots. They bring color and nutrition. You can also swap spices. Use Thai curry paste for a different flavor. Or, keep it classic with Indian spices. Each choice gives a new vibe to your dish.
Serving Suggestions
Serve your curry with tasty sides. Rice is a great choice to soak up the sauce. Naan bread is perfect for scooping up every bite. Quinoa adds a healthy grain option, too. For garnishing, sprinkle coconut flakes on top. Lime wedges add a nice zing. Fresh cilantro brightens the dish and makes it pop.
Storage Info
Refrigeration Tips
To keep your Slow Cooker Creamy Coconut Lentil Curry fresh, store leftovers in airtight containers. This helps prevent any odors from your fridge from getting in. In the fridge, the curry lasts about 4 to 5 days.
Freezing Instructions
Freezing is a great way to save your curry for later. Let the curry cool completely before transferring it to freezer-safe containers. Make sure to leave some space at the top, as it will expand when frozen. You can keep it frozen for up to 3 months. To reheat, thaw it overnight in the fridge. Then, heat it on the stove or in the microwave until it’s hot all the way through.
Meal Prep Suggestions
I love preparing ingredients ahead of time. Chop your onions, garlic, and ginger, and store them in the fridge. You can also rinse and soak the lentils the night before. Portioning the curry into single servings makes for easy weeknight meals. Just reheat and enjoy!
FAQs
How long does it take to cook in a slow cooker?
Cooking in a slow cooker is simple. You can cook on low for 6-8 hours. If you are short on time, set it to high for 3-4 hours. The lentils should be tender and flavorful when done.
Can I use canned lentils instead of dried?
Yes, you can use canned lentils. Canned lentils save time and are ready to eat. However, they may have less flavor than dried lentils. Dried lentils absorb the spices better and add depth. If you choose canned, rinse them to reduce sodium.
Is this recipe vegan and gluten-free?
This recipe is both vegan and gluten-free. All ingredients, like coconut milk and lentils, fit those diets. Always check labels to ensure there are no hidden gluten ingredients. Enjoy knowing your meal is friendly for various dietary needs!
This recipe combines simple ingredients into a tasty dish. We covered the main elements, cooking steps, and helpful tips. You can swap ingredients or spices to suit your taste. Store leftovers wisely for later meals. This curry adapts to your needs, providing easy options for everyone. Enjoy making this dish in your slow cooker for a flavorful, healthy meal. I hope you feel inspired to try it out!

. Start by peeling your sweet potatoes. Use a vegetable peeler for nice, even strips. Next, dice them into 1-inch cubes. This size helps them cook well. In a large bowl, toss the diced sweet potatoes with olive oil. Add smoked paprika, garlic powder, salt, and black pepper. Mix until every piece is coated. This step brings out the flavor. Preheat your oven to 400°F (200°C). This hot oven ensures crispy edges. Spread the seasoned sweet potatoes on a baking sheet. Make sure they are in a single layer for even cooking. Roast for 20-25 minutes. Stir halfway through to help with browning. The sweet potatoes should be tender and slightly caramelized when done. In a large skillet, combine the roasted sweet potatoes with black beans, corn, and diced tomatoes. Gently stir until everything is heated through. This mix creates a hearty base. Now, sprinkle the shredded cheddar cheese on top. Allow it to melt for about 3-5 minutes. Cover the skillet with a lid to speed up melting if needed. Once the cheese is melted, remove the skillet from heat. Top with jalapeños, green onions, and diced avocado. These additions add color and flavor. Finally, garnish with fresh cilantro. If you like, add a dollop of sour cream or Greek yogurt for creaminess. Serve your loaded sweet potato nacho skillet hot and enjoy the burst of flavors! For the complete cooking process, check the Full Recipe. To boost the flavor, consider adding different spices. You can use cumin or chili powder for a warm kick. A dash of cayenne pepper can also add heat. If you love fresh herbs, cilantro is perfect here. It adds a bright taste that pairs well with sweet potatoes. You can also try fresh parsley or green onions for a twist. Using a cast iron skillet can give your dish a nice crisp. It heats evenly and retains warmth well. If you prefer a non-stick pan, that works too. Just make sure your sweet potatoes do not stick. For even cooking, keep the heat steady. Stir often to prevent burning and ensure all ingredients meld nicely. For a great look, serve the skillet right at the table. This gives a rustic feel and makes sharing easy. You can add some colorful toppings, like diced avocado and sliced jalapeños. A sprinkle of cilantro adds fresh green color. For an extra crunch, serve with tortilla chips on the side. This adds texture and makes it even more fun to eat. Check out the Full Recipe for more serving ideas. {{image_4}} For a vegetarian or vegan touch, you can swap out the cheese. Try cashew cheese or nutritional yeast for a cheesy flavor without dairy. You can also pile on more plant-based toppings. Consider adding sautéed mushrooms, bell peppers, or even spinach. These ingredients add texture and boost nutrition. If you need gluten-free options, this dish is already a great choice. Sweet potatoes, beans, and veggies are naturally gluten-free. Just ensure any toppings or sauces are gluten-free too. For those who want high-protein variations, add cooked quinoa or lentils. You can also use a plant-based protein like tempeh or tofu. This way, you’ll keep the meal filling and nutritious. You can change the flavor profile by adding sweet or savory twists. Try mixing in some cinnamon or maple syrup for a sweet kick. This creates a unique balance with the savory ingredients. For international twists, consider adding spices from around the world. A sprinkle of taco seasoning gives a Mexican flair. Or, use curry powder for an Indian vibe. These simple changes can transform your loaded sweet potato nacho skillet. For the complete recipe, see [Full Recipe]. When storing your loaded sweet potato nacho skillet, let it cool first. This step helps avoid moisture buildup, which can make your dish soggy. Use an airtight container to keep it fresh. If stored properly, it lasts in the fridge for up to four days. To reheat leftovers, use a skillet for the best results. Heat on medium-low to keep the texture. Stir gently as you warm it up to avoid burning. Avoid the microwave if you can; it can make the dish soggy. If you must use it, heat in short bursts and stir often. You can freeze your loaded sweet potato nacho skillet for later use. Portion it into freezer-safe containers, leaving some space for expansion. It stays good for up to three months in the freezer. When ready to eat, thaw it in the fridge overnight before reheating. This keeps the flavors intact and the texture nice. You can use butternut squash or pumpkin. They have a similar texture and taste. Both options provide a nice sweetness. You can also try regular potatoes if you want a different flavor. Yes, you can prep some of the ingredients before. Roast the sweet potatoes a day ahead. Store them in the fridge. You can also mix the black beans, corn, and tomatoes in advance. Just heat everything up when ready to serve. To melt cheese evenly, use freshly shredded cheese. It melts better than pre-shredded cheese. Spread the cheese in an even layer on top of the skillet. Cover the skillet for a couple of minutes. This traps heat and helps the cheese melt smoothly. You can use many toppings for loaded nachos. Some popular choices include jalapeños, green onions, and diced avocado. For a twist, add pickled red onions or fresh salsa. Don't forget sour cream or Greek yogurt for creaminess. You can get creative and mix your favorite toppings! In this blog post, we explored how to create a delicious dish with sweet potatoes, black beans, and cheese. You learned about ingredient choices, measurements, and smart substitutions. I shared tips on roasting sweet potatoes and combining ingredients perfectly. We looked at variations for different diets and how to store leftovers. Remember, making this dish fun and flavorful is easy. Use the ideas provided to customize your meal, ensuring it fits your taste. Enjoy your cooking and make it a family favorite!](https://dishtreats.com/wp-content/uploads/2025/07/3c3c8a5c-337a-4892-8590-75b37c5e13f0-768x768.webp)
![To make Cherry Almond Protein Muffins, you need simple and healthy ingredients. Here’s a list for you: - 1 cup almond flour - 1/2 cup rolled oats - 1/2 cup protein powder (vanilla or unflavored) - 1/4 cup honey or maple syrup - 1/2 cup plain Greek yogurt - 2 large eggs - 1/2 cup unsweetened almond milk - 1 teaspoon baking powder - 1/2 teaspoon baking soda - 1/2 teaspoon salt - 1 cup fresh or frozen cherries, pitted and halved - 1/4 cup sliced almonds (for topping) - 1 teaspoon almond extract Each ingredient plays a key role in making these muffins tasty and nutritious. Almond flour gives a nutty flavor and a great texture. Rolled oats add heartiness and health benefits. Protein powder boosts the protein content, making these muffins perfect for a snack or breakfast. Using honey or maple syrup adds sweetness, while Greek yogurt keeps the muffins moist. The eggs help bind everything together, giving structure. Almond milk keeps the muffins light and adds a hint of almond flavor. Baking powder and baking soda make the muffins rise, resulting in fluffy bites. Cherries bring a burst of color and flavor, while sliced almonds on top add a delightful crunch. The almond extract enhances the nutty taste, tying all the flavors together. You can find the full recipe in the article to guide you step by step. Happy baking! Set your oven temperature to 350°F (175°C). Line a muffin tin with paper liners or grease each cup lightly. This helps the muffins come out easily after baking. In a large bowl, combine the almond flour, rolled oats, protein powder, baking powder, baking soda, and salt. Use a whisk to stir these ingredients well. Mixing them well ensures that your muffins rise evenly. In another bowl, whisk together the honey (or maple syrup), Greek yogurt, eggs, almond milk, and almond extract. Mix until it is smooth and creamy. This step adds moisture and flavor to your muffins. Gradually add the wet mixture to the dry mixture. Stir gently with a spatula until just combined. Be careful not to overmix the batter, as this can make the muffins tough. Gently fold the halved cherries into the batter. This adds bursts of flavor throughout each muffin. Then, fill each muffin cup about two-thirds full with the batter. This allows space for the muffins to rise. Place the muffin tin in the oven and bake for 18-20 minutes. The muffins should be golden on top. You can check for doneness by inserting a toothpick in the center; it should come out clean. Let the muffins cool in the pan for 5 minutes before transferring them to a wire rack. To make the best cherry almond protein muffins, watch your baking time. I suggest checking them at the 18-minute mark. If they look golden and a toothpick comes out clean, they are ready. Overbaking can dry out the muffins, so keep a close eye on them. After baking, let the muffins cool in the pan for five minutes. This step helps them firm up and gives you the right texture. Then, move them to a wire rack to cool completely. If you don’t have almond flour, you can use oat flour or whole wheat flour. They work well and will still taste great. For protein powder, you can try using a plant-based option or even a different flavor. If you need a non-dairy version, swap Greek yogurt for coconut yogurt or silken tofu. For almond milk, you can use soy milk or oat milk. These changes will still keep your muffins tasty and nutritious. Want to kick up the flavor? You can add a pinch of cinnamon or nutmeg to the batter. Both spices pair well with the cherries and almonds. You might also try adding a splash of vanilla extract for extra sweetness. If you enjoy a hint of citrus, a bit of lemon zest can brighten the taste. These simple additions can make your muffins even more delightful. Check out the full recipe to get started on your delicious cherry almond protein muffins! {{image_4}} You can play with flavors in these muffins. Dark chocolate chips add a rich touch. You can mix in some unsweetened coconut for a tropical twist. If you want to switch up the fruit, try using blueberries or raspberries. Both fruits pair well with almonds and give a fresh taste. You can also use dried cherries for a chewiness that works great in muffins. To make these muffins vegan, swap the eggs for flax eggs. Just mix one tablespoon of ground flaxseed with three tablespoons of water and let it sit for five minutes. Use plant-based yogurt instead of Greek yogurt. Maple syrup is a good choice to keep it sweet. You can still enjoy the same tasty muffins without animal products. If you want to cut back on sugar, reduce the honey or maple syrup. You can try using mashed bananas or unsweetened applesauce. Both will keep your muffins moist and sweet. Just remember to balance the flavors so you still enjoy every bite. Use spices like cinnamon to enhance the taste without adding more sugar. For the full recipe, check out the [Full Recipe] section above! To keep your Cherry Almond Protein Muffins fresh at room temperature, place them in an airtight container. This helps to keep moisture in and air out. Store them for up to three days. If you live in a warm area, keep them in a cool, dry place. Avoid direct sunlight, as it can dry them out. These muffins taste best when fresh, so enjoy them soon after baking. For long-term storage, freezing is the best option. Allow the muffins to cool completely before freezing. Wrap each muffin tightly in plastic wrap or aluminum foil. Then, place them in a freezer-safe bag or container. This method prevents freezer burn and helps preserve flavor. You can freeze them for up to three months. When ready to eat, simply thaw them in the fridge overnight or leave them at room temperature for a few hours. To enjoy your muffins warm, you can easily reheat them. Preheat your oven to 350°F (175°C). Place the muffins on a baking sheet and warm them for about 10 minutes. This method helps restore their soft texture. You can also use the microwave for a quick fix. Heat each muffin for 15-20 seconds. Just be careful not to overheat, as that can make them dry. For the full recipe, check out the delicious Cherry Almond Protein Muffins! Yes, you can use frozen cherries. They work just as well as fresh cherries. Just make sure to thaw them first and drain any extra liquid. This keeps the batter from becoming too wet. Frozen cherries can add a nice burst of flavor, and they are often just as nutritious as fresh ones. To check if your muffins are done, look for a golden top. Insert a toothpick into the center of a muffin. If it comes out clean or with a few crumbs, the muffins are ready. They should feel firm to the touch. If they are still wet, bake them for a few more minutes. Each muffin has about 150 calories. They are rich in protein and fiber. The almond flour and Greek yogurt add healthy fats and nutrients. Plus, cherries provide antioxidants. This makes them a tasty and nutritious snack. Enjoy these muffins guilt-free, knowing they are good for you! For the complete recipe, check the Full Recipe section. This blog post covers a simple and tasty cherry almond protein muffin recipe. You learned about the key ingredients and steps to make them. I shared tips for baking success, ingredient swaps, and ways to customize the recipe. Muffins can be fun and flexible. Whether you want to make them vegan or low-sugar, it's easy! Always store them well to keep their flavor fresh. Enjoy cooking, and have fun trying different variations. Your kitchen adventures can lead to yummy treats!](https://dishtreats.com/wp-content/uploads/2025/07/36a729b1-00f1-4288-a77b-47884a3c4d33-768x768.webp)

![- 1/2 cup rolled oats - 1 tablespoon cocoa powder - 1 tablespoon peanut butter - 1 cup almond milk - 1 tablespoon maple syrup - 1/2 teaspoon vanilla extract - A pinch of salt To create a bowl of chocolate peanut butter overnight oats, you need simple ingredients. Start with rolled oats; they act as the base. Cocoa powder adds rich chocolate flavor. Peanut butter gives a smooth, nutty taste. Use almond milk as a creamy liquid. Maple syrup sweetens the dish naturally. A touch of vanilla extract enhances the flavors. Finally, a pinch of salt brings everything together. - Sliced bananas - Chocolate chips - Crushed peanuts - Assorted fresh berries You can elevate your oats with fun toppings. Sliced bananas add sweetness and texture. Chocolate chips bring extra chocolate goodness. Crushed peanuts offer a nice crunch. Fresh berries brighten the dish with color and flavor. Choose your favorites or mix them up for a tasty treat. For the complete recipe, check out the [Full Recipe]. - Step 1: Combine dry ingredients in a bowl. In a medium mixing bowl, add 1/2 cup rolled oats and 1 tablespoon cocoa powder. Stir these together. This mix gives your oats a deep chocolate flavor. - Step 2: Whisk together wet ingredients separately. In another bowl, mix 1 cup almond milk, 1 tablespoon peanut butter, 1 tablespoon maple syrup, 1/2 teaspoon vanilla extract, and a pinch of salt. Make sure the peanut butter blends in well. - Step 3: Mix dry and wet ingredients thoroughly. Pour the wet mix over the dry oats. Stir with a spoon until every oat is coated. This step ensures creamy and rich oats. - Step 4: Transfer mixture to a jar or container. Carefully spoon the mixed oats into a clean jar. Choose a jar with a lid for best results. - Step 5: Seal and refrigerate overnight. Close the lid tightly. Place the jar in the fridge. Let it chill overnight or for at least 4 hours. The oats will soak up the flavors and soften. - Step 6: Stir before serving. When you’re ready to eat, take the jar out of the fridge. Stir the oats well. If they seem thick, add a little more milk to loosen them up. - Step 7: Add your choice of toppings. Top your oats with sliced bananas, chocolate chips, crushed peanuts, or fresh berries. These toppings add fun flavors and textures to your dish. Enjoy your creamy, chocolatey breakfast! For the full recipe, check out the complete guide. - For creamier oats, use whole milk or a milk alternative. - Allow oats to soak longer for a softer texture. Using whole milk adds richness. If you prefer a lighter option, almond or oat milk works well too. The key is to find what you love. Soaking longer lets the oats absorb more liquid. This makes them softer and more enjoyable to eat. - Try different nut butters like almond or cashew. - Experiment with sweeteners like agave or stevia. Feel free to swap peanut butter with almond or cashew butter for new flavors. Each nut butter brings its own taste. Use different sweeteners to find your perfect balance. Agave has a light flavor, while stevia is sugar-free. - Serve in a clear jar for visual appeal. - Drizzle extra peanut butter on top. Serving in a clear jar lets everyone see those delicious layers. It makes your dish look fancy! A drizzle of peanut butter on top adds a nice touch. It makes it more inviting and tasty. For an added twist, include colorful toppings like fresh berries or chocolate chips. Enjoy crafting your perfect chocolate peanut butter overnight oats! For the complete recipe, check the Full Recipe section. {{image_4}} You can switch up your chocolate peanut butter overnight oats with fun flavors. - Chocolate Banana Overnight Oats: Mash a ripe banana into the mix. The banana adds natural sweetness and a creamy texture. - Mocha Peanut Butter Overnight Oats: Add a teaspoon of instant coffee or espresso powder. This gives your oats a rich coffee flavor. Got dietary needs? No problem! You can easily modify this recipe. - Gluten-free option: Use certified gluten-free oats. This way, everyone can enjoy a tasty breakfast. - Vegan alternative: Swap regular milk for almond milk or oat milk. Use maple syrup or agave for sweetness. Change your oats with the seasons for exciting new tastes. - Adding pumpkin spice for fall: Mix in a teaspoon of pumpkin spice. This brings warmth and a cozy flavor to your oats. - Incorporating fresh berries in summer: Toss in some strawberries or blueberries. Fresh fruit brightens up your oats and adds nutrients. These variations keep your breakfast fun and exciting! You can find the full recipe here to make your own delicious creation. To keep your chocolate peanut butter overnight oats fresh, use an airtight container. This helps prevent moisture and odors from mixing in. Store the container in the refrigerator. Your oats will stay good for up to 5 days. This means you can make a batch and enjoy it throughout the week. Can you freeze overnight oats? Yes, you can freeze them! Freezing is a great way to save extra servings. Just make sure to use a freezer-safe container. How to thaw overnight oats for future use: To thaw, move the container to the fridge the night before you want to eat them. This will help them thaw slowly and evenly. You can also use the microwave if you’re in a hurry. Just heat it in short bursts, stirring in between. Best methods to reheat if desired: If you prefer warm oats, reheat them in the microwave. Place your oats in a microwave-safe bowl and cover it. Heat for 30 seconds, then stir. Repeat until warm enough. You can also reheat on the stove. Just add a splash of milk to a saucepan and warm it over low heat, stirring often. Enjoy your delicious oats however you like! What is the texture of overnight oats supposed to be? Overnight oats should be creamy and thick. They absorb the liquid overnight. This makes them soft but not mushy. You want a nice balance. If they seem too watery, add less milk next time. Can I use steel-cut oats instead of rolled oats? Yes, but steel-cut oats will need more time to soak. They take longer to soften. I recommend soaking them overnight to get a good texture. You may need to adjust the liquid and soaking time. How can I make my overnight oats thicker or creamier? To make your oats thicker, use less milk. You can also add chia seeds. They help absorb liquid and add fiber. Another tip is to let them sit longer in the fridge. Are overnight oats healthy? Yes, overnight oats are very healthy. They offer fiber and protein. This can help keep you full. They also provide vitamins and minerals. Plus, they are low in sugar if you control the toppings. What are the nutritional benefits of using peanut butter? Peanut butter adds healthy fats and protein. It helps keep your energy up. It also has vitamins like E and B. Just make sure to choose a natural peanut butter with no added sugar. What to pair with chocolate peanut butter overnight oats? You can pair them with fresh fruit. Bananas and berries taste great. Nuts or seeds also add a nice crunch. For extra sweetness, consider a drizzle of honey or maple syrup. Can overnight oats be eaten warm? Yes, you can eat them warm if you like. Just heat them gently in the microwave. Add a splash of milk to keep them creamy. Enjoy your warm treat any time of the day! You can create tasty and healthy overnight oats with simple ingredients. We discussed the main ingredients, preparation steps, and optional toppings. You learned tips for customization, serving, and storing your oats. Remember, you can adjust flavors and textures to suit your taste. Try different ingredients and enjoy your meals. Keep experimenting with toppings and variations. This way, overnight oats will always feel new and exciting. Enjoy every delicious bite and make it your own!](https://dishtreats.com/wp-content/uploads/2025/07/90d151b9-6d0c-4c1c-ba31-37512e57091e-768x768.webp)