Pumpkin Cream Cheese Cupcakes Delightful Fall Treat

Get ready to savor the season with my Pumpkin Cream Cheese Cupcakes! These soft, spiced treats are perfect for fall gatherings or quiet nights at home. With a rich cream cheese frosting, every bite feels like a hug. In this post, I’ll guide you through simple steps to make your own delightful cupcakes and share tips to make them truly shine. Let’s dive into the sweet world of pumpkin goodness!
Ingredients
List of Ingredients for Pumpkin Cream Cheese Cupcakes
- 1 ½ cups all-purpose flour
- 1 teaspoon baking powder
- 1 teaspoon baking soda
- ½ teaspoon salt
- 1 teaspoon ground cinnamon
- ½ teaspoon ground nutmeg
- ½ teaspoon ground ginger
- ½ cup granulated sugar
- ½ cup packed brown sugar
- ½ cup vegetable oil
- 2 large eggs
- 1 cup canned pumpkin puree
- 1 teaspoon vanilla extract
- 8 oz cream cheese, softened to room temperature
- ½ cup powdered sugar
- 1 tablespoon milk
- 1 teaspoon vanilla extract (for the cream cheese frosting)
These ingredients come together to create a warm, spiced flavor in your cupcakes. The all-purpose flour gives the right texture, while the baking powder and baking soda help them rise. Seasonal spices like cinnamon, nutmeg, and ginger bring the essence of fall into every bite.
You will need both granulated and brown sugars for a lovely sweetness. The brown sugar adds depth and moisture. The liquid ingredients, including vegetable oil, eggs, and pumpkin puree, are key for richness and flavor. Don’t forget the vanilla extract for that extra hint of warmth.
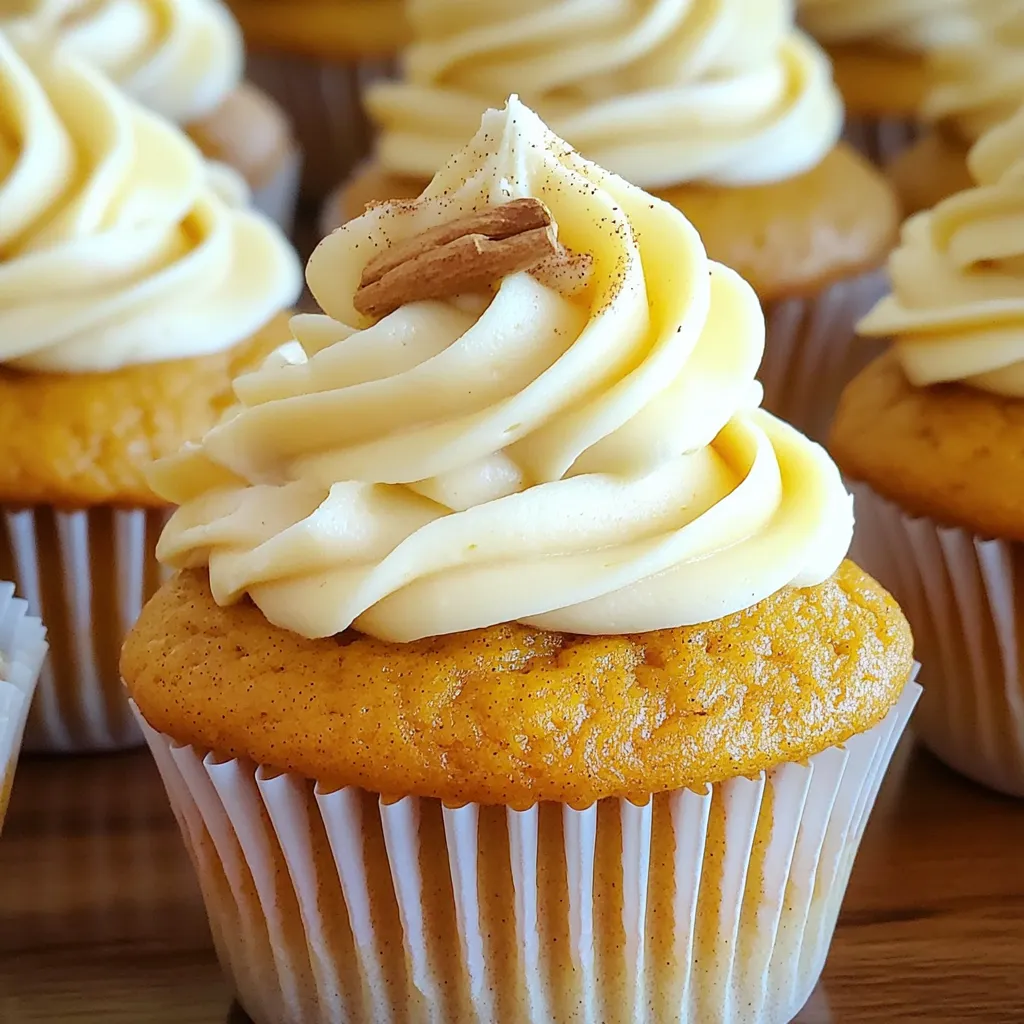
For the cream cheese frosting, you will use softened cream cheese and powdered sugar. This makes the frosting smooth and easy to spread. A touch of milk helps achieve the right consistency, along with more vanilla extract for flavor.
Gather these ingredients, and you’re ready to make a delightful batch of pumpkin cream cheese cupcakes!
Step-by-Step Instructions
Preparing the Oven and Batter
First, preheat your oven to 350°F (175°C). This helps the cupcakes bake evenly. Next, line a muffin tin with cupcake liners. This makes it easy to remove the cupcakes later.
Mixing Dry Ingredients
In a medium bowl, whisk together the all-purpose flour, baking powder, baking soda, salt, and spices like cinnamon, nutmeg, and ginger. Mixing these dry ingredients helps spread the flavors evenly in the batter.
Combining Wet Ingredients
In a large mixing bowl, mix the granulated sugar, brown sugar, and vegetable oil. Beat them until well combined. Then add in the eggs one at a time. Mix well after each egg. Next, stir in the pumpkin puree and vanilla extract until the mixture is smooth and creamy. This step gives the cupcakes their rich flavor.
Combining Wet and Dry Mixtures
Gradually fold the dry mixture into the wet ingredients. Use a spatula or wooden spoon for this. Mix gently until just combined. Make sure not to overmix, as this keeps the cupcakes light and fluffy.
Baking the Cupcakes
Use a spoon or cookie scoop to fill each cupcake liner about two-thirds full. This allows room for rising. Place the muffin tin in the oven and bake for 20-25 minutes. Check if they are done by inserting a toothpick in the center. If it comes out clean, they are ready. After baking, let them cool in the pan for 5 minutes before moving them to a wire rack.
Preparing the Cream Cheese Frosting and Frosting the Cupcakes
In a clean bowl, beat the softened cream cheese and powdered sugar. Mix until creamy and smooth. Add the milk and vanilla extract, mixing until well blended. Once the cupcakes are cool, frost them generously with the cream cheese frosting. This adds sweetness and richness to each bite.
Tips & Tricks
How to Achieve Light and Fluffy Cupcakes
To make light and fluffy cupcakes, avoid overmixing the batter. Overmixing can lead to dense cupcakes. Mix only until you see no more dry flour. This keeps the air in the batter, which helps them rise.
Using room temperature ingredients is also key. Cold eggs or pumpkin can shock the batter. Let your eggs and pumpkin sit out for about 30 minutes before mixing. This simple step can make a big difference in texture.
Perfecting the Cream Cheese Frosting
To get the right sweetness and texture for your cream cheese frosting, add milk. Start with a tablespoon and mix well. If it seems too thick, add a bit more milk. This keeps the frosting creamy and smooth.
When piping the frosting, use a steady hand. Hold the piping bag at a 90-degree angle. Apply even pressure as you swirl the frosting on each cupcake. Practice on a plate if you are new to this. It helps to get a feel for it.
Creative Presentation Ideas
Garnishing your cupcakes can add flair. A light dusting of cinnamon on top makes them look special. You can also add small pieces of candied ginger for a zesty touch.
Using decorative cupcake liners can elevate your presentation, too. Choose colorful or themed liners that match the season. This simple change can make your cupcakes pop at any gathering.

Variations
Gluten-Free Pumpkin Cream Cheese Cupcakes
To make gluten-free cupcakes, you can use almond flour or a gluten-free blend. Both options work well and give a nice texture. You might need to add a binding agent like xanthan gum. This will help your cupcakes hold together.
Vegan-Friendly Alternatives
For a vegan version, replace the eggs with flaxseed meal or applesauce. Use 1 tablespoon of flaxseed mixed with 2.5 tablespoons of water for each egg. For the cream cheese frosting, opt for vegan cream cheese. Almond milk can replace regular milk in the frosting too.
Flavor Infusions
You can add a twist to your cupcakes by mixing in chocolate chips, nuts, or dried fruits. Chocolate chips add sweet richness, while nuts give a nice crunch. Dried fruits, like raisins or cranberries, add both sweetness and texture. These simple additions can elevate your cupcakes to a new level.
Storage Info
Best Practices for Storing Cupcakes
To keep your pumpkin cream cheese cupcakes fresh, you have two main options: room temperature or refrigeration. If you plan to eat them within a few days, store them at room temperature. Just make sure to keep them in an airtight container or a cupcake dome. This will help prevent them from drying out.
If you need to store them for a longer time, refrigerate them. The cool air will help maintain their texture and flavor. However, be cautious, as the cold can make the frosting firm. An airtight container is essential here too, to keep moisture away.
Freezing Cupcakes
You can freeze pumpkin cream cheese cupcakes both before and after frosting. To freeze them unfrosted, let the cupcakes cool completely. Then, wrap them tightly in plastic wrap and place them in a freezer bag. This protects them from freezer burn.
To freeze frosted cupcakes, wait until the frosting has set. Then, use a similar wrapping method. Place a piece of parchment paper between the cupcakes to avoid sticking.
When you’re ready to enjoy them, thaw the cupcakes in the fridge overnight. For the best texture, avoid using the microwave. This will help keep them moist and fluffy.
FAQs
How can I tell when the cupcakes are fully baked?
You can check the cupcakes with a toothpick. Insert it into the center. If it comes out clean, they are done. Cupcakes take about 20 to 25 minutes to bake. Keep an eye on them to avoid burning.
Can I use pumpkin pie filling instead of pumpkin puree?
Using pumpkin pie filling is not the best choice. It has added spices and sweeteners. This can change the taste and texture of your cupcakes. Stick to plain pumpkin puree for the best results.
What is the best way to transport frosted cupcakes?
To transport frosted cupcakes, use a cupcake carrier. If you do not have one, place them in a sturdy box. Make sure they are not stacked. This keeps the frosting from getting messed up.
How long do these cupcakes last?
These cupcakes can last for about 3 to 5 days. Store them in an airtight container. Keep them at room temperature for the best taste. If you refrigerate them, they may dry out.
Can I make the cupcakes ahead of time?
Yes, you can make these cupcakes ahead of time. Bake them a day before you need them. Store them in an airtight container. Frost them the day you plan to serve them for the best flavor.
What can I substitute for cream cheese in the frosting?
If you need a substitute for cream cheese, use mascarpone cheese. Greek yogurt can work too, but it may change the flavor. You can also try a dairy-free cream cheese if you want a vegan option.
You can create delicious Pumpkin Cream Cheese Cupcakes with the right ingredients and steps. We covered everything from mixing and baking to frosting and storage. Remember to avoid overmixing the batter for light, fluffy cupcakes. Consider variations like gluten-free or vegan options for more choices. These cupcakes are perfect for any occasion. Enjoy making them and sharing with friends and family!


![To make avocado chocolate chip cookies, gather these simple items: - 1 ripe avocado, thoroughly mashed - 1/2 cup packed brown sugar - 1/4 cup granulated sugar - 1/4 cup unsalted butter, melted and slightly cooled - 1 teaspoon pure vanilla extract - 1 large egg, room temperature - 1 cup all-purpose flour - 1/2 teaspoon baking soda - 1/4 teaspoon fine sea salt - 1 cup semisweet chocolate chips These ingredients create a tasty cookie with a twist. If you don’t have some items, here are good swaps: - Avocado: Use 1/2 cup unsweetened applesauce. This keeps it moist. - Butter: Coconut oil works well. It adds a hint of flavor. - Brown Sugar: Use coconut sugar for a lower glycemic option. - All-purpose flour: Try oat flour for a gluten-free choice. These substitutes can change the flavor and texture but still taste great. These cookies are not just yummy; they also pack some nutrition. Here’s a quick look: - Calories: About 120 per cookie - Fat: 6g (mostly healthy fats from avocado) - Carbohydrates: 16g - Protein: 1g - Fiber: 1g Using avocado adds healthy fats and fiber. You can enjoy a treat without feeling guilty. For the full recipe, check out my detailed guide. 1. Preheat your oven to 350°F (175°C). This is key for even baking. 2. Line a baking sheet with parchment paper. This makes cleanup easy and prevents sticking. 3. In a large bowl, mash one ripe avocado until smooth. It should be creamy. 4. Add 1/2 cup brown sugar, 1/4 cup granulated sugar, 1/4 cup melted butter, and 1 teaspoon vanilla extract. Mix until smooth and creamy. 5. Crack one large egg into the bowl. Whisk until the mix is fluffy and well combined. 6. In another bowl, mix 1 cup flour, 1/2 teaspoon baking soda, and 1/4 teaspoon salt. This helps the cookies rise. 7. Slowly add the dry mix to the wet mix. Stir gently until combined. A few lumps are fine. 8. Fold in 1 cup of chocolate chips with a spatula. Make sure they spread evenly in the dough. 1. Use a tablespoon or cookie scoop to place rounded dough on the baking sheet. Space them about 2 inches apart. 2. Bake in the preheated oven for 10-12 minutes. Look for golden edges and soft centers. 3. Once done, take the cookies out of the oven. Let them sit on the sheet for about 5 minutes. This helps them firm up. 1. Transfer the cookies to a wire rack to cool completely. 2. Serve the cookies in a jar or on a decorative plate. 3. For a special touch, sprinkle them with sea salt before serving. This enhances the chocolate flavor. Follow the [Full Recipe] to make these tasty avocado chocolate chip cookies! - Use a ripe avocado. It should feel soft to the touch. - Measure your ingredients accurately for the best results. - Mix the wet ingredients until creamy for a smooth dough. - Don’t overmix when adding dry ingredients; a few lumps are okay. - Space cookies at least 2 inches apart on the baking sheet. - Using unripe avocados can lead to a gritty texture. - Overbaking makes cookies hard instead of soft and chewy. - Forgetting to let the melted butter cool can change the dough. - Not cooling cookies on a wire rack can make them soggy. - Store cookies in an airtight container to keep them fresh. - For longer storage, freeze the cookies in a freezer bag. - To reheat, warm cookies in the oven at 300°F (150°C) for 5-7 minutes. - Enjoy them warm for that fresh-baked taste! For the full recipe, check out the details above. {{image_4}} You can make vegan avocado chocolate chip cookies easily. Replace the egg with a flax egg. To make a flax egg, mix 1 tablespoon of ground flaxseed with 2.5 tablespoons of water. Let it sit for 5 minutes until it thickens. Use the same method as the original recipe. The cookies will still be soft and tasty. If you want gluten-free cookies, swap all-purpose flour for almond or oat flour. Both options work well. Just ensure they are finely ground. Adjust the amount slightly, as these flours absorb moisture differently. The taste will change, but the cookies will remain delicious. Get creative with your cookies! You can add nuts like walnuts or pecans for crunch. Dried fruit, like cranberries or raisins, adds a sweet touch. For a fun twist, try adding a teaspoon of instant coffee or a pinch of cinnamon. Each choice adds a unique flavor to your cookies. To keep your avocado chocolate chip cookies fresh, use an airtight container. Place parchment paper between layers to prevent sticking. Store them at room temperature for up to three days. If you want to keep them longer, consider refrigerating them. Just let them warm up to room temp before eating. You can freeze the cookie dough for later use. Scoop the dough onto a baking sheet and freeze until firm. Once solid, transfer the dough balls to a zip-top bag. They will last in the freezer for up to three months. When you’re ready to bake, just take them out and let them thaw for about 30 minutes before baking. Baked cookies can last about a week in an airtight container at room temperature. If you notice them getting hard, pop them in the microwave for a few seconds. This will soften them up again. For the best taste, try to eat them within a few days. Enjoy your delicious treats from the Full Recipe! Yes, you can use ripe avocados for this recipe. Ripe avocados add a smooth texture and rich taste. Look for avocados that yield slightly when you press them. This softness means they are ready to mash. The ripeness helps make the cookies moist and flavorful. You can also mash the avocado with a fork or a blender for a creamy mix. To know when the cookies are done, check the edges. They should be golden brown. The centers may look soft and slightly undercooked. This is perfect! They will firm up as they cool. For best results, set a timer for 10-12 minutes. Keep an eye on them to avoid burning. If your cookies turn hard, you can soften them easily. Place a slice of bread in the container with the cookies. The moisture from the bread will help them soften. You can also microwave cookies for a few seconds. This will warm them up and make them soft again. Store leftover cookies in an airtight container to keep them fresh longer. This blog post covered key ingredients, step-by-step instructions, and tips for making cookies. You learned about ingredient substitutes and nutrition too. I shared variations like vegan and gluten-free options. Storing and reheating cookies is essential to enjoy them longer. Remember the common mistakes to avoid for perfect cookies every time. Use the FAQ section for quick answers. Try these tips and recipes to create delicious cookies that everyone loves. Enjoy your baking adventure and happy eating!](https://dishtreats.com/wp-content/uploads/2025/07/2a4aa59d-42b3-40d6-b422-d0063b121310-768x768.webp)


![To create this tasty dip, you will need key ingredients that bring out the fall flavors. Here’s what you’ll need: - 8 oz cream cheese, softened to room temperature - 1 cup pumpkin puree (not pumpkin pie filling) - 1/2 cup powdered sugar - 1 tablespoon packed brown sugar - 1 teaspoon pure vanilla extract - 1 teaspoon pumpkin pie spice (plus extra for garnish) - 1/2 teaspoon ground cinnamon - 1/2 cup whipped topping (such as Cool Whip) - Assorted dippers: graham crackers, fresh apple slices, or pretzels Using the correct measurements is vital for the best flavor and texture. Too much cream cheese can make the dip thick. Too little sugar can make it bland. I recommend sticking closely to these amounts. This balance creates a creamy dip that is not too sweet. When it comes to serving your dip, you need the right dippers. Here are my favorites: - Graham crackers give a nice crunch. - Fresh apple slices add a crisp and juicy touch. - Pretzels offer a salty contrast. Feel free to mix and match! These options will make your dip even more fun. For the full recipe, check the recipe section. Start by taking your softened cream cheese. Place it in a large mixing bowl. Use an electric mixer on medium speed. Beat the cream cheese until it is smooth. Make sure there are no lumps left. This step is key for a creamy dip. Next, add the pumpkin puree into the cream cheese. Mix it in well. Now, add the powdered sugar, brown sugar, and vanilla extract. Include the pumpkin pie spice and ground cinnamon. Continue mixing on low speed. Ensure everything is combined but still smooth. You want a uniform texture without any streaks. Take your whipped topping and gently fold it in. Use a spatula for this step. Be careful to keep the dip light and fluffy. Stop mixing as soon as the whipped topping is blended in. This lightness adds to the creamy texture of the dip. For the full recipe, you can refer back to the beginning. Enjoy your creamy pumpkin spice cheesecake dip! To boost the flavor of your Pumpkin Spice Cheesecake Dip, try adding a pinch of nutmeg. This spice adds depth and warmth. If you like it sweeter, add more powdered sugar or brown sugar. You can also swap in maple syrup for a rich twist. For a touch of tang, mix in a bit of cream cheese with a hint of lemon juice. Taste as you go for the best result. Serving your dip in a fun bowl can make it pop. Use a bright or themed bowl for special occasions. A light dusting of pumpkin pie spice on top looks nice and smells great. Arrange your dippers around the bowl for a colorful display. This not only makes it pretty but also invites guests to dig in. You can even use cookie cutters to shape apple slices for extra flair. Making this dip ahead of time is a smart move. Chill it for at least 30 minutes before serving. This helps the flavors mix well and taste better. You can prepare it a day in advance and keep it covered in the fridge. Just remember to add the whipped topping right before serving for that fluffy texture. For the full recipe, check out the details above. {{image_4}} You can make a lighter version of this dip. Use Greek yogurt instead of cream cheese. Greek yogurt adds protein and tang. It keeps the dip creamy and delicious. Just blend 1 cup of Greek yogurt with the other ingredients. This swap helps cut down on calories while keeping flavor intact. Want to try something different? You can change the flavor profile easily. Swap pumpkin puree for sweet potato puree. This gives a unique taste that is still rich. You can also add a splash of maple syrup for a sweet twist. Another fun option is to mix in some Nutella for a chocolatey delight. Use seasonal ingredients to enhance your dip. In fall, add a handful of chopped pecans or walnuts for crunch. In winter, try mixing in dried cranberries for a tart flavor. You can also sprinkle some fresh nutmeg on top for a fragrant touch. These seasonal additions make your dip even more inviting and festive. For the full recipe, check out the [Full Recipe]. To keep your pumpkin spice cheesecake dip fresh, store it in an airtight container. Make sure the lid is tight to prevent air from getting in. I recommend refrigerating it as soon as you're done serving. This dip stays creamy and flavorful when stored properly. You can freeze this dip, but keep in mind it may change texture. To freeze, place the dip in a freezer-safe container. Leave some space at the top for expansion. When you're ready to use it, let it thaw in the fridge overnight. Stir well before serving to help regain some creaminess. The dip lasts about 3 to 5 days in the fridge. Check for any off smells or changes in texture. If it looks or smells funny, it’s best to toss it. To enjoy its best flavor, eat it within the first couple of days. For full instructions, see the Full Recipe. Yes, you can use homemade pumpkin puree! It adds a fresh taste. To make it, roast a pumpkin until soft, then blend until smooth. Just ensure it is thick like store-bought puree. This helps your dip stay creamy. To cut the sweetness, reduce the powdered sugar. You can also add more cream cheese. Another option is to mix in a bit of plain yogurt. This gives a nice tang, balancing the sweet flavors. Taste as you go to find your perfect mix. Absolutely! If you want to make it dairy-free, try vegan cream cheese. For a lower sugar option, use a sugar substitute. If you need gluten-free dippers, serve with apple slices or gluten-free pretzels. Be creative and adapt the recipe to fit your needs! For the full recipe, check out the details above. This article explored how to make a delicious pumpkin spice cheesecake dip. We covered key ingredients, the steps for mixing and folding, and helpful tips for flavor enhancements. You learned about storage options and creative variations, like using Greek yogurt or seasonal ingredients. Remember, making this dip can be fun and easy. Use fresh ingredients for the best taste. Enjoy creating your own version, and don’t forget to share with friends!](https://dishtreats.com/wp-content/uploads/2025/07/05024715-abe0-47f7-b5fb-2040be13b0f2-768x768.webp)
![- 1 cup rolled oats - 2 cups almond milk (or your preferred milk) - 1 medium sweet apple, diced (suggestions: Fuji or Gala) - 1 teaspoon ground cinnamon - 2 tablespoons maple syrup (or honey if you prefer) - 1/2 teaspoon vanilla extract - 1/4 cup plain Greek yogurt (optional) - Pinch of salt - Chopped nuts for topping - Extra apple slices and cinnamon for garnish Apple cinnamon overnight oats are easy to make and full of flavor. The oats soak overnight, making them creamy and delicious. You can customize this recipe based on your taste. For the base, I use rolled oats and almond milk, but feel free to pick any milk you like. The diced apple brings sweetness and crunch. I suggest using Fuji or Gala apples since they are sweet and juicy. Ground cinnamon adds warmth and a cozy touch. Maple syrup gives the oats a natural sweetness. If you want a little creaminess, add Greek yogurt. Don’t forget the pinch of salt; it enhances all the flavors. Chopped nuts add a nice crunch on top. You can use walnuts, pecans, or any nuts you enjoy. Finally, garnish with extra apple slices and a dusting of cinnamon for a pretty finish. - Different types of milk (coconut, oat, etc.) - Sweeteners (agave syrup, stevia, etc.) - Additional fruit (berries, bananas, etc.) If you want to try something different, there are many options. Swap almond milk for coconut or oat milk if you prefer. You can change sweeteners too; agave syrup or stevia work well. Add in more fruits like berries or sliced bananas for extra flavor. This makes each serving unique and fun. The best part? You can make it just how you like it! For the full recipe, check out Apple Cinnamon Overnight Oats Delight. - Step 1: Combine rolled oats with milk and yogurt. In a large bowl, mix 1 cup of rolled oats with 2 cups of almond milk. If you like, add 1/4 cup of Greek yogurt for creaminess. Stir until mixed well. - Step 2: Add apples, cinnamon, sweetener, vanilla, and salt. Fold in 1 diced apple, 1 teaspoon of ground cinnamon, and 2 tablespoons of maple syrup. Add 1/2 teaspoon of vanilla extract and a pinch of salt. Mix until everything is evenly distributed. - Step 3: Transfer mixture into jars and refrigerate. Spoon the oat mix into jars. Make sure each jar has some apple pieces. Close the lids and place them in the fridge overnight. - Evenly distribute diced apples among jars. This ensures each jar has the same amount of apple flavor. - Layer ingredients for visual appeal. Create a pretty look by layering oats and apples. This makes your breakfast even more inviting. - Stir before serving and adjust consistency. When you take the jars out, give them a good stir. If they feel too thick, add a splash of milk. - Top with nuts and additional apple slices. Finish with a sprinkle of chopped nuts and a few apple slices for crunch. A dash of cinnamon adds warmth and flavor. For full details, check the [Full Recipe]. To get the best texture, always use rolled oats. They soak up the liquid well. Steel-cut oats take longer to soften. You might want to avoid them for overnight oats. Adjust the sweetness by adding more or less maple syrup. Taste as you mix to find your perfect balance. Make a big batch of oats for quick breakfasts. You can prepare up to five jars at once. Store them in the refrigerator for up to five days. This way, you’ll have a quick meal ready on busy mornings. Feel free to experiment with spices like nutmeg or cardamom. Just a pinch can add a warm kick. You can also add seeds like chia or flaxseed. These add fiber and make your oats even better for you. {{image_4}} You can easily make apple cinnamon overnight oats vegan. Just swap the Greek yogurt for a plant-based yogurt. Use almond, coconut, or oat milk for a creamy base. These changes keep the flavor rich and tasty while being dairy-free. If you need gluten-free options, choose certified gluten-free oats. Many brands offer oats that are safe for those with gluten sensitivities. This way, you can enjoy your oats without worry. You can mix in other fruits to change the taste. Try berries like strawberries or blueberries for a fresh twist. Bananas also work well, adding sweetness and creaminess. For toppings, nuts and seeds add crunch. Chopped almonds, walnuts, or sunflower seeds all taste great. You can also sprinkle chia seeds for extra fiber and health benefits. In fall, add pumpkin spice to your oats for a cozy taste. Just mix in a teaspoon or two for that warm, spiced flavor. It pairs perfectly with apples. In summer, think about fresh fruits like peaches or mangoes. These fruits add a bright, juicy flavor. You can mix them in or use them as a topping for a colorful and tasty breakfast. For the complete recipe, check out the [Full Recipe]. To keep your apple cinnamon overnight oats fresh, use jars or airtight containers. Glass jars work great. They seal well and let you see the yummy layers. Make sure to refrigerate them right after you prepare them. This keeps the oats safe to eat. You can freeze individual servings of overnight oats. First, pour the oats into freezer-safe containers or jars. Leave some space at the top, as they will expand. To enjoy later, thaw them in the fridge overnight. Once thawed, stir well. You might want to add a splash of milk to make them creamy again. Apple cinnamon overnight oats can stay fresh in the fridge for up to five days. Check for any signs of spoilage before eating. If the oats smell sour or have a strange color, throw them away. Always trust your nose and eyes! For the best taste, enjoy them within the first few days. Apple cinnamon overnight oats are a tasty breakfast. They combine oats, milk, apples, and cinnamon. The mixture sits in the fridge overnight. This soaking makes the oats soft and creamy. You get a nice blend of flavors. It’s a quick way to enjoy a healthy meal. Yes, you can use quick oats. However, they have a different texture. Quick oats cook faster and become mushy. If you use them, soak for less time. Rolled oats keep a firmer bite and work better for overnight oats. Overnight oats last about 5 days in the fridge. Store them in airtight jars or containers. Check for bad smells or changes in texture. If they look or smell off, toss them out. Yes, kids love apple cinnamon overnight oats! They are sweet and fun to eat. Serve in small jars for a cute look. You can also add toppings like nuts or more fruit for variety. This makes it a family-friendly dish everyone can enjoy. Apple cinnamon overnight oats offer a delightful and easy breakfast option. You can prepare them quickly with just a few simple steps. This meal not only fills you up but also lets you customize flavors to your taste. Experiment with different fruits, sweeteners, and spices to keep it fun. Remember to store your oats correctly for freshness. Enjoy this nutritious dish throughout the week! Your mornings can be bright and delicious with this recipe.](https://dishtreats.com/wp-content/uploads/2025/06/6eb7544b-1d16-4ecc-8a32-decb7f29ee21-768x768.webp)