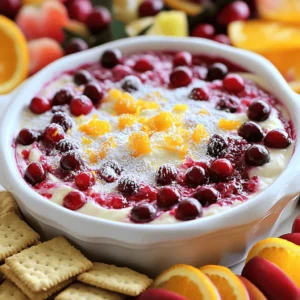
Cranberry Orange Cheesecake Dip Delightful and Creamy

Get ready to indulge in a treat that combines creamy cheesecake with a burst of festive flavor! My Cranberry Orange Cheesecake Dip is perfect for any gathering or cozy night in. This dip is simple to make and calls for just a few key ingredients. Once you try it with your favorite dippers, you’ll find it hard to stop! Let’s dive into this delight and discover how to create this delicious dip.
Ingredients
Main Ingredients
- 8 oz cream cheese, softened to room temperature
- 1 cup powdered sugar, sifted
- 1/4 cup plain Greek yogurt
Flavor Enhancers
- 1 teaspoon pure vanilla extract
- Zest of 1 large orange
- 1 tablespoon freshly squeezed orange juice
- 1/2 cup fresh cranberries, finely chopped (or 1/2 cup canned cranberry sauce)
Serving Suggestions
- Graham crackers
- Assorted fresh fruit like apple, pear, or strawberries
This dip comes together with just a few key ingredients. First, I use cream cheese to give it that rich, creamy texture. Powdered sugar adds sweetness without the graininess of granulated sugar. Greek yogurt lightens the dip and adds a slight tang that pairs well with the other flavors.
For flavor enhancers, I love using pure vanilla extract. It gives depth to the dip. The zest and juice from an orange brighten the dish and make it taste fresh. You can use fresh cranberries for a tart bite or canned cranberry sauce for sweetness.
When it comes to serving, I recommend using graham crackers. They offer a nice crunch. Fresh fruits like apples, pears, or strawberries add a juicy contrast to the creamy dip. This mix of flavors and textures makes every bite delightful and satisfying.
Step-by-Step Instructions
Preparation Steps
1. Start by taking your soft cream cheese and powdered sugar.
2. In a large mixing bowl, combine them well.
3. Use an electric mixer on medium speed.
4. Beat the mix for about 2-3 minutes until smooth.
5. Next, add the pure vanilla extract and Greek yogurt.
6. Mix again for another 1-2 minutes until fluffy.
Incorporating Flavors
1. Now it’s time to add some zest!
2. Blend in the zest of one large orange.
3. Add in one tablespoon of freshly squeezed orange juice.
4. Mix until the color is bright and even.
5. Gently fold in the finely chopped fresh cranberries.
6. If you prefer, you can use canned cranberry sauce instead.
7. Ensure the cranberries are evenly mixed in with a spatula.
Final Touches
1. Carefully transfer the dip to a nice serving bowl.
2. Use a spatula to smooth the top for a polished look.
3. Cover the bowl with plastic wrap or a lid.
4. Place it in the fridge for at least one hour.
5. This chilling helps the flavors come together perfectly.
Tips & Tricks
Achieving the Perfect Consistency
To make the dip creamy, use softened cream cheese. This helps it mix well with other ingredients. Cold cream cheese will not blend smoothly. Always take it out of the fridge ahead of time.
When mixing, use an electric mixer. Start on low speed, then increase to medium. Beat the mixture for 2-3 minutes. This adds air and makes it fluffy.
Flavor Customization
You can adjust the sweetness of the dip. Add more powdered sugar if you like it sweeter. Taste it as you go. You can also use less sugar if you prefer a tangy flavor.
Try different fruits or flavorings. You can swap cranberries for raspberries or blueberries. Add spices like cinnamon for extra warmth. This lets you change the dip to fit your taste.
Presentation Ideas
Garnish your dip for a pretty look. Sprinkle some orange zest on top. Add a few whole cranberries for color. You can also use mint leaves for a fresh touch.
For serving, pick a nice platter. Arrange graham crackers or fresh fruit around the dip. This makes it inviting and fun to eat.

Variations
Alternative Ingredients
You can easily modify the Cranberry Orange Cheesecake Dip to fit your needs. If you want a vegan option, swap cream cheese for a plant-based cream cheese. Use maple syrup instead of powdered sugar for sweetness. For a sugar-free version, consider using a sugar substitute like erythritol. These changes keep the dip creamy and tasty.
Flavor Variations
Adding spices can elevate the flavor. A pinch of cinnamon or nutmeg gives warmth and depth. You can also mix in other fresh fruits. Raspberries or blueberries add a nice twist. They provide a burst of color and flavor. Experimenting with these options can make your dip unique!
Seasonal Twists
Seasonal ingredients can bring fun changes to the dip. For holiday-themed versions, add crushed gingerbread cookies on top. This adds a festive crunch and flavor. In summer, use fresh summer fruits, like peaches or strawberries. These fruits keep the dip light and refreshing. No matter the season, you can create a new favorite version!
Storage Info
Proper Storage Techniques
To keep your cranberry orange cheesecake dip fresh, store it in the fridge. Use an airtight container to prevent any odors from mixing. Glass containers work well since they do not stain and keep the dip fresh longer. If you use plastic, ensure it is food-grade and tightly sealed.
Shelf Life
This dip will stay fresh in the fridge for about 3 to 5 days. Always check for signs of spoilage before you enjoy it. If you notice any off smells or a change in texture, it’s best to throw it away. Fresh cranberries can spoil quickly, so watch for any signs of mold or discoloration.
Freezing Tips
You can freeze cheesecake dip, but it may change in texture. If you plan to freeze it, do so right after making it. Use a freezer-safe container, leaving space at the top for expansion. To thaw, place it in the fridge overnight before serving. This allows it to regain some of its original creaminess.
FAQs
How do I make Cranberry Orange Cheesecake Dip creamy?
To make your dip creamy, start with softened cream cheese. Cold cream cheese will not mix well and may cause lumps. I recommend letting it sit out for about 30 minutes before mixing.
When you mix, use an electric mixer at medium speed. This helps blend ingredients evenly. Start with the cream cheese and powdered sugar. Beat for 2-3 minutes until smooth. Then add the Greek yogurt and vanilla. Mix for another 1-2 minutes.
Can I make this dip ahead of time?
Yes, you can make this dip ahead of time. I suggest chilling it for at least 1 hour. This allows the flavors to blend together nicely.
For best results, cover the dip tightly with plastic wrap or a lid. This keeps it fresh in the fridge. You can prepare it a day in advance. Just remember to let it chill before serving.
What can I serve with Cranberry Orange Cheesecake Dip?
The best dippers for this dip are graham crackers and fresh fruit. Sliced apples, pears, or strawberries work great. You can set up a fun dipping platter.
For a twist, try using pretzels for a salty-sweet combo. You can even use vanilla wafers for a tasty change. Get creative with your serving ideas!
The blog post covered making a delicious Cranberry Orange Cheesecake Dip. You learned about the key ingredients, like cream cheese and Greek yogurt, that create a creamy base. We explored enhancing flavors with vanilla and fresh fruit. Tips for perfect consistency and serving ideas added extra value. You can even customize the recipe with variations.
In the end, this dip is easy and fun for all occasions, whether a party or a quiet night in. Enjoy making it your own!
. Enjoy making your air fryer sweet potato chips! You now know how to make tasty sweet potato chips with an air fryer. We covered the needed ingredients, proper preparation, and seasoning. I shared tips for perfect crispiness and suggested flavor boosts. I also explored storage and reheating methods to keep your chips fresh. Try different seasonings and root veggies for variety. Enjoy the fun of making your own snacks!](https://dishtreats.com/wp-content/uploads/2025/06/63cc0e6b-da42-45de-be59-e2118d293653-768x768.webp)
![- Shrimp: Use 1 pound of large shrimp. Fresh shrimp works best. Look for shrimp that is pink and firm. Avoid shrimp that smells strong or has a slimy texture. - Honey: Use pure honey for the best flavor. Clover honey or wildflower honey both work well. They add the right sweetness without being too strong. - Lime Juice: Fresh lime juice is best. It gives a bright, zesty flavor. If you use bottled lime juice, choose one with no added sugars for a true taste. - Soy Sauce: Use low-sodium soy sauce. This keeps the dish from being too salty. It adds depth without overpowering other flavors. - Fresh Cilantro: This herb adds a fresh taste. If you don’t like cilantro, try parsley as a mild substitute. - Lime Wedges: Serving lime wedges with the dish boosts the flavor. Squeezing fresh lime juice on the shrimp adds a nice zing. For the full recipe, check the details above. Start by whisking together the marinade ingredients in a bowl. This mixture includes honey, lime juice, soy sauce, minced garlic, minced ginger, and crushed red pepper flakes. Blending these ingredients well is key. It helps the flavors combine and coat the shrimp evenly. The honey adds sweetness, while lime juice gives a zesty kick. Soy sauce brings depth, and garlic and ginger add warmth. This blend will make your shrimp burst with flavor. Once you have the marinade ready, add the peeled and deveined shrimp. Make sure each shrimp gets a good coat of the marinade. Cover the bowl with plastic wrap and let it sit. The best time for marinating is 15 to 20 minutes at room temperature. This allows the shrimp to soak up the flavors. If you let it sit too long, the acid from the lime juice can change the shrimp's texture. Now it's time to cook! Heat olive oil in a large skillet over medium-high heat. Wait until the oil shimmers before adding the shrimp. This heat ensures a good sear. Add the marinated shrimp to the skillet, but remember to save any leftover marinade. Cook the shrimp for about 2 to 3 minutes without stirring. You want one side to turn pink and opaque. Flip the shrimp and cook for another 2 minutes until done. To finish, pour the reserved marinade into the skillet and let it cook for one more minute. This step helps the flavors come together. Remove the skillet from heat and season with salt and pepper. Your spicy honey lime shrimp is now ready to serve. Enjoy it warm, garnished with fresh cilantro and lime wedges. For the full recipe, refer back to the beginning! To cook shrimp just right, avoid overcooking. Shrimp turns pink and opaque when done. Look for a firm texture. If it curls tightly, it may be overcooked. Using a meat thermometer helps ensure perfect shrimp. The ideal internal temperature is 120°F. This temperature keeps your shrimp juicy and tender. To spice things up, adjust the heat levels to your liking. If you enjoy more heat, add extra crushed red pepper flakes. Start with a little and add more if needed. Consider adding aromatics for extra flavor. Garlic and ginger bring warmth. You can also try adding cumin or smoked paprika for a new twist. Use your creativity to enhance flavors you love. {{image_4}} You can try different proteins for this dish. Chicken works well if you prefer it. Tofu is a great choice for a plant-based option, absorbing flavors nicely. Just cut them into bite-sized pieces and follow the same cooking steps. For sweeteners, honey is fantastic, but maple syrup can add a nice twist. Agave syrup is another option to consider. Both alternatives will still give you that sweet touch without losing flavor. Want to switch up the citrus? You can use lemon or orange juice for a fresh taste. Both add a unique zing that pairs well with shrimp. Adjusting the spice level is easy too. If you want more heat, add extra crushed red pepper flakes. For less spice, reduce the amount or leave it out. This way, you can make the dish just how you like it! For the full recipe, check [Full Recipe]. To keep your Spicy Honey Lime Shrimp fresh, follow these tips. - Refrigerator Storage: Place leftovers in an airtight container. Use glass or plastic containers that seal well. Store the shrimp in the fridge for up to three days. Make sure they cool down before sealing to avoid moisture buildup. - Freezing Options: If you want to save shrimp for later, freezing is a great choice. Lay the shrimp flat in a single layer on a baking sheet. Freeze until solid, then transfer to a freezer-safe bag. This method prevents clumping and keeps shrimp fresh for up to three months. Reheating shrimp can be tricky. Here’s how to do it right. - Best Methods: The microwave is quick but can make shrimp rubbery. Instead, use a skillet for better results. Heat a little oil in the skillet over medium heat. Add the shrimp and cook until warmed through. - Maintaining Texture: To avoid rubbery shrimp, don’t overheat them. Just warm until they are hot but still tender. Stir gently to keep them from sticking to the pan. Enjoy your shrimp like they were just cooked! For the full recipe, check out the [Full Recipe]. You can tell shrimp is done by its color and texture. Cooked shrimp turns pink and becomes firm. They should look opaque, not translucent. The safe internal temperature for shrimp is 120°F (49°C). Use a meat thermometer for the best results. Yes, you can prep this dish ahead. Marinate the shrimp and store it in the fridge. This can last for up to 2 hours. If you want to keep it longer, freeze the marinated shrimp. Thaw in the fridge before cooking. Pair this shrimp with rice or a fresh salad. Here are some great options: - Steamed jasmine rice - Quinoa salad - Grilled vegetables - Avocado slices These sides balance the shrimp's spice and sweetness. You can also serve warm tortillas for a fun twist. Check the Full Recipe for more details! You learned how to make Spicy Honey Lime Shrimp with fresh ingredients and easy steps. We talked about the best shrimp, types of honey, and the importance of lime juice. I shared tips on marinating and cooking to get shrimp just right. Remember to check for doneness and how to store leftovers. You can also try new flavors by changing ingredients. Enjoy your dish, share it, and impress your friends. Simple cooking can lead to big smiles!](https://dishtreats.com/wp-content/uploads/2025/07/32f525eb-631f-4155-a120-c5a025aaa712-768x768.webp)