
Pumpkin Chocolate Chip Pancake Stack Irresistible Delight

Are you ready to make breakfast a festival of flavor? These Pumpkin Chocolate Chip Pancakes are more than just a treat; they’re a cozy hug on a plate. With warm spices, sweet chocolate, and rich pumpkin puree, this recipe will take your mornings to a new level. Let’s dive into the ingredients and steps so you can enjoy this irresistible delight in no time!
Ingredients
List of Essential Ingredients
- 1 cup all-purpose flour
- 1 tablespoon baking powder
- 1/2 teaspoon baking soda
- 1/2 teaspoon salt
- 1 teaspoon ground cinnamon
- 1/2 teaspoon ground nutmeg
- 1 cup canned pumpkin puree
- 2 large eggs
- 1/2 cup milk (or your preferred plant-based alternative)
- 1/4 cup pure maple syrup (plus extra for serving)
- 1 teaspoon vanilla extract
- 1/2 cup semi-sweet chocolate chips
- Butter or neutral oil for cooking
These ingredients create a delicious stack of pancakes. The all-purpose flour gives the base a soft texture. Baking powder and baking soda help the pancakes rise. Salt balances the sweetness, while cinnamon and nutmeg add warmth and spice. The canned pumpkin puree brings moisture and flavor.
Using eggs helps bind everything together. The milk adds creaminess, and maple syrup sweetens the mix. Vanilla extract enhances the flavor, making each bite special. Semi-sweet chocolate chips bring a sweet surprise in every pancake. Finally, butter or oil makes cooking easy.
Each ingredient plays a role in crafting the perfect pancake. You can mix and match some components, but keep the core ingredients for best results. Enjoy these pancakes warm, topped with maple syrup and extra chocolate chips. They are sure to impress your family and friends!
Step-by-Step Instructions
Prepping the Dry Ingredients
Start by gathering your dry ingredients. In a large mixing bowl, combine:
- 1 cup all-purpose flour
- 1 tablespoon baking powder
- 1/2 teaspoon baking soda
- 1/2 teaspoon salt
- 1 teaspoon ground cinnamon
- 1/2 teaspoon ground nutmeg
Whisk these ingredients together thoroughly. This step helps eliminate any lumps. You want a smooth, even mix to ensure fluffy pancakes.
Mixing the Wet Ingredients
Next, move on to the wet ingredients. In a separate bowl, blend together:
- 1 cup canned pumpkin puree
- 2 large eggs
- 1/2 cup milk (or your preferred plant-based alternative)
- 1/4 cup pure maple syrup
- 1 teaspoon vanilla extract
Mix these until the mixture is smooth and well incorporated. A well-blended mixture makes for lighter pancakes.
Combining Mixtures
Now, it’s time to combine the wet and dry ingredients. Slowly pour the pumpkin mixture into the bowl with the dry ingredients. Gently stir using a wooden spoon or spatula.
Be careful not to overmix—it’s fine if some small lumps remain. Finally, fold in:
- 1/2 cup semi-sweet chocolate chips
This will add delightful bursts of chocolate in each bite.
Cooking the Pancakes
Preheat your non-stick skillet or griddle over medium heat. Lightly grease the surface with butter or neutral oil for a non-stick effect.
For each pancake, measure about 1/4 cup of batter onto the hot skillet. Cook until bubbles appear on the surface, which takes about 2-3 minutes.
Flip the pancake and cook for another 2 minutes, until it turns a lovely golden brown. Keep an eye on cooking time to avoid burning.
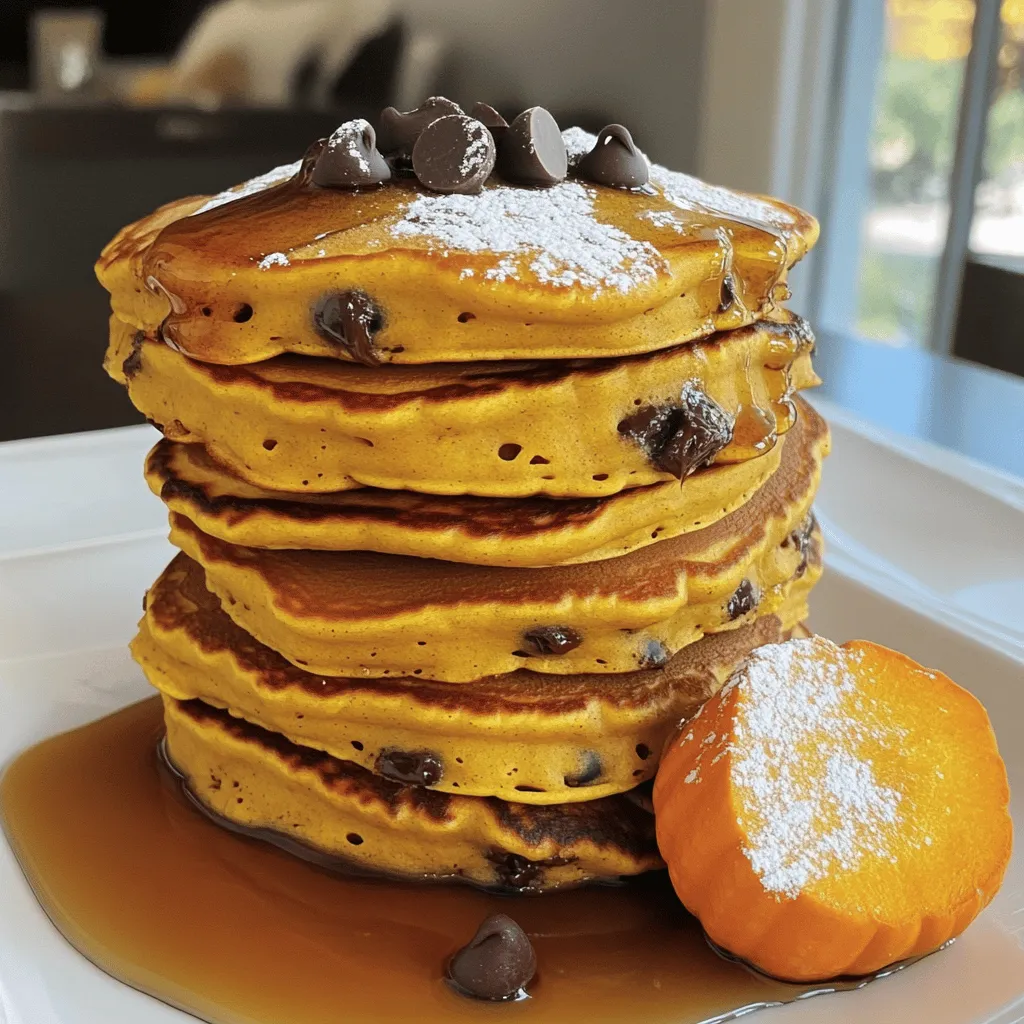
Repeat with the remaining batter. Once done, stack the pancakes high on a serving plate. Enjoy warm, drizzled with extra maple syrup and sprinkled with more chocolate chips.
Tips & Tricks
Perfect Cooking Techniques
To cook perfect pancakes, your skillet needs the right heat. Aim for medium heat. A drop of water should sizzle and dance on the surface. If it evaporates too fast, the skillet is too hot.
Flipping pancakes can be tricky. Use a thin spatula to slide under the pancake. Lift it gently, then flip quickly. This keeps the pancake intact and fluffy.
Enhancing Flavor
Spices add depth to your pancakes. Use ground cinnamon and nutmeg for warmth. Consider adding a pinch of ginger or allspice for a twist.
You can also mix in extras. Try chopped nuts like walnuts or pecans. Adding small pieces of fruit, like banana or apple, can give a nice burst of flavor.
Presentation Ideas
How you stack pancakes matters. Make a tall stack on a large plate for wow factor. You can alternate layers with chocolate chips for a fun look.
Garnish with a dusting of powdered sugar or a drizzle of whipped cream. For added flair, sprinkle extra chocolate chips and place a slice of pumpkin on the side. This makes your dish pop and looks inviting.
Variations
Ingredient Substitutions
You can swap out some ingredients to fit your needs. If you want a dairy-free option, try using almond milk or oat milk instead of regular milk. These alternatives work well and keep the pancakes moist.
For those who need gluten-free options, you can use a gluten-free flour blend. Just make sure it has xanthan gum, which helps with texture. This way, everyone can enjoy these tasty pancakes!
Flavor Experimentation
To make your pancakes even more special, consider adding different extracts. A splash of almond extract can give a nice twist. You can also try pumpkin spice for an extra autumn vibe.
Don’t be afraid to mix in seasonal ingredients too. Adding fresh cranberries can bring a tart bite. Chopped pecans add a nice crunch and nutty flavor. Experimenting can lead to your new favorite recipe!
Storage Info
Storing Leftover Pancakes
To keep your pumpkin chocolate chip pancakes fresh, follow these tips:
- Refrigeration: Place pancakes in an airtight container. Separate layers with parchment paper. This prevents sticking.
- Freezing: For longer storage, stack pancakes with parchment in between. Wrap the stack tightly in plastic wrap, then place in a freezer bag.
Make sure to label the container with the date. This way, you can enjoy your pancakes later without worry.
Reheating Tips
When it’s time to enjoy your leftover pancakes, reheating is key. Here’s how to do it right:
- Microwave: Place pancakes on a microwave-safe plate. Cover with a damp paper towel. Heat for 20-30 seconds. Check for warmth and repeat if needed.
- Skillet: Preheat a non-stick skillet over low heat. Add a tiny bit of butter or oil. Place pancakes in the skillet and heat for about 1-2 minutes on each side. This method adds a nice crispness.
These methods ensure your pancakes stay soft and tasty. Enjoy every bite!
FAQs
Can I make Pumpkin Chocolate Chip Pancakes ahead of time?
Yes, you can make these pancakes ahead of time. Here are some tips for batch cooking and storing:
- Prepare the batter: You can mix the batter a day in advance. Store it in the fridge.
- Cook and cool: Cook the pancakes and let them cool completely.
- Refrigerate or freeze: Stack the pancakes with parchment paper between them. Place them in an airtight container. They will last in the fridge for 3 days or in the freezer for 2 months.
- Reheat: Use the microwave or toaster to warm them up. This way, you enjoy fresh pancakes anytime!
How can I make these pancakes healthier?
You can make these pancakes healthier with a few simple changes:
- Reduce sugar: Use less maple syrup in the batter. You can also use mashed bananas for sweetness.
- Use whole wheat flour: Swap some or all of the all-purpose flour for whole wheat flour. This adds fiber and nutrients.
- Opt for low-fat milk: Choose low-fat milk or a plant-based milk with fewer calories.
- Add fruits: Mix in fruits like blueberries or chopped apples for added vitamins and fiber.
Can I use fresh pumpkin instead of canned?
Yes, you can use fresh pumpkin. Here’s how to prepare fresh pumpkin puree:
- Choose the right pumpkin: Use a sugar pumpkin or pie pumpkin. They are sweeter and smoother.
- Roast it: Cut the pumpkin in half. Remove the seeds and strings. Place it cut side down on a baking sheet. Roast at 400°F (200°C) for about 45 minutes or until soft.
- Puree it: Let it cool, then scoop out the flesh. Blend it until smooth. This fresh puree works well in your pancakes and adds great flavor!
In this post, we explored making Pumpkin Chocolate Chip Pancakes from scratch. We listed essential ingredients, detailed step-by-step instructions, and shared helpful tips. We also offered ideas for variations, storage, and answered common questions.
Now you have everything you need to make delicious pancakes at home. Enjoy the fun of cooking and the joy of sharing these tasty treats!


![To make delicious grilled veggie kabobs, gather these fresh ingredients: - 1 bell pepper (any color), cut into 1-inch pieces - 1 zucchini, sliced into rounds - 1 yellow squash, sliced into rounds - 1 red onion, cut into wedges - 8 cherry tomatoes - 1 cup mushrooms, cleaned and stems removed - 3 tablespoons olive oil - 2 cloves garlic, finely minced - 1 teaspoon smoked paprika - 1 teaspoon dried oregano - Salt and freshly ground black pepper to taste - 8 skewers (wooden or metal) Fresh vegetables make a big difference in flavor. You can swap in seasonal veggies, like asparagus or eggplant, based on what you find at the market. This keeps your kabobs fresh and exciting. If you have frozen vegetables, use those too! Just remember to thaw and drain them well. Fresh veggies often taste better but frozen can be a great backup. Using fresh ingredients ensures better taste and texture. Fresh veggies hold their shape and crunch better on the grill. When you bite into a grilled kabob, you want that satisfying crunch. Plus, fresh produce packs more nutrients and flavor. So, always try to choose fresh when you can! For the full recipe, check the section above. Cutting vegetables evenly ensures they cook at the same rate. Aim for 1-inch pieces for bell peppers and wedges for onions. Slice zucchini and yellow squash into rounds. If using wooden skewers, soak them in water for at least 30 minutes. This step prevents burning and keeps them strong. Marinating vegetables adds rich flavor. Combine olive oil, minced garlic, smoked paprika, and oregano. Toss in salt and pepper, then mix well. Add your veggies and coat them with the marinade. Let them sit for 15 minutes to soak up the flavors. Preheat your grill to medium-high heat. A hot grill helps create nice grill marks and a good sear. Place the kabobs on the grill grates. Arrange them evenly for better cooking. Cook for about 10-15 minutes. Turn them occasionally to ensure even cooking. Look for tender veggies with nice grill marks. To serve kabobs, use a rustic platter for a warm touch. Garnish with fresh herbs for added color. Serve with tzatziki or yogurt dip for a creamy contrast. Pair with a light salad or grilled protein for a complete meal. Enjoy your delicious creation! For the full recipe, check out the Grilled Veggie Kabobs details above. To boost the taste of your grilled veggie kabobs, try different marinades. Balsamic vinegar adds a sweet tang. Citrus juices like lemon or lime give a bright kick. You can also add spices or herbs. Consider rosemary, thyme, or cayenne pepper for extra flavor. Smoking the veggies adds depth too. If you have a grill with a smoker box, use it. Wood chips like hickory or mesquite can make a big difference. When you assemble your kabobs, think about color and texture. Alternate your veggies for a pretty look. Start with a bell pepper, then add a mushroom, followed by a cherry tomato. This keeps the kabob interesting. To prevent veggies from falling apart, push them snugly together on the skewer. Avoid overloading them; a little space helps. You can also add proteins like chicken or shrimp, or even cheese cubes for variety. This makes your kabobs more filling and tasty. For a twist, try marinating the protein in the same mix as the veggies. If you want to dive deeper into the recipe, check out the Full Recipe for more details! {{image_4}} You can easily customize grilled veggie kabobs by using seasonal vegetables. Here are some ideas: - Summer: Try corn on the cob, eggplant, and asparagus. - Fall: Use butternut squash, Brussels sprouts, and sweet potatoes. - Winter: Consider root veggies like carrots, turnips, and beets. You can also grill fruits alongside your veggies. Fruits add sweetness and a nice contrast. Pineapple, peaches, and bell peppers work well. Skewer them together for fun color and taste. For a great look and texture, combine different colors and shapes. Mix round cherry tomatoes with long zucchini slices. Use bright peppers with earthy mushrooms. This creates visual interest on your plate. You can make grilled veggie kabobs vegan by omitting any animal products. The recipe is already plant-based, so it’s a perfect choice. If you want a gluten-free version, ensure your marinade is gluten-free. Most spices and oils are safe, but check labels. You can enhance nutrition by adding grains or legumes. Try adding cooked quinoa or chickpeas to your kabobs. This gives extra protein and fiber. If you follow a low-carb diet, focus on non-starchy vegetables. Zucchini, bell peppers, and mushrooms are great picks. You can skip the starchy veggies like corn or potatoes. Check out the Full Recipe for more ideas on how to adapt these kabobs! To keep your leftover kabobs fresh, store them in the fridge. Place them in an airtight container. They can last up to three days. For longer storage, freeze them. Wrap each kabob in plastic wrap, then place them in a freezer bag. They can stay frozen for up to three months. When reheating kabobs, use the oven or grill. Preheat the oven to 350°F. Place the kabobs on a baking sheet. Heat them for about 10 minutes. This method keeps the veggies tender. You can also grill them for 5 minutes on medium heat. Avoid microwaving, as it makes them soggy. The freshness of your ingredients matters. Bell peppers and zucchini last well in the fridge for about a week. Tomatoes and mushrooms are best if used within three days. Always check for signs of spoilage before using leftovers. You can prep veggies ahead of time for easy grilling. Cut your bell pepper, zucchini, and onion in advance. Store them in the fridge in sealed bags. This saves time when you're ready to grill. Kabobs are great for meal plans. You can mix and match different veggies throughout the week. Pair them with grains or salads for a full meal. They also work well for lunch boxes. Just make sure to keep them cool until you eat. If you have a gathering, kabobs are a hit! You can set up a kabob station. Guests can choose their favorite veggies. This adds fun and personalization to your meal. Kabobs not only taste great but also look colorful and inviting on the table. For the complete recipe, check out the [Full Recipe]. Can I make these kabobs in the oven? Yes, you can! Set your oven to 400°F. Place the kabobs on a baking sheet. Bake for about 20 minutes, turning halfway through. This gives you a tasty option when grilling isn't possible. What are the best vegetables for grilling? The best vegetables for grilling include: - Bell peppers - Zucchini - Yellow squash - Red onion - Cherry tomatoes - Mushrooms These veggies hold up well on the grill and taste great! How to know when the vegetables are done cooking? Look for nice grill marks and tenderness. You can pierce them with a fork. If they are soft but still firm, they are ready to eat. How to make grilled veggie kabobs more flavorful? Use a good marinade with olive oil, garlic, and spices. Let the veggies soak in the marinade for at least 15 minutes. This step really boosts their taste. Why should you marinate vegetables? Marinating adds flavor and helps keep them juicy. The oil and spices soak into the veggies, making each bite delicious. What type of skewers work best for grilling? Both wooden and metal skewers work well. If using wooden skewers, soak them first. This prevents burning. Metal skewers can be reused and do not need soaking. Can I use tofu or tempeh in veggie kabobs? Yes, tofu or tempeh can add protein. Cut them into cubes and marinate like the veggies. They grill nicely and taste great with the other flavors. How do I prevent vegetables from burning on the grill? Start with a clean grill and preheat it. Keep an eye on the kabobs while grilling. Turn them often to ensure even cooking and avoid burning. What can I serve alongside grilled veggie kabobs? Serve kabobs with dips like tzatziki or hummus. They also pair well with rice, quinoa, or a fresh salad. Adding some bread can complete the meal nicely. You now have all the tools to create delicious grilled veggie kabobs. We covered essential ingredients, preparation methods, grilling tips, and serving ideas. Remember, fresh ingredients make a big difference. You can also customize with various vegetables and flavors. Don’t forget to store leftovers properly for future meals. Enjoy your grilling adventure, and get creative with your kabob variations. With practice, you'll master this fun cooking method that delights everyone!](https://dishtreats.com/wp-content/uploads/2025/06/56cc5cbd-3bee-4e7d-a92f-dff27107e6fe-768x768.webp)
