Slow Cooker Apple Cider Bread Pudding Delight
Are you ready to bring some fall magic to your kitchen? With my Slow Cooker Apple Cider Bread Pudding Delight, you can transform simple ingredients into a warm, sweet treat. This dish uses apple cider and spices to create a cozy aroma while cooking. Whether you’re an expert baker or a kitchen novice, I’ll guide you step by step to ensure perfect flavor and texture every time. Let’s make baking fun and easy!
Ingredients
Key Ingredients Overview
For a rich and tasty Slow Cooker Apple Cider Bread Pudding, the right ingredients matter.
- Bread types: Use day-old bread like challah or brioche. They soak up flavors well and stay soft.
- Wet ingredients: Blend 2 cups of apple cider, 1 cup of whole milk, and 4 large eggs. This mix gives moisture and creaminess.
- Spice profile: Essential spices include 1 teaspoon of cinnamon, 1/2 teaspoon of nutmeg, and a pinch of salt. These spices add warmth and depth.
Optional Add-Ins
Add-ins can make your bread pudding even better.
- Common additions: You can mix in 1/2 cup of raisins or 1/4 cup of chopped pecans or walnuts for extra texture and flavor.
- Apple varieties: I recommend using tart apples like Granny Smith or Honeycrisp. Their tangy taste balances the sweetness of the pudding.
Step-by-Step Instructions
Preparation of Ingredients
To start, you need to cube the day-old bread correctly. I like to use challah or brioche. These types hold moisture well. Cut the bread into 1-inch cubes. Try to make them even so they cook evenly.
Next, mix the wet ingredients thoroughly. In a large bowl, whisk together the apple cider, whole milk, eggs, packed brown sugar, vanilla extract, ground cinnamon, ground nutmeg, and salt. Make sure the mixture is smooth. This step is key for great flavor!
Cooking Process
Now, let’s layer the ingredients in the slow cooker. First, place the cubed bread evenly at the bottom. Then, pour the apple cider mixture over the bread. This helps every piece soak up the liquid. Add in the diced tart apples, raisins, and nuts if you are using them. Gently fold these into the bread, mixing until combined.
Next, set the slow cooker. Cover it securely and set it to cook on low for 6 to 8 hours. It’s best to check the pudding near the end. The bread pudding is done when it has set, and a knife inserted in the center comes out clean.
Finishing Touches
When do you check for doneness? About an hour before the cooking time ends, start checking. This way, you won’t overcook it.
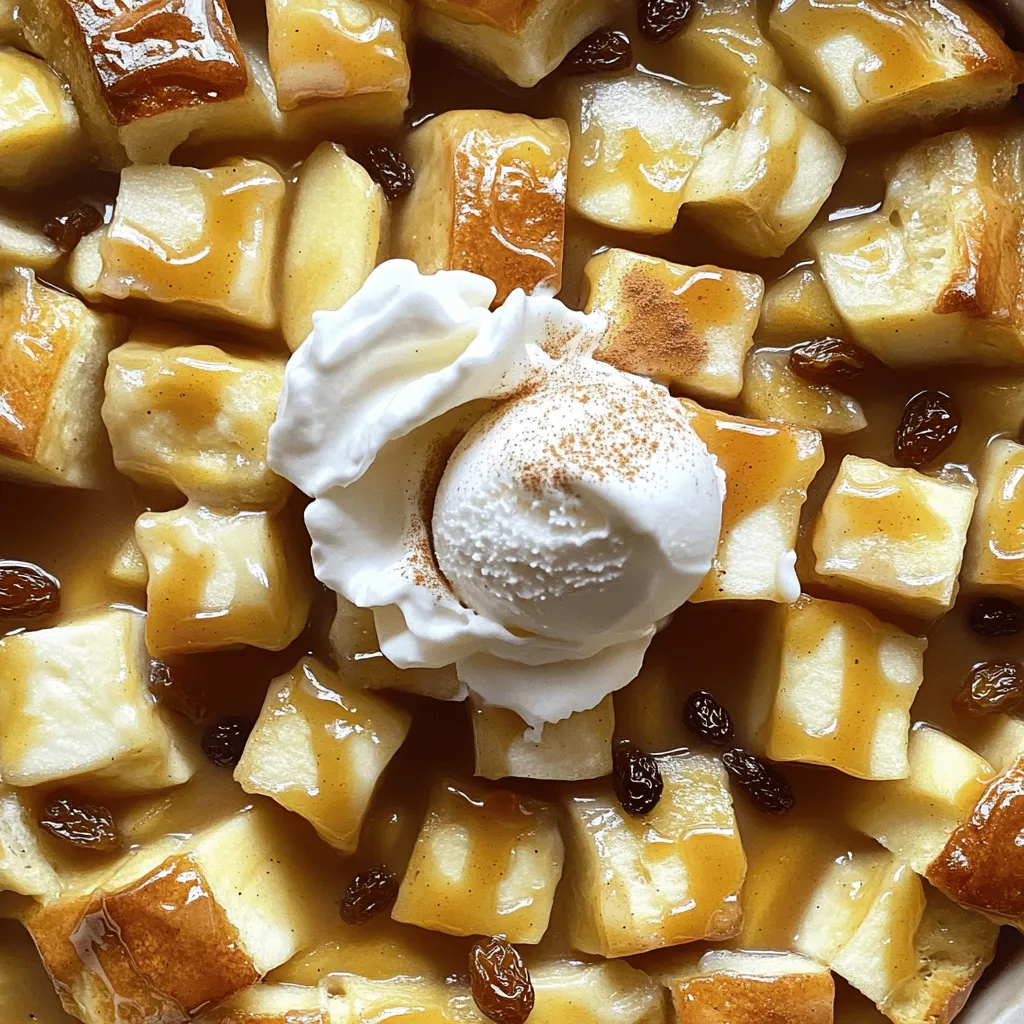
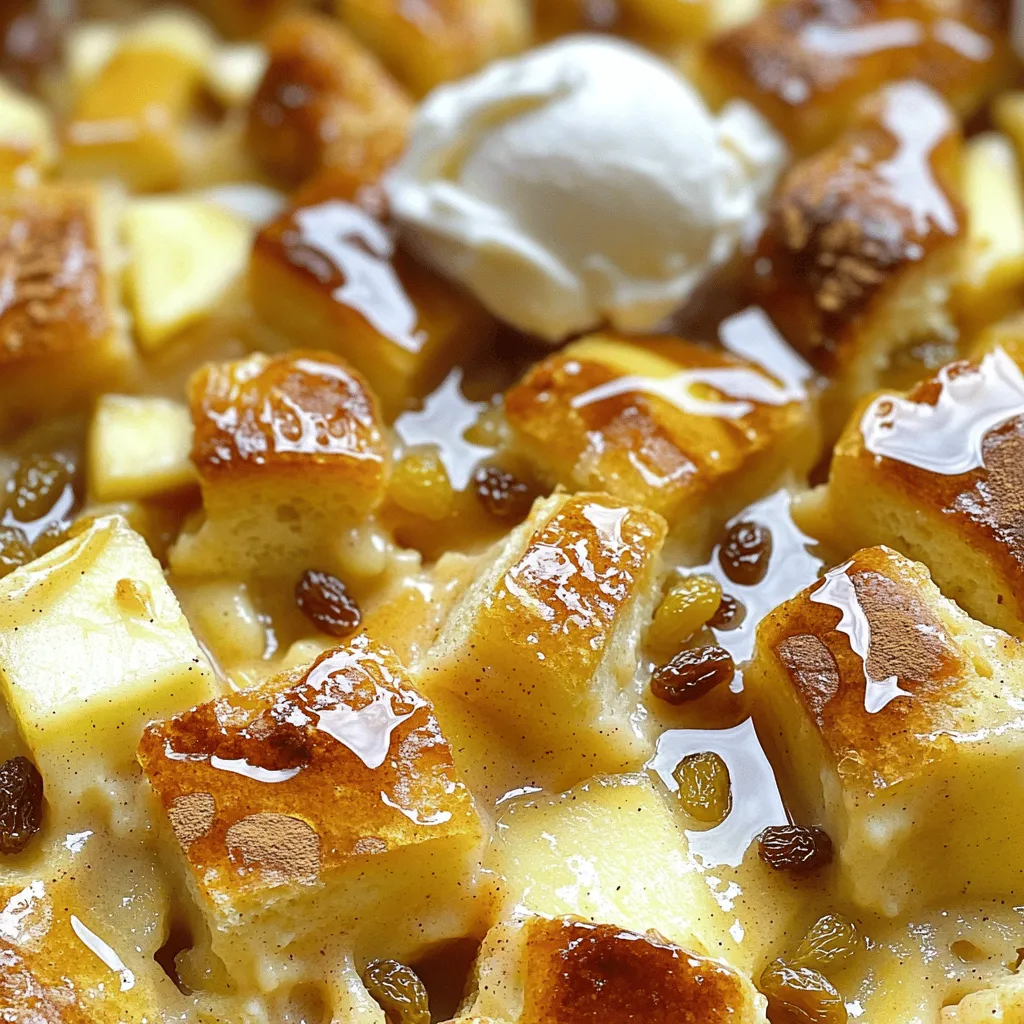
After cooking, let the bread pudding rest for about 15 minutes. This resting time helps it firm up. It makes serving easier and keeps the shape better. Enjoy your warm bread pudding with a splash of apple cider, whipped cream, or vanilla ice cream on top!
Tips & Tricks
Ensuring Perfect Texture
To avoid sogginess in your slow cooker apple cider bread pudding, use day-old bread. Fresh bread absorbs too much liquid, leading to a mushy result. I recommend using challah or brioche for their rich texture.
Make sure to cube the bread into even pieces. This helps the bread soak evenly and cook properly. It’s also key to mix the wet ingredients well before adding them to the bread. This ensures all flavors blend nicely.
To achieve the perfect balance of flavors, consider the spice mix. Ground cinnamon and nutmeg work together to bring warmth. You can adjust the spices based on your taste. If you love more warmth, add extra cinnamon or a pinch of ginger.
Serving Suggestions
For a beautiful presentation, serve the bread pudding warm. Drizzle it with a splash of apple cider for extra flavor. A sprinkle of cinnamon or thin apple slices on top adds a nice touch.
Pair your bread pudding with whipped cream or a scoop of vanilla ice cream. The creaminess complements the warm bread perfectly. If you want to be fancy, try both. Each bite will be a delightful mix of flavors and textures.
Variations
Flavor Profile Adjustments
You can change the flavor of your slow cooker apple cider bread pudding easily. Try adding spices like ginger or cardamom for a warm kick. A little goes a long way, so start small. You can always add more if you like the taste.
Using flavored bread can also change the game. For example, cinnamon raisin bread adds a sweet twist that pairs well with apple cider. This variation makes your dessert even more exciting and delicious.
Dietary Modifications
If you need gluten-free options, use gluten-free bread. Many stores offer great choices that taste good. It works the same way in the recipe, so you won’t miss the gluten at all.
For a vegan version, swap the eggs and milk. Use a mix of flaxseed meal and water for the eggs. For milk, try almond or oat milk. These changes keep your bread pudding creamy and tasty without dairy.
Storage Info
Refrigeration Guidelines
To store leftover bread pudding, let it cool down first. Place it in an airtight container. Keep it in the fridge for up to four days. When you want to enjoy it again, simply reheat a portion in the microwave. Heat it for 30 seconds, then check if it’s warm. If not, keep heating in short bursts. You can also use the oven to reheat. Preheat your oven to 350°F (175°C), cover it with foil, and bake for about 15 minutes. This helps keep it moist.
Freezing Recommendations
You can freeze both unbaked and baked bread pudding. If you freeze unbaked pudding, prepare it and place it in a freezer-safe dish. Cover it tightly with plastic wrap and foil. It can stay frozen for up to three months. To bake, thaw it in the fridge overnight and then cook as usual. For baked bread pudding, let it cool completely before freezing. Cut it into portions for easy access later. When you’re ready to eat, thaw it in the fridge overnight. Reheat in the oven or microwave as mentioned before.
FAQs
Common Questions
Can I use fresh bread instead of day-old?
You can use fresh bread, but it won’t soak up the liquid as well. Day-old bread has a firmer texture, which helps it absorb the apple cider mix better. This gives you a richer and softer bread pudding. If you only have fresh bread, let it sit out for a few hours to dry slightly.
How long will the bread pudding last in the fridge?
Your bread pudding can last for about 3 to 4 days in the fridge. Just place it in an airtight container. When you want to enjoy it again, warm it up in the microwave or oven.
Troubleshooting Tips
What to do if the bread pudding is too dry?
If your bread pudding turns out dry, drizzle some apple cider or milk over it before serving. This will add moisture and flavor back into the dish. You can also reheat it with a little bit of liquid to bring back the soft texture.
Ideas for using leftover bread pudding
There are many fun ways to use leftover bread pudding! You can turn it into a breakfast dish by adding yogurt and fresh fruit. You can also make bread pudding pancakes or a sweet bread pudding trifle. Just layer in a glass with yogurt and berries for a tasty treat!
To make bread pudding, start with the right ingredients: bread, milk, and eggs. Choose your spices to enhance flavors. Follow my step-by-step guide for easy preparation and cooking. Use handy tips to ensure perfect texture and presentation.
In the end, you can get creative with variations and storage. Bread pudding is simple yet customizable. Enjoy your journey to making this classic dish, and savor each bite!