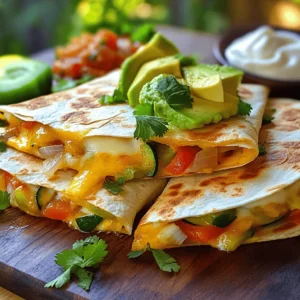
TikTok Tortilla Wrap Quesadillas Flavorful Fun Meal

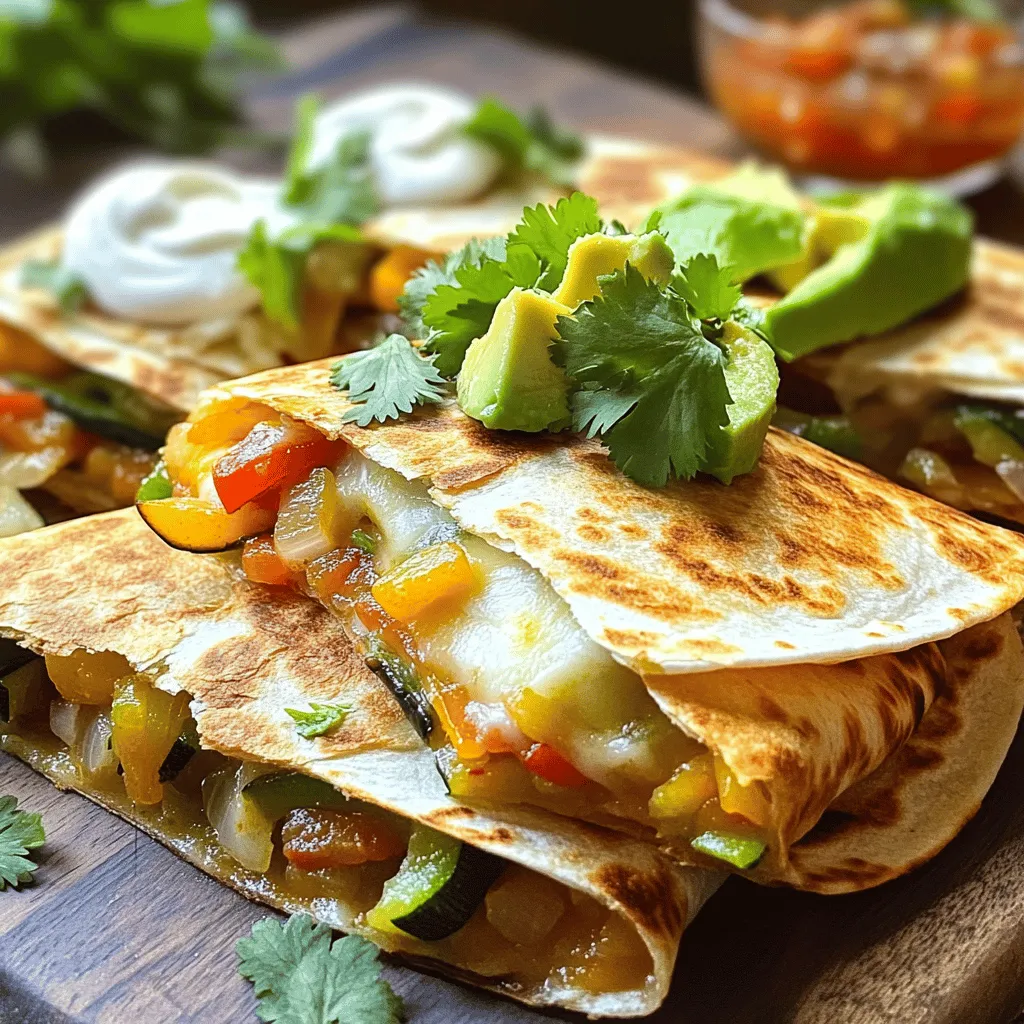
If you’re ready to spice up taco night, TikTok’s tortilla wrap quesadillas are a game changer! These tasty treats combine gooey cheese and fresh veggies, all wrapped up in a warm tortilla. In just a few simple steps, you’ll create a flavorful meal that’s fun to make—and eat! Let’s dive into the ingredients and get cooking with this trendy dish that everyone will love!
Ingredients
To make TikTok tortilla wrap quesadillas, you need the following items:
- 4 large flour tortillas
- 1 cup shredded mozzarella cheese
- 1 cup shredded cheddar cheese
- 1 medium bell pepper, thinly sliced
- 1 small onion, thinly sliced
- 1 medium zucchini, thinly sliced
- 1/2 cup cooked chicken, shredded (optional)
- 1/4 cup fresh cilantro, roughly chopped
- 1 ripe avocado, sliced
- 1 tablespoon olive oil
- 1 teaspoon ground cumin
- 1 teaspoon smoked paprika
- Salt and pepper to taste
- Sour cream and salsa for serving
These ingredients create a tasty blend of flavors and textures. The mix of cheeses gives a rich, gooey feel. The veggies add freshness and crunch. You can skip the chicken if you want a vegetarian version. Use ripe avocado for creaminess and fresh cilantro for a burst of flavor.
With these ingredients, you can customize your quesadilla. You can add different veggies or try other spices. This recipe lets you explore and have fun. Enjoy the process of cooking and make it your own!
Step-by-Step Instructions
Preparation and Preheating
- Preheat the skillet: Start by heating a large non-stick skillet over medium heat.
- Prepare the vegetable mix: In a bowl, mix the sliced bell pepper, onion, and zucchini. Drizzle with olive oil. Add ground cumin, smoked paprika, salt, and pepper. Toss well to coat the veggies.
Cooking the Vegetables
- Sautéing tips for best texture: Cook the veggies for 5-7 minutes. Stir occasionally for even cooking.
- Achieving the right char: Look for a slight char on the edges for great flavor.
Assembling the Quesadilla
- Layering tips for optimal flavor: Use one tortilla and place cheese on one half. Add the sautéed veggies next. If using chicken, sprinkle it on top. Finish with more cheese.
- Proper folding technique: Fold the tortilla over the filling to create a half-moon shape.
Cooking the Quesadilla
- Ideal cooking time for golden color: Cook each quesadilla for 3-4 minutes per side.
- Signs the quesadilla is ready: Look for a golden brown color and melted cheese.
Serving Suggestions
- Slicing techniques for presentation: After cooking, let the quesadillas rest for a minute. Cut them into wedges for easy serving.
- Recommended accompaniments: Serve with slices of avocado, sour cream, and salsa for added flavor.
Tips & Tricks
Choosing the Right Tortillas
When making TikTok tortilla wrap quesadillas, I prefer flour tortillas. They are soft and easy to fold. Corn tortillas can work, too, but they may crack. For size, look for large tortillas. They hold more filling. Thicker tortillas give a nice bite, while thinner ones crisp up better.
Melting Cheese Perfectly
I suggest using a mix of mozzarella and cheddar cheese. This blend gives a great taste. Mozzarella melts well, while cheddar adds flavor. To ensure even melting, cook over medium heat. Press down gently with a spatula, so the cheese warms up nicely. Flip the quesadilla only when the bottom is golden.
Enhancing Flavor
To make your quesadillas pop, add spices like cumin and smoked paprika. These give warmth and depth. You can also try garlic powder or chili powder for more kick. If you’re feeling creative, swap the veggies. Spinach or mushrooms can replace zucchini. You can even add black beans for extra protein!

Variations
Vegetarian Option
For a tasty vegetarian quesadilla, load it with vibrant veggies. Try these combinations:
- Spinach and mushrooms
- Corn and black beans
- Roasted red peppers and artichokes
If you want a dairy-free option, look for cheese made from nuts or soy. Brands like Daiya or Violife offer great flavors. You can melt them just like regular cheese.
Loaded Quesadilla
To make a loaded quesadilla, add more proteins. Black beans or pinto beans offer great taste and texture. Shredded chicken is a classic choice, but you can also use ground beef or turkey.
Add toppings like:
- Diced jalapeños for heat
- Fresh salsa for zest
- Sliced olives for saltiness
These extras make each bite exciting.
Flavor Profiles
You can mix up the flavors based on your mood. For a Mexican-inspired twist, use:
- Chorizo or seasoned ground beef
- Refried beans and guacamole
For a Mediterranean flair, fill your quesadilla with:
- Feta cheese and sun-dried tomatoes
- Spinach and olives
These variations keep your meals fun and fresh!
Storage Info
Storing Leftovers
To keep your quesadillas fresh, store them in an airtight container. Place parchment paper between layers if stacking them. This helps prevent sticking. Refrigerate for up to three days. If you want to keep them longer, freezing is a great option. Wrap each quesadilla tightly in plastic wrap. Then, place them in a freezer bag. They can last up to two months in the freezer.
Reheating Techniques
When it’s time to eat your leftovers, reheating is key. The best way to keep them crispy is using a skillet. Heat a non-stick skillet over medium heat. Place the quesadilla in the pan and cook for about 2-3 minutes on each side. This method revives the crunch.
You can use a microwave too, but it may make them soft. If you go this route, place a paper towel under the quesadilla. This helps absorb extra moisture. Heat for about 30 seconds to one minute, checking to avoid sogginess. Enjoy your tasty quesadillas!
FAQs
Can I use other types of cheese?
Yes, you can switch up the cheese in your quesadillas. Here are some great options:
- Pepper jack for a spicy kick
- Monterey Jack for a mild flavor
- Cream cheese for a creamy texture
- Vegan cheese if you’re dairy-free
Feel free to mix cheeses too! Combining mozzarella and cheddar adds depth. Always choose cheese that melts well for the best results.
How do I prevent the quesadilla from getting soggy?
To keep your quesadillas crispy, follow these tips:
- Don’t overfill them; less is more!
- Make sure your veggies are cooked before adding them.
- Use a hot skillet to cook the quesadilla fast.
- Press down gently with a spatula while cooking.
These steps will help you achieve a nice, crisp texture.
What’s the best way to serve quesadillas for a party?
Serving quesadillas at a party can be fun! Here are some ideas:
- Slice them into wedges for easy sharing.
- Arrange on a colorful platter for a nice look.
- Add small bowls of salsa and sour cream on the side.
- Garnish with fresh cilantro and lime wedges.
These touches make your quesadilla spread look vibrant and inviting!
You now have a clear guide to make delicious quesadillas. We covered ingredients, cooking steps, tips, variations, and storage. Follow these tips for great flavor and texture. Don’t be afraid to try new ingredients, too! Enjoy your cooking journey and impress your friends. Happy eating!


![- 8 oz rotini or fusilli pasta - 1 cup cherry tomatoes, halved - 1 cucumber, diced - 1 cup Kalamata olives, pitted and halved - 1/2 red onion, finely chopped - 1 bell pepper, diced - 1 cup feta cheese, crumbled - 1/4 cup fresh parsley, chopped - 1/4 cup extra virgin olive oil - 3 tablespoons red wine vinegar - 1 teaspoon dried oregano - Salt and pepper, to taste - Substitute red wine vinegar with apple cider vinegar - Add other vegetables like bell peppers or spinach This salad bursts with color and flavor. The main ingredients bring freshness. Each bite is full of crunch and zest. The pasta holds the dressing well, creating a tasty mix. The dressing is simple but packs a punch. Extra virgin olive oil adds richness. Red wine vinegar gives a tangy taste. Dried oregano adds a hint of earthiness. Salt and pepper enhance all the flavors. Want to mix it up? Try adding apple cider vinegar instead of red wine vinegar. You can also throw in extra veggies like spinach. This salad is flexible and lets your creativity shine. For the full recipe, check out the Zesty Greek Pasta Salad with Feta & Olives. To start, bring salted water to a rolling boil. Add 8 ounces of rotini or fusilli pasta. Cook for 8-10 minutes until al dente. Once cooked, drain the pasta in a colander. Rinse it under cold water to stop the cooking. Set the drained pasta aside for later. While your pasta cooks, wash and chop your vegetables. Use 1 cup of cherry tomatoes, 1 cucumber, 1/2 red onion, and 1 bell pepper. Dice these into bite-sized pieces. Also, chop 1/4 cup of fresh parsley. Once chopped, place all the vegetables into a large mixing bowl. This creates a colorful and fresh base for your salad. Now it’s time to mix things! Add the cooled pasta and 1 cup of Kalamata olives to the bowl of vegetables. This combination adds a nice salty flavor. In a separate bowl, prepare the dressing. Mix together 1/4 cup of olive oil, 3 tablespoons of red wine vinegar, and 1 teaspoon of dried oregano. Add salt and pepper to taste. Whisk until well combined. Drizzle the dressing over the pasta and vegetable mixture. Gently fold in 1 cup of crumbled feta cheese. Make sure all the ingredients are evenly coated with the dressing. This step is key for great flavor in every bite. Cover the salad with plastic wrap or a lid. Place it in the refrigerator for 30 minutes. This chilling time helps the flavors meld together. You can serve your pasta salad cold or at room temperature. For the full recipe, check out the details above. Serve your Greek pasta salad in a vibrant bowl for visual appeal. A colorful dish draws people in. You can also use individual plates for a fresh look. Garnish each serving with extra feta and parsley. This adds a pop of color and flavor. Let your salad chill longer in the fridge. This helps the flavors blend and deepen. If you love herbs, try adding basil or dill. Fresh herbs boost the taste and aroma. Prep your ingredients in advance. Chop vegetables and cook the pasta ahead of time. This makes assembly quick and easy. When storing leftovers, use an airtight container. It keeps the salad fresh and tasty for days. For the best flavor, consume within three to five days. {{image_4}} There are many fun ways to switch up your Easy Greek Pasta Salad. Try a Mediterranean twist for a new taste. Here are some ideas: - Add sun-dried tomatoes for a sweet, tangy flavor. - Toss in artichoke hearts for extra texture. - For protein, add grilled chicken or chickpeas. Both options make it filling. If you need to change the recipe for your diet, here are some tips: - Use gluten-free pasta to make it gluten-free. - For a vegan option, skip the feta cheese or try a vegan substitute. Enjoy seasonal ingredients by mixing in fresh veggies: - In summer, add zucchini for a crunchy touch. - Use roasted vegetables for deeper flavors. Roasting brings out their natural sweetness. These variations keep your Easy Greek Pasta Salad fresh and exciting! Check out the [Full Recipe] for the base you can customize. To keep your Easy Greek Pasta Salad fresh, place it in an airtight container. You can store it in the refrigerator for about 3-5 days. This salad tastes best when you enjoy it fresh. I do not recommend freezing this salad. Freezing can change its texture, making it less enjoyable. If you prepare a large batch, store the dressing separately. This keeps the flavors bright and fresh. This pasta salad is best served cold. However, you can also enjoy it at room temperature. Before serving, gently toss the salad. This helps mix the flavors evenly throughout. For the full recipe, check back to the beginning. Yes, it can be prepared a day in advance for flavor enhancement. This allows all the tastes to blend and become more rich. Just keep it in the fridge until you are ready to serve. You can use vegan feta or other cheese alternatives. This makes the dish suitable for various diets. You might want to try a creamy cheese for a nice texture. Yes, it’s perfect for picnics and potlucks if kept properly chilled. The fresh ingredients hold up well. Just pack it in a cooler or insulated bag to keep it fresh. Consider adding grilled chicken, shrimp, or canned chickpeas. These options make the salad more filling. They also add great taste and texture to the mix. This salad combines fresh pasta with vibrant vegetables, feta, and a simple dressing. Using easy steps, you can create a delightful dish that's perfect for any gathering. Remember, you can adjust flavors and ingredients to fit your taste. Meal prep helps save time, and eating fresh is best. Enjoy your colorful pasta salad, whether at a picnic or a family dinner!](https://dishtreats.com/wp-content/uploads/2025/06/42921458-26d8-4100-967d-b17bfbbdb796-768x768.webp)
![- Firm tofu (14 oz, pressed and cubed) - Panko breadcrumbs (1 cup) - Cornstarch (1/4 cup) - Soy sauce (1 tablespoon) - Nutritional yeast (optional, 1 tablespoon) - Garlic powder (1 teaspoon) - Onion powder (1 teaspoon) - Dried oregano (1 teaspoon) - Salt and freshly ground black pepper - Air fryer - Mixing bowls - Cooking spray When making crispy air fryer tofu nuggets, the right ingredients matter. Start with firm tofu. Firm tofu holds its shape well and gives a satisfying bite. Press it to remove extra moisture. This step is crucial. It helps the tofu absorb sauces and seasonings better. Next, panko breadcrumbs add crunch. They are lighter than regular breadcrumbs. This texture makes your nuggets crispy and fun to eat. The cornstarch helps create a crispy coating. For seasonings, soy sauce gives a rich flavor. Nutritional yeast adds a cheesy taste, but it is optional. Garlic powder and onion powder enhance the savory notes. Dried oregano adds a nice herbal touch. Always season with salt and pepper to taste. Gather your cooking supplies. An air fryer is key for even cooking and crispiness. Mixing bowls help combine ingredients well. Don't forget cooking spray! It ensures a golden crust on your tofu nuggets. For the full recipe, check the detailed instructions above. Happy cooking! - Preheat air fryer to 400°F (200°C). This helps the nuggets get crispy. - Toss cubed tofu in soy sauce. Make sure every piece is well-coated. - Combine dry ingredients in a bowl. Use panko, cornstarch, and spices. - Coat each tofu cube in the breadcrumb mixture. Press gently to stick well. - Arrange nuggets in a single layer in the air fryer. Space is key for even cooking. - Mist with cooking spray and cook for 12-15 minutes. Shake the basket halfway for best results. Enjoy your crispy air fryer tofu nuggets! Check out the Full Recipe for more tips. To get crispy tofu nuggets, preheat your air fryer to 400°F (200°C). This helps the nuggets cook evenly and become perfectly crunchy. While cooking, use cooking spray. A light mist on the nuggets before frying ensures they get that golden finish. You can change the taste of your tofu nuggets easily. Swap the seasonings for different flavors. Try adding chili powder for heat or smoked paprika for a rich flavor. You can also use other types of breadcrumbs. Regular breadcrumbs or crushed cornflakes can work well. Pair your crispy nuggets with tasty dipping sauces. Sweet chili sauce or spicy mayo works great. For a fun presentation, garnish your dish with fresh cilantro or thinly sliced green onions. This adds color and makes your meal look appealing. Try these tips, and your tofu nuggets will impress everyone! {{image_4}} You can easily make this recipe vegan. If you want to skip the nutritional yeast, that’s fine. The tofu will still taste great. You can also change the seasonings to fit your taste. Try using paprika, cumin, or even curry powder for a unique twist. If you need a gluten-free snack, swap the regular breadcrumbs for gluten-free ones. You should also check the soy sauce. Some brands add gluten, so look for a gluten-free option. This way, everyone can enjoy your crispy tofu nuggets. Feel free to mix in some veggies or spices. Chopped bell peppers or green onions can add a nice crunch. You could also use cheese alternatives. Adding these can create an extra layer of flavor and keep things exciting. To store your crispy air fryer tofu nuggets, let them cool down first. Place them in an airtight container. This keeps them fresh and tasty. They can last in the fridge for 3 to 4 days. Make sure to check for any signs of spoilage before eating. You can freeze cooked tofu nuggets if you want to save some for later. Arrange them in a single layer on a baking sheet. Freeze them for about 1 hour until solid. Then, transfer them to a freezer bag or container. They can stay in the freezer for up to 3 months. When you want to eat them, thaw them in the fridge overnight. To keep your nuggets crispy, use an air fryer or an oven to reheat them. Preheat the air fryer to 350°F (175°C) and cook for about 5 to 7 minutes. If using an oven, place them on a baking sheet and heat at 350°F (175°C) for 10 to 15 minutes. Avoid using a microwave, as it can make them soggy. Enjoy your crispy air fryer tofu nuggets again! To make sure your air fryer tofu nuggets are crispy, follow these tips: - Press your tofu: Remove excess moisture by pressing your tofu. This helps it soak up flavors and become crispier. - Use panko breadcrumbs: Panko gives a better crunch than regular breadcrumbs. - Preheat the air fryer: Always preheat your air fryer to 400°F (200°C) before cooking. This step is key for crispiness. - Don't overcrowd the basket: Place nuggets in a single layer, leaving space between them. This ensures hot air can circulate. - Mist with cooking spray: A light spray helps create a golden, crispy surface. - Shake halfway through: Give the basket a shake halfway through cooking for even crispiness. Yes, you can use different types of tofu for this recipe: - Firm tofu: This works best for nuggets. It holds its shape and crisps well. - Extra firm tofu: This is also a great choice. It will be very crispy and satisfying. - Silken tofu: I do not recommend this type for nuggets. It will crumble and not hold its shape during cooking. To add some heat to your tofu nuggets, try these suggestions: - Add cayenne pepper: Mix cayenne pepper into your breadcrumb mixture for a kick. - Use spicy sauce: Toss the tofu in a spicy sauce before coating with breadcrumbs. - Include chili powder: Mix chili powder into your dry ingredients for a warm flavor. - Serve with hot sauce: Pair your nuggets with a spicy dipping sauce like sriracha or hot chili sauce. For the full recipe and more details on making crispy air fryer tofu nuggets, check out the [Full Recipe]. These tofu nuggets are easy and fun to make. You prep the tofu, coat it, and air fry it for a tasty snack. You can adjust the seasonings and even use different breadcrumbs for variety. Store leftovers well for later enjoyment. In the end, these nuggets are a great meal or snack choice. Explore different flavors and share them with friends. Enjoy your cooking adventures!](https://dishtreats.com/wp-content/uploads/2025/06/79817f14-b7a2-45e9-a748-387ee13ee939-768x768.webp)


