Sheet Pan Greek Chicken & Potatoes Tasty Dinner
Looking for a simple yet tasty dinner idea? My Sheet Pan Greek Chicken & Potatoes will delight your taste buds! This dish combines juicy chicken, crispy potatoes, and fresh veggies, all cooked together with amazing flavors. Plus, it’s quick to prepare and clean-up is a breeze! Stick around as I guide you through each step of creating this mouthwatering meal that your family will love. Let’s dive in!
Ingredients
Main Ingredients
- 4 chicken thighs, skin-on and bone-in
- 4 medium Yukon Gold potatoes, cut into wedges
- 1 red onion, cut into wedges
- 1 cup cherry tomatoes, halved
Marinade Components
- 3 cloves garlic, minced
- 2 tablespoons olive oil
- 1 tablespoon dried oregano
- 1 teaspoon smoked paprika
- 1 teaspoon lemon zest
- Salt and black pepper to taste
Optional Additions
- Fresh parsley, chopped (for garnish)
- 2 tablespoons feta cheese, crumbled (optional)
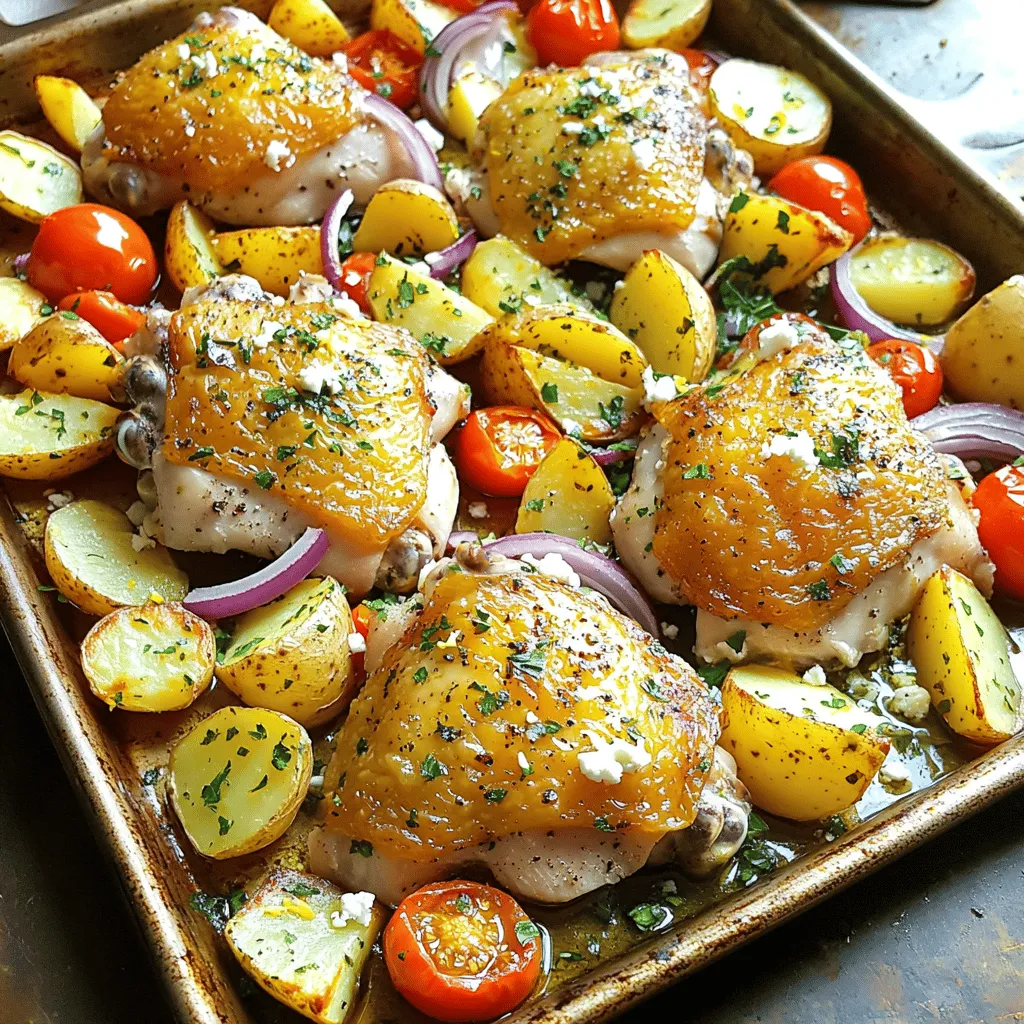
This dish is built on simple yet flavorful ingredients. The chicken thighs give rich taste and stay juicy. Yukon Gold potatoes add a creamy texture. Red onion brings sweetness, while cherry tomatoes add freshness. The marinade uses garlic for depth and olive oil for moisture. Dried oregano and smoked paprika give a lovely Mediterranean flair. Lemon zest adds brightness and balances the flavors.
You can garnish with fresh parsley for color. Crumbled feta adds a salty punch if you want. Each ingredient plays a key role in making this meal a hit. You’ll love how these flavors blend together as they roast in the oven.
Step-by-Step Instructions
Preheating the Oven
First, set your oven to 425°F (220°C). This high heat helps the chicken and potatoes cook evenly. A hot oven makes the chicken crispy and golden. It also aids in cooking the potatoes until they are tender.
Preparing the Marinade
In a large bowl, mix 2 tablespoons of olive oil, 3 minced garlic cloves, 1 tablespoon of dried oregano, 1 teaspoon of smoked paprika, and 1 teaspoon of lemon zest. Add salt and black pepper to taste. Use a whisk to combine everything well. This marinade gives the chicken a rich flavor. Next, add the 4 chicken thighs to the bowl. Make sure each piece is well coated. For the best taste, let the chicken sit in the marinade for at least 15 minutes. For deeper flavor, cover and refrigerate it overnight.
Arranging the Ingredients
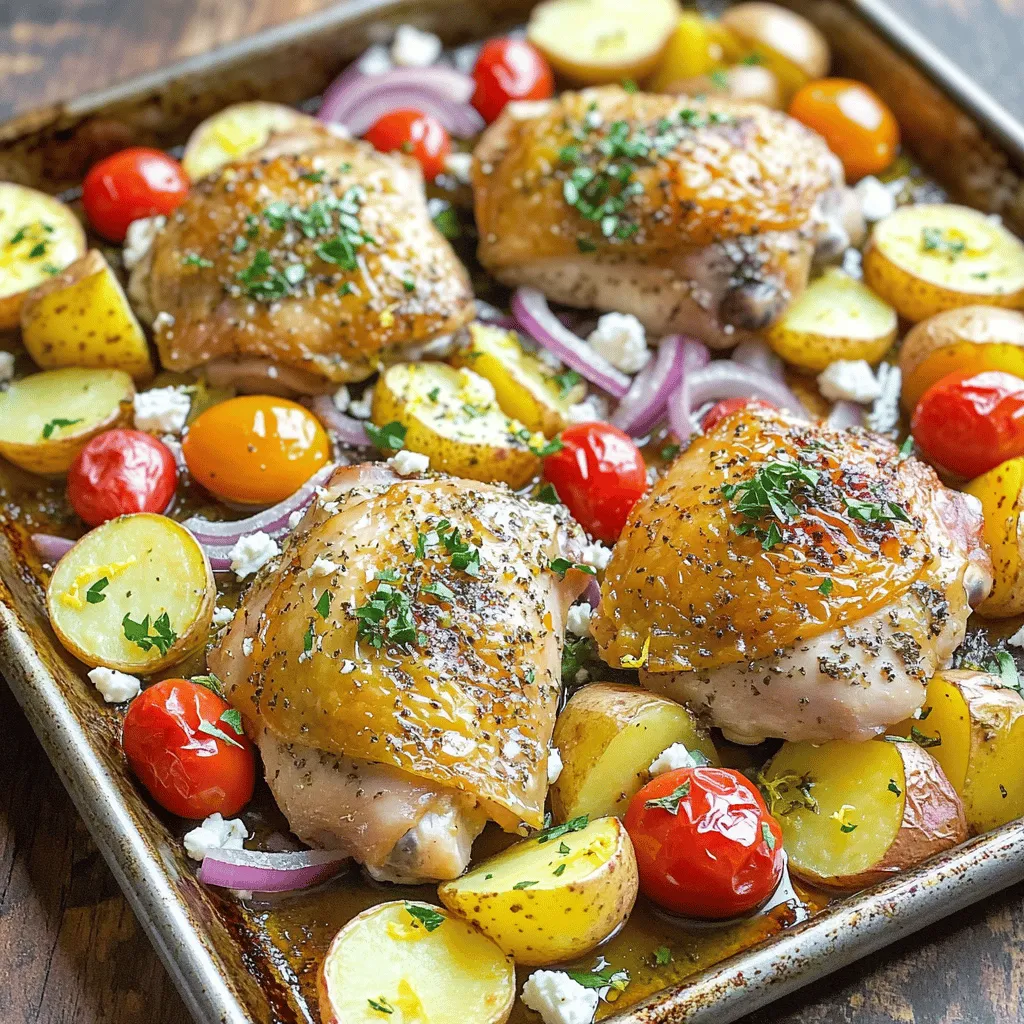
Take a large sheet pan and layer the 4 medium Yukon Gold potatoes, cut into wedges, and the red onion wedges in a single layer. Drizzle them lightly with olive oil, then season with salt and pepper. Toss the potatoes and onions to coat them evenly. Now, nestle the marinated chicken thighs on top of the potatoes and onions. This allows the chicken juices to mix with the veggies. Scatter the halved cherry tomatoes around the chicken. They will add color and flavor.
Baking Instructions
Slide the sheet pan into your preheated oven. Bake for 35-40 minutes. The chicken needs to reach an internal temperature of 165°F (75°C). Check if the potatoes are golden and tender. If you want crispy chicken skin, broil for 2-3 minutes at the end. This step adds a nice crunch. After baking, let everything rest for 5 minutes. Top with fresh parsley and crumbled feta cheese if you like.
Tips & Tricks
Marinating Tips
For the best flavors, marinate your chicken for at least 15 minutes. This time lets the marinade soak in. If you want a deeper taste, cover the chicken and let it sit in the fridge overnight. The longer it marinates, the better the flavor.
Achieving Crispy Skin
To get that crispy skin on your chicken, broil it for 2-3 minutes at the end of cooking. This step makes the skin delicious and crunchy. Keep an eye on it to avoid burning. A good tip is to place the pan on the top rack while broiling. This helps the heat reach the skin better.
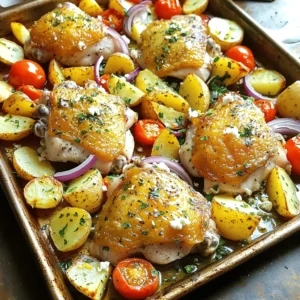
Presentation Suggestions
You can serve this dish straight from the pan for a casual vibe. It makes it easy for guests to help themselves. If you prefer a more formal look, transfer the food to a large platter. Add fresh herbs and lemon wedges on top for extra color and flavor. Using crumbled feta adds a nice touch, too.
Variations
Substitutions for Chicken
You can swap chicken thighs for chicken breasts or drumsticks. Chicken breasts will cook faster and stay juicy if not overcooked. Drumsticks add a fun, crispy element. If you prefer a vegetarian option, try using chickpeas or firm tofu. Both options soak up flavors well, making them tasty substitutes.
Flavor Enhancements
To boost flavor, consider adding olives or artichokes. Both add a briny punch that pairs nicely with chicken. You can also use different herbs or spices like thyme or rosemary. These herbs bring fresh, earthy notes that can elevate your dish.
Vegetable Options
Feel free to mix in other vegetables. Zucchini, bell peppers, or asparagus work great. These veggies add color and crunch. You can also use seasonal vegetables based on what’s fresh. This keeps your meal vibrant and exciting throughout the year.
Storage Info
Storing Leftovers
To keep your leftovers fresh, let the dish cool first. Place it in an airtight container. This helps keep moisture in and prevents odors. The dish will last about 3 to 4 days in the fridge. If you want to enjoy it longer, consider freezing it.
Reheating Instructions
When you reheat, use the oven for best texture. Preheat your oven to 350°F (175°C). Place the chicken and potatoes on a baking sheet. Cover with foil to keep them moist, then heat for 20 minutes. If you want crispy skin, remove the foil for the last 5 minutes. This gives you that nice crunch.
Freezing Information
You can freeze this dish for up to 2 months. Make sure it cools completely before freezing. Use a freezer-safe container or bag. Label it with the date so you know when to eat it. To thaw, place it in the fridge overnight. This keeps the chicken juicy and the potatoes tasty.
FAQs
Can I make this recipe ahead of time?
Yes, you can prep this dish ahead. Marinate the chicken the night before. Store it in the fridge. This makes the chicken tastier. You can also chop the potatoes and onions in advance. Keep them in water to prevent browning. When ready to cook, just assemble everything on the sheet pan. This saves you time on a busy day.
Is this dish gluten-free?
Yes, this dish is gluten-free. The ingredients do not contain gluten. Chicken, potatoes, and vegetables are all safe choices. Be sure to check any spice blends you use. Some may have gluten additives. Stick with pure spices and herbs for safety.
What sides pair well with Sheet Pan Greek Chicken?
Several sides work well with this dish:
- Greek salad for freshness
- Tzatziki sauce for a cool touch
- Pita bread for a fun dip
- Roasted asparagus for extra veggies
These sides enhance the meal and add variety. Enjoy experimenting with different flavors!
This blog post gave you a step-by-step guide to making Sheet Pan Greek Chicken. We covered main ingredients, marinade components, and optional additions for extra flavor. I shared tips for perfecting crispy skin and presentation. You can also explore variations for different tastes and learn how to store and reheat leftovers.
In the end, this dish is not just easy to make; it brings joy to your meals. Enjoy cooking and sharing this crowd-pleaser!
![To make a delicious Sweet Potato and Kale Hash, gather the following ingredients: - 2 medium sweet potatoes, peeled and diced into 1/2-inch cubes - 1 tablespoon extra virgin olive oil - 1 small onion, finely chopped - 2 cloves fresh garlic, minced - 1 bell pepper of your choice (red, green, or yellow), diced - 4 cups fresh kale, stems removed and leaves chopped - 1 teaspoon smoked paprika for a smoky flavor - 1/2 teaspoon ground cumin for warmth - Salt and freshly cracked pepper to taste - 2 large eggs (optional, for added protein) - Fresh parsley, chopped, for garnish These ingredients combine to create a hearty, flavorful dish. The sweet potatoes provide natural sweetness, while kale adds nutrition and color. The spices bring warmth and depth to the meal. If you choose to add eggs, they can make your hash more filling. This recipe celebrates whole, fresh foods that everyone will enjoy. For the full recipe, be sure to check out the detailed instructions! - Heating the oil: Start by placing a large skillet over medium heat. Add 1 tablespoon of extra virgin olive oil. Let the oil warm for about one minute. - Cooking sweet potatoes: Once the oil shimmers, add 2 medium sweet potatoes, peeled and diced into 1/2-inch cubes. Season them with salt and pepper. Sauté for 10-12 minutes. Stir occasionally until the sweet potatoes become tender and golden brown. - Sautéing onions and peppers: Next, add 1 small onion, finely chopped, and 1 bell pepper, diced. Cook for another 5 minutes. Stir often until the onion turns soft and translucent. - Adding aromatics: Stir in 2 cloves of minced garlic, 1 teaspoon of smoked paprika, and 1/2 teaspoon of ground cumin. Let this cook for 1-2 minutes. Stir frequently until the garlic smells fragrant and the spices blend well. - Incorporating kale: Add 4 cups of chopped kale to the skillet. Mix it well with the other ingredients. Cook for about 2-3 minutes until the kale wilts and softens. - Cooking eggs (optional): If you want to add protein, create small wells in the hash using the back of a spoon. Crack 2 large eggs into each well. Cover the skillet. Cook for 4-5 minutes, or until the egg whites are set but the yolks remain runny. - Finishing touches: Remove the skillet from heat. Taste the hash and adjust the seasoning with more salt and pepper if needed. Serve warm, garnished with fresh parsley. This dish is a wholesome meal in itself, packed with flavors and nutrients. For the full recipe, check out the detailed instructions above. - Ensuring even cooking for sweet potatoes Cut the sweet potatoes into even 1/2-inch cubes. This helps them cook at the same rate. When you sauté them, keep the heat at medium. Stir them occasionally to prevent sticking and promote browning. - Using fresh versus dried spices Fresh spices give a brighter taste. Try to use fresh garlic and smoked paprika for the best flavor. If you only have dried spices, use them but adjust the amount. Dried spices are stronger, so use less. - Best practices for sautéing kale Add the kale last, as it cooks quickly. Stir it in with the other ingredients for a couple of minutes. Cook until it wilts but remains bright green. This keeps the nutrients intact and enhances the dish's visual appeal. - Suggested pairings for the hash Serve the sweet potato and kale hash with toasted whole-grain bread. A slice of avocado on the side adds creaminess. You can also top it with salsa for a fresh kick. - Combining with proteins for a full meal Add eggs for protein. Cook them sunny-side up directly in the hash. You can also serve it with grilled chicken or turkey sausage for a hearty breakfast or brunch. For the complete recipe, check out the [Full Recipe]. {{image_4}} You can easily switch up the vegetables in this hash. Instead of sweet potatoes, try using: - Butternut squash for a sweeter taste. - Zucchini for a lighter option. - Mushrooms for added umami flavor. If you want a vegan dish, skip the eggs. You can still enjoy a hearty meal by adding: - Avocado for creaminess. - Tofu for protein. - Chickpeas for a filling option. The spices in this dish can change the whole flavor. You can adjust the seasoning to suit your taste: - Use curry powder for an Indian twist. - Try Italian herbs like oregano and basil for a Mediterranean flavor. If you like heat, you can add: - Red pepper flakes for a gentle kick. - Hot sauce for a bold flavor boost. These swaps keep your sweet potato and kale hash exciting and new each time! For the full recipe, check out the detailed instructions above. To keep your sweet potato and kale hash fresh, store it in an airtight container. This helps prevent moisture loss and keeps the flavors intact. The hash will stay good in the fridge for about 3 to 5 days. Make sure it cools down before sealing it. This way, it won’t steam inside the container. When it's time to reheat, you have a few good options. The best way is to use a skillet over medium heat. Add a touch of olive oil or water to keep it moist. Stir gently as it warms up. This method helps keep the texture just right. If you're in a hurry, you can use the microwave. Place the hash in a microwave-safe bowl. Cover it loosely with a paper towel to trap steam. Heat in short bursts, stirring in between, until warm. To refresh the dish, consider adding a squeeze of lemon or a sprinkle of fresh herbs. This adds brightness and makes the flavors pop again. Enjoy your meal! Yes, you can prepare this dish in advance. Cook the hash, let it cool, and store it in an airtight container. It will stay fresh in the fridge for up to three days. When you're ready to eat, just reheat it on the stove or in the microwave. Kale is a superfood packed with vitamins A, C, and K. It has lots of fiber, which helps digestion. Eating kale can boost your immune system and keep your bones strong. It also contains antioxidants, which help fight inflammation. To enhance the flavor of your hash, try adding different spices. A bit of chili powder can add heat. Fresh herbs like thyme or cilantro add freshness. You can also squeeze some lemon juice on top for a zesty kick. Consider using smoked salt for a deeper flavor. Absolutely! This hash works great for meal prep. You can make a big batch and separate it into containers. It’s easy to heat up for breakfast or lunch throughout the week. Plus, it tastes just as good reheated! For the full recipe, check out Savory Sweet Potato and Kale Hash. This blog post detailed how to create a tasty sweet potato and kale hash. I outlined the key ingredients and shared step-by-step cooking instructions. I also provided helpful tips and variations to fit your taste. In the end, this dish is simple and offers great nutrition. You can easily adjust it to suit your needs. Enjoy making this hash and feel free to get creative!](https://dishtreats.com/wp-content/uploads/2025/06/6b9629fe-c0a6-4f89-abcf-b289cc15d1fb-768x768.webp)