Slow Cooker Pumpkin Turkey Meatballs Savory Delight
If you love savory meals that are easy to make, you’re in the right place! My Slow Cooker Pumpkin Turkey Meatballs blend healthy ingredients with rich flavors. Using ground turkey and creamy pumpkin, these meatballs are a delight for any dinner table. Plus, they cook effortlessly in your slow cooker. Let’s dive into the ingredients and step-by-step instructions to create these tasty bites today!
Ingredients
Main Ingredients
- 1 lb ground turkey
- 1 cup canned pumpkin puree
- 1/2 cup whole wheat breadcrumbs
Seasoning Components
- 1/4 cup freshly grated Parmesan cheese
- 2 cloves garlic, finely minced
- 1 teaspoon dried oregano
- 1 teaspoon ground cumin
- 1 teaspoon onion powder
- Salt, to taste
- Freshly ground black pepper, to taste
Sauce and Garnish
- 1 jar (24 oz) marinara sauce
- Fresh parsley, finely chopped (for garnish)
To make these slow cooker pumpkin turkey meatballs, you need some key ingredients. First, ground turkey gives the meatballs their protein base. It’s lean and keeps the dish healthy. Next, canned pumpkin puree adds moisture and a subtle sweetness. It also brings in the fall flavors we love. Whole wheat breadcrumbs work well to bind the meatballs together.
For seasoning, freshly grated Parmesan cheese adds a savory touch. Garlic brings in great flavor, while oregano and cumin provide warmth. Onion powder enhances the mix, and you can add salt and pepper to your taste.
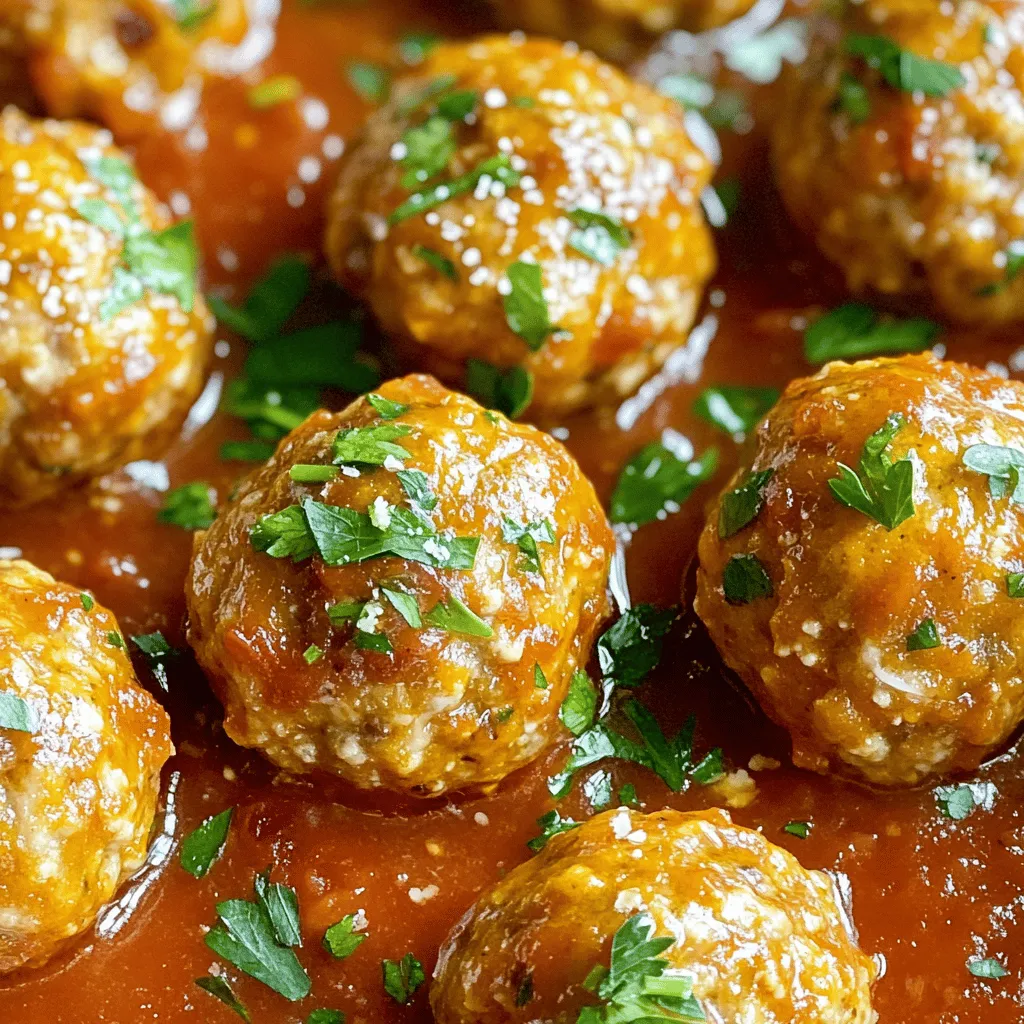
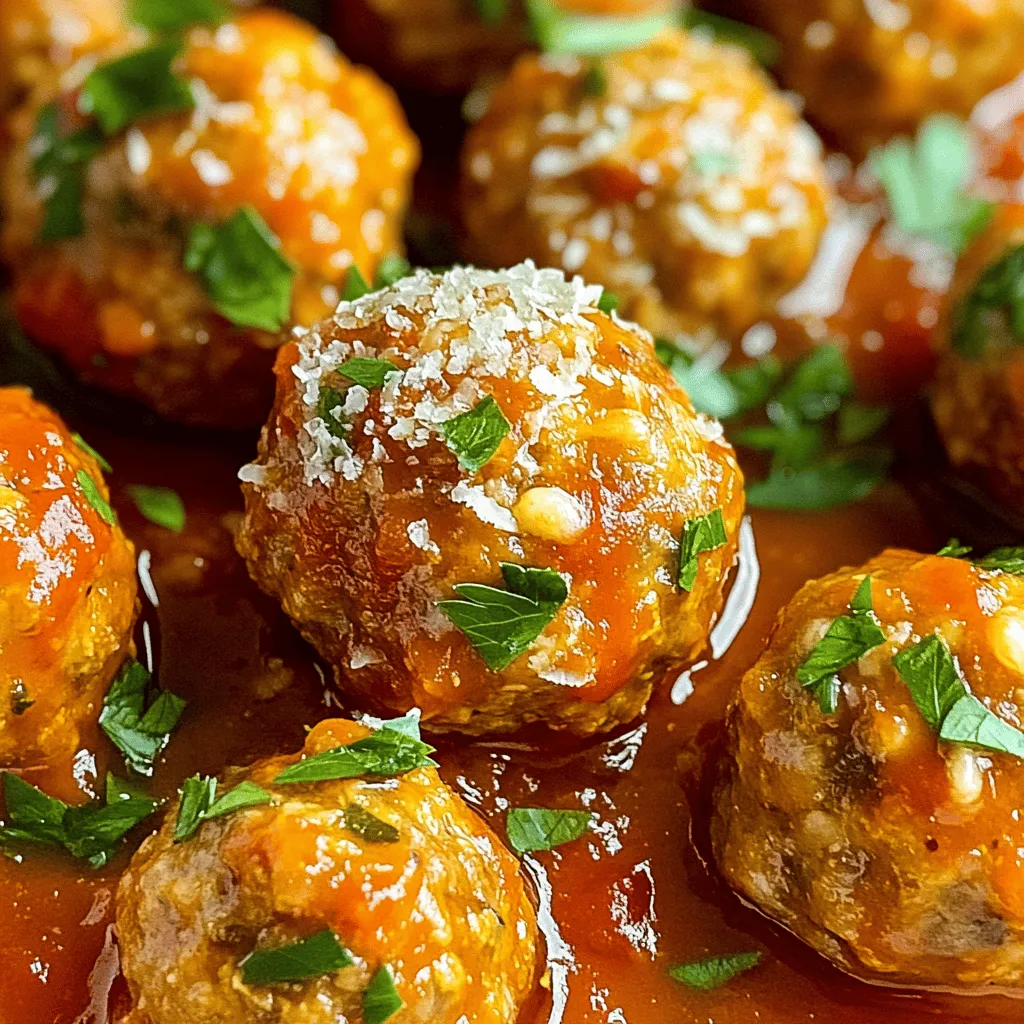
Lastly, marinara sauce is essential for cooking the meatballs. It gives a rich and tangy flavor. Fresh parsley adds a pop of color and freshness when you serve. Each of these ingredients plays a big role in making this dish a delightful treat.
Step-by-Step Instructions
Preparing the Mixture
In a large mixing bowl, start by adding the ground turkey and canned pumpkin puree. Next, add the whole wheat breadcrumbs, freshly grated Parmesan cheese, and the beaten egg. Then, toss in the minced garlic, dried oregano, ground cumin, onion powder, and a good pinch of salt and pepper.
To mix the ingredients, use your hands or a fork. Make sure to blend everything well until it holds together. This step is key for tasty meatballs. You want the mixture to be smooth and even.
Forming the Meatballs
Now, it’s time to shape the meatballs. Take a small amount of the mixture and roll it between your palms. Aim for about 1.5 inches in diameter. You should get around 12 to 16 meatballs from this recipe.
To help with cooking, try to make your meatballs the same size. This way, they will cook evenly. If you want to be extra careful, use a scoop to help measure each meatball.
Slow Cooking Process
Before placing your meatballs in the slow cooker, spray the inside with non-stick cooking spray. This makes cleanup easier later. Arrange the meatballs in a single layer. This helps them cook well and keeps them from sticking together.
Next, pour the marinara sauce over the meatballs. Make sure they are covered but still visible. Cover your slow cooker with the lid. Set it to cook on low for 6 to 7 hours or on high for 3 to 4 hours. The meatballs should reach an internal temperature of 165°F.
Once done, gently stir the meatballs in the sauce. This lets the flavors mix nicely. Then, serve them on a platter and add some chopped fresh parsley for a pretty touch.
Tips & Tricks
Ensuring Perfect Meatballs
To keep your meatballs moist, use a mix of turkey and pumpkin. The pumpkin adds moisture. Avoid over-mixing. It can make them tough. Add a splash of milk if the mix feels dry. To boost flavor, try fresh herbs like basil or thyme. A dash of hot sauce also adds a nice kick.
Debugging Common Issues
If your meatballs fall apart, check the binder. Make sure you use enough breadcrumbs and egg. If they still crumble, try chilling the mixture before forming. This helps them hold shape better. Cooking times matter too. For a firmer meatball, cook on high for 3 hours. If you prefer softer ones, go low for 7 hours.
Serving Suggestions
Pair these meatballs with whole grain pasta or a fresh salad. Garlic bread also makes a great side. For leftovers, try making a meatball sub. Just place meatballs in a toasted bun with marinara and cheese. Another idea is to mix them into soup for a cozy meal.
Variations
Ingredient Swaps
You can easily swap the ground turkey for other proteins. Ground beef or chicken works well. For a vegetarian option, try using lentils or chickpeas. They give a nice texture.
Changing herbs and spices can also make a big difference. If you like heat, add red pepper flakes. For freshness, try basil or thyme. Each swap adds new flavor to your meatballs.
Sauce Alternatives
While marinara is classic, feel free to explore other sauces. Pesto offers a rich, herbal taste. Barbecue sauce gives a sweet and tangy kick. Both options pair well with pumpkin meatballs.
You can also serve the meatballs without sauce. Try them on a bed of rice or in a salad. This way, you highlight the flavors of the meatballs themselves.
Dietary Adaptations
If you need gluten-free options, use gluten-free breadcrumbs. Almond flour is another great choice. It keeps the meatballs moist and tasty.
For low-carb diets, skip the breadcrumbs altogether. You can add finely chopped vegetables like zucchini instead. This keeps the meatballs light and healthy.
Storage Info
Storing Leftovers
To keep your slow cooker pumpkin turkey meatballs fresh, follow these steps:
- Refrigeration: Place leftovers in an airtight container. This helps keep them moist.
- Consumption Timeline: Eat them within three to four days for the best taste.
Freezing Tips
Freezing is a great option if you want to save some meatballs for later. Here’s how:
- Freezing Effectively: Lay the meatballs on a baking sheet. Freeze them for about two hours. Then, transfer them to a freezer bag. This helps keep their shape.
- Thawing Instructions: When you’re ready to eat, thaw them in the fridge overnight. This is the best way to keep them juicy.
Reheating Methods
Reheating properly makes all the difference in taste and texture. Here are the best methods:
- Best Methods: The oven is great for reheating. Preheat it to 350°F. Place the meatballs in a dish. Cover them with foil for even heating.
- Microwave vs. Oven: The microwave is faster but may dry them out. If you use the microwave, heat them in short bursts. Check often to avoid overcooking.
FAQs
Can I make Slow Cooker Pumpkin Turkey Meatballs ahead of time?
Yes, you can make these meatballs ahead of time. You can prepare them, shape them, and refrigerate them for up to one day. Just cook them when you are ready. This gives you a quick option for busy days.
How do I know when the meatballs are cooked?
To check if the meatballs are cooked, use a meat thermometer. The internal temperature should reach 165°F. If you don’t have a thermometer, you can cut one open. The inside should be no longer pink.
What can I serve with pumpkin turkey meatballs?
These meatballs pair well with many sides. You can serve them with pasta, rice, or a salad. They also work great in a sub sandwich, topped with cheese. Adding a side of roasted veggies can add color and nutrition.
Is this recipe suitable for meal prep?
Yes, this recipe is perfect for meal prep. You can make a big batch and divide it into portions. Store them in the fridge for quick meals throughout the week. They also freeze well for future use.
Can I add vegetables to the meatball mixture?
Absolutely! You can add finely chopped veggies like spinach, bell peppers, or onions. Just make sure to chop them small so they mix well. This adds nutrition and flavor to your meatballs.
This article covered how to make slow cooker pumpkin turkey meatballs. We discussed main ingredients like ground turkey and pumpkin puree. We also explored techniques for mixing and cooking. The tips help ensure perfect meatballs every time. You learned about variations and storage methods to keep leftovers fresh. Finally, I answered common questions to make it easy for you. I hope you feel ready to create this tasty dish. Enjoy your cooking adventure!


![- 1 large zucchini, sliced into thick rounds - 1 red bell pepper, cut into 1-inch squares - 1 yellow bell pepper, cut into 1-inch squares - 1 red onion, cut into large chunks - 8 cherry tomatoes, whole - 1 cup mushrooms, halved - 3 tablespoons extra virgin olive oil - 2 teaspoons dried oregano - 1 teaspoon garlic powder - Salt and black pepper to taste - Fresh parsley, finely chopped (for garnish) - 8 skewers (if using wooden skewers, soak in water for 30 minutes prior to use) Choosing the right ingredients is key to making these grilled Mediterranean veggie skewers shine. Fresh, colorful vegetables not only taste better but also look great on the plate. I love using seasonal veggies for the best flavor. You can mix and match as you like. The extra virgin olive oil adds richness and helps the spices stick. Dried oregano gives that classic Mediterranean taste. Garlic powder adds depth without the hassle of fresh garlic. Don't forget to season with salt and black pepper. This simple step makes a big difference in flavor. Fresh parsley as a garnish not only adds color but also a fresh taste that brightens up the dish. When preparing the skewers, remember to soak wooden skewers in water first. This prevents them from burning on the grill. If you use metal skewers, you can skip this step. For the full recipe, check out the details above. Enjoy preparing these delicious veggie skewers! - Preheat grill to medium-high heat. - In a bowl, combine the vegetables: zucchini, bell peppers, onion, tomatoes, and mushrooms. - In a small bowl, mix olive oil, oregano, garlic powder, salt, and pepper. - Drizzle the marinade over the veggies. Toss until all pieces are coated. - Thread the marinated vegetables onto skewers. Alternate colors for a bright look. - Place the skewers on the hot grill. Grill for 10-12 minutes. - Turn the skewers occasionally. This helps them cook evenly. - Remove skewers from the grill and let them cool slightly. - Just before serving, sprinkle fresh parsley on top for a nice finish. For the complete details, check the [Full Recipe]. For the best grilled Mediterranean veggie skewers, pick seasonal vegetables. Fresh veggies taste better and add more flavor. Look for zucchini, bell peppers, and red onions. They offer great colors and textures. When you shop, choose firm, bright vegetables. Avoid any that feel soft or look dull. You can spice up your marinade. Try adding fresh herbs like basil or thyme. They add a nice touch. You can also use lemon juice for a zesty flavor. For oils, consider using avocado or sesame oil. Each type brings a unique taste to the skewers. To get those perfect grill marks, heat your grill well. A hot grill helps sear the veggies. Place the skewers at an angle for better marks. Turn them every few minutes. This promotes even cooking and prevents burning. To stop veggies from sticking, oil the grill grates lightly. You can also brush oil on the skewers before grilling. For the full recipe, check the details above! {{image_4}} You can mix up your veggie skewers with many different vegetables. Try adding eggplant, asparagus, or zucchini for a tasty twist. Each vegetable brings its unique flavor and texture. Think about color too! Using red, yellow, green, and purple veggies makes your skewers look bright and fun. This also helps to attract kids and picky eaters. More colors usually mean more vitamins and minerals, too! Want to add protein? Try tofu or tempeh for a plant-based option. Marinate them just like the veggies for great flavor. If you prefer meat, chicken or shrimp works well. Marinate your choice of meat in olive oil, herbs, and spices. This adds depth to your skewers. It’s an easy way to make a filling meal. Don’t be afraid to play with flavors! Try different marinades. A simple lemon juice and herb mix can brighten the dish. You can also use spicy sauces for a kick. Before serving, drizzle some fresh dressing on top. This adds a burst of flavor and makes the dish even more appealing. For the full recipe, check out the complete guide. To store leftover skewers, let them cool down first. Place them in an airtight container. You can use glass or plastic containers. Make sure the lid seals well to keep the flavors fresh. For freezing skewers safely, wrap each skewer in plastic wrap. Then, place them in a freezer bag. This keeps them from getting freezer burn. When you reheat, take them out and thaw in the fridge overnight. To warm them up, place them on a grill or in the oven. Heat them until they are hot, about 5 to 10 minutes. These skewers can last up to 4 days in the refrigerator. After that, they may start to lose flavor and texture. Watch for signs that the skewers have gone bad. If they smell off or look slimy, it’s best to toss them. Always trust your senses when it comes to food safety. For the full recipe, check the section above. Yes, you can prep these skewers in advance. Start by cutting the vegetables. Place them in a bowl. Drizzle with olive oil and spices. Toss until coated. Cover the bowl and refrigerate. This keeps them fresh and ready to grill. I recommend marinating for at least 30 minutes. This allows the flavors to soak in well. Grill these skewers on medium-high heat. This ensures even cooking. Aim for a temperature of about 400°F (200°C). Grill for 10-12 minutes. Turn the skewers every few minutes. This will give you nice grill marks. Check the veggies for tenderness. They should be soft but still slightly firm. You can use wooden, metal, or bamboo skewers. Each has its benefits. Wooden skewers need soaking in water for 30 minutes. This prevents burning on the grill. Metal skewers are reusable and sturdy. They can handle heavy vegetables well. Bamboo skewers are lightweight and easy to find. Choose what works best for you! For the full recipe, refer to the earlier section. In this blog post, I shared a simple way to make tasty vegetable skewers. We covered the ingredients, preparation steps, and grilling techniques. You learned tips to choose fresh veggies, add flavors, and create fun variations. Remember, you can customize skewers to suit your taste. Enjoy the grilling process and share your creations with friends and family. Happy grilling!](https://dishtreats.com/wp-content/uploads/2025/07/4b70700e-9f85-4317-b9e4-a855a04e592b-768x768.webp)