
Mongolian Shrimp Better Than Takeout Delicious Dish
Craving takeout but want something better? Try making Mongolian Shrimp at home! This dish features juicy shrimp and crisp veggies, all coated in a sweet and savory sauce. You can whip it up in no time, using fresh ingredients that pack flavor. With my step-by-step guide, you’ll create a delicious meal that’s even better than your favorite restaurant. Let’s dive into this homemade delight!
Ingredients
Main Ingredients
- 1 lb large shrimp, peeled and deveined
- 2 tablespoons vegetable oil
- 1 medium onion, sliced thin
- 3 cloves garlic, minced
- 1 inch piece of fresh ginger, grated
- 1 red bell pepper, sliced into strips
- 1 cup snow peas, trimmed and ends snapped off
- 1/4 cup green onions, finely chopped
Sauce Components
- 1/4 cup low-sodium soy sauce
- 2 tablespoons brown sugar (packed)
- 1 tablespoon cornstarch
- 1 teaspoon sesame oil
Optional Garnishes
- Fresh cilantro leaves for garnish
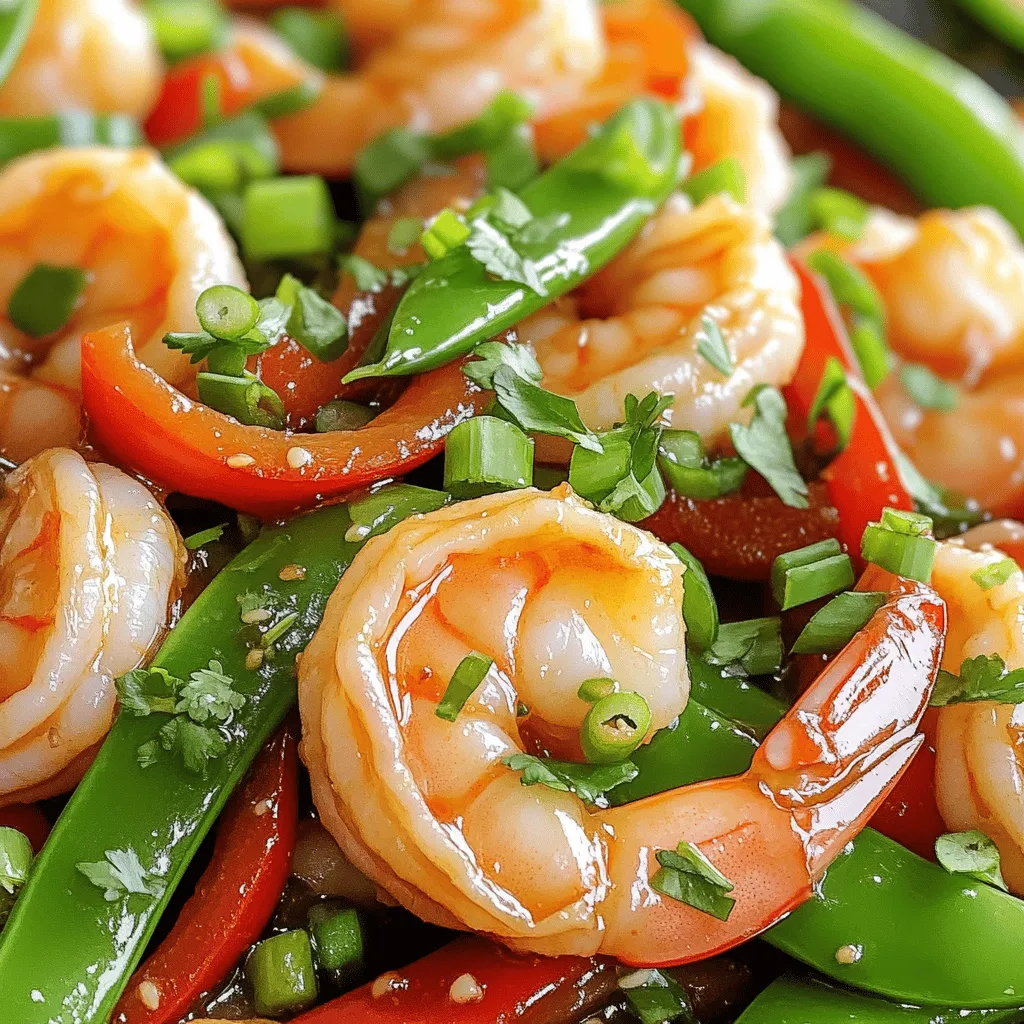
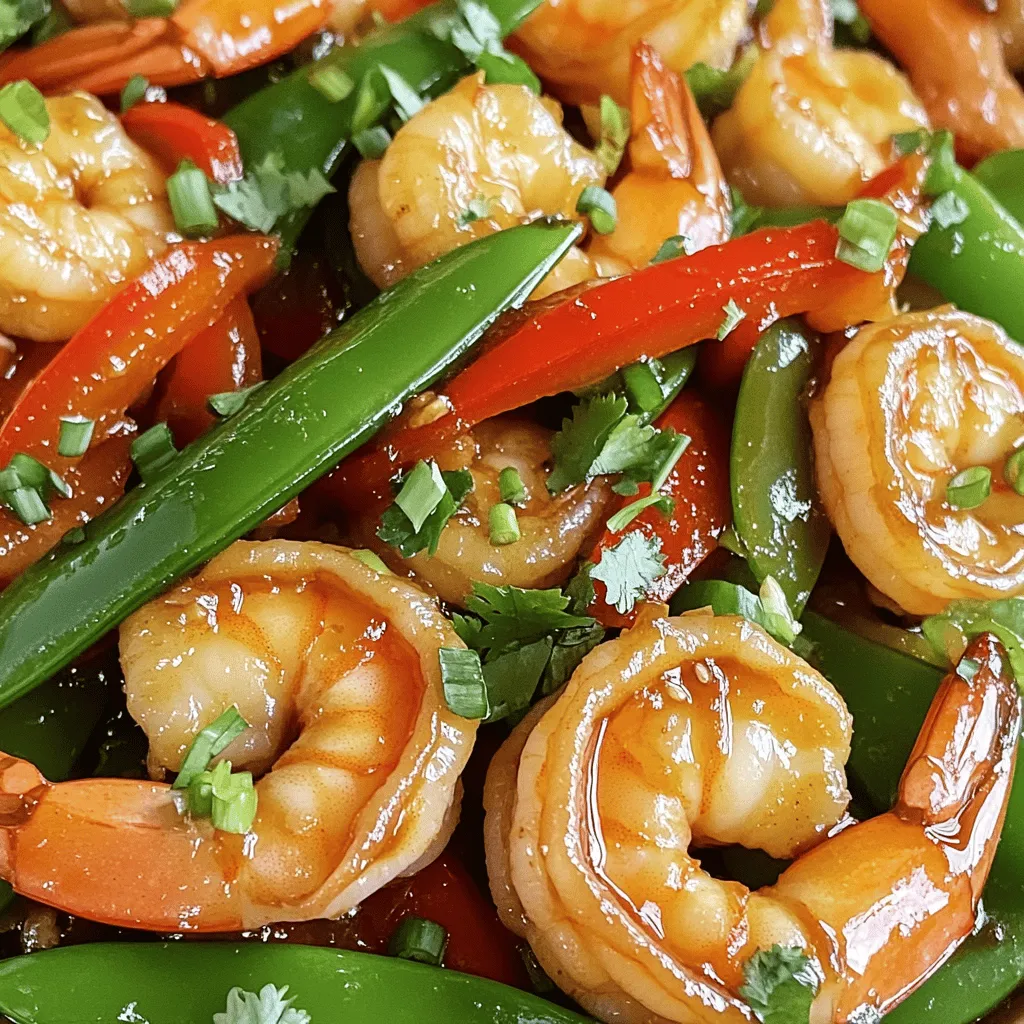
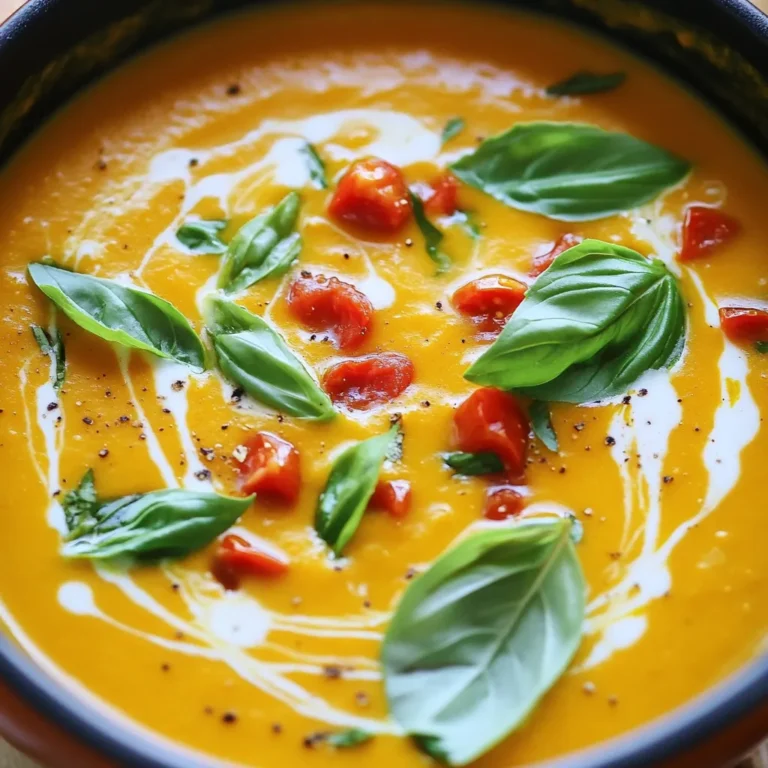
The main ingredients create a vibrant, colorful dish. The large shrimp form the base, giving you a sweet and tender bite. The onion, garlic, and ginger add depth and warmth to the flavor. The red bell pepper and snow peas bring fresh crunch and color.
For the sauce, the low-sodium soy sauce keeps it savory without being too salty. Brown sugar gives a touch of sweetness, while cornstarch thickens the sauce, making it cling perfectly to the shrimp and veggies. A splash of sesame oil adds a lovely nutty flavor.
Lastly, fresh cilantro leaves are a great touch. They brighten the dish and add a hint of freshness. You can skip them if you prefer, but I recommend trying them. Each ingredient works together to create a dish that’s better than takeout!
Step-by-Step Instructions
Preparing the Sauce
- Combine soy sauce, brown sugar, and cornstarch in a bowl; whisk until smooth.
This sauce is key to the flavor. It balances salty and sweet notes. Use low-sodium soy sauce if you want it lighter. The cornstarch helps thicken the sauce later on.
Cooking the Vegetables
- Heat vegetable oil in a skillet; sauté onions until soft.
Start by heating the oil over medium-high. The oil should shimmer before adding onions. Cook the onions for about 2-3 minutes. You want them soft and translucent.
- Add garlic and ginger, cooking until fragrant.
Next, add your minced garlic and grated ginger. Stir them in for about 30 seconds. This step adds a nice aroma and depth to your dish. Be careful not to burn them.
Cooking the Shrimp
- Add shrimp to the skillet; cook until pink and opaque.
Now, it’s shrimp time! Toss in the peeled and deveined shrimp. Cook for about 2-3 minutes. They should turn bright pink and opaque. This shows they are cooked through.
- Incorporate red bell pepper and snow peas; stir-fry for tender-crisp texture.
Add your sliced red bell pepper and snow peas next. Stir-fry for about 2 minutes. You want them to stay crunchy, adding great texture to the meal.
Finalizing the Dish
- Pour the sauce into the skillet; cook until thickened.
Now, pour that prepared sauce into the skillet. Stir everything to coat well. Let it cook for 1-2 minutes. The sauce should thicken and become glossy.
- Drizzle with sesame oil and add green onions; toss to combine.
Finally, drizzle some sesame oil over the top. Add your chopped green onions and toss everything gently. This step adds a fresh taste and bright color to your dish.
Tips & Tricks
Perfectly Cooked Shrimp
To avoid tough shrimp, cook them just right. Here are some key tips:
- Look for color change: Shrimp turn pink and opaque when cooked.
- Use high heat: A hot skillet cooks shrimp fast and keeps them tender.
- Timing is key: Cook shrimp for only 2-3 minutes until done.
- Avoid overcrowding: Cook in batches if needed for even cooking.
Choosing Fresh Ingredients
Fresh ingredients make a big difference in taste. Here’s how to choose the best:
- Shrimp: Look for shrimp with a firm texture and a mild smell. Fresh shrimp should not have a strong fishy odor.
- Vegetables: Choose bright, crisp vegetables. For bell peppers, look for smooth skin, and for snow peas, choose ones that snap easily.
- Onions and Garlic: Select firm onions and plump garlic cloves without soft spots.
Enhancing Flavor
To elevate your dish, try these simple tips:
- Add spices: A pinch of red pepper flakes adds heat.
- Include fresh herbs: Cilantro or basil will brighten flavors.
- Experiment with sauces: A splash of oyster sauce or hoisin sauce can add depth.
- Try citrus: A squeeze of lime or lemon juice can brighten the dish.
These tips will help you make your Mongolian shrimp better than takeout. Enjoy your cooking!
Variations
Protein Alternatives
You can easily swap shrimp for other proteins. Chicken works great. Use boneless, skinless chicken thighs or breasts. Just cut them into bite-sized pieces. Cook them until they are no longer pink. Tofu is also a fantastic choice. Use firm tofu, cut into cubes. Sauté it until golden. Beef is another option. Thinly slice flank steak or sirloin and cook until tender. Each protein adds its own flavor and texture.
Vegetable Substitutions
Feel free to mix up the veggies in this dish. Broccoli florets add a nice crunch. Carrots, sliced thin, bring a sweet note. Snap peas or bell peppers can also shine in this recipe. You can even try bok choy for a unique twist. Make sure to keep the vegetables crisp for a great bite.
Gluten-Free Options
Want to make this dish gluten-free? Swap out the soy sauce for tamari. Tamari has a similar taste but is gluten-free. You can also use coconut aminos as a soy sauce alternative. Be sure to check labels on any sauces you use. This way, you can enjoy a delicious meal without worry.
Storage Info
Refrigeration Guidelines
Store your leftover Mongolian shrimp in an airtight container. This keeps it fresh. Place it in the fridge within two hours of cooking. It will last for 2 to 3 days. When you’re ready to eat, just check for any off smells or changes in texture.
Freezing Instructions
To freeze Mongolian shrimp, let it cool completely first. Then, transfer it to a freezer-safe bag. Remove as much air as possible to prevent freezer burn. This dish can stay frozen for up to three months. Label the bag with the date, so you remember when you made it.
Reheating Tips
Reheat your shrimp in a skillet over medium heat. Add a splash of water or broth to keep it moist. Stir gently to ensure even heating. You can also use a microwave, but cover it to keep moisture in. Heat it in short bursts, stirring in between, until hot. Enjoy your meal just like the first time!
FAQs
Can I make Mongolian shrimp ahead of time?
Yes, you can prepare Mongolian shrimp in advance. Start by cooking the shrimp and vegetables. Let them cool before storing. Keep the dish in an airtight container in the fridge for up to two days. When you are ready to eat, just reheat it in a pan over medium heat. Add a splash of water or soy sauce to help it heat evenly. This makes it quick and easy for busy nights!
What can I serve with Mongolian shrimp?
Mongolian shrimp pairs well with many sides. Here are some great ideas:
- Jasmine rice
- Fried rice
- Noodles
- Steamed broccoli
- Stir-fried vegetables
- Egg rolls
These options add variety and make your meal more filling.
How spicy is this recipe?
This recipe is not very spicy. The flavors come from garlic, ginger, and soy sauce. If you want some heat, try adding red pepper flakes or sliced jalapeños. You can control the spice by adding little by little until it suits your taste.
Can I use frozen shrimp for this recipe?
Yes, you can use frozen shrimp. Just make sure to thaw them first. You can do this by placing them in the fridge overnight or running them under cold water for about 10 minutes. After thawing, pat them dry with paper towels before cooking. This helps them cook evenly and prevents extra water from affecting the sauce.
This blog post covered how to make a delicious Mongolian shrimp dish. You learned about the main ingredients, sauce components, and cooking steps. I shared helpful tips for perfecting the shrimp and selecting fresh veggies. You also discovered variations with different proteins and ways to store your leftovers.
Mongolian shrimp is easy to make and full of flavor. With these steps, you can create a dish that impresses friends and family. Enjoy cooking!

 for all the details! How can I ensure my shrimp don't overcook? To avoid overcooking shrimp, watch the color. When they turn pink, they are close to done. Cook for about 2-3 minutes on each side. Remove them from heat as soon as they are opaque. This helps keep them tender and juicy. Can I use frozen shrimp for this recipe? Yes, you can use frozen shrimp. Just thaw them first. Place them in cold water for about 15-20 minutes. Pat them dry before cooking. This ensures they cook evenly and absorb the sauce well. What can I substitute for soy sauce? If you need a substitute for soy sauce, try coconut aminos. It has a similar flavor and is often gluten-free. You can also use tamari for a gluten-free option. Both choices will still give you that umami taste. How to make the dish gluten-free? To make this dish gluten-free, use tamari instead of soy sauce. Ensure that all other ingredients, like butter and honey, are also gluten-free. This way, you can enjoy the same great flavor without gluten. What side dishes pair well with honey garlic butter shrimp? Honey garlic butter shrimp tastes great with rice or quinoa. You can also serve it with steamed veggies or a fresh salad. These sides balance the rich flavors of the dish, making a perfect meal. Can this recipe be scaled up for larger servings? Yes, you can easily scale up this recipe. Just double or triple the ingredients based on how many servings you need. Make sure your skillet is large enough, or use two pans to cook everything evenly. This keeps the shrimp from overcrowding and helps them cook well. This blog post offered a complete guide on making honey garlic butter shrimp. We explored each ingredient's role and shared cooking tips to ensure success. I highlighted variations and storage advice for leftovers. In conclusion, with fresh shrimp and the right techniques, you can create a flavorful dish. Explore your options and enjoy your culinary journey. Trust me, this recipe is worth trying!](https://dishtreats.com/wp-content/uploads/2025/07/4796c05b-30f7-4441-b7cb-ba0299151dfe-768x768.webp)
![- 4 boneless, skinless chicken thighs - 1 cup teriyaki sauce - 1/2 fresh pineapple, sliced into 1/2-inch rings - 2 tablespoons soy sauce - 1 tablespoon brown sugar - 1 teaspoon freshly grated ginger - 2 cloves garlic, finely minced - 1 tablespoon sesame oil - 1 tablespoon rice vinegar - 2 green onions, finely chopped - Sesame seeds Gathering the right ingredients is key for Grilled Pineapple Teriyaki Chicken. Start with fresh chicken thighs. They stay juicy and tender when grilled. You can use store-bought or homemade teriyaki sauce. I often prefer making my own, as it gives a fresh taste. Next, you want ripe pineapple. Choose one that feels heavy and smells sweet. The sweetness will balance the salty teriyaki sauce. For the marinade, you need a few simple items. Soy sauce adds saltiness, while brown sugar gives a nice caramel note. Ginger and garlic bring warmth and depth. Sesame oil adds a nutty flavor, and rice vinegar gives a bit of tang. Finally, for garnishing, chop green onions for color and freshness. A sprinkle of sesame seeds adds a nice crunch. These ingredients come together to create a vibrant, tasty dish. For the full recipe, check the provided link. First, gather your ingredients for the marinade. In a bowl, mix teriyaki sauce, soy sauce, brown sugar, grated ginger, minced garlic, sesame oil, and rice vinegar. Whisk these together until smooth. Add the chicken thighs and coat them well with the marinade. Cover the bowl with plastic wrap and put it in the fridge. Let the chicken marinate for at least 30 minutes. For more flavor, let it marinate for up to 2 hours. While the chicken marinates, preheat your grill to medium-high heat. If you’re using charcoal, wait for the coals to glow red. This will ensure even grilling and great flavor in your chicken. Now it's time to grill the pineapple. Take your pineapple rings and brush both sides with teriyaki sauce. Once the grill is hot, place the pineapple on it. Grill for about 3-4 minutes on each side. You want to see nice grill marks and a caramelized look. When done, set the grilled pineapple aside on a plate. Next, take the chicken thighs out of the fridge. Let any extra marinade drip off. Place the chicken on the hot grill. Cook for about 5-7 minutes per side. Aim for an internal temperature of 165°F (75°C). In the last few minutes, brush on more marinade for added flavor. When the chicken is cooked, take it off the grill. Let it rest for a few minutes. This helps keep the juices inside. To serve, place a grilled pineapple ring on each plate. Top it with a grilled chicken thigh. For a beautiful touch, sprinkle chopped green onions and sesame seeds on top. Enjoy your meal! For the full recipe, check out [Full Recipe]. For juicy chicken, preheat your grill to medium-high heat. This temperature helps create a nice sear on the chicken. A hot grill also locks in moisture, making the meat tender. If using charcoal, wait until the coals glow red and spread evenly for the best result. The marinade is key to great flavor. I suggest marinating the chicken for at least 30 minutes. This time allows the flavors to soak in. For an even richer taste, let it marinate for up to 2 hours. Just remember, don’t go over 2 hours, or the chicken might turn mushy. When picking a pineapple, look for one that feels heavy for its size. The skin should be golden and slightly soft at the base. A ripe pineapple smells sweet at the bottom. Avoid ones that are too green or have brown spots. A good pineapple adds the perfect touch to your grilled chicken. For more details and to try the dish, check out the Full Recipe. {{image_4}} You can easily swap chicken for other proteins. Try pork tenderloin or shrimp for a tasty twist. Tofu is a great choice for a vegetarian option. Just make sure to press the tofu to remove extra moisture. This helps it absorb the marinade better. No matter what protein you choose, aim for similar cooking times for best results. Want to kick up the flavor? Add red pepper flakes for heat or lime juice for zest. You can also mix in a dash of sesame seeds or a splash of orange juice for sweetness. Experimenting with spices like smoked paprika or five-spice powder can add depth. This way, you can create a unique flavor profile each time. Pair your grilled pineapple teriyaki chicken with steamed rice or a fresh salad. Jasmine rice complements the dish's sweetness well. For salads, consider a mix of greens with a light vinaigrette. You can also serve it with grilled vegetables for added color and nutrition. These options enhance your meal and make it more satisfying. For the full recipe, check out the details above. Store your Grilled Pineapple Teriyaki Chicken in an airtight container. This keeps it fresh and prevents odors from mixing. The chicken and pineapple can last in the fridge for about 3 to 4 days. Always let the chicken cool down before sealing it. This helps avoid condensation inside the container. To freeze your grilled chicken and pineapple, first, let them cool completely. Wrap each piece tightly in plastic wrap. Then place them in a freezer bag or a container. This keeps air out and prevents freezer burn. You can freeze it for up to 3 months. Label the bags with the date for easy tracking. To reheat your chicken, use the oven or stovetop. Preheat your oven to 350°F (175°C). Place the chicken in a baking dish and add a splash of water or broth. Cover it with foil. Heat for about 15-20 minutes until warm. For stovetop, use a skillet over medium heat. Add a bit of oil and warm the chicken gently. Avoid high heat to keep it juicy. You can make teriyaki sauce easily at home. Here’s how: - 1 cup soy sauce - 1/2 cup brown sugar - 1/4 cup rice vinegar - 2 tablespoons sesame oil - 1 teaspoon grated ginger - 2 cloves minced garlic Combine all these ingredients in a saucepan. Heat over medium until the sugar dissolves. Stir it well, and let it simmer for a few minutes. Your homemade teriyaki sauce is ready to use! Yes, you can use chicken breasts. They are leaner but may dry out faster than thighs. To prevent this, marinate them longer. Chicken thighs stay juicy and tender. If you prefer breasts, just keep an eye on cooking time. Many sides pair well with this dish. Here are some ideas: - Steamed jasmine rice - Grilled vegetables - Asian slaw - Quinoa salad These sides will complement the sweet and savory flavors of the chicken. Marinate the chicken for at least 30 minutes. For the best flavor, aim for 2 hours. The longer it sits, the more flavor it absorbs. Just don’t marinate too long, or the texture may change. Yes, you can grill indoors! Use a grill pan on your stovetop. Another option is to use a broiler in your oven. Both methods will give you a nice char and keep the flavor intact. This blog post covered how to make Grilled Pineapple Teriyaki Chicken. We explored key ingredients, marinade tips, and grilling steps. I shared variations and storage info to help you enjoy this dish longer. Always remember to adjust the marinade and experiment with flavors. Whether serving to friends or family, this dish is sure to impress. With these tips, you'll cook with confidence and skill. Enjoy the process and the delicious outcome!](https://dishtreats.com/wp-content/uploads/2025/06/0924d723-9b8a-4a49-9695-7d965ac302d4-768x768.webp)