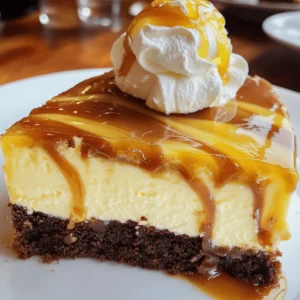
Caramel Swirl Brownie Cheesecake Irresistible Delight

If you crave a dessert that combines rich chocolate with creamy cheesecake, you’re in the right place! My Caramel Swirl Brownie Cheesecake is an irresistible delight that will please any sweet tooth. With layers of fudgy brownies and velvety cheesecake, each slice offers a perfect blend of flavors. I’ll guide you through each step, sharing tips and variations to make this treat your own. Ready to dive into dessert paradise? Let’s get started!
Ingredients
List of Required Ingredients
- Brownie mix details: Use one batch of brownie mix. Follow the package instructions for best results. This will ensure a rich, chewy base for your cheesecake.
- Cream cheese specifications: You need 16 oz of cream cheese. Make sure it is softened to room temperature. This helps create a smooth, creamy filling.
- Caramel sauce options: Use 1/2 cup of caramel sauce. You can buy store-bought or make your own. Homemade caramel adds a special touch to your dessert.
These ingredients come together to create a dessert that is both rich and satisfying. They blend perfectly to make a delicious caramel swirl brownie cheesecake. Enjoy the process of mixing and baking these tasty components!
Step-by-Step Instructions
Preparation of the Brownie Layer
First, preheat your oven to 325°F (160°C). Grease a 9-inch springform pan with butter or non-stick spray. This helps the cheesecake come out smoothly later. Now, prepare your brownie mix by following the package instructions. Mix well until it is smooth. Pour this brownie batter into the bottom of your pan and spread it evenly. Bake in the oven for 20-25 minutes. The edges should look set, but the center can still be a bit soft. After baking, let it cool slightly.
Making the Cheesecake Filling
While the brownie base bakes, let’s make the cheesecake filling. In a large bowl, beat 16 oz of softened cream cheese with an electric mixer. Mix it on medium speed for about 2 minutes until it is creamy. Next, add 1 cup of granulated sugar gradually. Blend it well after each addition until it is smooth. Now, pour in 1 teaspoon of pure vanilla extract and mix it in. Then fold in 1/2 cup of sour cream gently with a spatula. Make sure the mixture is uniform and smooth. Add 3 large eggs one at a time. Mix on low speed after each egg, but avoid overmixing.
Combining the Layers
Once your brownie layer has cooled a bit, pour the creamy cheesecake mixture over it. Spread it gently with a spatula for an even layer. Now, take 1/2 cup of caramel sauce and drizzle it over the cheesecake layer. Use a knife or skewer to swirl the caramel into the cheesecake. This creates a lovely marbled effect.
Baking Instructions
Bake the cheesecake in the oven for 45-50 minutes. The edges should look set while the center has a slight jiggle. After baking, turn off the oven but leave the cheesecake inside with the door slightly open for 1 hour. This step helps prevent cracks. Once it cools, carefully take it out and refrigerate for at least 4 hours, or overnight for the best taste. Before serving, you can drizzle extra caramel sauce on top. Enjoy this delightful treat!
Tips & Tricks
Perfecting the Brownie and Cheesecake Layers
To make a great brownie cheesecake, avoid common mistakes. First, do not overmix the brownie batter. This makes them tough. Also, remember to let the brownie layer cool before adding the cheesecake. If it’s too hot, it can cook the cheesecake layer.
To prevent cracks in your cheesecake, bake it gently. Keep the oven door slightly ajar after baking. This gradual cooling helps set the cheesecake without forming cracks. Another tip is to mix the cheesecake batter slowly. Overbeating can introduce too much air, leading to cracks.
Presentation and Serving Suggestions
A polished look makes your dessert shine. Slice the cheesecake into neat wedges. Place each slice on a dessert plate. Drizzle extra caramel sauce over each slice before serving. This adds a beautiful touch.
For garnishing, whipped cream is a great choice. A dollop on top of each slice looks inviting. You can also sprinkle chocolate chips for extra texture. These simple touches make a big difference in presentation. Enjoy your creation!

Variations
Flavor Modifications
You can have fun with flavors to make this cheesecake your own. You might try using different chocolate chips. Dark chocolate chips give a rich taste. Milk chocolate chips add sweetness. You can also sprinkle toppings on top, like crushed cookies or nuts.
If you like a fruity twist, add some fresh berries. Chopped strawberries or raspberries work great. They not only add flavor but also color to your dessert. You can mix these into the cheesecake or place them on top before serving.
Dietary Alternatives
Do you need a gluten-free option? You can use a gluten-free brownie mix. Many brands offer tasty mixes that work well. Just make sure to check the label for gluten-free status.
For those who want a vegan cheesecake, there are great alternatives. You can use vegan cream cheese and replace eggs with flaxseed meal or silken tofu. These swaps help you create a creamy texture without animal products. Enjoy experimenting with these variations to fit your taste and needs!
Storage Info
Proper Storage Techniques
To keep your caramel swirl brownie cheesecake fresh, store any leftovers properly. First, let the cheesecake cool completely in the fridge. Once it’s cool, cover it tightly with plastic wrap or foil. This helps prevent the cheesecake from drying out. You can also use an airtight container.
- Use a springform pan if you still have some cheesecake left in it.
- If you want to slice it, place parchment paper between slices to prevent sticking.
- Store it in the fridge. It will stay fresh for about five days.
Freezing Instructions
If you want to save your cheesecake for later, freezing is a great option. Here are the best practices for freezing:
- Wrap the cheesecake well in plastic wrap. Then, wrap it in foil for extra protection.
- Make sure it is tightly sealed. This keeps ice crystals from forming.
- For best results, freeze it for no more than three months.
When you’re ready to enjoy it, thaw the cheesecake slowly. Place it in the fridge overnight. This method helps keep its creamy texture. Avoid thawing at room temperature, as it can make the cheesecake too soft. Enjoy your sweet treat whenever you want!
FAQs
How do I know when the cheesecake is done?
To check if the cheesecake is done, look for these signs:
- The edges should be firm and set.
- The center should still jiggle slightly.
- A toothpick inserted in the center should come out mostly clean.
These signs mean it’s ready to cool. Avoid overbaking. This can make it dry.
Can I make this cheesecake in advance?
Yes, you can make this cheesecake ahead of time. It keeps well in the fridge. Store it for up to 3 days before serving. For the best flavor, let it chill overnight. This gives the flavors time to blend.
What can I substitute for sour cream?
If you don’t have sour cream, here are some options:
- Plain yogurt works great.
- Cream cheese can be used, but thin it with a bit of milk.
- Cottage cheese blended smooth is another choice.
These alternatives help keep your cheesecake creamy and delicious.
This blog post guides you through making a decadent brownie cheesecake. We covered important ingredients, step-by-step instructions, and helpful tips. You learned how to combine layers and avoid common mistakes. Variations allow you to customize your dessert, while proper storage ensures freshness.
Enjoy creating this treat and impressing your family and friends. With practice, you will master this dessert and make it your own. Happy baking!


![- 1 cup green or brown lentils - 1 tablespoon olive oil - 1 medium onion, finely chopped - 2 cloves garlic, minced - 2 medium carrots, diced into bite-size pieces - 2 stalks celery, diced - 1 red bell pepper, diced - Ground cumin - Smoked paprika - Turmeric - Salt - Black pepper - 6 cups vegetable broth (preferably low-sodium) - 1 (14-ounce) can diced tomatoes, including their juices - 2 tablespoons fresh lemon juice In this vegan lentil soup, I love using green or brown lentils. They add a hearty feel. The olive oil helps to sauté the veggies, making them soft and full of flavor. The mix of vegetables is key. You need an onion for sweetness. Garlic adds a nice kick. Carrots and celery give texture. The red bell pepper adds color and sweetness. For spices, I use ground cumin and smoked paprika. They bring warmth and depth. A bit of turmeric adds a lovely golden hue. Salt and black pepper round out the flavors. Liquid ingredients are vital too. I use vegetable broth for a rich base. Diced tomatoes add acidity and sweetness. Lastly, fresh lemon juice brightens the dish. You can find the full recipe above for all the details! - Rinse the lentils and chop the vegetables. - Heat olive oil and sauté onion and garlic. Start by rinsing one cup of green or brown lentils under cold water. This helps remove any dirt or debris. While the lentils drain, chop your vegetables. You will need one medium onion, two cloves of garlic, two medium carrots, two stalks of celery, and one red bell pepper. Next, in a large pot, heat one tablespoon of olive oil over medium heat. Add the chopped onion and cook for about five minutes. Stir until it becomes soft and clear. Then, add the minced garlic. Cook for one more minute to release its wonderful aroma. - Incorporate remaining vegetables and spices. - Add lentils, broth, and tomatoes, bring to a boil. Now, add the diced carrots, celery, and red bell pepper to the pot. Cook for another five to seven minutes. Stir often until the vegetables become tender. To build flavor, sprinkle in one teaspoon of ground cumin, one teaspoon of smoked paprika, and half a teaspoon of turmeric. Mix well and cook for one more minute. After the spices bloom, add the rinsed lentils, six cups of vegetable broth, and one can of diced tomatoes with their juices. Increase the heat and bring this mixture to a boil. Once it boils, reduce the heat and cover the pot. Let it simmer for 25 to 30 minutes, or until the lentils are soft but not mushy. - Simmer and add kale. - Season and serve. Once the lentils are cooked, stir in two cups of chopped kale. Let it simmer for an additional five to seven minutes. The kale should turn bright green and wilted. Now, season your soup with salt, freshly ground black pepper, and two tablespoons of fresh lemon juice. The lemon juice adds a nice zing. Taste it and adjust the seasoning as needed. Serve the soup hot, garnished with fresh parsley for a hint of color and flavor. For a full recipe, please see the [Full Recipe]. Enjoy your warm and nourishing vegan lentil soup! To boost the taste of your vegan lentil soup, consider these tips: - Add spices: Try bay leaf for depth or chili flakes for heat. - Sauté longer: Cook your vegetables a bit more. This gives a richer, deeper flavor. This soup shines when paired with the right sides. Here are my favorite ways: - Bread: Serve it with homemade bread for a warm, cozy meal. - Garnishes: Top it with nutritional yeast for a cheesy flavor or creamy avocado for richness. Lentils are packed with nutrients. Here’s why they are great: - Nutritional benefits: They provide protein, fiber, and iron, making them a healthy choice. - Leafy greens: Adding kale boosts vitamins and minerals. It also adds color and texture. For the full experience, check out the Full Recipe. These tips will help you create a dish that's not just tasty but also nourishing! {{image_4}} You can switch lentils for other beans or pulses. Black beans or chickpeas work well. Each bean adds a unique taste and texture to the soup. You can also use seasonal vegetables. Try zucchini in summer or butternut squash in fall. These swaps keep your soup fresh and exciting. To make your soup creamier, add coconut milk. It gives a rich texture and a hint of sweetness. You can also use fresh herbs like basil or cilantro. They add bright flavors and an herbal kick. A sprinkle of fresh herbs before serving makes a big difference. If you want a faster option, try an Instant Pot. Cook the soup on high pressure for about 15 minutes. You can also use a slow cooker. Simply set it on low for 6-8 hours. For a creamy version, use a blender. Blend half the soup and mix it back in. This makes the soup thick and smooth. Explore the [Full Recipe] for more ideas on making this soup your own! After enjoying your vegan lentil soup, you can store leftovers easily. Let the soup cool down first. Then, transfer it to airtight containers. Glass or plastic containers work well for this. Store it in the fridge for up to five days. For longer storage, freeze the soup. Use freezer-safe containers or bags to prevent freezer burn. The soup can last up to three months in the freezer. When it’s time to enjoy the soup again, reheat it gently. You can use a pot on the stove or a microwave. If using a pot, heat it over medium-low until warm. Stir occasionally to prevent sticking. In the microwave, use a microwave-safe bowl. Heat in short bursts, stirring in between. This helps heat evenly. Avoid overcooking, as the lentils may become mushy. Preparing for future meals is smart and easy with this soup. Chop your vegetables ahead of time, like onion, garlic, and carrots. Store them in the fridge for quick use. You can also rinse your lentils in advance and keep them in a container. Making larger batches is a great idea too. This way, you always have a warm, nourishing meal ready. Just follow the full recipe and freeze extra portions for busy days. Green and brown lentils are great for soup. They hold their shape well. Green lentils have a slightly peppery taste. Brown lentils are milder and cook faster. Both work well in this vegan lentil soup. Yes, you can adapt this recipe. If you prefer meat, try adding cooked chicken or sausage. For dairy, a splash of cream or some cheese can add richness. Just remember, this makes it less vegan. To thicken your soup, you have a few options. You can mash some lentils against the pot. Adding a spoonful of tomato paste also helps. If you want a creamier feel, blend a portion of the soup. These techniques will help you achieve the perfect consistency. For more details, check the full recipe. This blog post covers the key aspects of making a hearty lentil soup. We discussed the essential ingredients, including lentils, vegetables, and spices. I shared step-by-step instructions for preparing and cooking the soup. We explored tips for enhancing flavors and serving suggestions. You can create variations with different ingredients and learn best practices for storing and reheating leftovers. Lentil soup is a healthy, versatile meal that is easy to make. Enjoy experimenting with your own flavors and keep discovering new ways to make it.](https://dishtreats.com/wp-content/uploads/2025/06/c46bc7f1-46e5-4579-b786-1848127316df-768x768.webp)