Mouthwatering Mango Habanero Shrimp Tacos Recipe

Looking to spice up your taco night? These Mango Habanero Shrimp Tacos will wow your taste buds! With fresh shrimp, ripe mango, and a kick from habanero, each bite bursts with flavor. I’ll walk you through easy steps to create this delicious meal that’s perfect for any occasion. Get ready to impress your family and friends with a dish that’s as fun to make as it is to eat!
Ingredients
List of Fresh Ingredients
- 1 lb large shrimp, peeled and deveined
- 1 ripe mango, diced
- 1 habanero pepper, finely chopped
- 1/4 cup red onion, finely diced
- 2 tablespoons fresh cilantro, chopped
Pantry Staples
- 2 tablespoons fresh lime juice
- 1 tablespoon olive oil
- 1 teaspoon garlic powder
- Salt and black pepper, to taste
Tortilla and Garnish Selection
- 8 small corn tortillas
- 1 avocado, sliced thinly
- 1/2 cup crumbled queso fresco (optional)
Gathering fresh ingredients makes this dish shine. Start with large shrimp, as they give a good bite. Peel and devein them for a clean taste. The ripe mango adds sweetness and color. Make sure it is firm yet soft enough to cut easily into small cubes. The habanero gives heat, so chop it finely to spread the flavor. Red onion adds crunch and a bit of sharp taste. Cilantro brings freshness, cutting through the richness of the shrimp.
In your pantry, lime juice brightens every bite. Olive oil helps to marinate the shrimp well. Garlic powder adds depth, while salt and black pepper enhance all the flavors.
For tortillas, small corn tortillas work best. They hold the filling nicely. Avocado adds creaminess, balancing the heat from the habanero. If you want a bit of tang, crumble queso fresco on top as a garnish. This entire mix creates a tasty taco experience.
Step-by-Step Instructions
Marinating the Shrimp
- Combine shrimp, garlic powder, lime juice, olive oil, and seasonings.
- Incorporate finely chopped habanero pepper.
- Marinate for 15 to 20 minutes.
I love starting with the shrimp. You want to use large, fresh shrimp. Peel and devein them first. Then, in a bowl, mix garlic powder, lime juice, olive oil, and a sprinkle of salt and pepper. Add the finely chopped habanero pepper. If you want less heat, use less pepper. Toss everything to coat the shrimp well. Cover the bowl and let it sit for 15 to 20 minutes. This step lets the shrimp soak up those zesty flavors.
Preparing the Mango Salsa
- Mix diced mango, red onion, cilantro, lime juice, and salt.
- Allow flavors to blend.
While the shrimp marinates, it’s time for the mango salsa. Grab another bowl and add diced ripe mango, finely chopped red onion, and chopped cilantro. Squeeze in fresh lime juice and add a pinch of salt. Mix it all gently. Let it sit for a few minutes. This waiting time helps the flavors mix nicely.
Cooking the Shrimp
- Heat skillet to medium-high.
- Cook shrimp for 2 to 3 minutes per side.
- Avoid overcooking for best texture.
Now, heat a skillet over medium-high heat. Once hot, add the marinated shrimp in a single layer. Cook for about 2 to 3 minutes on each side. Watch for the shrimp to turn pink and opaque. Overcooking can make them rubbery, so keep an eye on them. Once done, remove the skillet from heat.
Warm the Tortillas
- Heat tortillas in a skillet or microwave.
- Ensure pliability without crisping.
Next, it’s time to warm the tortillas. You can do this in a dry skillet for about 30 seconds on each side. They should be pliable but not crispy. If you prefer, wrap them in a clean towel and microwave for about 20 seconds. This makes the tortillas easy to fold.
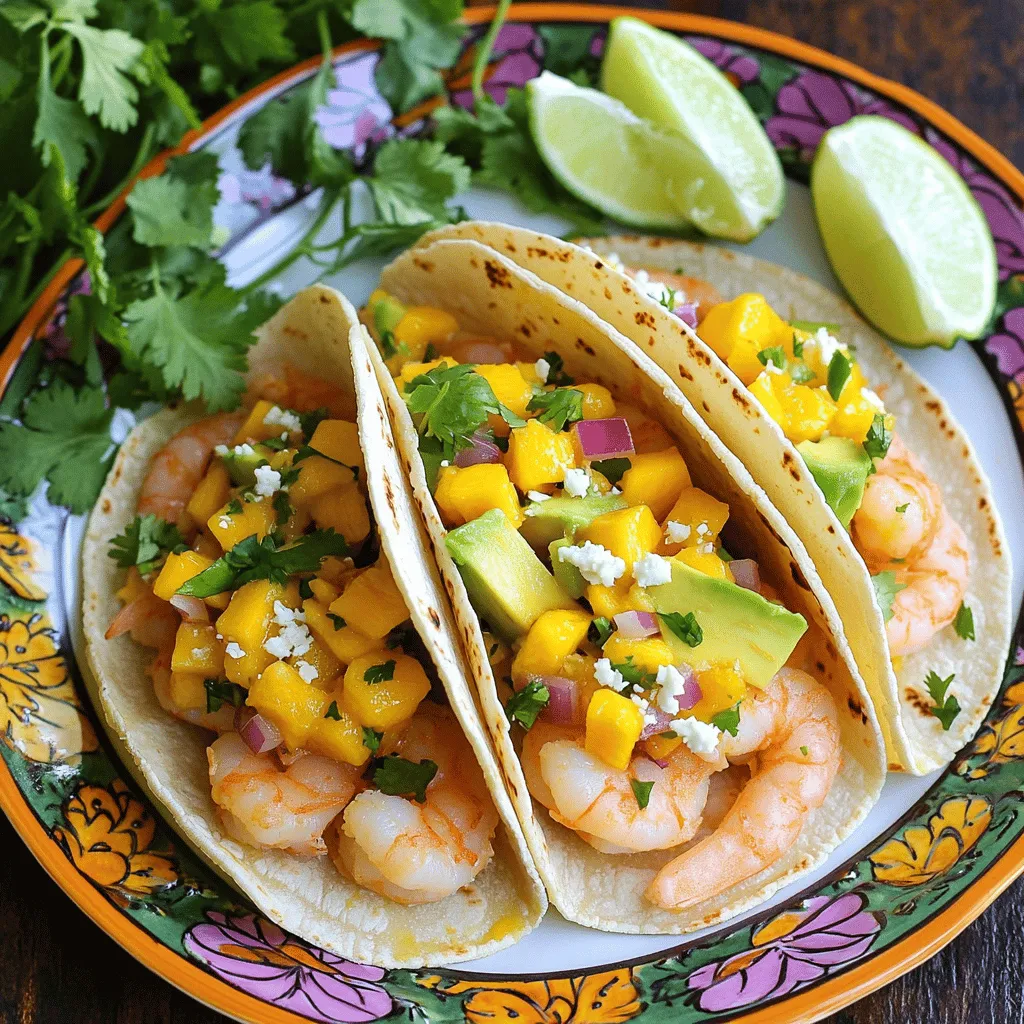
Assembling the Tacos
- Layer shrimp and salsa in tortillas.
- Add avocado slices and queso fresco.
Now comes the fun part—assembling the tacos! Take a warm tortilla and add a generous portion of the cooked shrimp. Spoon some mango salsa on top. If you like, add a few slices of avocado for creaminess. For an extra treat, sprinkle some crumbled queso fresco on top.
Garnishing and Serving
- Serve immediately with lime wedges and extra cilantro.
Serve the tacos right away while they’re warm. Include lime wedges on the side for a zesty kick. You can also add extra cilantro sprigs for a fresh look. Enjoy your mango habanero shrimp tacos!
Tips & Tricks
Perfecting the Shrimp
To avoid rubbery shrimp, do not overcook them. Cook for just 2 to 3 minutes on each side. The shrimp should turn pink and opaque when done. If you want less heat, use less habanero. You can also remove the seeds to lower the spice level. This way, you can still enjoy the vibrant flavor without the burn.
Making the Best Salsa
Balancing sweetness and acidity in your salsa is key. The ripe mango adds sweetness, while fresh lime juice brings in acidity. Add a pinch of salt to enhance the flavor. For more texture, try adding diced cucumber or chopped bell pepper. You can also mix in some diced jalapeño for extra kick or use fresh avocado for creaminess.
Tortilla Preparation Techniques
Warm your tortillas to enhance their flavor. I prefer using a dry skillet over medium heat. Heat each tortilla for about 30 seconds on each side. This makes them soft and easy to fold. If you have leftovers, store them in a sealed bag or container. This keeps them fresh and ready for your next meal.

Variations
Dietary Substitutions
For those who want to swap shrimp, chicken or tofu works great. Chicken adds hearty flavor while tofu gives a satisfying bite. If you prefer a vegan option, try a mango salsa with black beans. This mix keeps the dish hearty and healthy.
Spice Level Adjustments
If habaneros are too hot, use jalapeños or bell peppers instead. These peppers offer a milder taste. To make it extra spicy, add more chopped habaneros or even a dash of hot sauce. Adjust to your taste for the perfect kick.
Additional Serving Ideas
These tacos pair well with rice or beans for a filling meal. Try serving them in lettuce wraps for a fun low-carb twist. This adds crunch and freshness, making it a great option for those watching carbs.
Storage Info
Storing Leftover Tacos
To keep your tacos fresh, it’s best to store the shrimp, salsa, and tortillas separately. This way, the tortillas stay soft and the shrimp remains juicy. Use airtight containers for the shrimp and salsa. For tortillas, wrap them in plastic wrap or place them in a resealable bag.
Reheating Instructions
When reheating shrimp, use a skillet over medium heat. Add a splash of water to keep them moist. Heat for just a few minutes until warm, but don’t overcook. For tortillas, warm them in a dry skillet or microwave for about 20 seconds. This helps maintain their softness. You can also serve leftover shrimp on a salad or in a wrap for a twist.
Storage Duration
Shrimp lasts about three days in the fridge. Salsa can stay fresh for up to five days. If you freeze shrimp, it can last up to three months. Always check for signs of spoilage. Shrimp should smell fresh, not fishy. Salsa that looks dull or has mold should be discarded.
FAQs
Can I use frozen shrimp for this recipe?
Yes, you can use frozen shrimp. First, thaw the shrimp safely. Place them in the fridge overnight or run cold water over them for 10 to 15 minutes. Avoid hot water, as it can cook the shrimp. Pat them dry before marinating. This helps the shrimp soak up all the flavors.
What else can I add to these tacos?
You can add many toppings. Try shredded cabbage for crunch. Pickled onions add a tangy bite. You can also use fresh jalapeños for extra heat. A drizzle of spicy mayo can enhance the flavor. Serve with lime wedges for a zesty touch.
How can I make this dish ahead of time?
To prep ahead, marinate the shrimp earlier in the day. Store them in the fridge until you are ready to cook. You can also make the mango salsa in advance. Just keep it covered in the fridge. Warm the tortillas just before serving for the best taste.
In summary, we explored vibrant shrimp tacos made with fresh and pantry ingredients. We marinated shrimp, prepared a delicious mango salsa, and assembled the tacos with care. Remember, you can adjust spice levels and substitute proteins to fit your tastes. Store leftovers properly for future enjoyment. Experimenting with different flavors and serving ideas can keep meals exciting. Get creative, and enjoy your delicious tacos!


![To make tasty chicken gyros, you need fresh and simple ingredients. Here’s what you will need: - 500g chicken breast, thinly sliced - 2 tablespoons olive oil - 1 tablespoon dried oregano - 1 teaspoon garlic powder - 1 teaspoon onion powder - 1 teaspoon smoked paprika - Salt and freshly ground black pepper, to taste - 4 pita breads - 1 cup Greek yogurt - 1 tablespoon fresh lemon juice - 1 cucumber, finely diced - 1 ripe tomato, finely diced - 1 small red onion, thinly sliced - Fresh parsley, chopped, for garnish These ingredients work together to create a rich flavor for your gyros. The chicken pairs well with the spices. The tzatziki adds a creamy texture that balances the dish. Feel free to add more flavors to your gyros. Here are some optional ingredients: - Feta cheese, crumbled - Bell peppers, thinly sliced - Hot sauce or chili flakes for spice These extras can personalize your gyros. They can boost the taste and make your meal even more exciting. Garnishes make your gyros look pretty and add flavor. Here are some great ideas: - Extra tzatziki sauce on the side - Sliced olives for a briny kick - Fresh mint or dill for added freshness Serve your gyros with a side of simple salad or roasted potatoes. This adds to the fun and makes a complete meal. For the full recipe, check the earlier section! To start, you need to make the chicken marinade. In a big bowl, mix the chicken breast with olive oil, dried oregano, garlic powder, onion powder, smoked paprika, salt, and pepper. Ensure every piece is coated well. Cover the bowl with plastic wrap or a lid. Let it sit in the fridge for at least 30 minutes. You can even marinate it for up to 2 hours. This step helps the chicken soak up all the flavors. Next, heat your grill or skillet over medium-high heat. When it's hot, add the marinated chicken slices. Cook them for about 6 to 8 minutes. Make sure to turn them occasionally. You want them golden brown and fully cooked. Use a meat thermometer to check the chicken's internal temperature. It should reach 75°C (165°F) to be safe to eat. While the chicken cooks, prepare the tzatziki sauce. In a medium bowl, mix Greek yogurt, fresh lemon juice, finely diced cucumber, salt, and pepper. Stir it well and set it aside. Letting it sit helps the flavors blend together nicely. This sauce adds a cool taste to your gyros. It's a perfect match for the warm chicken. For the full recipe including all ingredients and steps, see [Full Recipe]. When making chicken gyros, many people make simple errors. Here are some to watch for: - Not marinating long enough: Marinate your chicken for at least 30 minutes. Longer gives better flavor. - Overcrowding the grill: Give each piece space. This helps the chicken cook evenly. - Skipping the meat thermometer: Always check if chicken is at 75°C (165°F). This keeps it safe to eat. You can easily change the recipe to fit your needs. Here are some ideas: - Gluten-free: Use gluten-free pita or lettuce wraps instead of pita bread. - Dairy-free: Swap Greek yogurt with a non-dairy yogurt for the tzatziki sauce. - Low-carb: Serve the chicken on a salad instead of using pita bread. Grilling chicken gyros can be easy with a few tips: - Heat control: Make sure your grill is hot before adding chicken. This gives nice grill marks. - Avoid pressing down: Don’t press the chicken with a spatula. This releases juices and dries it out. - Let it rest: Always let the chicken rest after cooking. This keeps it juicy when you slice it. Using these tips will help you craft great homemade chicken gyros. For the complete recipe, check out the Full Recipe section. {{image_4}} You can swap chicken with other meats. Try beef, lamb, or pork. Each protein brings its own taste. Marinate them the same way as chicken. This gives you tasty options for your gyros. For example, beef adds a rich flavor. Lamb has a unique zest. Pork is juicy and tender. All these variations keep your meals exciting. If you prefer plant-based meals, there are great choices. Use marinated mushrooms or eggplant as your base. Grilled zucchini or bell peppers work well too. For protein, try chickpeas or lentils. These options are filling and tasty. You can still make a delicious tzatziki sauce with vegan yogurt. This lets everyone join in on the fun. Want to change up the flavor? Add spices like cumin or coriander to the marinade. This gives your gyros a warm, earthy taste. You can also try different herbs, like mint or dill. They add a fresh twist. For a kick, include hot sauce or chili flakes. Each tweak can create a new flavor experience. Enjoy creating your own unique version of homemade chicken gyros. For the full recipe, check the earlier section. To keep your leftover gyros fresh, wrap them tightly. I recommend using plastic wrap or aluminum foil. This helps prevent air from getting in and keeps the flavors locked in. Place the wrapped gyros in an airtight container or a resealable bag. Store them in the fridge for up to three days. If you notice any extra moisture, you can add a paper towel inside to absorb it. Reheating gyros can be easy. To maintain their taste and texture, use a skillet or grill. Heat it over medium heat. Place the gyros in the skillet for about 3-4 minutes. Turn them halfway through so they warm evenly. If you prefer, you can also use a microwave. Just remember to wrap them in a damp paper towel. This keeps them from drying out. Heat for 30 seconds, then check. If they need more time, heat in 10-second bursts. If you want to save gyros for later, freezing is a great option. Start by letting the cooked chicken cool completely. Then, wrap the chicken in plastic wrap. Place it in a freezer-safe bag or container. You can freeze the chicken for up to three months. When you are ready to eat, thaw it in the fridge overnight. Reheat it as mentioned earlier. You can also freeze the tzatziki sauce separately. Just remember to stir it well after thawing. To make tzatziki sauce, mix Greek yogurt, fresh lemon juice, and diced cucumber. Add salt and pepper for taste. This sauce adds a cool, creamy touch to your gyros. It’s simple and fresh. Let it sit for a few minutes to blend the flavors. Yes, you can use store-bought pita bread. It saves time and works well. Just warm the pita on the grill or in a skillet. This makes it soft and ready to hold your tasty filling. Homemade pita is great, but store-bought is quick and easy. Serve chicken gyros with a side of Greek salad or roasted veggies. You can also add extra tzatziki for dipping. For drinks, try a refreshing lemonade or some iced tea. These sides enhance your meal and bring more flavor to the table. For the full recipe, check out the complete guide on making Homemade Chicken Gyros. Homemade chicken gyros are easy and fun to make. We covered key ingredients, cooking steps, and tips to avoid mistakes. You can add your own twist by using different proteins or flavors. Storing leftovers or prepping meals ahead keeps dinner simple. With all this info, you can create a tasty meal your whole family will love. Enjoy making gyros that bring great joy to your table!](https://dishtreats.com/wp-content/uploads/2025/06/a33d49ac-ff2d-4809-8657-a37e258bd1fd-768x768.webp)


![To make this dish, you need a few key items. These ingredients work together for great flavor. Here’s what you will need: - 4 chicken thighs, bone-in and skin-on - 1/4 cup honey - 1/4 cup low-sodium soy sauce - 4 cloves garlic, finely minced - 1 tablespoon fresh ginger, grated - 1 teaspoon sesame oil - 1 tablespoon olive oil - Salt and freshly ground black pepper to taste While the main ingredients shine, you can add optional items for extra flavor. Try using these to enhance your dish: - A splash of rice vinegar for acidity - A pinch of red pepper flakes for heat - Fresh herbs like cilantro or parsley for freshness Presentation matters when serving food! Beautiful garnishes make a dish pop. Here’s what to top your chicken with: - 2 green onions, finely sliced - Sesame seeds for a crunchy finish First, grab a medium mixing bowl. Add 1/4 cup honey, 1/4 cup low-sodium soy sauce, 4 minced garlic cloves, 1 tablespoon of grated ginger, and 1 teaspoon of sesame oil. Whisk them together until mixed well. This sweet and savory blend will become your marinade and glaze. It infuses the chicken thighs with tasty flavor. Next, season the chicken thighs. Use salt and freshly ground black pepper on both sides. Heat 1 tablespoon of olive oil in a large skillet over medium-high heat. Once hot, place the chicken thighs skin-side down. Let them sear for about 6-8 minutes. You want that skin golden brown and crispy. This step adds great texture and taste. After searing, flip the chicken thighs. Pour the honey garlic mixture over them. Let it simmer gently, coating the chicken in flavor. Cover the skillet and reduce the heat. Cook for 15-20 minutes until the chicken reaches 165°F (75°C) inside. When the chicken is ready, remove the lid. Turn the heat back up to medium-high. Let the sauce simmer for 5 minutes, stirring often. This will thicken the sauce, helping it stick to the chicken. Once thickened, take the skillet off the heat. Allow the chicken to rest for a few minutes. This lets the juices settle, keeping the meat tender. Serve the chicken on a platter, drizzling the sauce over the top. Add a sprinkle of sliced green onions and sesame seeds for a bright finish. Enjoy your Honey Garlic Chicken Thighs! For the full recipe, refer to [Full Recipe]. To get crispy skin, start with bone-in, skin-on chicken thighs. Pat the skin dry with paper towels. This step removes moisture and helps the skin crisp up nicely. Heat olive oil in a hot skillet before adding the chicken. Sear it skin-side down for 6-8 minutes. Resist the urge to move the chicken too much. Let it cook undisturbed for a golden crust. For tender chicken, season it well with salt and pepper. This enhances flavor and locks in moisture. When cooking, keep an eye on the internal temperature. Aim for 165°F (75°C) to ensure it’s fully cooked. Let the chicken rest after cooking. This lets the juices settle back in, making each bite juicy and satisfying. Honey garlic chicken pairs well with several sides. Try serving it with steamed rice for a classic combo. The rice soaks up the tasty sauce. You can also serve it with a fresh green salad. The crunch of the veggies complements the soft chicken perfectly. Roasted vegetables add color and flavor, making for a well-rounded meal. For the full recipe, check out [Full Recipe]. {{image_4}} You can change the taste of honey garlic chicken thighs by swapping some ingredients. For a fruitier twist, try using maple syrup instead of honey. This will give your dish a rich, deep flavor. You can also replace soy sauce with coconut aminos for a gluten-free option. If you like citrus, add some fresh orange juice to the marinade. It brightens the flavor and adds a zesty note. While chicken thighs are juicy, you can use other cuts too. Chicken breasts work well if you prefer leaner meat. Just remember, they may dry out faster, so watch the cooking time. Drumsticks are another tasty option. They are fun to eat and stay moist during cooking. Whichever cut you choose, make sure it is about the same size for even cooking. Want some heat? It's easy to spice things up! Add red pepper flakes or sriracha to the marinade for a kick. You can also use fresh jalapeños or chili paste for a bolder flavor. Adjust the amount based on your heat tolerance. If you love spicy food, this will make your honey garlic chicken thighs truly exciting. For the full recipe, check out the [Full Recipe]. Store your honey garlic chicken thighs in an airtight container. Make sure to let them cool to room temperature first. They will stay fresh in the fridge for up to 3 days. This keeps the flavors intact and ensures the chicken remains juicy. To reheat, place the chicken thighs in a skillet over low heat. Cover the skillet to keep moisture in. Heat until warmed through, about 5-10 minutes. You can also microwave them, but cover the dish to prevent drying out. You can freeze the chicken thighs for later use. Wrap each thigh in plastic wrap, then place them in a freezer bag. They will last for about 2-3 months in the freezer. Thaw them in the fridge overnight before reheating. This method keeps the chicken tasty and tender. For the full recipe, refer to the section above. You should cook chicken thighs for about 20-25 minutes. Start by searing them for 6-8 minutes on the skin side. Then, flip them over and pour the sauce on top. Cover the skillet and let them simmer for 15-20 minutes. This method helps keep the meat juicy and full of flavor. Yes, you can use boneless chicken thighs. They will cook faster than bone-in thighs. Sear them for about 5-7 minutes on each side. Make sure to check their internal temperature. It should reach 165°F (75°C) to be safe to eat. The best way to check if the chicken is done is with a meat thermometer. Insert it into the thickest part of the thigh. When it reads 165°F (75°C), the chicken is ready. You can also cut into the meat. If the juices run clear, it’s cooked. To adjust the sweetness, add more honey for a sweeter taste. If you want it less sweet, add more soy sauce or a splash of vinegar. Taste the sauce as you go. This way, you can find the perfect balance for your dish. For the full recipe, please check the [Full Recipe]. Honey garlic chicken thighs are simple and tasty. We covered the key ingredients and optional marinades. You learned how to prepare the marinade and cook the chicken. I shared tips for crispy skin, tender meat, and delicious sides. We also explored variations and storage tips to keep your meals fresh. When you try this recipe, it will impress your family and friends. Enjoy the rich flavors and make it your own!](https://dishtreats.com/wp-content/uploads/2025/06/32d13aa5-8be9-48e3-be5a-1699ade8ce81-768x768.webp)
