Pumpkin Spice Hot Chocolate Bombs Simple Cozy Treat
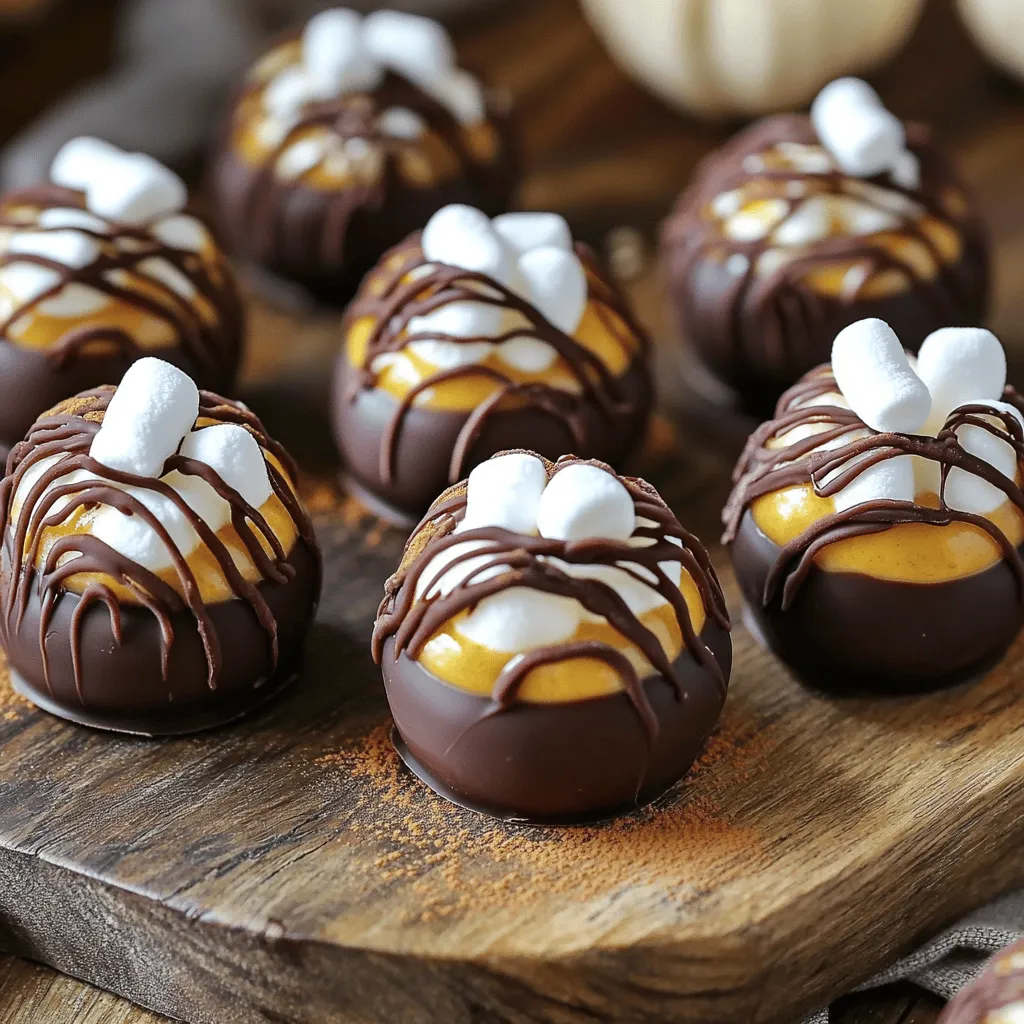
If you’re ready for a warm hug in a mug, you’ll love these Pumpkin Spice Hot Chocolate Bombs! This simple cozy treat combines rich chocolate with delicious pumpkin flavors, making it perfect for chilly nights. In this guide, I’ll share all the ingredients, step-by-step instructions, and tips for creating these delightful bombs at home. Let’s dive into a fun kitchen adventure that’s sure to impress!
Ingredients
Chocolate Choices
For the shells, you need 1 cup of chocolate chips. You can choose either dark or milk chocolate. Dark chocolate gives a rich taste. Milk chocolate offers a sweeter flavor. Both options work well for a cozy treat.
Pumpkin Filling Components
The filling is where the magic happens. You will need:
- 1/2 cup pumpkin puree (canned or homemade)
- 1/4 cup powdered sugar for sweetness
- 1 teaspoon pumpkin spice blend to add flavor
Mix these well in a bowl. The puree makes it creamy, while the sugar and spice boost the taste.
Optional Ingredients for Customization
You can add a few fun extras to change things up. Consider:
- 1/4 cup mini marshmallows for texture and fun
- 1/4 cup hot cocoa mix to enhance chocolate flavor
- Extra pumpkin spice for a decorative dusting
These options let you personalize your hot chocolate bombs. Feel free to experiment!
Step-by-Step Instructions
Melting the Chocolate
To start, grab a microwave-safe bowl. Add 1 cup of chocolate chips. You can pick dark or milk chocolate based on what you love. Heat the bowl in the microwave for 30 seconds. After that, stir the chocolate well. Repeat this until it’s smooth and melted. Be careful! If you heat it too long, it can burn.
Molding the Chocolate Shells
Now, take a silicone mold made for hot chocolate bombs. Spoon about one tablespoon of the melted chocolate into each cavity. Use the back of the spoon to coat the sides evenly. Make sure the chocolate is thick enough to keep your filling safe. If you have melted chocolate left over, set it aside for later.
Assembling the Hot Chocolate Bombs
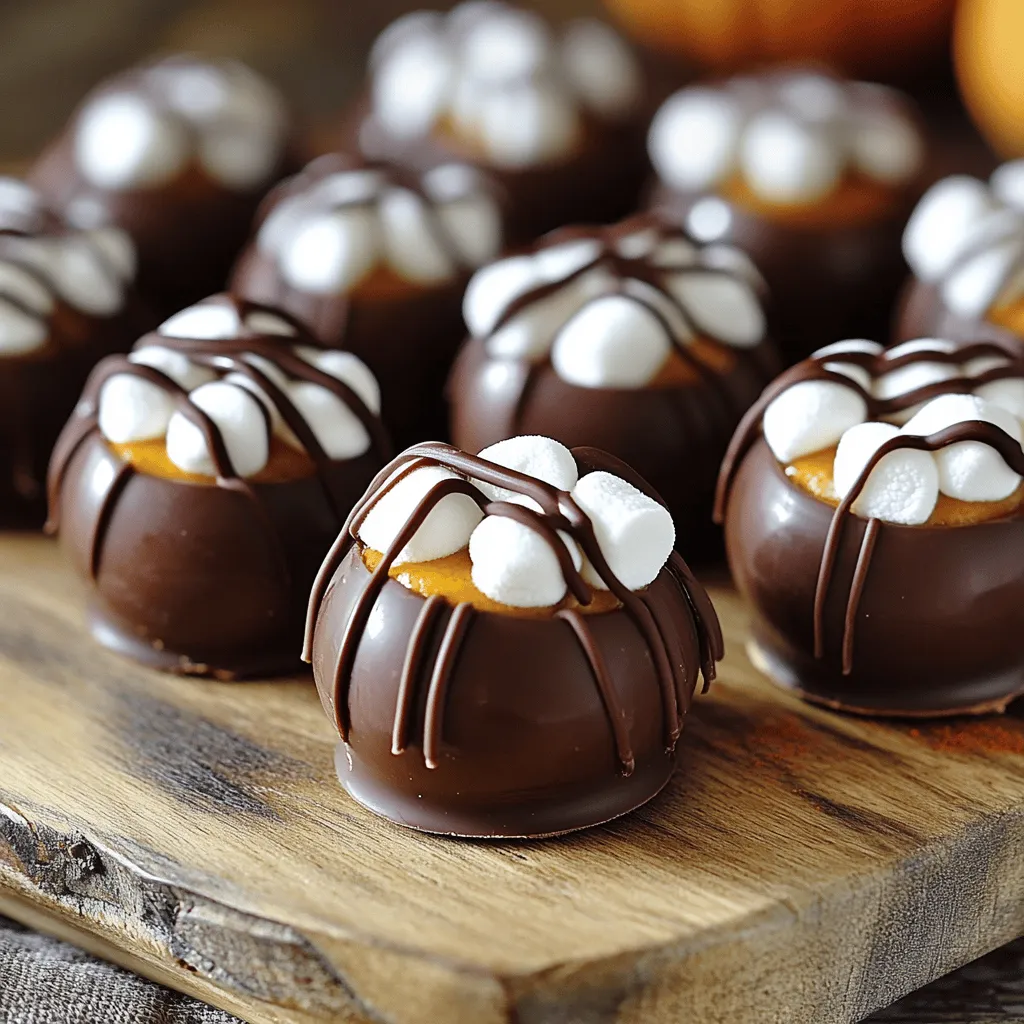
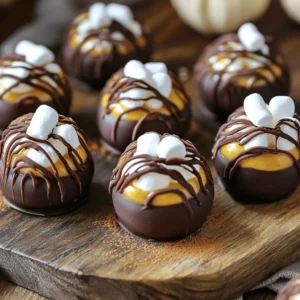
Once the shells harden, take them out of the mold. Place half of the shells on a plate. In a bowl, mix together 1/2 cup of pumpkin puree, 1/4 cup of powdered sugar, and 1 teaspoon of pumpkin spice blend. Stir until it’s nice and smooth. Spoon a teaspoon of this pumpkin filling into each of the shells. Add a few mini marshmallows and a sprinkle of hot cocoa mix for extra flavor.
Next, take the other half of the chocolate shells. Warm the edges for 5-10 seconds in the microwave. Press these onto the filled shells to seal them well. For fun, drizzle leftover chocolate on top and dust with more pumpkin spice if you like.
Now, you can store these tasty treats in an airtight container. When you’re ready, drop one into a cup of hot milk. Watch the magic happen as it melts!
Tips & Tricks
Best Practices for Melting Chocolate
To melt chocolate, use a microwave-safe bowl. Heat the chocolate chips in short bursts. Start with 30 seconds, then stir. Repeat until the chocolate is smooth. Avoid overheating, as chocolate can burn easily. If you have a double boiler, that works great too! This method gives you more control over the heat.
Ensuring a Perfect Seal
When sealing your hot chocolate bombs, warmth is key. Heat the edges of the chocolate shells for a few seconds in the microwave. This helps them stick together well. Press the halves firmly but gently. Make sure there are no gaps, or the filling might spill out.
Creative Decoration Ideas
Decorating your bombs can be fun! Drizzle melted chocolate on top for a fancy look. You can use white chocolate for contrast. Add a sprinkle of pumpkin spice on top for that extra flair. For a festive touch, use edible glitter or colorful sprinkles. These little details make your bombs stand out!
Variations
Alternative Flavors for Hot Chocolate Bombs
You can switch up the flavor of your hot chocolate bombs. Try using white chocolate instead of dark or milk chocolate. For a rich twist, add a hint of caramel or hazelnut flavor. You could also try mixing in different spices like cinnamon or ginger for a fun kick. Each option brings its own unique taste.
Dietary Modifications (e.g., Dairy-Free Versions)
To make dairy-free hot chocolate bombs, use dairy-free chocolate chips. They come in dark or milk alternatives. For the filling, swap regular pumpkin puree with a plant-based option. You can use almond, oat, or coconut milk instead of regular milk when serving. This way, everyone can enjoy this cozy treat!
Seasonal Additions (e.g., Peppermint, Caramel)
Seasonal flavors can make your hot chocolate bombs even more fun. In winter, add crushed peppermint candies to the filling for a minty touch. In the fall, a drizzle of caramel sauce adds sweetness. You can even sprinkle some nutmeg on top for a festive look. These little extras can elevate each sip.
Storage Info
How to Store Hot Chocolate Bombs
To keep your pumpkin spice hot chocolate bombs fresh, store them in an airtight container. This keeps moisture out and helps the chocolate stay firm. You can place parchment paper between layers if you stack the bombs. This will prevent them from sticking together.
Shelf Life and Best Before Tips
These delightful treats can last about two weeks when stored properly. For the best taste, use them within the first week. After that, the chocolate may lose its texture, but they are still safe to eat. Always check for any signs of spoilage, like an off smell or changes in texture.
Reheating and Usage Tips
When you’re ready to enjoy your hot chocolate bombs, simply drop one into a cup of hot milk. Use whole milk for a rich flavor, or try almond milk for a lighter option. Stir gently as it melts for even distribution. If you have leftovers, you can store them in the refrigerator, but it’s best to consume them at room temperature for the best taste.
FAQs
What is a Hot Chocolate Bomb?
A hot chocolate bomb is a sphere of chocolate filled with cocoa mix and goodies. When you drop it in hot milk, it melts and creates a rich drink. It’s a fun treat for cozy days.
How do you use Pumpkin Spice Hot Chocolate Bombs?
To use these bombs, heat a cup of milk until it’s hot but not boiling. Place one pumpkin spice hot chocolate bomb in your mug. Pour the hot milk over it and watch it melt. Stir well, and enjoy your creamy drink topped with marshmallows!
Can I make these ahead of time?
Yes, you can make these hot chocolate bombs ahead of time. Store them in an airtight container. They stay fresh for up to two weeks. This makes them perfect for gifts or last-minute treats!
In this blog post, we explored how to make hot chocolate bombs. We looked at the best chocolate choices, the right pumpkin filling components, and optional ingredients for fun. I shared step-by-step instructions on melting chocolate and molding your bombs. Tips on sealing and decorating helped make them shine. We discussed flavor variations, dietary options, and storage tips.
With a bit of creativity, you can enjoy these treats all year. Happy making!

![- 4 boneless, skinless chicken thighs - 1 cup teriyaki sauce - 1/2 fresh pineapple, sliced into 1/2-inch rings - 2 tablespoons soy sauce - 1 tablespoon brown sugar - 1 teaspoon freshly grated ginger - 2 cloves garlic, finely minced - 1 tablespoon sesame oil - 1 tablespoon rice vinegar - 2 green onions, finely chopped - Sesame seeds Gathering the right ingredients is key for Grilled Pineapple Teriyaki Chicken. Start with fresh chicken thighs. They stay juicy and tender when grilled. You can use store-bought or homemade teriyaki sauce. I often prefer making my own, as it gives a fresh taste. Next, you want ripe pineapple. Choose one that feels heavy and smells sweet. The sweetness will balance the salty teriyaki sauce. For the marinade, you need a few simple items. Soy sauce adds saltiness, while brown sugar gives a nice caramel note. Ginger and garlic bring warmth and depth. Sesame oil adds a nutty flavor, and rice vinegar gives a bit of tang. Finally, for garnishing, chop green onions for color and freshness. A sprinkle of sesame seeds adds a nice crunch. These ingredients come together to create a vibrant, tasty dish. For the full recipe, check the provided link. First, gather your ingredients for the marinade. In a bowl, mix teriyaki sauce, soy sauce, brown sugar, grated ginger, minced garlic, sesame oil, and rice vinegar. Whisk these together until smooth. Add the chicken thighs and coat them well with the marinade. Cover the bowl with plastic wrap and put it in the fridge. Let the chicken marinate for at least 30 minutes. For more flavor, let it marinate for up to 2 hours. While the chicken marinates, preheat your grill to medium-high heat. If you’re using charcoal, wait for the coals to glow red. This will ensure even grilling and great flavor in your chicken. Now it's time to grill the pineapple. Take your pineapple rings and brush both sides with teriyaki sauce. Once the grill is hot, place the pineapple on it. Grill for about 3-4 minutes on each side. You want to see nice grill marks and a caramelized look. When done, set the grilled pineapple aside on a plate. Next, take the chicken thighs out of the fridge. Let any extra marinade drip off. Place the chicken on the hot grill. Cook for about 5-7 minutes per side. Aim for an internal temperature of 165°F (75°C). In the last few minutes, brush on more marinade for added flavor. When the chicken is cooked, take it off the grill. Let it rest for a few minutes. This helps keep the juices inside. To serve, place a grilled pineapple ring on each plate. Top it with a grilled chicken thigh. For a beautiful touch, sprinkle chopped green onions and sesame seeds on top. Enjoy your meal! For the full recipe, check out [Full Recipe]. For juicy chicken, preheat your grill to medium-high heat. This temperature helps create a nice sear on the chicken. A hot grill also locks in moisture, making the meat tender. If using charcoal, wait until the coals glow red and spread evenly for the best result. The marinade is key to great flavor. I suggest marinating the chicken for at least 30 minutes. This time allows the flavors to soak in. For an even richer taste, let it marinate for up to 2 hours. Just remember, don’t go over 2 hours, or the chicken might turn mushy. When picking a pineapple, look for one that feels heavy for its size. The skin should be golden and slightly soft at the base. A ripe pineapple smells sweet at the bottom. Avoid ones that are too green or have brown spots. A good pineapple adds the perfect touch to your grilled chicken. For more details and to try the dish, check out the Full Recipe. {{image_4}} You can easily swap chicken for other proteins. Try pork tenderloin or shrimp for a tasty twist. Tofu is a great choice for a vegetarian option. Just make sure to press the tofu to remove extra moisture. This helps it absorb the marinade better. No matter what protein you choose, aim for similar cooking times for best results. Want to kick up the flavor? Add red pepper flakes for heat or lime juice for zest. You can also mix in a dash of sesame seeds or a splash of orange juice for sweetness. Experimenting with spices like smoked paprika or five-spice powder can add depth. This way, you can create a unique flavor profile each time. Pair your grilled pineapple teriyaki chicken with steamed rice or a fresh salad. Jasmine rice complements the dish's sweetness well. For salads, consider a mix of greens with a light vinaigrette. You can also serve it with grilled vegetables for added color and nutrition. These options enhance your meal and make it more satisfying. For the full recipe, check out the details above. Store your Grilled Pineapple Teriyaki Chicken in an airtight container. This keeps it fresh and prevents odors from mixing. The chicken and pineapple can last in the fridge for about 3 to 4 days. Always let the chicken cool down before sealing it. This helps avoid condensation inside the container. To freeze your grilled chicken and pineapple, first, let them cool completely. Wrap each piece tightly in plastic wrap. Then place them in a freezer bag or a container. This keeps air out and prevents freezer burn. You can freeze it for up to 3 months. Label the bags with the date for easy tracking. To reheat your chicken, use the oven or stovetop. Preheat your oven to 350°F (175°C). Place the chicken in a baking dish and add a splash of water or broth. Cover it with foil. Heat for about 15-20 minutes until warm. For stovetop, use a skillet over medium heat. Add a bit of oil and warm the chicken gently. Avoid high heat to keep it juicy. You can make teriyaki sauce easily at home. Here’s how: - 1 cup soy sauce - 1/2 cup brown sugar - 1/4 cup rice vinegar - 2 tablespoons sesame oil - 1 teaspoon grated ginger - 2 cloves minced garlic Combine all these ingredients in a saucepan. Heat over medium until the sugar dissolves. Stir it well, and let it simmer for a few minutes. Your homemade teriyaki sauce is ready to use! Yes, you can use chicken breasts. They are leaner but may dry out faster than thighs. To prevent this, marinate them longer. Chicken thighs stay juicy and tender. If you prefer breasts, just keep an eye on cooking time. Many sides pair well with this dish. Here are some ideas: - Steamed jasmine rice - Grilled vegetables - Asian slaw - Quinoa salad These sides will complement the sweet and savory flavors of the chicken. Marinate the chicken for at least 30 minutes. For the best flavor, aim for 2 hours. The longer it sits, the more flavor it absorbs. Just don’t marinate too long, or the texture may change. Yes, you can grill indoors! Use a grill pan on your stovetop. Another option is to use a broiler in your oven. Both methods will give you a nice char and keep the flavor intact. This blog post covered how to make Grilled Pineapple Teriyaki Chicken. We explored key ingredients, marinade tips, and grilling steps. I shared variations and storage info to help you enjoy this dish longer. Always remember to adjust the marinade and experiment with flavors. Whether serving to friends or family, this dish is sure to impress. With these tips, you'll cook with confidence and skill. Enjoy the process and the delicious outcome!](https://dishtreats.com/wp-content/uploads/2025/06/0924d723-9b8a-4a49-9695-7d965ac302d4-768x768.webp)