Crispy Sweet Potato Black Bean Tacos Simple Treat
If you’re looking for a delightful meal that’s simple and satisfying, you’ve found it! Crispy Sweet Potato Black Bean Tacos are a treat that brings happiness to any table. With roasted sweet potatoes, warm black beans, and crispy tortillas, this dish is hard to resist. Let me walk you through the easy steps to create these tasty tacos, from the perfect seasoning to optional toppings. Your taste buds will thank you!
Ingredients
Main Ingredients
- 2 large sweet potatoes, peeled and cut into ½-inch cubes
- 1 can (15 oz) black beans, thoroughly rinsed and drained
- 8 small corn tortillas
Sweet potatoes add sweetness and texture. Black beans give protein and fiber. Corn tortillas wrap everything nicely. This trio forms a tasty base for your tacos.
Seasonings and Oils
- 1 tablespoon extra virgin olive oil
- 1 teaspoon ground cumin
- 1 teaspoon smoked paprika
- ½ teaspoon garlic powder
- Salt and freshly cracked black pepper, to taste
Olive oil helps crisp the sweet potatoes. Cumin and smoked paprika deepen the flavor. Garlic powder adds a savory kick. Salt and pepper enhance all the tastes.
Optional Toppings
- 1 ripe avocado, sliced into thin wedges
- ¼ cup fresh cilantro, roughly chopped
- 1 lime, cut into wedges
- Additional toppings: diced red onion, crumbled feta cheese, hot sauce
Avocado adds creaminess. Fresh cilantro gives a burst of freshness. Lime juice brightens the flavors. Extra toppings let you customize each taco.
Step-by-Step Instructions
Preparing the Sweet Potatoes
Start by preheating your oven to 400°F (200°C). This step is key to getting the sweet potatoes nice and crispy. Next, take your two large sweet potatoes, peel them, and cut them into ½-inch cubes. Place them on a large baking sheet. Drizzle the sweet potatoes with one tablespoon of extra virgin olive oil. Sprinkle on one teaspoon of ground cumin, one teaspoon of smoked paprika, and half a teaspoon of garlic powder. Add salt and freshly cracked black pepper to taste. Toss the sweet potatoes well to coat them evenly with the oil and seasonings. Roast the sweet potatoes in the preheated oven for 25 to 30 minutes. Stir them halfway through to ensure they cook evenly. They should be golden brown and soft when done.
Heating the Black Beans
While the sweet potatoes roast, grab a can of black beans. Rinse them thoroughly under cold water and drain them well. Place the black beans in a small saucepan over medium heat. Stir gently and cook until warmed through, which should take about five minutes. You can add a pinch of salt and pepper to enhance their flavor. Once warmed, set them aside until you are ready to assemble your tacos.
Toasting the Corn Tortillas
Next, take your corn tortillas and heat a dry skillet over medium-high heat. Toast each tortilla for about 30 seconds on each side. This adds flavor and makes them soft and warm. Make sure not to burn them. You want them to be pliable for easy assembly.
Assembling the Tacos
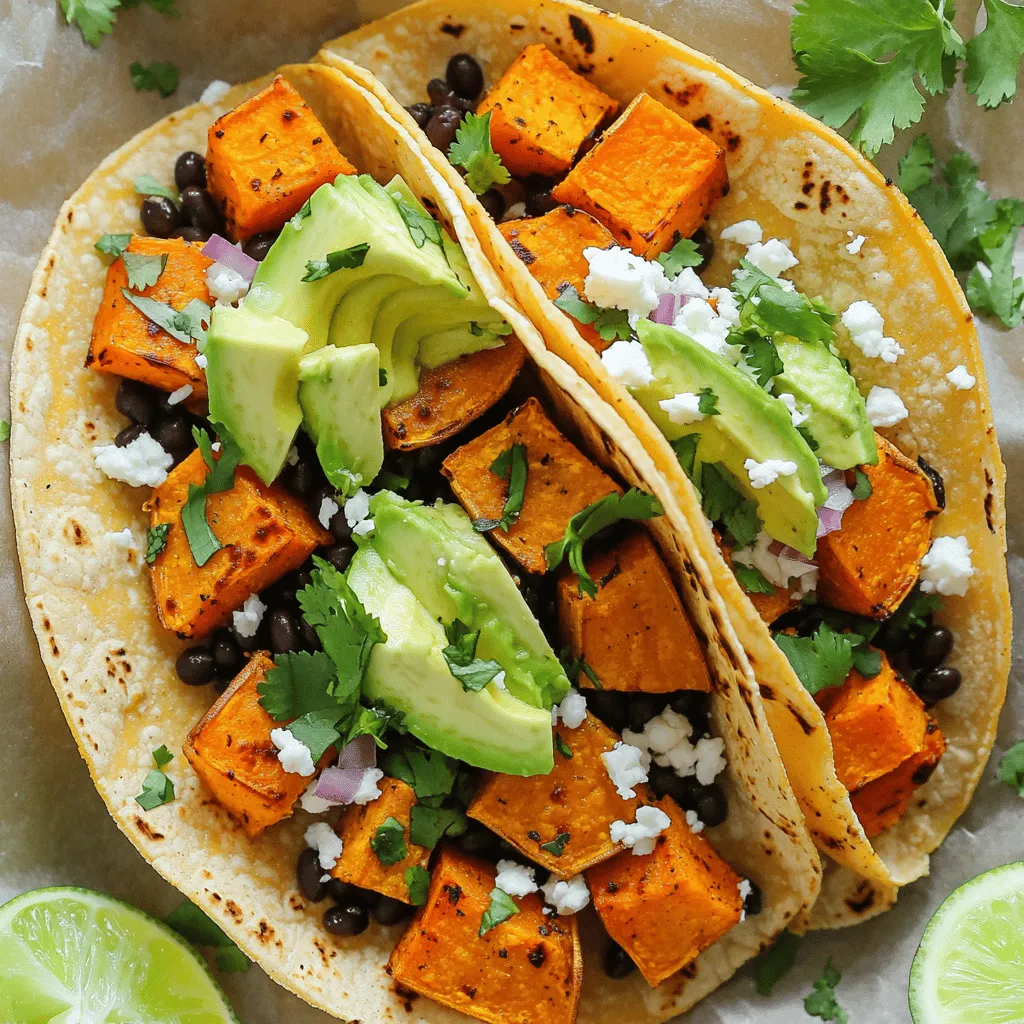
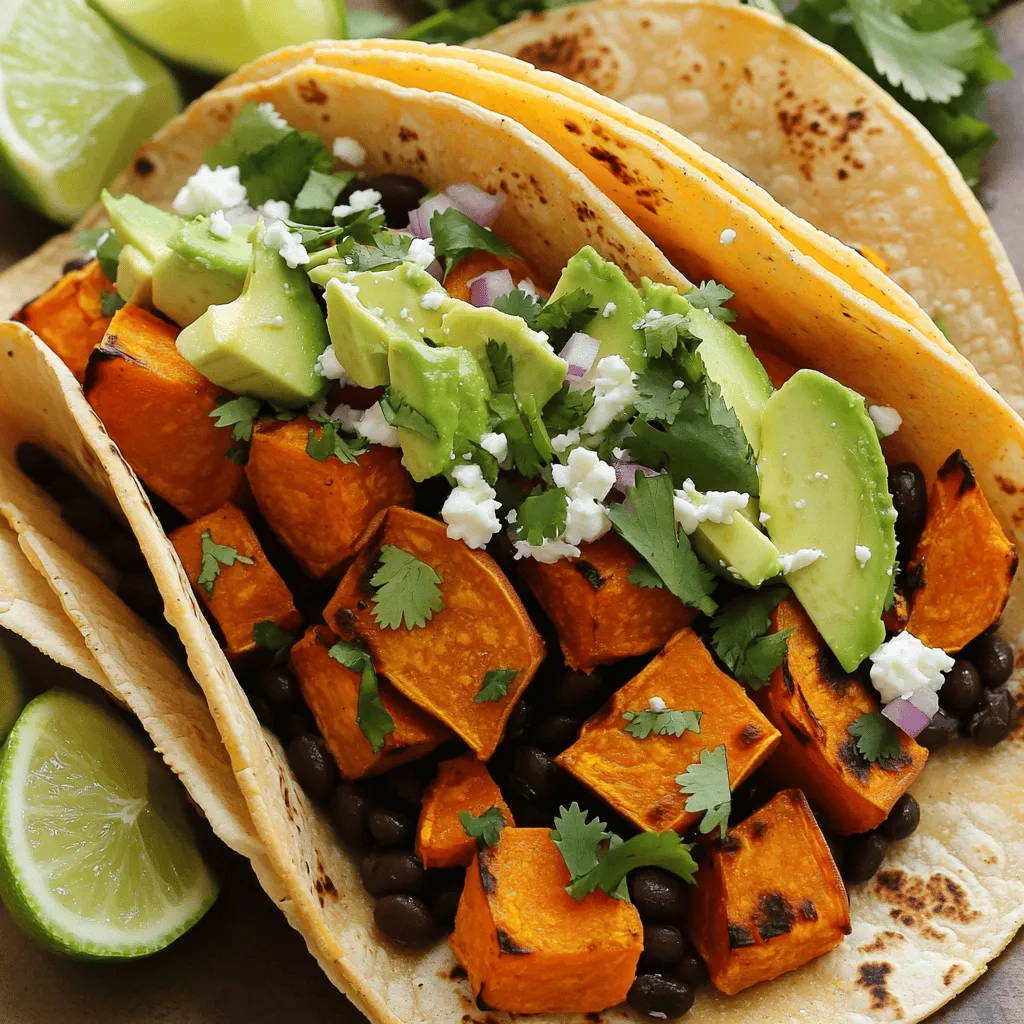
Now it’s time to build your tacos! Take a warm tortilla and add a layer of roasted sweet potatoes. Follow this with a generous spoonful of your warmed black beans. Top each taco with slices of creamy avocado and a sprinkle of fresh cilantro. Optionally, add diced red onion or crumbled feta cheese for extra flavor. Finally, squeeze fresh lime juice over the tacos just before serving. This brightens up all the flavors and makes each bite delicious!
Tips & Tricks
Achieving Perfectly Crispy Sweet Potatoes
To get crispy sweet potatoes, coat them well with oil and seasoning. I like to use one tablespoon of olive oil and a mix of spices. This helps them roast evenly. Make sure the sweet potatoes are in a single layer on the baking sheet. Stir them halfway through roasting. This lets all sides get that perfect crunch. You’ll know they’re done when they turn golden brown and feel tender.
Serving Suggestions
These tacos shine with fresh salsa or creamy guacamole. Both add flavor and color. Sprinkle some diced red onion or crumbled feta cheese on top. This makes the tacos look more appealing. Don’t forget to arrange them on a colorful platter with lime wedges. It’s all about the presentation!
Dietary Considerations
These tacos are vegan and gluten-free, making them a great choice for many diets. Sweet potatoes are packed with vitamins. They offer fiber and antioxidants. Black beans add protein and even more fiber. Together, they create a meal that is both tasty and healthy. Enjoy these tacos without worry!
Variations
Ingredient Substitutes
If you want to switch things up, try different beans. Pinto beans or chickpeas work well. They add a nice texture and flavor. For veggies, consider bell peppers or zucchini. These add crunch and color to your tacos.
Flavor Enhancements
Spice lovers can experiment with chili powder or cayenne. These spices will add some heat. You can also add a pinch of oregano for a fresh twist. As for tortillas, corn tortillas are classic. But flour tortillas or whole wheat ones can be tasty too. They give a different texture and flavor.
Serving Ideas
Want to take it up a notch? Try a taco salad. Just layer the sweet potatoes and beans on a bed of greens. Top it with avocado and cilantro for a fresh crunch. Another idea is to use wrap-style tortillas. Fill them up and roll them tight. This makes for a fun, easy-to-eat option!
Storage Info
Best Practices for Storing Leftovers
To keep your crispy sweet potato black bean tacos fresh, follow these tips:
- Refrigeration tips: Store leftovers in the fridge within two hours. This keeps them safe to eat.
- Container recommendations: Use airtight containers to prevent moisture loss. This helps maintain texture.
Reheating Guidelines
To enjoy your tacos again, reheat them properly:
- Best ways to reheat sweet potatoes and beans: Use the oven or a skillet. This keeps the sweet potatoes crispy and beans warm.
- Maintaining taco texture: Reheat tortillas briefly in a skillet. This helps them stay soft and tasty.
Freezing Options
If you want to save your tacos for later, consider these tips:
- Freezing tacos separately: Freeze sweet potatoes and beans apart from tortillas. This keeps everything fresh.
- Recommended storage duration: Store them in the freezer for up to three months. Be sure to label them for easy access.
FAQs
How can I make crispy sweet potato black bean tacos ahead of time?
You can prepare the sweet potatoes and beans in advance. Roast the sweet potatoes and warm the black beans a day before. Store them in separate airtight containers in the fridge. When you are ready to eat, simply warm them in the oven or microwave. This way, you save time and enjoy a quick meal. Just remember to toast the tortillas fresh for the best taste.
Can I use other types of beans?
Yes, you can use different beans! Pinto beans, kidney beans, or chickpeas work great too. Each type adds a unique flavor and texture. Just make sure to rinse and drain them well. For a twist, you could even try lentils. They offer a nice bite and blend well with sweet potatoes.
What can I serve with these tacos?
These tacos pair well with fresh salsa or guacamole. A side of rice or quinoa adds heartiness too. For drinks, try serving them with a refreshing limeade or a light beer. You can also offer a simple salad on the side to round out the meal.
Are these tacos suitable for meal prep?
Absolutely! These tacos are great for meal prep. You can prepare all the components ahead of time. Store them separately and assemble before eating. This makes it easy to grab a tasty meal during the week. Plus, they stay fresh in the fridge for several days.
These sweet potato black bean tacos are tasty and easy to make. We covered the key ingredients and steps, from roasting sweet potatoes to toasting tortillas. Remember, use fresh toppings for even more flavor. You can also switch ingredients to fit your taste or diet. Storing and reheating properly keeps them delicious. Enjoy experimenting with this simple dish, and make it your own!

![- 8 oz spaghetti or fettuccine pasta - 2 boneless, skinless chicken breasts - 1 cup basil pesto (homemade or store-bought) - 1/2 cup heavy cream - 1/4 cup cherry tomatoes, halved - 1/4 cup freshly grated Parmesan cheese - Fresh basil leaves for garnish - Salt and freshly ground black pepper, to taste - 2 tablespoons extra virgin olive oil Gather these ingredients before you start cooking. The pasta and chicken form the base of your dish. The creamy pesto sauce adds rich flavor. The cherry tomatoes bring a burst of freshness. The Parmesan cheese tops it off with a salty kick. Fresh basil leaves make it look gorgeous. Using fresh ingredients makes a big difference. If you have the time, try making your own pesto. It’s simple and tastes amazing. You can adjust the flavors to your liking. You can also swap the pasta type if you want. Just keep in mind that different shapes may change how the sauce clings to the pasta. For the chicken, you want it juicy and tender. The seasoning is key here. Use good quality olive oil, salt, and pepper. This will help keep the flavor bright and fresh. Once you have everything, you’ll be ready to make a delicious meal. If you want the full recipe, check out the complete guide for step-by-step instructions. Start by boiling a large pot of water. Add a good amount of salt to the water. This will help flavor the pasta. Once the water is boiling, add your spaghetti or fettuccine. Cook it until it is al dente, which means it should be firm to the bite. This usually takes around 8-10 minutes. When done, drain the pasta. Make sure to save about 1/2 cup of the pasta water for later. While the pasta cooks, get ready to season the chicken. Sprinkle salt and pepper on both sides of the chicken breasts. Heat 2 tablespoons of olive oil in a large skillet over medium heat. When the oil is hot, add the chicken. Cook each side for about 6-7 minutes. You want the chicken to turn a nice golden brown. Check that the juices run clear when you cut into it. Once cooked, take the chicken out of the skillet and let it rest for a few minutes. Then, slice it into thin strips. In the same skillet, lower the heat to medium-low. Add your basil pesto to the pan and stir it. You want to warm it through but not burn it. After about a minute, slowly pour in 1/2 cup of heavy cream. Stir it all together until it is well mixed and heated, which should take about 2-3 minutes. Now, add the cooked pasta to the skillet with your creamy pesto sauce. Toss the pasta gently to make sure it gets coated evenly. If the sauce looks too thick, add a little of the reserved pasta water. This will help you reach your desired creamy consistency. To finish, fold in the halved cherry tomatoes and the sliced chicken. Stir everything together for another 2 minutes. This will warm the chicken and tomatoes through. Finally, sprinkle freshly grated Parmesan cheese on top. Toss it lightly to mix. For a bright touch, garnish with fresh basil leaves before serving. For a full recipe, check out the details above! You can use homemade or store-bought pesto for this dish. Homemade pesto gives you full control over flavors, but store-bought saves time. If you want a stronger basil taste, simply add more fresh basil leaves to your mix. For a milder flavor, blend in more nuts or cheese. This helps balance the taste to your liking. To keep your chicken juicy, avoid overcooking it. Cook chicken breasts in a hot skillet for 6-7 minutes on each side. The internal temperature should reach 165°F. Rest the chicken for a few minutes before slicing. This helps the juices stay inside. You can make your sauce thicker or lighter based on your taste. For a richer sauce, use more heavy cream. If you want a lighter option, try half-and-half or low-fat milk. Adding a splash of pasta water helps adjust the sauce's thickness too. This way, you can achieve the perfect creamy texture for your chicken pesto pasta. For the Full Recipe, check out the detailed instructions to create this delightful dish! {{image_4}} Adding vegetables to your Chicken Pesto Pasta makes it even better. It boosts flavor and nutrition. Seasonal veggies like spinach or bell peppers work great. Spinach adds a nice green color. Bell peppers give a sweet crunch. You can toss them in during the last few minutes of cooking. This way, they stay bright and fresh. If you need gluten-free pasta, you have choices! You can use rice pasta or chickpea pasta. These options taste great and cook well. Just follow the package instructions. Cooking times may differ, so keep an eye on them. You want your pasta to be tender but not mushy. Not in the mood for chicken? Try shrimp or tofu instead! Shrimp cooks fast and adds a nice twist. Just sauté them until they turn pink. Tofu is a fantastic plant-based option. Make sure to press it first to remove extra water. Adjust cooking times based on what you choose. This keeps your dish delicious and exciting. For the full recipe, check out the [Full Recipe]. Store any leftovers in the fridge. Use a tight-sealing container to keep your chicken pesto pasta fresh. Glass containers work well, as do plastic ones. Make sure to let it cool down before putting it away. It stays good in the fridge for up to three days. To freeze your chicken pesto pasta, pack it in an airtight container or freezer bag. Remove as much air as possible. This helps prevent freezer burn. You can freeze it for up to three months. Just label the bag with the date so you remember when you froze it. When reheating, use the microwave or stovetop. If using the microwave, heat in short bursts. Stir between each burst to ensure even warming. On the stovetop, add a splash of water or cream to keep it moist. This helps keep the creaminess intact. Enjoy your meal again as if it were fresh! To make chicken pesto pasta from scratch, follow these basic steps: 1. Cook the pasta. Boil water in a large pot, add salt, and cook your choice of spaghetti or fettuccine until al dente. 2. Prepare the chicken. Season boneless chicken breasts with salt and pepper. Sear them in olive oil until golden brown. 3. Make the sauce. In the same skillet, mix basil pesto with heavy cream until warm and creamy. 4. Combine. Toss the cooked pasta with the sauce and sliced chicken. Adjust the sauce with reserved pasta water if needed. 5. Serve. Garnish with cherry tomatoes, Parmesan cheese, and fresh basil. You can find the full recipe above for a detailed guide. Yes, you can make chicken pesto pasta ahead of time. Here are some tips: - Cooked pasta and sauce. Prepare the chicken and sauce, then store them separately from the pasta. This keeps them fresh. - Refrigerate. Store in airtight containers in the fridge for up to three days. - Freeze. For longer storage, freeze the chicken and sauce. Use within two months for best flavor. - Reheat. When ready, reheat the chicken and sauce. Cook the pasta fresh to keep it al dente. Chicken pesto pasta pairs well with various side dishes. Consider these suggestions: - Garlic bread. A warm, crispy slice complements the creamy pasta. - Salad. A light green salad with a tangy vinaigrette balances the richness of the dish. - Roasted vegetables. Seasonal veggies add color and nutrients to the meal. Chicken pesto pasta can be a healthy option. Here’s why: - Protein. Chicken provides lean protein, which is vital for muscle health. - Basil and olive oil. These ingredients are rich in antioxidants and healthy fats. - Pasta. Whole-grain pasta offers fiber, which aids digestion. - Portion control. Adjust the serving size to fit your dietary needs. Absolutely! You can use various pasta types. Here are some alternatives: - Whole wheat pasta. Adds extra fiber and nutrients. - Gluten-free pasta. Great for those with gluten sensitivities. - Zoodles. Spiralized zucchini for a low-carb option. - Penne or rigatoni. These shapes hold the sauce well, providing a satisfying bite. In this post, I covered how to make a delicious chicken pesto pasta. We discussed the main ingredients and their roles, along with simple steps for cooking. I also shared tips for perfecting your dish and exciting variations to try. In closing, this recipe is easy and flexible, letting you customize flavors. Whether you choose to add veggies or change proteins, your meal will impress. Enjoy this tasty dish and make it your own!](https://dishtreats.com/wp-content/uploads/2025/06/ae0d281d-adb6-406a-8a42-58bd8911a0b3-768x768.webp)


![- 1 pre-made pizza dough - 1/2 cup fresh basil pesto - 1 cup shredded mozzarella cheese - 1 medium lemon (zested and juiced) - 1 cup cherry tomatoes, halved - 1/4 cup finely grated Parmesan cheese - 1 tablespoon extra-virgin olive oil - Salt and freshly ground black pepper to taste - Fresh basil leaves for garnish - Additional toppings (e.g., olives, peppers) - Alternative cheese options (feta, goat cheese) To make a great Lemon Basil Pesto Pizza, you need these ingredients. They work together to create a fresh, bright flavor. First, the pre-made pizza dough saves time and makes this recipe easy. You can find it in stores. Fresh basil pesto adds a rich, herby taste. It’s the star of this dish. Shredded mozzarella cheese melts beautifully. It gives that familiar cheesy texture we love. The lemon zest and juice bring a tangy punch. Cherry tomatoes add sweetness and color. Grated Parmesan cheese gives a nutty, salty flavor. The olive oil helps everything blend well. Salt and pepper round out the taste. For those who want to mix things up, you can add more toppings. Olives and peppers are great choices. You might also try different cheeses like feta or goat cheese for a twist. With these simple and tasty ingredients, you’re on your way to making a delightful pizza. For the full recipe and step-by-step guide, check out the [Full Recipe]. 1. Preheat your oven to 475°F (245°C). If you have a pizza stone, place it in the oven. This helps the crust cook evenly. If not, use a baking sheet. 2. Lightly flour a clean surface. Roll out the pizza dough to your desired thickness. Make sure it fits your baking surface. 3. Once rolled out, move the dough onto parchment paper. This will help you transfer the pizza later. 1. Spread the fresh basil pesto over the dough. Leave a half-inch border for the crust. 2. Sprinkle the shredded mozzarella cheese over the pesto. Make sure it covers the whole pizza. 3. Add the halved cherry tomatoes on top of the cheese. This adds color and flavor. 4. Drizzle the extra-virgin olive oil over everything. Season with salt and freshly ground black pepper to taste. 5. Zest the lemon and sprinkle it evenly on the pizza. This adds a fresh citrus aroma. 1. Slide the parchment paper with the pizza onto the preheated pizza stone or baking sheet. 2. Bake for about 12-15 minutes. Look for a golden brown crust and bubbling cheese. 3. Carefully take the pizza out of the oven. Drizzle fresh lemon juice over the top. 4. Sprinkle grated Parmesan cheese over the warm pizza. Add fresh basil leaves for garnish. 5. Use a sharp knife or pizza cutter to slice the pizza into wedges. Serve hot for the best taste. You can find the Full Recipe for this delicious Lemon Basil Pesto Pizza above. To get the best crust, I recommend using a pizza stone. It heats up and gives your pizza a crispy base. If you don’t have one, a baking sheet works too. Just make sure you preheat it well. Roll your pizza dough to the right thickness. Aim for about a quarter-inch thick. This allows for a nice rise and crunch without being too thin. For flavor, balance the saltiness with fresh lemon juice. A squeeze of lemon brightens up the taste. It makes the pizza feel fresh and lively. Use only fresh ingredients. Fresh basil, ripe tomatoes, and good cheese make a big difference. They add depth and vibrancy to your dish. When serving, place the pizza on a rustic wooden board. It adds a nice touch. You can also use a colorful platter for a fun look. Garnish with whole basil leaves and a lemon wedge. This makes it visually appealing and invites your guests to dig in. Serve it hot for the best taste! For the full recipe, check out the complete details above. {{image_4}} You can switch up the sauce for your pizza. Tomato sauce works well if you want a classic taste. You can also try a creamy white sauce. This adds a rich flavor that pairs nicely with lemon. Seasonal pesto is another fun option. You can make it with fresh herbs like parsley or cilantro. This gives a new twist to your dish. If you need a gluten-free pizza, several dough options are available. Many stores sell gluten-free pizza crusts. You can also make your own using almond flour or cauliflower. For those who follow a vegan diet, you can skip the cheese. There are many tasty vegan cheese substitutes. Look for brands made from nuts or soy for a creamy texture. Toppings can make your pizza unique. Popular choices include pepperoni, mushrooms, and bell peppers. Try mixing and matching your favorites. Seasonal vegetables add color and flavor. In summer, fresh zucchini or bell peppers work well. In winter, roasted butternut squash or kale can be a great choice. Don't be afraid to get creative with your toppings! To keep your Lemon Basil Pesto Pizza fresh, let it cool to room temperature. This step is key to avoid moisture buildup. Wrap each slice in plastic wrap or aluminum foil. You can also place them in an airtight container. This helps retain flavor and texture. Store the pizza in the fridge for up to three days. For best results, enjoy it within this time frame. When it's time to eat leftovers, you can use either an oven or a microwave. The oven is best for maintaining crispiness. Preheat your oven to 375°F (190°C). Place the pizza on a baking sheet and heat for about 10 minutes. This warms it up well without making it soggy. If you choose the microwave, place a slice on a microwave-safe plate. Add a cup of water next to it. This helps keep the crust from getting too chewy. Heat in 30-second intervals until warm. But remember, the microwave won't keep it crispy. For the best taste, the oven is your friend! Use these tips to enjoy your pizza even after the first delightful slice. For the full recipe, check out the complete article. To make your own basil pesto, you need a few simple ingredients. Combine fresh basil, garlic, pine nuts, Parmesan cheese, and olive oil in a food processor. Blend until smooth. Adjust the taste with salt and pepper. This mix adds great flavor to your pizza. Yes, you can freeze lemon basil pesto pizza. First, let the pizza cool completely. Then, wrap it in plastic wrap and place it in a freezer bag. It can last for up to three months. When you are ready to eat, bake it straight from the freezer. This makes a quick meal! Several side dishes pair well with lemon basil pesto pizza. Here are some of my favorites: - A light green salad with vinaigrette - Garlic bread for a crunchy side - Roasted vegetables for added flavor These sides balance the pizza's taste and make for a complete meal. To cut your pizza into even slices, use a sharp pizza cutter or knife. Start by cutting it in half, then cut each half into smaller sections. Aim for 8 slices for a standard pizza. This way, everyone gets a fair share! You can find high-quality pre-made pizza dough at many grocery stores. Look in the refrigerated section or the freezer aisle. Some local pizzerias also sell their dough. If you want a special option, check out artisan bakeries. They often have fresh dough made with quality ingredients. In this pizza guide, we covered essential ingredients, step-by-step instructions, and useful tips. You learned how to customize your pizza and store leftovers. Remember, fresh ingredients make a big difference in taste. If you try different toppings or variations, have fun with it! I believe cooking should be enjoyable and creative. Follow these steps, and you’ll create delicious pizza every time. Enjoy your cooking adventure!](https://dishtreats.com/wp-content/uploads/2025/06/c2cede7a-626b-4fd1-91be-1b09c425b287-768x768.webp)