Creamy Broccoli Cheddar Soup Rich and Comforting Delight

If you’re craving a bowl of something warm and hearty, look no further! This Creamy Broccoli Cheddar Soup is rich, comforting, and loaded with flavor. With fresh broccoli, sharp cheddar, and a hint of garlic, it’s a delightful dish that’s easy to make. Join me as I take you through simple steps to whip up this creamy masterpiece. Let’s get cooking and enjoy every delicious spoonful!
Ingredients
List of Ingredients
- 4 cups fresh broccoli florets
- 1 cup carrots, diced
- 1 medium onion, finely chopped
- 3 cloves garlic, minced
- 4 cups vegetable broth
- 1 cup heavy cream
- 2 cups sharp cheddar cheese, shredded
- 1 tablespoon olive oil
- 1 teaspoon salt
- 1/2 teaspoon freshly ground black pepper
- 1/2 teaspoon ground nutmeg (optional, for an aromatic touch)
- 1/4 cup all-purpose flour (optional, for thickening)
Optional Ingredients
- Ground nutmeg adds a warm flavor.
- All-purpose flour helps thicken the soup.
Garnish Suggestions
- Fresh parsley gives a nice pop of color and freshness.
When I gather these ingredients, I feel excited. Fresh broccoli brings bright color and nutrients. Carrots and onions add sweetness and depth. Garlic gives that perfect aroma. Vegetable broth serves as a great base. Heavy cream and cheddar cheese create a rich, creamy texture that comforts. The optional nutmeg adds warmth, while the flour thickens the soup to a delightful consistency. Finally, fresh parsley on top makes it look pretty and fresh. With these ingredients, you’re set for a cozy bowl of creamy broccoli cheddar soup.
Step-by-Step Instructions
Sautéing the Vegetables
Start by heating olive oil in a large pot over medium heat. Add chopped onion and diced carrots. Stir them for about five minutes. Look for the onions to turn soft and see-through. This step is key. It brings out their sweet flavor. After five minutes, add minced garlic. Cook for one more minute. The garlic will smell great!
Cooking the Broccoli
Next, add the fresh broccoli florets to the pot. Pour in the vegetable broth. Turn up the heat until it boils. Once boiling, lower the heat and let it simmer. You want to cook it for about ten to fifteen minutes. The goal is fork-tender broccoli. To check, poke a floret with a fork. If it goes in easily, you’re good!
Blending the Soup
Now it’s time to blend the soup. You can use an immersion blender right in the pot. This makes it simple. If you choose a countertop blender, be careful. Let the soup cool a bit first. Blend in small batches. Hot soup can splash, so take your time!
Adding Cream and Cheese
Once blended, stir in the heavy cream and shredded cheddar cheese. Keep stirring until the cheese melts. This adds a rich, creamy feel. If you want it thicker, mix some flour with a little soup liquid first. Whisk it back into the pot for a smoother texture.
Seasoning the Soup
Now, it’s time to season. Add salt and freshly ground black pepper. If you like, sprinkle in ground nutmeg. This adds a warm flavor. Let the soup simmer for another five minutes. This helps the flavors blend well together.
Garnishing and Serving
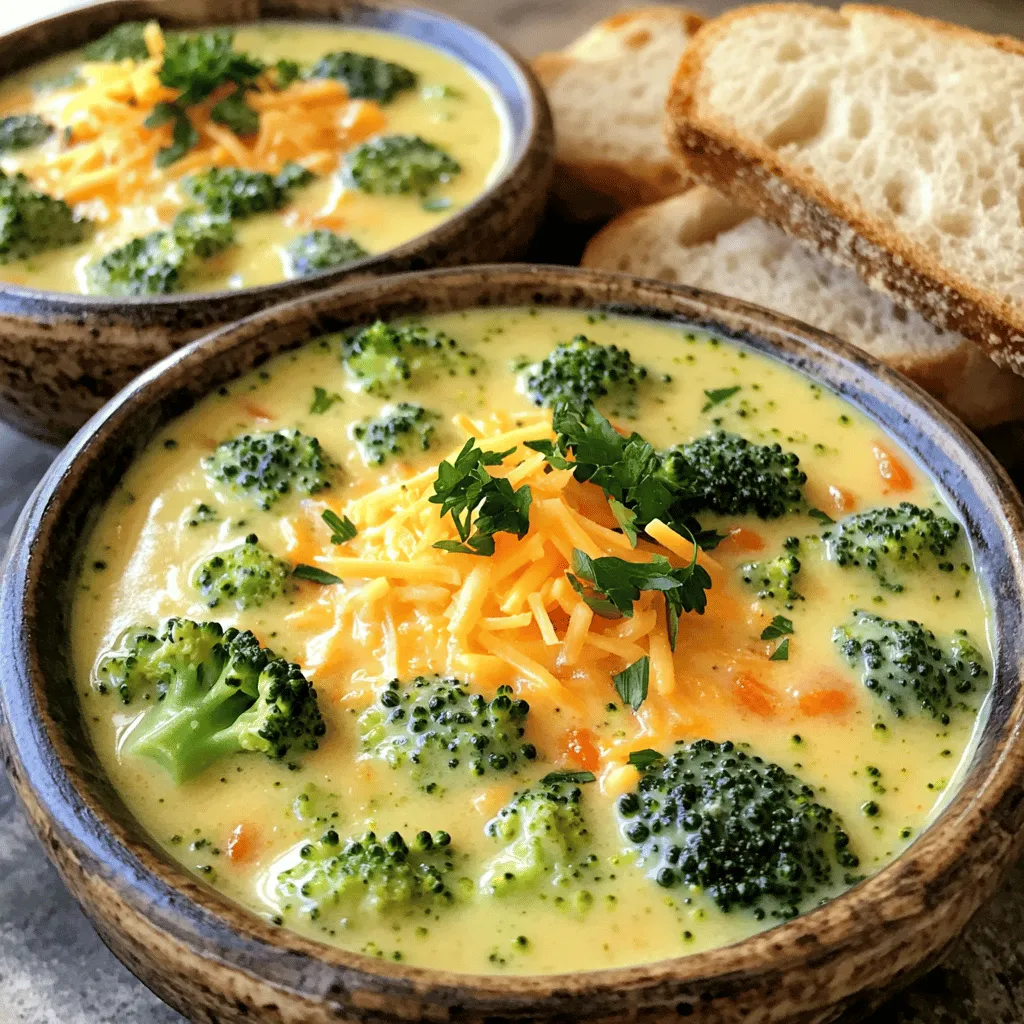
Finally, ladle the creamy soup into rustic bowls. For a lovely touch, top with chopped parsley. You can also add more cheddar for a cheesy finish. Serve with a slice of crusty bread on the side. It makes for a fun dipping experience!
Tips & Tricks
Perfecting Your Soup Texture
To get a creamy and thick soup, start by blending it well. Use an immersion blender for a smooth finish. If you prefer, blend in batches with a countertop blender. Just let it cool a bit first. If you want it even thicker, mix a bit of flour with water to make a slurry. Stir this into the soup while it simmers. This helps create that rich mouthfeel we all love.
Flavor Enhancements
To make your soup more exciting, try adding spices. A pinch of cayenne pepper gives a nice kick. You can also add a dash of lemon juice for brightness. If you love herbs, consider adding thyme or basil. Fresh herbs can add depth and freshness. Don’t forget to taste as you go. Adjust the salt and pepper to your liking.
Quick Cooking Tips
To save time, prepare your veggies in advance. Chop the onions and carrots the night before. Store them in the fridge until you’re ready to cook. When sautéing, keep the heat medium, so they cook evenly. Also, use pre-shredded cheese to cut down on prep time. This helps the cheese melt faster in your soup. Remember, cooking can be quick and fun!
Variations
Vegetarian and Vegan Options
If you want a vegetarian or vegan soup, you can make easy swaps. For cheese, try using nutritional yeast. It gives a cheesy flavor without dairy. For cream, coconut milk works great. It adds a nice richness. Just pick a plant-based broth to keep it vegan. These changes make the soup tasty for everyone.
Additional Ingredients
You can add proteins to make the soup heartier. Shredded chicken is a great choice. It pairs well with the cheese and broccoli. If you love bacon, add crispy bits for a smoky flavor. Just cook the bacon first, then add it to the pot. These additions boost the soup’s taste and nutrition.
Different Cheese Options
Cheese makes this soup creamy and rich. While sharp cheddar is classic, other cheeses can change the flavor. Gouda adds a smoky taste, while Monterey Jack gives a mild creaminess. You can mix different cheeses to find your favorite blend. Experimenting with cheese will make your soup unique and delightful.
Storage Info
Refrigeration Tips
To store leftover soup, let it cool first. Then, transfer it to an airtight container. You can keep it in the fridge for up to three days. When you’re ready to enjoy it again, just reheat it on the stove or in the microwave.
Freezing Guidelines
For freezing, use a freezer-safe container. Leave some space at the top, as the soup will expand when frozen. Creamy Broccoli Cheddar Soup keeps well in the freezer for up to three months. To reheat, thaw it in the fridge overnight. Warm it on low heat until it’s hot throughout. Stir often to keep it smooth.
Shelf Life Considerations
Creamy Broccoli Cheddar Soup lasts about three days in the fridge. If you freeze it, it can last up to three months. Always check for signs of spoilage, like an off smell or unusual texture, before eating. Enjoy your delicious soup while it’s fresh!
FAQs
Can I use frozen broccoli instead of fresh?
Yes, you can use frozen broccoli. Frozen broccoli is convenient and saves time. It’s often blanched before freezing, which helps preserve nutrients. However, it may have a softer texture after cooking. If you prefer crunchier broccoli, fresh is the way to go.
What can I serve with Creamy Broccoli Cheddar Soup?
This soup pairs well with many sides. Try serving it with crusty bread for dipping. A fresh garden salad adds nice crunch and color. Grilled cheese sandwiches also complement the rich flavors. These sides enhance the meal experience.
How do I thicken the soup without flour?
You can thicken the soup using several methods. One option is to blend some of the broccoli to create a creamy base. Another method is to add mashed potatoes. Pureed beans or lentils can also work well for a thicker texture.
Is this recipe suitable for meal prep?
Yes, this soup is great for meal prep. You can make it ahead of time and store it in the fridge. It keeps well for up to three days. Just reheat it on the stove or in the microwave. For longer storage, freeze portions in airtight containers.
Can I substitute heavy cream?
Definitely! You can use half-and-half for a lighter option. Coconut milk adds a nice flavor for dairy-free needs. Greek yogurt can also work, but add it after cooking to avoid curdling. Choose what fits your dietary preferences best.
This blog post gave you all the details to make Creamy Broccoli Cheddar Soup. You learned about key ingredients, cooking steps, and tips for a great texture. We also covered variations and storage methods to keep your soup fresh.
Remember, cooking should be fun and easy. Use fresh ingredients and experiment with flavors. Enjoy making this soup that warms the heart and fills the belly!



![- 1 large head of cauliflower, trimmed and cut into bite-sized florets - 1 cup shredded sharp cheddar cheese, divided - 1 cup cream cheese, softened to room temperature - 1 cup milk, preferably whole - 1/2 cup grated Parmesan cheese - 1 cup breadcrumbs (whole wheat or panko for extra crunch) - 2 garlic cloves, finely minced - 1 teaspoon onion powder - Salt and freshly cracked black pepper to taste - 2 tablespoons extra virgin olive oil - Fresh parsley, finely chopped (for garnish) - For cheese lovers, try gouda or mozzarella for a different taste. - If you want a dairy-free version, use cashew cream and dairy-free cheese. - Whole grain breadcrumbs work well. For gluten-free, use crushed nuts or gluten-free crumbs. This cheesy cauliflower casserole is perfect for a cozy meal. The rich flavors come from simple ingredients, making it easy to enjoy. You can find the full recipe above to guide you through the cooking process. First, set your oven to 375°F (190°C). Preheating is key. It ensures even cooking and helps achieve a golden crust. If you skip this step, your casserole may not cook right. Next, you will blanch the cauliflower. Fill a large pot with water and add a pinch of salt. Once it boils, gently add the cauliflower florets. Blanch them for about 5 minutes. They should be tender but still crunchy. Drain and let them cool. Keeping that crunch is important for the final dish. Now, let’s make the cheese mixture. In a big bowl, mix softened cream cheese with milk until smooth. Then add minced garlic and onion powder. Finally, fold in half of the shredded cheddar cheese. You want it creamy and well-blended. This mixture adds great flavor. Next, fold the blanched cauliflower into the cheese mixture. Make sure each floret gets coated well. This is where you can add salt and freshly cracked black pepper. Taste it to ensure it’s seasoned just right. Take a 9x13 inch casserole dish and grease it with olive oil or cooking spray. Pour the creamy cauliflower mixture into the dish. Spread it out evenly. This helps every bite to be delicious. Finally, bake your casserole. Place it in the oven for 25-30 minutes. Look for a golden brown top and bubbly cheese. When it’s done, let it cool for about 5 minutes before serving. This helps the flavors settle and makes it easier to serve. For the full recipe, check out the details above. To get creamy cauliflower, use softened cream cheese and whole milk. This mix gives a rich feel. Blanch the cauliflower just right, so it stays firm. If you want a crispy topping, use panko breadcrumbs. They add extra crunch and texture. Mixing the breadcrumbs with a bit of olive oil helps them brown. Try adding fresh herbs like thyme or rosemary for extra flavor. A pinch of smoked paprika can bring a nice twist too. If you like heat, consider some chili flakes. Always taste your mix before baking. Adjust salt and pepper to your liking. This will make sure every bite is just right. For a fun touch, serve the casserole in individual ramekins. This makes each serving special. You can also top each ramekin with fresh parsley for color. Using a sprinkle of extra Parmesan adds a nice look and taste. Remember, we eat with our eyes first. A pretty dish makes it more inviting! {{image_4}} To make a low-carb version, use cauliflower rice instead of whole florets. This change will keep the dish light and reduce carbs. You can also add other veggies like broccoli or spinach. These will boost the flavor and nutrition. For a vegan option, swap dairy cheese with dairy-free cheese alternatives. Look for brands made from nuts or soy that melt well. You can also use plant-based cream options like coconut cream or cashew cream. This keeps the creamy texture without dairy. If you like heat, add chili flakes or jalapeños. These will give your casserole a nice kick. You may also explore global twists. Try Mediterranean flavors with olives and feta cheese, or go for Mexican flavors by adding black beans and corn. Each twist makes this dish exciting! For the full recipe, check out the [Full Recipe]. To store leftovers, use an airtight container. Make sure to cool the casserole first. Place it in the fridge. It will stay fresh for about 3 to 5 days. Always check for signs of spoilage before eating. For reheating, the oven is best for keeping the texture. Preheat your oven to 350°F (175°C). Place the casserole in a baking dish. Cover it with foil to avoid drying out. Heat for about 20 minutes or until warm. Limit reheating to just once to keep it tasty. To freeze, let the casserole cool completely. Cut it into portions for easy use. Wrap each piece well in plastic wrap. Then place them in a freezer-safe bag. It can last up to 3 months. For thawing, place it in the fridge overnight for best results. This helps keep the quality. To make this cheesy cauliflower casserole, follow these easy steps: 1. Preheat the oven: Set it to 375°F (190°C). 2. Blanch the cauliflower: Boil water with salt, then add cauliflower florets for about 5 minutes. Drain and let cool. 3. Prepare the cheese mixture: In a bowl, mix cream cheese and milk until smooth. Add minced garlic, onion powder, and half the cheddar cheese. 4. Combine with cauliflower: Fold the blanched cauliflower into the cheese mixture. Season with salt and pepper. 5. Fill the casserole dish: Grease a 9x13 inch dish and pour the mixture in. 6. Prepare the topping: Combine breadcrumbs, Parmesan, remaining cheddar, and olive oil. Sprinkle on top. 7. Bake: Cook in the oven for 25-30 minutes until golden brown. 8. Cool and garnish: Let it cool for a few minutes and add parsley on top. You can find the full recipe above for more details. Yes, you can make this casserole ahead of time. Prepare it up to the baking step. Cover it and place it in the fridge for up to 24 hours. When ready to serve, bake it at 375°F (190°C) for about 30-35 minutes. You may need to add a few extra minutes if it’s cold from the fridge. This casserole pairs well with many dishes. Here are some great options: - Grilled chicken or fish for protein. - A fresh green salad for crunch. - Roasted vegetables for added nutrition. - Garlic bread for a comforting touch. These sides will balance the rich flavors of the casserole. Yes, it is perfect for meal prep. Store leftovers in airtight containers in the fridge for up to 4 days. Reheat in the microwave or oven. For best results, use the oven to keep the topping crispy. Cauliflower is a powerhouse of nutrients. Here are some key benefits: - Low in calories: This makes it great for weight management. - High in fiber: Promotes good digestion and keeps you full. - Rich in vitamins: Especially vitamin C and K, which support health. - Antioxidants: Help protect your body from damage. Including cauliflower in your diet can boost overall health while enjoying delicious meals. This cheesy cauliflower casserole is a blend of flavor and ease. We covered the key ingredients, preparation steps, and variations to make it your own. From storing leftovers to serving suggestions, this dish fits many needs. Whether you prefer it low-carb, vegan, or with a spicy kick, there's a version for everyone. Enjoy creating your own twist on this delightful dish. Cooking should be fun and tasty!](https://dishtreats.com/wp-content/uploads/2025/07/466b6563-f7cf-4c28-8259-a68bc212ec4f-768x768.webp)


![To make honey garlic glazed carrots, gather these items: - 1 lb baby carrots (or 4-5 regular carrots, peeled and cut into sticks) - 3 tablespoons honey - 2 tablespoons unsalted butter - 2 cloves garlic, minced - 1 tablespoon fresh ginger, finely grated - Salt and freshly ground black pepper to taste - 2 tablespoons fresh parsley, finely chopped (for garnish) You can change up the flavor with these ingredients: - 1 teaspoon red pepper flakes for heat - 1 tablespoon soy sauce for depth - 1 tablespoon lemon juice for brightness - Chopped nuts like walnuts or pecans for crunch When selecting carrots, look for these signs: - Choose bright orange carrots without dark spots. - Check for firmness; soft carrots may be old. - Look for greens if buying whole carrots; they should be fresh and vibrant. - Avoid carrots with cracks or wrinkles, as they may be dry. These tips help ensure you use the best carrots for your dish. Fresh carrots enhance the taste and texture of your honey garlic glazed carrots. For the full recipe, don't forget to check the complete instructions! 1. Start by washing your carrots well. If you use regular carrots, peel them. Then, cut them into sticks. Baby carrots need less prep. Just wash them. 2. Take a large skillet and add the unsalted butter. Heat it on medium. Watch closely until it starts to foam. 3. Next, add the minced garlic and grated ginger. Stir them for 1-2 minutes. You want them to smell great but not brown. 4. Now, pour in the honey. Mix it well with the garlic and ginger. This makes a tasty glaze. 5. Carefully add your carrots into the skillet. Use tongs or a spoon to toss them in the glaze. Make sure they get covered well. 6. Season with salt and black pepper to taste. Lower the heat and cover the skillet. Cook for 10-15 minutes. Stir them a bit to cook evenly. They should be tender but not mushy. 7. When the carrots are done, remove the lid. Turn the heat back to medium. Sauté them uncovered for 2-3 minutes. This helps the glaze become sticky. 8. Finally, take the skillet off the heat. Move the glazed carrots to a serving dish. Garnish with fresh parsley for a bright touch. - Prep: Use a sharp knife for even cuts. This helps with cooking time. - Sautéing: Keep the heat steady. This prevents burning the garlic. - Glaze: Watch for a shiny, thick look. That means it's ready to serve. - Don’t burn the garlic. It can turn bitter fast. - Avoid overcrowding the pan. This can lead to uneven cooking. - Don’t skip the garnish. Fresh parsley adds flavor and color. By following these steps, you can create delicious honey garlic glazed carrots that everyone will love! For the full recipe, check out the [Full Recipe]. To get the best glaze, start with fresh ingredients. Use high-quality honey for more flavor. Heat the butter slowly to avoid burning. Once the garlic and ginger smell great, add the honey. Stir it well to mix the flavors. Cook the carrots in the glaze until they are tender but not mushy. This gives you that nice sticky texture. Don't forget to sauté them uncovered at the end. This helps the glaze thicken and shine. Serve your honey garlic glazed carrots in a shallow bowl. This way, the glossy glaze stands out. Add an extra sprinkle of parsley on top for color. These carrots pair well with roasted chicken or grilled fish. You can also serve them alongside rice or quinoa for a nice meal balance. They make a great side dish for any dinner. Want to spice things up? Try adding fresh herbs like thyme or rosemary. A pinch of chili flakes can give a nice kick. You can also use lemon zest for a bright taste. If you like a deeper flavor, add a splash of soy sauce. Just remember, keep it balanced. You want the sweet honey to shine, too. For even more fun, try mixing in some nuts for crunch. {{image_4}} You can make honey garlic glaze work with many veggies. Try adding green beans, broccoli, or bell peppers. Cut them to the same size as the carrots. This helps them cook evenly. Each vegetable brings its own texture and flavor. You can mix and match to keep it fun! To make this dish vegan, swap butter for olive oil or coconut oil. This keeps the flavor rich while making it plant-based. Also, use maple syrup instead of honey. It gives a sweet touch that works great with garlic. Your dish will still taste amazing while being vegan-friendly. In fall, try using roasted squash or sweet potatoes. These add a lovely flavor. For a winter twist, consider using parsnips or turnips. If you want to avoid honey, you can use agave syrup or date syrup. Both are sweet and work well with garlic. Each season offers unique veggies to explore. After enjoying your honey garlic glazed carrots, let them cool down. Place leftovers in an airtight container. Make sure to store them in the fridge. They can last up to 3 days. If you notice any excess moisture, use a paper towel to absorb it. You can freeze honey garlic glazed carrots, but they may lose some texture. Place cooled carrots in a freezer-safe bag. Try to remove as much air as possible. They can stay good for about 2 months. When you’re ready to use them, thaw them in the fridge overnight. To reheat, you have a few options. You can use the microwave for quick warming. Heat in intervals, stirring in between to ensure even heating. If you prefer, reheat them on the stove. Add a splash of water or broth in a pan. This helps keep them moist. Heat on low until warmed through, stirring gently. For a crispy finish, sauté them in a pan for a few minutes. Enjoy your sweet and savory dish again! Yes, you can! While I love baby carrots, you can use regular carrots too. Just peel and cut them into sticks. This helps them cook evenly. If you want a fun twist, try rainbow carrots. They add color and taste to your dish. These glazed carrots pair well with many dishes. Try them with roasted chicken or grilled fish. They also go great with rice or quinoa. For a hearty meal, serve them with beef or pork. You can even add them to a veggie bowl for a healthy lunch. To thicken the glaze, cook it longer. Let it simmer until it reduces and gets sticky. If you want a thinner glaze, add a bit of water or broth. Stir well to combine. Adjust it to your taste and enjoy! For the full recipe, check out the detailed steps above. Honey garlic glazed carrots are a simple side dish. They bring sweet and savory flavors to your meal. The honey adds a nice touch of sweetness. Garlic and ginger give it a warm, spicy zing. This dish is perfect for any dinner, big or small. - Prep Time: 10 min - Cook Time: 15 min - Total Time: 25 min - Servings: 4 This recipe is quick and easy. You can have it ready in just 25 minutes. Each serving of honey garlic glazed carrots is about: - Calories: 150 - Fat: 7g - Carbohydrates: 23g - Fiber: 3g - Sugar: 12g - Protein: 1g These carrots are good for you and taste great. They are a fun way to add veggies to any meal. For the full recipe, you can check out the details above. This blog post covered all you need for honey garlic glazed carrots. We talked about key ingredients, cooking steps, and variations. You learned how to avoid common mistakes and store leftovers. Remember, fresh carrots boost flavor, and adding spices can elevate your dish. Try different vegetables or keep it vegan for new tastes. With these tips, you can serve a delicious side meal every time. Happy cooking!](https://dishtreats.com/wp-content/uploads/2025/07/6848e6f0-ffb0-4855-be77-9b0adbe9293f-768x768.webp)