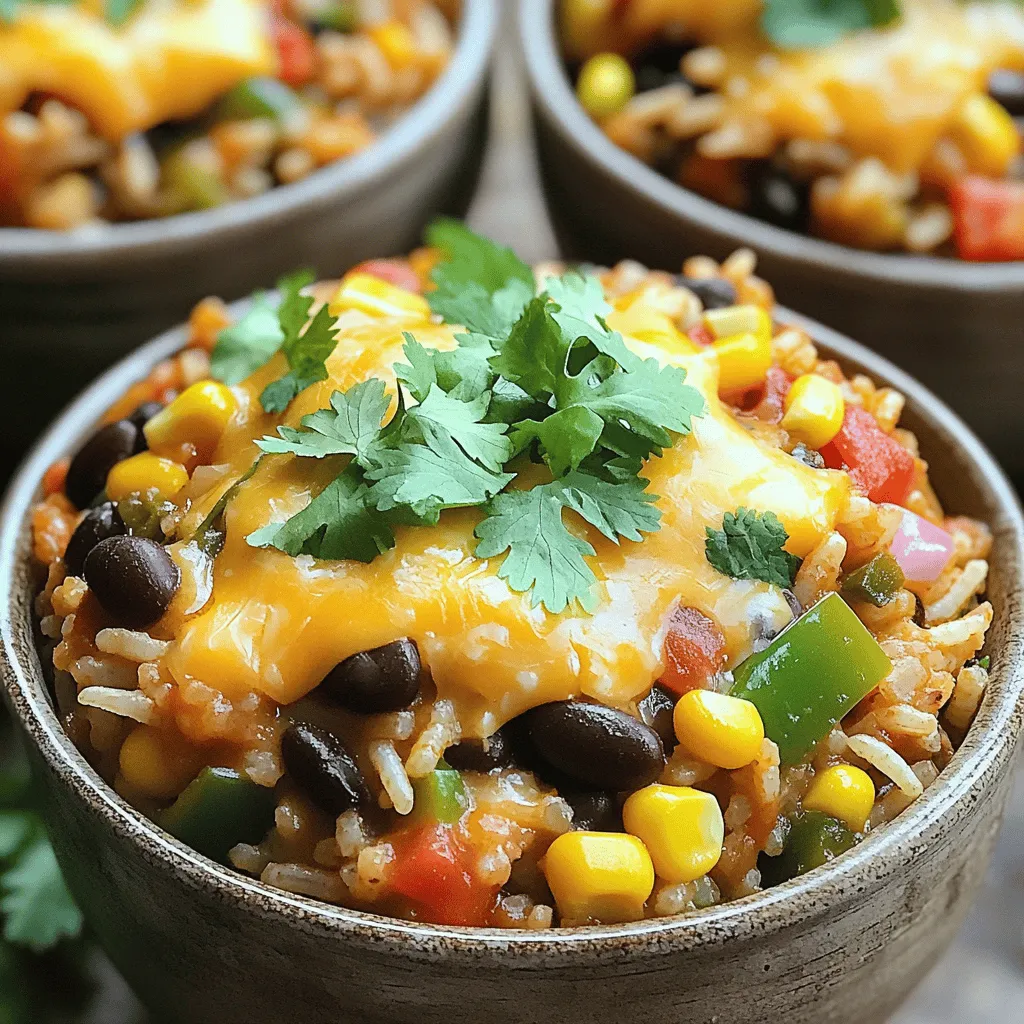
One-Pot Mexican Rice Casserole Flavorful Family Meal
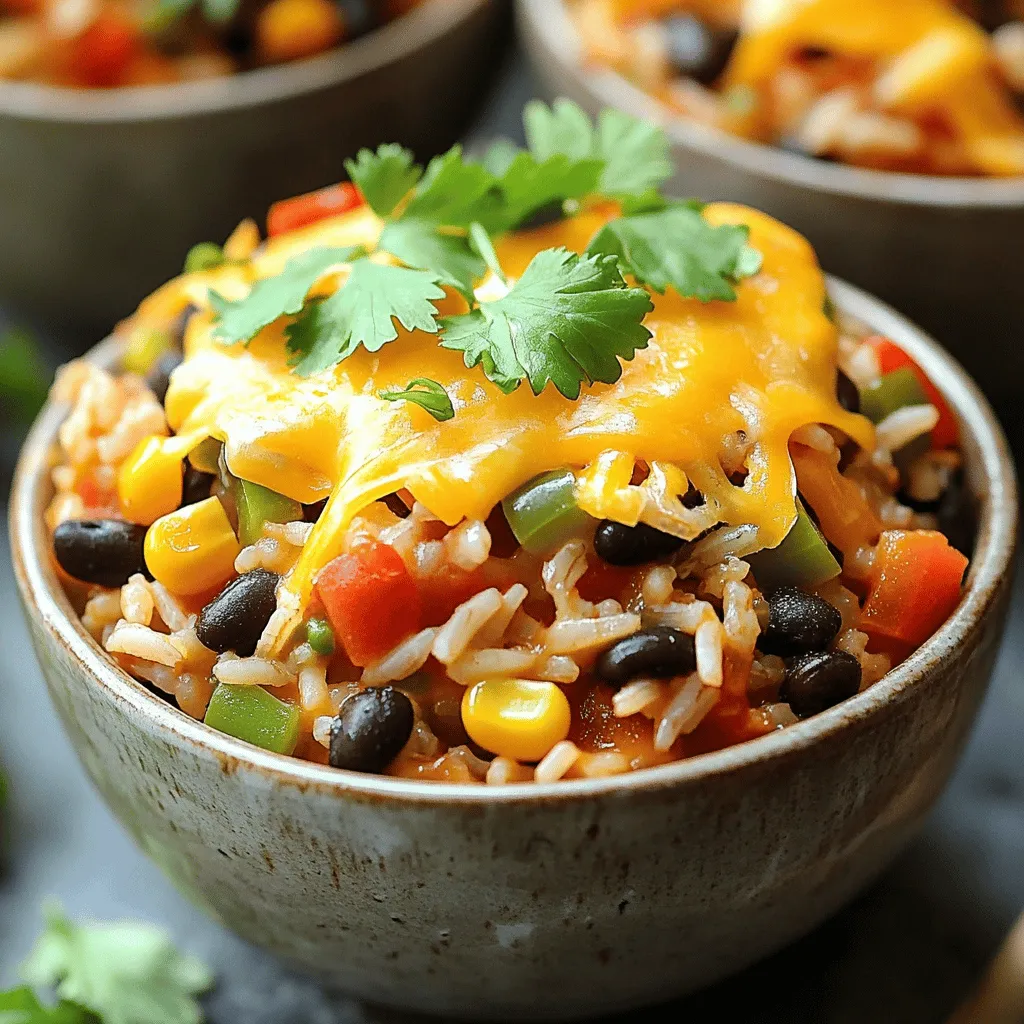
Looking for a simple, delicious family meal? Let me introduce you to my One-Pot Mexican Rice Casserole! This dish combines vibrant flavors and easy preparation, making it perfect for busy nights. With just a few ingredients and minimal cleanup, you can create a filling meal that pleases everyone at your table. Ready to dig in? Let’s explore how to make this tasty casserole!
Ingredients
Main Ingredients
- Rice Type
I prefer long-grain rice for this dish. It cooks evenly and stays fluffy.
- Canned Goods
You will need:
- 1 can (15 oz) black beans, drained and rinsed
- 1 can (14.5 oz) diced tomatoes with green chilies
- Fresh Produce
For fresh flavors, include:
- 1 bell pepper, any color, diced
- 1 small onion, finely chopped
- 2 cloves garlic, minced
- 1 cup corn kernels (fresh, frozen, or canned)
Spices and Seasoning
- Essential Spices
Key spices are:
- 1 teaspoon ground cumin
- 1 teaspoon chili powder
- 1/2 teaspoon smoked paprika
- Salt and Pepper
Use salt and freshly ground black pepper to taste. They enhance the flavors.
Toppings
- Cheese Options
For a rich finish, use:
- 1 cup shredded cheese (cheddar or Mexican blend)
- Garnishing Choices
Fresh cilantro adds a burst of color and flavor. You can also add sour cream or avocado slices.
Step-by-Step Instructions
Prepping the Ingredients
Chopping Vegetables
Start by washing your bell pepper and onion. Dice the bell pepper into small pieces. Finely chop the onion. This step adds a fresh taste to our dish.
Measuring Rice and Beans
Next, measure 1 cup of long-grain rice. Rinse it under cold water to remove extra starch. Open a can of black beans, drain it well, and rinse to remove excess salt.
Cooking Process
Initial Sautéing
In a large pot or Dutch oven, heat 1 tablespoon of olive oil. Once it shimmers, add the chopped onion and bell pepper. Sauté these for about 5 minutes. Stir them often until they soften and smell great.
Toasting Rice
Now, add the rinsed rice to the pot. Stir well to coat it with the oil and veggies. Let the rice toast for about 2 minutes. This step helps to deepen the flavor.
Simmering the Dish
Carefully pour in 2 cups of vegetable broth. Add the can of diced tomatoes with their juices, the black beans, and corn. Season with salt and black pepper to taste. Stir everything until well mixed. Bring the mixture to a boil. Once boiling, reduce the heat to low. Cover the pot and let it simmer for 20-25 minutes. Check that the rice is tender and has absorbed most of the liquid.
Final Touches
Adding Cheese
After cooking, remove the pot from heat. Sprinkle 1 cup of shredded cheese over the top. Cover the pot again for about 5 minutes. This allows the cheese to melt nicely.
Mixing and Serving
Once the cheese is melted, gently stir the casserole to mix it all together. Just before serving, add fresh cilantro on top for a burst of flavor and color. Enjoy your One-Pot Mexican Rice Casserole!
Tips & Tricks
Cooking Tips
Avoiding Sticky Rice
To prevent sticky rice, rinse your long-grain rice before cooking. This removes excess starch. You can also toast the rice in olive oil for 2 minutes. This adds flavor and keeps grains separate.
Adjusting Spices
Taste is key when it comes to spices. Start with the suggested amounts. If you love heat, add more chili powder. For a milder dish, cut back on spices. Always taste as you go to find your perfect balance.
Serving Suggestions
Garnishing Ideas
Add flavor and color with fresh cilantro. You can also top each bowl with sour cream. Slices of avocado add a creamy touch. For a little crunch, try tortilla chips on top.
Accompanying Dishes
This casserole pairs well with a fresh salad. A zesty lime vinaigrette can brighten your meal. You can also serve it with warm corn tortillas for a complete experience.
Healthier Alternatives
Low-Sodium Broth
To make a healthier dish, use low-sodium vegetable broth. This cuts down on salt without losing flavor. It helps keep your meal balanced and tasty.
Vegetarian/Vegan Adjustments
This dish can easily become vegan. Simply skip the cheese or use a dairy-free alternative. You can add more veggies like zucchini or spinach for extra nutrition.
Variations
Ingredient Swaps
Alternative Proteins
You can change up the protein in this dish. Instead of black beans, try using chickpeas or lentils. For meat lovers, ground turkey or chicken works well, too. Just cook the meat before adding it to the pot. This adds flavor and texture to your meal.
Different Vegetables
Feel free to mix in your favorite veggies. Zucchini, carrots, or spinach all add great taste and nutrition. You can also use frozen veggies for convenience. Just toss them in with the rice. This makes it easy to customize your casserole.
Cooking Method Alternatives
Slow Cooker Version
To make this in a slow cooker, sauté the onion, bell pepper, and garlic first. Then, add the rice, beans, tomatoes, corn, and spices into the slow cooker. Pour in the broth and cook on low for 4-6 hours. This method gives a warm, cozy flavor.
Instant Pot Method
If you’re short on time, use an Instant Pot. Sauté the veggies as usual, then add the rice and other ingredients. Close the lid and cook on high for 10 minutes. Quick and easy, the Instant Pot makes this dish a breeze.
Flavor Profile Changes
Spicy Additions
Want to kick up the heat? Add jalapeños or a dash of hot sauce. You can also use spicy diced tomatoes for more flavor. Adjust the spice to your liking for a warming dish.
Herb Combinations
Fresh herbs can change the taste completely. Try adding chopped cilantro or parsley for freshness. You can also mix in dried herbs like oregano or thyme. This adds depth and makes your casserole sing with flavor.
Storage Info
Refrigeration
To store leftovers, place the casserole in an airtight container. Let it cool to room temperature first. You can keep it in the fridge for up to four days.
For reheating, you can use the microwave or the stove. If using the microwave, heat it in 30-second intervals. Stir between intervals for even warming. On the stove, add a splash of broth to prevent sticking. Heat on low until warm.
Freezing Guidance
If you want to freeze the casserole, use a freezer-safe container. Allow it to cool completely, then cover tightly. You can freeze it for up to three months.
For thawing, move it to the fridge overnight before reheating. This way, it thaws slowly and safely. If you’re in a hurry, you can use the microwave on defrost mode.
Shelf Life
In the fridge, the casserole lasts about four days. In the freezer, it keeps well for three months. Always check for signs of spoilage, like off smells or changes in texture. Enjoy your meal safely!
FAQs
Can I use brown rice instead of long-grain rice?
Yes, you can use brown rice, but cooking time changes. Brown rice takes longer to cook than white rice. You will need to add about 10-15 more minutes to the cooking time. Make sure to check the rice for doneness. If it’s still firm, let it simmer longer with a bit more broth.
Is this recipe gluten-free?
Yes, this recipe can be gluten-free. Check your canned goods for gluten-free labels. The black beans, tomatoes, and corn should be gluten-free. Use gluten-free vegetable broth to ensure the whole dish is safe for those avoiding gluten.
Can I make this casserole ahead of time?
Yes, you can prep this casserole ahead. Cook the rice mixture as directed and let it cool. Store it in the fridge for up to 2 days. When ready to eat, reheat it on the stove or in the oven. Add cheese before reheating for that gooey melted texture.
This article explored how to create a delicious casserole. We covered key ingredients like rice, fresh produce, and spices. I shared step-by-step instructions for prepping, cooking, and adding final touches. Helpful tips offered ways to avoid sticky rice and serve with style. We discussed variations, storage methods, and answered common questions. Casseroles are versatile and easy, making them a great choice. Try different flavors and ingredients to make it your own. Enjoy cooking and sharing your tasty creations with others!

![To make crispy baked sweet potato fries, you need just a few simple ingredients. Here’s what you’ll need: - 2 large sweet potatoes - 2 tablespoons extra-virgin olive oil - 1 teaspoon cornstarch - 1 teaspoon smoked paprika - 1/2 teaspoon garlic powder - 1/2 teaspoon onion powder - 1/4 teaspoon cayenne pepper (optional) - Salt and freshly ground black pepper - Fresh parsley for garnish These ingredients combine to create a flavorful and fun side dish. Sweet potatoes give a natural sweetness. Olive oil helps with that crispy texture. The cornstarch is the secret for extra crunch. Smoked paprika adds a nice depth of flavor. Garlic and onion powder bring warmth. Cayenne pepper can spice things up if you like it hot. Finally, salt and pepper enhance everything. Using fresh parsley on top not only looks nice but adds a fresh taste. This is the perfect mix for a tasty treat. You can find the full recipe in the recipe section to make it easy for you. 1. Preheat your oven to 425°F (220°C). It’s key for crispiness. 2. Line a large baking sheet with parchment paper. This helps fries not stick. 3. Take 2 large sweet potatoes. Rinse and cut them into even-sized fries. Try to keep them similar in size for even cooking. 4. Place the fries in a mixing bowl. Drizzle 2 tablespoons of olive oil over them. Mix well to coat each fry evenly. 1. Sprinkle 1 teaspoon of cornstarch over the fries. This helps them get that crispy texture. 2. Add spices: 1 teaspoon of smoked paprika, 1/2 teaspoon of garlic powder, 1/2 teaspoon of onion powder, and 1/4 teaspoon of cayenne pepper if you like spice. 3. Season with salt and black pepper to taste. Toss the fries gently to make sure they are all coated well with the seasonings. 1. Arrange the seasoned fries on your baking sheet. Make sure they are in a single layer. This allows air to flow and makes them crispy. 2. Bake in the preheated oven for 25 to 30 minutes. Flip the fries halfway through. This helps them brown evenly. 3. When they turn golden and crispy, they are ready. Let them cool for a few minutes before serving. Enjoy these crispy baked sweet potato fries with your favorite dips! For the full recipe, check out the detailed instructions. To get the best crispy fries, air circulation is key. When you spread the fries out on the baking sheet, make sure they aren't touching. This allows hot air to flow all around them. If your fries aren’t crispy enough, try adding a few extra minutes to the cooking time. Keep an eye on them to avoid burning. You can customize the spice levels based on your taste. If you like more heat, add more cayenne pepper. For a milder flavor, leave it out. You can also swap the spices for other favorites like chili powder or Italian herbs. Mix and match to find your perfect blend. An eye-catching way to serve your fries is in a cone or a basket with parchment paper. This makes them look fun and inviting. Pair your fries with tasty dipping sauces like spicy mayo, creamy ranch, or classic ketchup. It adds more flavor and makes the meal special. Enjoy your crispy baked sweet potato fries from the [Full Recipe]. {{image_4}} You can easily change the taste of your sweet potato fries. For a sweet and spicy option, drizzle them with maple syrup before baking. This will add a nice glaze and a kick of flavor. If you prefer herbs, try adding fresh rosemary or thyme. These herbs bring a savory touch that pairs well with the natural sweetness of the potatoes. Using an air fryer is a fantastic way to make crispy fries. Set your air fryer to 400°F (200°C) and cook them for about 15-20 minutes. Shake the basket halfway through to ensure even cooking. If you enjoy grilling, you can also grill sweet potato fries. Slice them thicker, brush with olive oil, and grill over medium heat for about 5-7 minutes on each side. This gives a nice smoky flavor. Sweet potato fries are great on their own, but you can elevate your meal. Pair them with grilled chicken, fish, or a fresh salad for a balanced dish. They also work well in meal prep. You can make a batch and store them in the fridge. Just reheat them for a quick snack or side dish. For a fun twist, serve them in a cone with a side of your favorite dipping sauce. Try creamy ranch, spicy mayo, or classic ketchup for added flavor. For the full recipe, check out the full recipe link! To keep your crispy baked sweet potato fries fresh, store them in the fridge. Place them in an airtight container. This helps maintain their flavor and texture. They can last for up to three days in the fridge. If you want to keep them longer, freezing is a great option. Place the fries in a freezer-safe bag. Remove as much air as you can before sealing. This prevents freezer burn and keeps them tasty. When you're ready to enjoy your leftovers, reheating is key. For crispy fries, use the oven. Preheat your oven to 400°F (200°C). Spread the fries in a single layer on a baking sheet. Heat for about 10 to 15 minutes, flipping halfway through. This method keeps the fries crispy. You can also use an air fryer. Set it to 380°F (193°C) and heat for about 5 to 7 minutes. Avoid using a microwave, as it can make the fries soggy. In the fridge, your fries can last about three days. In the freezer, they can last up to three months. When you store them correctly, you can enjoy them later without losing flavor or texture. Just remember to check for any signs of freezer burn if they are in the freezer for a while. How can I make sweet potato fries even crispier? To make your sweet potato fries crispier, soak them in cold water. Do this for at least 30 minutes. This helps remove excess starch. After soaking, dry them well with a towel. Also, use cornstarch before baking to create a crisp outer layer. Can I use regular potatoes instead? Yes, you can use regular potatoes. They will taste different but can still be delicious. You might need to adjust the cooking time. Regular potatoes may cook faster than sweet potatoes. What's the nutritional value of sweet potato fries? Sweet potato fries are high in vitamins A and C. They are also a good source of fiber. Compared to regular fries, they have fewer calories and more nutrients. This makes them a healthier choice for a snack or side dish. What is the optimal temperature for baking sweet potato fries? The best temperature for baking sweet potato fries is 425°F (220°C). This high heat helps them cook evenly and get crispy. How long should I bake them for the best results? Bake the fries for 25 to 30 minutes. Be sure to flip them halfway through to get an even golden color. They should look crispy and slightly browned when done. Can I use a different oil? Yes, you can use other oils like avocado oil or canola oil. Each oil has a different flavor, but all will work well for baking. What if I don't have cornstarch? If you don't have cornstarch, you can use potato starch or even flour. Both will help create a crisp texture. Just use the same amount as the cornstarch in the recipe. Making sweet potato fries is simple and fun. You learned the key ingredients and steps to create crispy fries. I shared tips for seasoning and presentation to elevate your meal. You can also explore variations and alternative cooking methods. Storing and reheating properly ensures you can enjoy leftovers without losing quality. Incorporate your favorite flavors and get creative. Remember, these fries are a tasty, healthy option for any meal. Enjoy your cooking adventure!](https://dishtreats.com/wp-content/uploads/2025/07/5c45319a-0858-4d48-b29a-502acd419023-768x768.webp)


![To make crispy cauliflower tacos, gather these key ingredients: - 1 head of cauliflower, separated into bite-sized florets - 1 cup panko breadcrumbs - 1 teaspoon smoked paprika - 1 teaspoon garlic powder - 1 teaspoon onion powder - 1/2 teaspoon cayenne pepper (adjust to your spice level) - Salt and pepper to taste - 1 cup all-purpose flour - 1 cup plant-based milk (or regular milk) - Corn tortillas (for assembling the tacos) - 1 ripe avocado, sliced - 1 cup shredded red cabbage - Fresh cilantro, for garnishing - Lime wedges, for serving You can swap some ingredients based on your needs. Here are some ideas: - Use gluten-free flour instead of all-purpose flour. - Replace panko with crushed cornflakes for a different crunch. - Try almond milk or oat milk instead of plant-based milk. - Use different spices, like chili powder or cumin, for a unique flavor. To make your tacos even more delicious, consider these toppings: - Fresh salsa for a burst of flavor. - Pickled onions for a tangy kick. - Crumbled feta or queso for creaminess. - Radish slices for added crunch. - A drizzle of hot sauce for some heat. For the full recipe, refer back to the earlier section. Enjoy creating your crispy cauliflower tacos! Start by preheating your oven to 425°F (220°C). This ensures even cooking and crispiness. Next, take your head of cauliflower and separate it into bite-sized florets. Make sure the pieces are not too big. Smaller florets cook faster and get crispier. Now, let’s set up your breading station. Get three bowls in a row. In the first bowl, add one cup of all-purpose flour. In the second bowl, pour one cup of plant-based milk (or regular milk). In the third bowl, mix one cup of panko breadcrumbs with one teaspoon of smoked paprika, one teaspoon of garlic powder, one teaspoon of onion powder, and half a teaspoon of cayenne pepper. Add salt and pepper to taste. Stir the breadcrumbs well to spread the spices evenly. Once your cauliflower is ready and your breading station is set, it’s time to coat the florets. Dip each floret into the flour first. Make sure it’s fully coated, then shake off the excess. Next, dip the floret into the plant-based milk, letting any extra drip off. Finally, roll it in the breadcrumb mixture, pressing gently. Place the breaded florets on a lined baking sheet, leaving space between them. Now, slide the baking sheet into your preheated oven. Bake for 25-30 minutes. Flip the florets halfway through to ensure they brown evenly. When they turn golden and crispy, they’re ready! Enjoy your crispy cauliflower tacos with all the tasty toppings from the Full Recipe. To get that crunch, the key is the panko breadcrumbs. They create a light and crispy coating. Make sure to coat each cauliflower floret well. When you bake them, place them evenly on the sheet. This allows hot air to circulate, making them crispier. Spice up your tacos with smoked paprika and cayenne pepper. They add a nice kick. You can also mix in herbs like cumin or oregano for extra depth. Don't forget to season with salt and pepper. Taste the breadcrumbs before coating the cauliflower to ensure they are flavorful. For the best serving experience, warm your corn tortillas before filling them. This makes them pliable and tasty. Layer your tacos with fresh avocado and shredded cabbage. Top with chopped cilantro and a squeeze of lime for brightness. For an extra treat, serve with a side of salsa or hot sauce. If you want the full recipe, check out the Crispy Cauliflower Tacos section. {{image_4}} You can easily make these tacos vegan. Use plant-based milk instead of regular milk. For the breading, stick to vegan-friendly panko breadcrumbs. This keeps the flavor and crunch you want. To make these tacos gluten-free, swap regular flour with a gluten-free all-purpose blend. Gluten-free panko will also work well for the breading. This way, everyone can enjoy these tasty tacos. You can change the flavor of your tacos. For a spicy kick, add more cayenne pepper or some chili powder. If you prefer sweet, try adding a drizzle of agave syrup or honey. For a savory twist, consider using smoked paprika or a dash of soy sauce in the batter. Each variation brings a new taste adventure to your table. To store leftover tacos, place them in an airtight container. Separate the crispy cauliflower and tortillas if you can. This keeps the tortillas from getting soggy. Store in the fridge for up to three days. When you are ready to eat, you can reheat them for the best taste. To reheat, place the cauliflower on a baking sheet. Preheat your oven to 350°F (175°C). Bake for about 10-15 minutes until crispy again. For the tortillas, heat them in a dry pan for a minute on each side. This helps to keep them warm and flexible. If you want to freeze the tacos, wrap each taco tightly in plastic wrap. Place them in a freezer-safe bag to avoid freezer burn. They can last up to a month in the freezer. When ready to eat, thaw them overnight in the fridge and reheat as mentioned above. Enjoy the great taste even after storage! For the full recipe, refer back to the beginning of the article. To make your cauliflower tacos crispier, follow these tips: - Use Panko Breadcrumbs: They are lighter and create a better crunch than regular breadcrumbs. - Double Coat: For extra crunch, dip the florets in flour, then milk, and roll in breadcrumbs twice. - Bake at High Heat: Ensure your oven is at 425°F (220°C) for that golden finish. - Don’t Crowd the Pan: Space the florets on the baking sheet. This helps them crisp all over. - Flip Regularly: Halfway through baking, flip the florets to cook evenly. By using these steps, you'll achieve a wonderfully crispy texture every time. Yes, you can use different tortillas! Here are some options: - Flour Tortillas: These are soft and great for holding fillings. - Whole Wheat Tortillas: A healthier choice with more fiber. - Lettuce Wraps: For a low-carb option, try using large lettuce leaves. - Taco Shells: Crunchy taco shells add a fun twist. Choose the tortilla that fits your taste and dietary needs. Pair your crispy cauliflower tacos with these delicious side dishes: - Mexican Rice: Fluffy rice with spices complements the tacos well. - Black Beans: A protein-rich side that adds flavor and nutrition. - Guacamole: Creamy and fresh, it’s always a hit. - Corn Salad: A sweet and tangy salad brightens the meal. - Grilled Vegetables: Charred veggies bring a smoky flavor that pairs nicely. These sides will enhance your taco experience and create a full, flavorful feast. For the complete recipe, check out the [Full Recipe]. This blog covered ingredients, steps, tips, variations, and storage for cauliflower tacos. You learned how to prep, bread, and bake for that perfect crunch. I shared useful flavor boosts and serving ideas. You can explore vegan and gluten-free options to suit your needs. Finally, I provided storage tips to keep leftovers fresh. Cauliflower tacos are fun and flexible. Enjoy making them your own!](https://dishtreats.com/wp-content/uploads/2025/07/b9e73b78-f0ec-4a59-80bf-257d8f9aee98-768x768.webp)