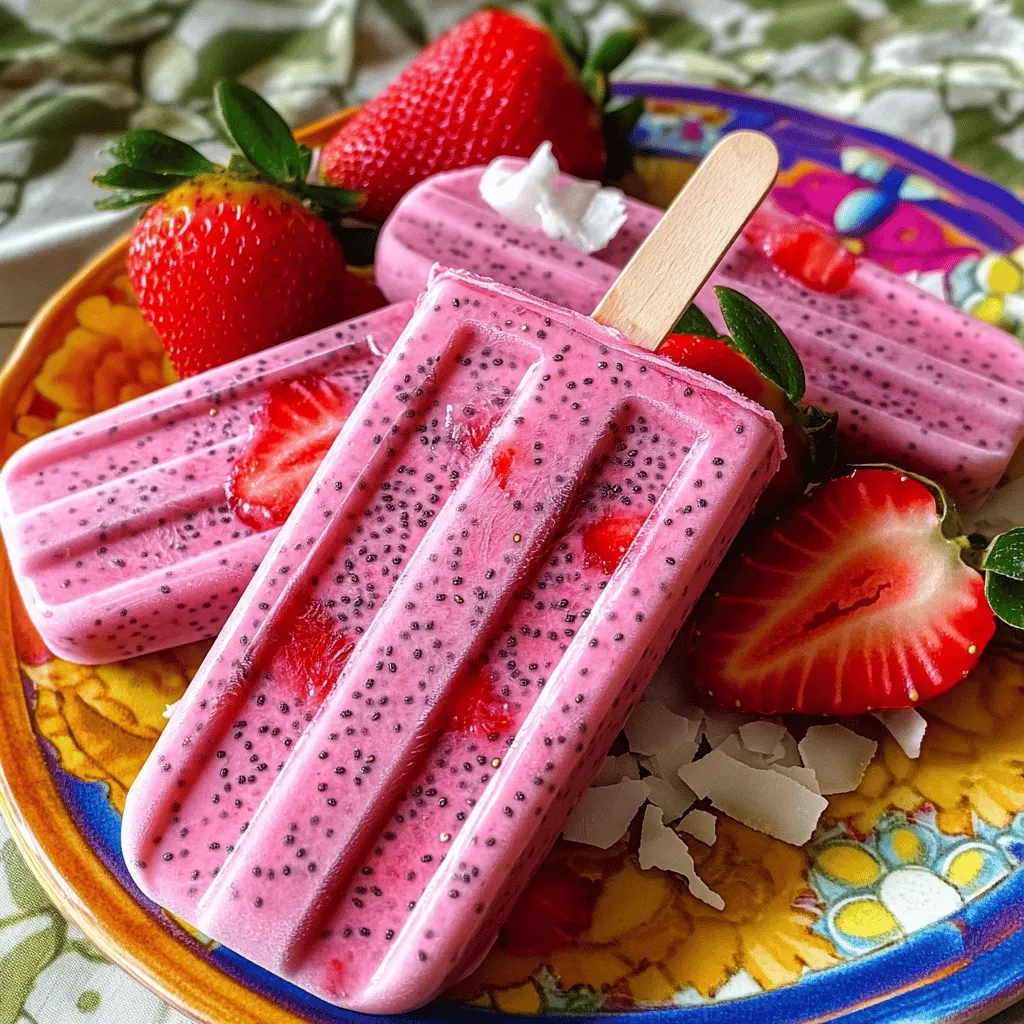
Strawberry Coconut Chia Popsicles Fresh and Simple Treat

Are you ready for a cool, refreshing treat? Strawberry Coconut Chia Popsicles are simple to make and bursting with flavor. With just a few fresh ingredients like strawberries, coconut milk, and chia seeds, you’ll have a tasty snack perfect for sunny days. In this guide, I’ll walk you through easy steps to create these delicious pops. Let’s dive in and make your new favorite summer treat!
Ingredients
When making Strawberry Coconut Chia Popsicles, you need fresh and simple ingredients. Each item adds flavor and nutrition to your treat. Here’s what you will need:
- 2 cups fresh strawberries, hulled and sliced
- 1 cup canned coconut milk
- 2 tablespoons honey or maple syrup
- 1/4 cup chia seeds
- 1 teaspoon pure vanilla extract
- Pinch of sea salt
Fresh strawberries bring sweetness and bright color. Canned coconut milk adds a creamy texture. You can choose honey or maple syrup based on your taste. Chia seeds give the popsicles a fun crunch and nutrients. Vanilla extract enhances the overall flavor, while sea salt balances everything. Each ingredient plays a key role in making these popsicles delicious and healthy.
Step-by-Step Instructions
Blending the Base
To start, grab your blender. Add 2 cups of hulled and sliced strawberries. Pour in 1 cup of canned coconut milk. Blend this mixture on high speed until it is smooth and creamy. You want no chunks of strawberry left.
Next, add 2 tablespoons of honey or maple syrup. This sweetens the pops. Then, include 1 teaspoon of pure vanilla extract and a pinch of sea salt. Blend again until everything is mixed well. You should have a uniform, delicious base.
Mixing in Chia Seeds
Now, transfer your blended mixture to a large bowl. It’s time to stir in 1/4 cup of chia seeds. Make sure they are evenly spread through the liquid. Mix well to avoid clumping.
Allow the mixture to rest for about 10 minutes. This lets the chia seeds absorb liquid and swell. After resting, give it another good stir to keep everything well mixed.
Pouring into Molds
Next, carefully pour the mixture into your popsicle molds. Fill each mold almost to the top. Leave a small gap at the top for expansion as they freeze.
Now, insert popsicle sticks into the molds. Make sure each stick is centered. This will help with easy handling later on.
Freezing and Unmolding
Place the molds in the freezer. Let them freeze for at least 4 to 6 hours. They need to be completely solid before you remove them.
When you are ready to enjoy your popsicles, run warm water over the outside of the molds for a few seconds. This helps release the popsicles. Gently pull them out without breaking. Enjoy your tasty treat!
Tips & Tricks
Perfecting Texture
How to Avoid Clumping of Chia Seeds
To prevent clumping, mix the chia seeds into the blended fruit and coconut milk slowly. Stir well after adding them to ensure even distribution. If you notice clumps, use a whisk to break them up. This helps keep your popsicles smooth and creamy.
Resting Technique for Ideal Consistency
Let the mixture rest for about 10 minutes after mixing in the chia seeds. This time allows the seeds to absorb some liquid and swell. Stir again after resting to ensure the seeds are spread evenly. This step is key for the perfect gel-like texture.
Serving Suggestions
Presentation Tips
Serve your popsicles on a vibrant plate for a fun look. You can place them upright in a cup or lay them down with spacing. This makes them easy to grab and adds color to your table.
Garnishing Ideas
Garnish with fresh strawberry slices or a sprinkle of coconut flakes. These additions make your popsicles more enticing. You can also drizzle a bit of honey or maple syrup on top for a sweet touch.
Health Benefits
Nutritional Advantages of Ingredients
These popsicles are packed with vitamins and minerals. Strawberries provide vitamin C and antioxidants. Coconut milk adds healthy fats, while chia seeds are full of fiber and protein. This treat is not only tasty but also nutritious.
Why Chia Seeds are Beneficial
Chia seeds are a superfood. They help keep you full longer and support digestion. They also provide omega-3 fatty acids, which are good for heart health. Adding these seeds to your popsicles makes them a smart choice for a snack.
Variations
Flavor Combinations
You can easily change up the flavors in your strawberry coconut chia popsicles. Adding other fruits can bring new tastes. For instance, try adding mango or pineapple. These fruits pair well with strawberries and coconut. Blend them in with your base for a tropical twist. You will enjoy a sweeter and tangier flavor.
Incorporating herbs can also make these popsicles exciting. Mint is a great choice. It adds a cool, refreshing taste that works well with strawberries. Just a few mint leaves blended in will do. You can also experiment with basil for a unique touch.
Dietary Modifications
If you need a dairy-free option, this recipe is already great! The canned coconut milk is a perfect substitute. It gives a rich, creamy texture without dairy. You can enjoy these popsicles guilt-free.
For sugar variations, consider using stevia or agave. Both sweeteners work well in this recipe. They can replace honey or maple syrup easily. Adjust the amount to your taste. This way, you can control the sweetness and keep it healthy.
Different Serving Suggestions
You can turn your popsicles into smoothie bowls. Simply chop the popsicles into pieces and blend them with yogurt. Top with fresh fruits, nuts, and seeds for a fun breakfast or snack.
Making popsicle sandwiches is another fun idea. Take two popsicles and place a cookie in the middle. It creates a tasty treat that kids love. Use soft cookies for the best experience. Enjoy these creative options to make your popsicles even more delightful!
Storage Info
Proper Freezing Techniques
To freeze your popsicles effectively, use a sturdy popsicle mold. Fill each mold with the mixture, leaving space at the top. This space allows for expansion as they freeze. Place the lids on, if available, to keep out any odors from the freezer.
To prevent freezer burn, wrap the molds in plastic wrap before freezing. This adds an extra layer of protection. You can also store the popsicles in a freezer-safe bag. Squeeze out any extra air before sealing.
Shelf Life
These strawberry coconut chia popsicles can last in the freezer for about two months. For the best taste and texture, enjoy them within the first month.
Look for signs of spoilage, like ice crystals on the surface or a change in color. If the popsicles look dry or have an off smell, it’s best to toss them.
Thawing Instructions
When you’re ready to enjoy your popsicles, thaw them for a few minutes at room temperature. This method helps maintain their texture. You can also run warm water over the outside of the molds for quicker removal.
Avoid thawing in the microwave. It can make your popsicles lose their creamy texture. This will leave you with a mushy treat instead of a refreshing bite.
FAQs
How do you make strawberry coconut chia popsicles vegan?
To make these popsicles vegan, simply swap honey for maple syrup. Maple syrup is a great choice and keeps the sweetness. The other ingredients, like strawberries and coconut milk, are already vegan. You will have a delicious treat that everyone can enjoy, no matter their diet.
Can I use frozen strawberries instead of fresh?
Yes, you can use frozen strawberries. However, this may change the texture. Frozen strawberries can make the popsicles a bit more watery. To fix this, you may need to add a little less coconut milk. The flavor will still be sweet and fruity, which is a bonus.
What if I don’t have popsicle molds?
No popsicle molds? No problem! You can use small cups instead. Fill them with the mixture and add sticks. You can also use ice cube trays for mini popsicles. Just remember to cover them with plastic wrap to hold the sticks in place. This way, you still get to enjoy your tasty treat!
You now have a clear path to making delicious strawberry coconut chia popsicles. We covered all the essentials, from ingredients to mixing techniques and freezing tips. Remember, you can explore fun variations by adding different fruits or herbs. Storage matters too, so follow the best practices to keep your popsicles fresh. Enjoy these treats not just for their taste but also for their health benefits. Dive into this sweet, nutritious treat, and make it your own!

![- 1 lb (450g) chicken breast, thinly sliced - 1 cup fresh Thai basil leaves, packed - 3 cloves garlic, minced - 2 red Thai chili peppers, thinly sliced (adjust based on your spice preference) For this dish, I prefer chicken breast. It cooks quickly and stays juicy. Fresh Thai basil gives this meal its unique flavor. Garlic adds a nice aroma, and Thai chili peppers bring heat. You can control the spice by adding more or less chili. - 2 tablespoons soy sauce - 1 tablespoon oyster sauce (or substitute with mushroom sauce for vegetarian) - 1 tablespoon fish sauce (or an extra tablespoon of soy sauce for vegetarian) - 1 teaspoon sugar (to balance flavors) - 1 tablespoon vegetable oil (for frying) These sauces are key to great taste. Soy sauce offers saltiness, while oyster and fish sauces add depth. Sugar balances the salty flavors, making everything taste better. - 1 bell pepper, sliced (your choice of color for visual appeal) - 1 small onion, sliced into thin wedges - Optional: other vegetables for added nutrition I like using bell pepper and onion for color and crunch. You can add other veggies like carrots or snap peas. They bring more nutrition and flavor, making the dish more vibrant. For the full recipe, refer to the [Full Recipe]. To start, you need to combine the chicken with the sauces. In a medium bowl, add the sliced chicken breast, soy sauce, oyster sauce, fish sauce, and sugar. Mix these ingredients well so the chicken gets all the flavor. Let it marinate for 15 minutes. This short time helps the chicken absorb the tasty sauces. Next, heat the vegetable oil in a large skillet or wok over medium-high heat. You want the oil to shimmer before adding anything. Then, add the minced garlic and sliced Thai chili peppers. Stir-fry them for about 30 seconds until they smell amazing. Be careful not to burn the garlic. Now, add the marinated chicken to the pan. Spread it out evenly for even cooking. Stir-fry for about 5 to 7 minutes. Cook until the chicken is no longer pink and has a nice brown color. After that, toss in the sliced bell pepper and onion. Stir-fry for another 3 to 4 minutes. This will make the vegetables tender but still crisp. Once the chicken and veggies are done, take the skillet off the heat. Gently fold in the fresh Thai basil leaves. They will wilt quickly from the heat and add a lovely aroma. Serve the dish hot, over a bed of fluffy jasmine rice. This rice complements the stir-fry well. Enjoy your Thai Basil Chicken Stir-Fry! For the full recipe, check out the details above. Using fresh ingredients makes a big difference. Fresh Thai basil gives a sweet and fragrant flavor to the dish. Always choose bright green basil leaves. They should smell strong and sweet. The chicken should be fresh, too. This keeps your stir-fry tasty and safe to eat. For the best flavor, cook on high heat. A hot pan helps to sear the chicken. This adds a nice caramel color and enhances the taste. When you add garlic and chili, cook them quickly. This brings out their strong flavors without burning them. You can change the heat level easily. If you want it milder, remove the seeds from the chili peppers. You can also use fewer peppers or substitute with sweet bell peppers. If you like a kick but want it less spicy, try adding sugar. It balances the heat. You can also use a bit of honey for sweetness without heat. Pair your Thai basil chicken stir-fry with jasmine rice. The rice absorbs the sauce well. You can also add a side of steamed veggies for extra nutrition. For garnishes, consider adding lime wedges or crushed peanuts. They add color and crunch. Fresh cilantro or extra basil leaves also make it pop. Enjoy your meal with these simple touches! For the full recipe, check out the details above. {{image_4}} For a vegetarian or vegan version, you can swap chicken for tofu or tempeh. These options give a nice texture. Use mushroom sauce instead of oyster sauce. It brings depth and umami flavor. For the fish sauce, simply add an extra tablespoon of soy sauce. This keeps the taste bold. To maintain flavor, marinate the tofu or tempeh just like chicken. Allow it to soak up the sauces. When cooking, make sure to press out excess moisture. This helps achieve that nice, crispy texture we all love. If you want to try something new, switch the chicken for shrimp or beef. Shrimp cooks quickly, so cut down the cooking time to about 3-4 minutes. Beef takes longer. Slice it thin and cook it for about 6-8 minutes. Remember, cooking times change based on what protein you use. Always make sure your protein is fully cooked before adding in the veggies. Want to shake things up? Add sauces like teriyaki or sriracha for an exciting twist. Teriyaki gives a sweet flavor, while sriracha adds heat. You can even mix both for a sweet and spicy kick. Feel free to experiment with herbs and spices too. Adding cilantro or mint can brighten the dish. Try a sprinkle of lime juice for an extra zest. These tiny changes can create a whole new taste experience. For the full recipe, check the section above. Enjoy cooking! To keep your Thai basil chicken stir-fry fresh, store it in an airtight container. Refrigerate the leftovers within two hours of cooking. If you want to save it longer, freeze the stir-fry. Make sure to cool it completely before freezing. This method helps retain flavor and texture. When you reheat your stir-fry, use a skillet for the best results. Heat it over medium warmth and stir often. This keeps the chicken juicy and prevents it from drying out. For rice, add a splash of water and cover it. This helps the rice steam and become fluffy again. In the fridge, your Thai basil chicken stir-fry lasts up to four days. If frozen, it can last for about three months. Always check for off smells or changes in color. If you see these, it's best to discard it for safety. Thai Basil Chicken Stir-Fry has roots in Thai street food. This dish reflects the vibrant flavors of Thai cuisine. It showcases fresh herbs, bold spices, and simple cooking techniques. Thai basil, known for its unique flavor, is key to this dish. It adds a sweet and slightly spicy note that enhances the chicken. This meal represents the balance of sweet, salty, and spicy tastes typical in Thai dishes. Each bite transports you to bustling markets in Thailand. Yes, you can prepare Thai basil chicken stir-fry in advance. Cook and store it in the fridge for up to three days. To keep it fresh, store it in an airtight container. When you are ready to eat, simply reheat it on the stove. This dish tastes even better the next day as flavors meld. Serve it over freshly cooked jasmine rice for a quick meal. If you cannot find Thai basil, you have options. Sweet basil or holy basil works well as a substitute. Sweet basil offers a milder flavor, while holy basil is spicier. You can also mix in a bit of mint for a fresh twist. While these substitutes change the taste slightly, they still create a tasty dish. Just remember, the flavor will differ from the original recipe. The spice level of Thai Basil Chicken Stir-Fry can vary. It depends on the number of Thai chili peppers you use. Typically, this dish has a mild to medium heat. If you prefer a milder dish, use fewer chilis or remove the seeds. For those who love heat, add extra chilis or a dash of hot sauce. Adjusting spice levels allows everyone to enjoy this flavorful meal. Thai Basil Chicken Stir-Fry is a simple yet flavorful dish. You learned about the key ingredients, like fresh basil and chicken. The step-by-step instructions make cooking easy, even for beginners. We explored tips to enhance flavor and adjust spice levels to suit your taste. You can even try fun variations with different proteins or herbs. Enjoy making it your own, and savor the fresh flavors. Every bite will bring joy to your table.](https://dishtreats.com/wp-content/uploads/2025/06/20a2f9de-1755-4b6a-ade1-393123d10e24-768x768.webp)