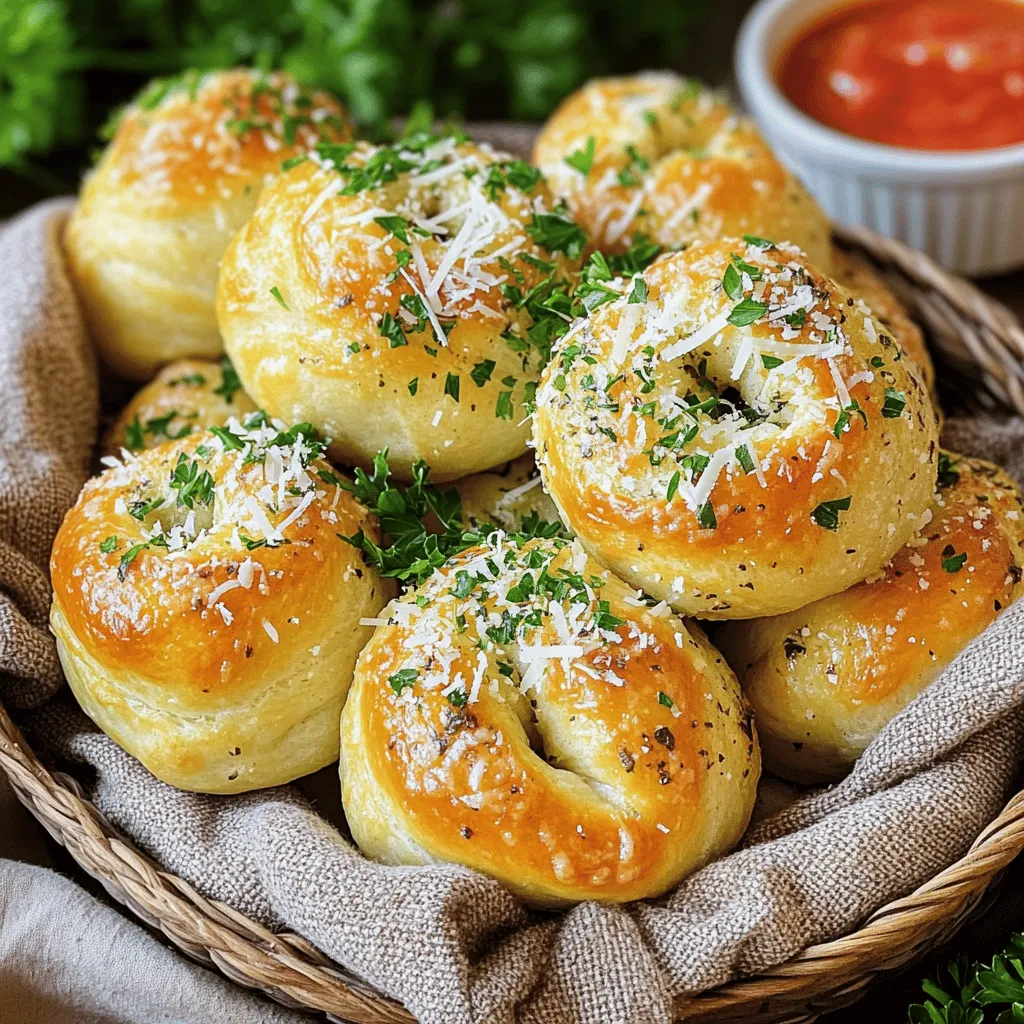
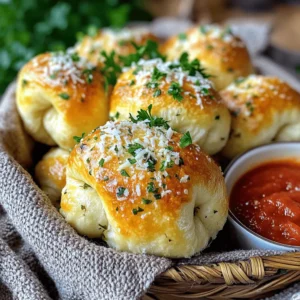
Garlic Parmesan Knots Fluffy and Tasty Treats

Welcome to my kitchen! Today, I’ll show you how to make delicious Garlic Parmesan Knots that are fluffy and full of flavor. These knots are the perfect mix of buttery goodness and zesty garlic. Whether you want a snack or a side dish, these treats are sure to impress. Let’s dive into the simple ingredients and steps to create these tasty bites!
Ingredients
List of Ingredients
To make delicious Garlic Parmesan Knots, you will need:
- 1 package (1 lb.) pizza dough
- 4 tablespoons unsalted butter, melted
- 4 cloves garlic, minced
- 1/4 cup grated Parmesan cheese
- 2 tablespoons fresh parsley, finely chopped
- 1 teaspoon dried oregano
- 1/2 teaspoon salt
- 1/4 teaspoon freshly cracked black pepper
- Extra grated Parmesan cheese for garnishing (optional)
Optional Additional Ingredients
You can enhance your knots with these extras:
- Fresh basil, chopped for a sweet flavor
- Crushed red pepper for some heat
- Mozzarella cheese for a cheesy surprise inside
Pantry Staples for Garlic Parmesan Knots
These are common items you should have ready:
- Olive oil for brushing if you run out of butter
- Sugar to balance flavors if needed
- All-purpose flour for dusting while rolling out the dough
When you gather these ingredients, you set yourself up for success. Each one plays a role in creating that fluffy texture and rich flavor. Having everything prepped will make cooking fun and easy!
Step-by-Step Instructions
Preparation Steps
First, preheat your oven to 425°F (220°C). This step is key for a perfect bake. Next, line a baking sheet with parchment paper. This helps prevent sticking. In a small bowl, mix melted butter, minced garlic, chopped parsley, dried oregano, salt, and black pepper. Whisk them together until well mixed. This fragrant mix is what makes these knots so tasty.
Rolling and Cutting the Dough
Now, take your pizza dough and place it on a lightly floured surface. Roll it out into a rectangle that is about 1/2 inch thick. Use enough flour to stop it from sticking. Once rolled, grab a sharp knife or pizza cutter. Cut the dough into strips that are about 1 inch wide and 4 inches long. With each strip, twist the dough and tie it into a knot. Tuck the ends underneath to keep the knot secure. Place the knots on your baking sheet, leaving space between each one.
Baking the Garlic Parmesan Knots
Brush each knot with the garlic butter mixture. Make sure to cover every surface for great flavor. Sprinkle grated Parmesan cheese on top of each knot. If you love cheese, add more! Now, place the baking sheet in the oven and bake for 12-15 minutes. Watch them turn golden brown and puff up nicely. When they are done, let them cool for a few minutes. For extra flavor, brush them with more garlic butter before serving. Enjoy your tasty garlic Parmesan knots!
Tips & Tricks
Achieving Perfectly Fluffy Knots
To make your garlic Parmesan knots fluffy, follow these steps:
- Use fresh pizza dough for the best texture.
- Let the dough rest for about 10 minutes after shaping.
- Make sure your oven is preheated to 425°F (220°C) before baking.
- Space the knots apart on the baking sheet; this helps them rise.
Each knot needs room to puff up. The steam inside them creates that airy feel.
Storage and Reheating Suggestions
Store any leftover knots in an airtight container. Keep them at room temperature for up to 2 days. If you want to keep them longer, freeze them. Wrap each knot in plastic wrap, then place them in a freezer bag. They can last about a month in the freezer.
To reheat, place them on a baking sheet at 350°F (175°C) for 10-15 minutes. This brings back their fluffy texture. You can also pop them in the microwave for about 15 seconds, but they may lose some crunch.
Serving Suggestions and Pairings
These knots shine when served warm. Here are some great ideas:
- Serve them with marinara sauce for dipping.
- Pair them with a fresh salad for a complete meal.
- Add them to a cheese platter for a fun snack.
- For extra flavor, sprinkle more Parmesan cheese on top before serving.
These simple tips will help you create tasty garlic Parmesan knots that everyone will love!
Variations
Cheesy Garlic Knots
You can easily add more cheese to your garlic knots. Start with the basic recipe and top each knot with a mix of mozzarella and Parmesan. This makes them gooey and extra cheesy. Bake as directed, and enjoy a cheesy pull with each bite.
Herb-Infused Options
For a fresh twist, add more herbs to the butter mixture. Consider using basil, rosemary, or thyme along with parsley. These herbs will add bright flavors to your knots. You can also sprinkle dried Italian herbs on top before baking for an extra herbal kick.
Spicy Garlic Parmesan Knots
If you love heat, try adding red pepper flakes to the garlic butter mix. Start with a pinch and adjust to your taste. This will give the knots a spicy kick. You can also serve them with a spicy marinara for dipping. Enjoy the blend of garlic, cheese, and spice in every knot!
Storage Info
How to Store Leftovers
To keep your garlic parmesan knots fresh, place them in an airtight container. You can store them at room temperature for up to two days. If you need them to last longer, refrigerate them. They will stay good in the fridge for about four days. Just make sure the container seals well to keep moisture out.
Freezing Instructions
You can freeze garlic parmesan knots for later use. First, let them cool completely. Then, wrap each knot in plastic wrap. Place the wrapped knots in a freezer bag or airtight container. This way, they will stay fresh for up to three months. When you’re ready to eat them, just thaw in the fridge overnight and reheat.
Best Practices for Maintaining Freshness
To maintain the best taste and texture, avoid stacking the knots. This can cause them to become soggy. Instead, spread them out in a single layer for storage. If you’re reheating, preheat your oven to 350°F (175°C). Place the knots on a baking sheet for about 10 minutes. This will help them regain their fluffiness and warmth.
FAQs
Can I use homemade pizza dough?
Yes, you can use homemade pizza dough. I often make my own, and it works great. Just make sure it’s the right texture. It should be soft and easy to roll out. If you need help, there are many simple recipes online.
How can I make these knots gluten-free?
To make gluten-free knots, use gluten-free pizza dough. You can find this in stores or make a batch at home. Follow the same steps for preparation and baking. Just keep an eye on the bake time, as it may differ.
What can I serve with Garlic Parmesan Knots?
Garlic Parmesan knots pair well with many dishes. I love serving them with marinara sauce for dipping. You can also serve them alongside pasta, salads, or soups. They make a great snack or side dish for any meal.
We covered how to make delicious garlic parmesan knots. You learned about key ingredients, step-by-step prep, and baking tips. I shared storage methods and helpful variations for your knots. With these skills, you can enjoy fluffy, tasty knots at home. Remember to experiment with herbs or cheese for fun twists. Now, go ahead and enjoy your baking adventure!
![- 1 cup quinoa - 2 cups water or vegetable broth - 1 large cucumber, diced - 1 red bell pepper, diced - 1 cup cherry tomatoes, halved - 1/4 red onion, finely chopped - 1 cup fresh parsley, roughly chopped - 1/4 cup tahini - 2 tablespoons fresh lemon juice - 1 tablespoon extra virgin olive oil - 1 clove garlic, minced - Salt and freshly cracked pepper - 1/4 cup sunflower seeds - Chopped nuts (walnuts or almonds) The ingredients for your Lemon Tahini Quinoa Salad are fresh and colorful. Each one adds flavor and nutrition. Start with quinoa, which is the base of this dish. It is high in protein and gluten-free. For the salad, you need diced cucumber, red bell pepper, cherry tomatoes, red onion, and parsley. The cucumber gives crunch. The red bell pepper adds sweetness. Cherry tomatoes bring juiciness. The red onion gives a mild bite, while parsley adds a fresh taste. Next, let’s talk about the dressing. Tahini is a creamy paste made from sesame seeds. It gives richness to the salad. Lemon juice adds zing and brightness. Olive oil makes it smooth. Garlic adds depth of flavor. A pinch of salt and cracked pepper finishes it off. If you want more texture, try adding sunflower seeds or chopped nuts. They add crunch and healthy fats. This Lemon Tahini Quinoa Salad is easy to make and packed with good ingredients. You can find the Full Recipe to guide you through the steps. First, you need to cook the quinoa. Combine one cup of rinsed quinoa and two cups of water or vegetable broth in a medium saucepan. Bring the mixture to a rapid boil over medium-high heat. Once it boils, lower the heat and cover the pot. Let it simmer for about 15 minutes. The quinoa will soak up all the liquid and become fluffy. After cooking, remove it from heat and let it cool for a bit. While the quinoa cooks, you can prepare the dressing. In a small bowl, whisk together a quarter cup of tahini, two tablespoons of fresh lemon juice, one tablespoon of olive oil, and one clove of minced garlic. Mix until it becomes smooth and creamy. You can add salt and pepper to taste. Now it's time to make the salad. In a large mixing bowl, add one large diced cucumber, one diced red bell pepper, one cup of halved cherry tomatoes, one-fourth of a finely chopped red onion, and one cup of roughly chopped fresh parsley. Stir these ingredients together until they are well mixed. Next, add the cooled quinoa to the bowl with the veggies. Toss everything together gently so the ingredients blend well. Drizzle the tahini dressing over the salad and mix again. For a nice crunch, you can sprinkle a quarter cup of sunflower seeds or chopped nuts on top before serving. For the full recipe, refer to the earlier sections. Enjoy your fresh and flavorful Lemon Tahini Quinoa Salad! To make the best quinoa, start with rinsing it well. This removes any bitter coating. Use cold water and a fine mesh strainer. After rinsing, cook the quinoa in water or broth. Cooking this way adds a nice flavor. Once cooked, let it cool a bit. This helps it mix better with other ingredients. For a creamy dressing, whisk all ingredients together. Use a bowl that allows for easy mixing. If you find clumps, keep whisking until smooth. Adjust the lemon juice and tahini to match your taste. You may like it tangy or mild. Experiment to find your favorite balance. Presentation is key! Serve the salad in colorful bowls. This makes it more inviting and fun. Add lemon slices and fresh parsley on top for a pop of color. These garnishes not only look great but also add extra flavor. For a unique touch, use clear glasses to showcase the vibrant layers of the salad. Check the Full Recipe for more tips on serving! {{image_4}} You can easily boost the protein in your Lemon Tahini Quinoa Salad. Incorporate chickpeas for a hearty touch. These legumes add fiber and flavor. Diced grilled chicken also works well if you want meat. For those following a vegan diet, try tempeh or tofu. Both options soak up flavors and make the salad filling. Feel free to mix in various vegetables. Substitute or add bell peppers, carrots, or creamy avocado. These veggies add crunch and color. You can also use seasonal vegetables for extra freshness. Think of bright summer tomatoes or hearty winter squash. The key is to choose what you enjoy most. Spice up your salad with fun flavors. Add spices like cumin or paprika for a tasty twist. These spices bring warmth and depth to the dish. Fresh herbs like mint or cilantro can brighten things up, too. They add a burst of freshness that takes your salad to the next level. Store your Lemon Tahini Quinoa Salad in an airtight container in the fridge. This keeps it fresh and tasty. It’s best to eat it within 3-5 days. After this time, the flavors may fade, and veggies can lose their crunch. You can freeze quinoa salad if needed. Dress it before serving after you thaw it. Be aware that freezing may change the texture of some vegetables. It’s a good idea to use firmer veggies like bell peppers, as softer ones may not hold up well. I don’t recommend reheating salads. They taste best when served chilled. However, if you want to reheat, you can warm individual components like quinoa or cooked veggies. Just make sure to let them cool before mixing back into the salad. Enjoy the fresh, vibrant flavors! Yes, it's great for meal prep; just dress before serving. This salad stays fresh for days. You can cook the quinoa and chop the veggies in advance. When you are ready to eat, mix in the dressing. This way, the salad will taste fresh. Yes, quinoa is naturally gluten-free. It makes this salad a perfect choice for gluten-free diets. Always check that your other ingredients, like broth, are gluten-free too. This salad is friendly for many diets. You can add different vegetables, proteins, or dressings to suit your taste. Try adding chickpeas for protein or avocados for creaminess. You can also change the herbs or use a different dressing. The choices are endless! It can be a side dish or a main dish, served chilled or at room temperature. For a picnic, serve it cold. If you want a warm meal, let it sit for a bit. Dress it just before serving for the best flavor. Yes, other grains like farro or bulgur can be used as substitutes. Each grain brings a different taste and texture. You can experiment to find your favorite. Just cook them according to package directions. Check the [Full Recipe] for more details! This blog post covered how to make a tasty Lemon Tahini Quinoa Salad. You learned the main ingredients, cooking steps, and tips for perfecting the dish. Remember, feel free to add your favorite proteins or veggies. You can also make it ahead of time for meal prep. Enjoy this salad fresh and chilled for the best flavor. Experiment with it, and you'll find your perfect mix!](https://dishtreats.com/wp-content/uploads/2025/07/0131a3b2-a937-48f9-ad75-9f78e7be101a-768x768.webp)