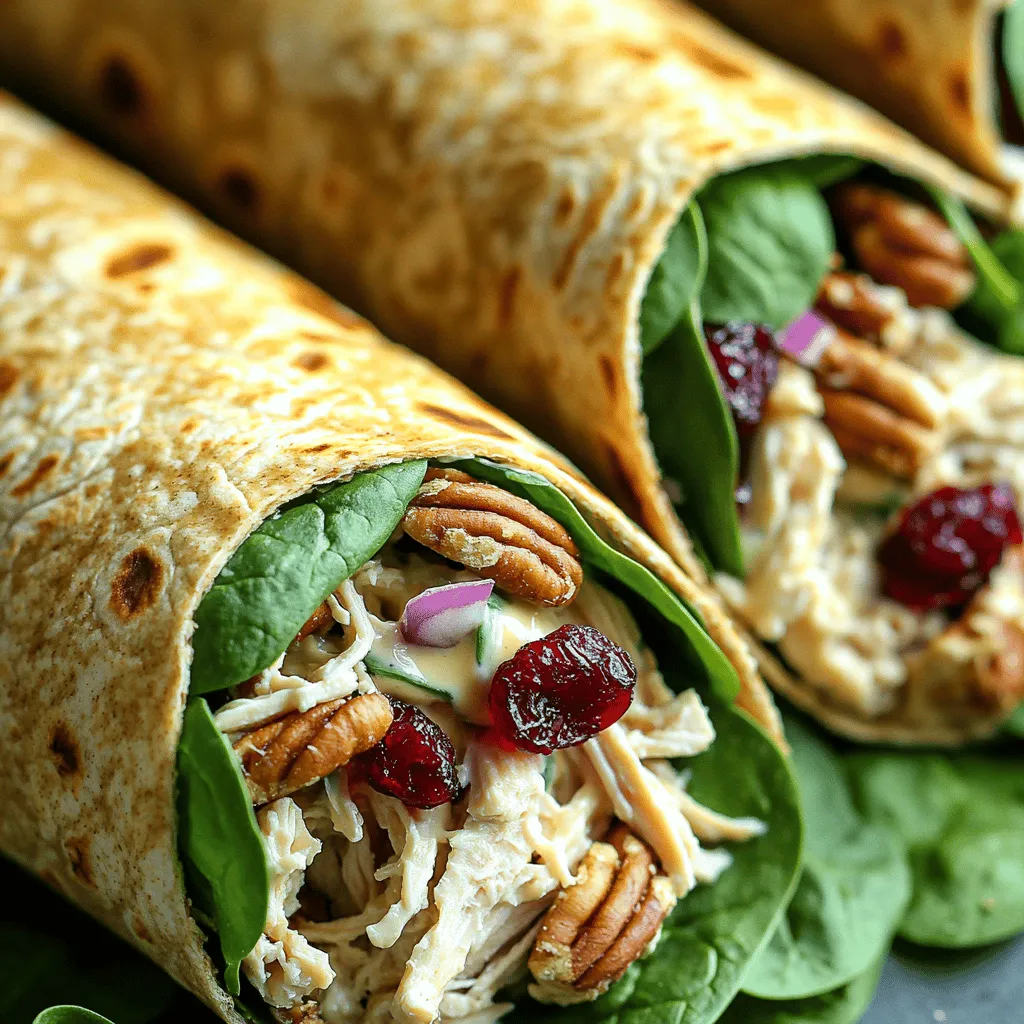
Cranberry Pecan Chicken Salad Wraps Quick and Easy Meal

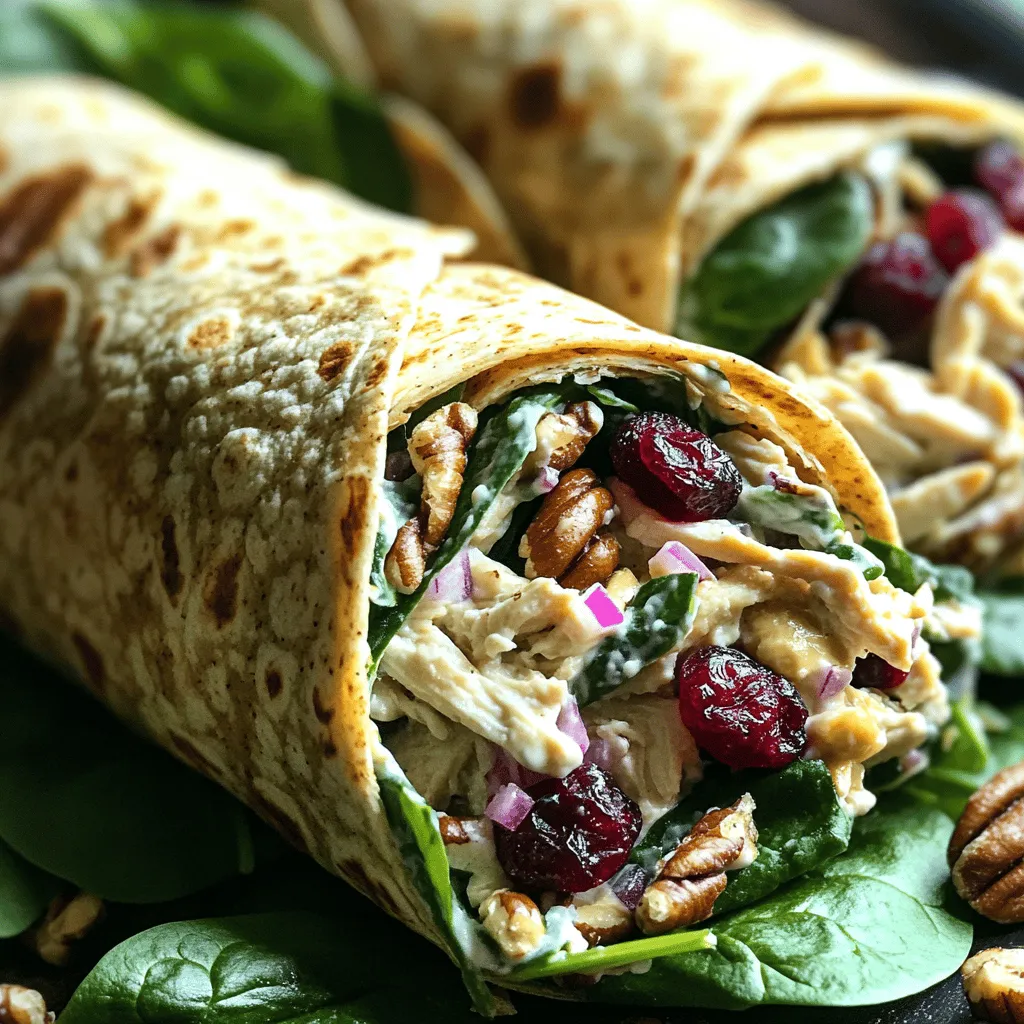
Looking for a quick and easy meal that packs a punch? Dive into my Cranberry Pecan Chicken Salad Wraps! With just a few simple ingredients, you can create a delicious and filling dish that’s perfect for lunch or dinner. I’ll show you how to mix bold flavors with crunchy textures, all wrapped in a wholesome tortilla. Let’s get started on this tasty journey that won’t take up your whole day!
Ingredients
Main Ingredients List
- 2 cups cooked chicken
- 1/2 cup dried cranberries
- 1/2 cup pecans
- 1/4 cup plain Greek yogurt
- 1/4 cup mayonnaise
- 1 tablespoon Dijon mustard
- 1 celery stalk
- 1/4 red onion
- Salt and pepper
Tortilla and Fresh Ingredients
- 4 large whole wheat tortillas
- Fresh spinach leaves
Gather these ingredients before you start. The cooked chicken can be shredded or diced. I prefer shredded for a nice texture. Dried cranberries add sweetness. Chopped pecans give a great crunch. The Greek yogurt and mayonnaise make the salad creamy. Dijon mustard adds a nice zing.
Chop the celery and red onion finely. This step ensures the flavors blend well. Don’t forget to season with salt and pepper to your taste. Whole wheat tortillas are a healthy choice. Fresh spinach leaves add color and nutrition. Enjoy this tasty mix!
Step-by-Step Instructions
Preparation of Chicken Salad
- Combine chicken, cranberries, and pecans in a bowl.
- Whisk together Greek yogurt, mayo, and Dijon mustard in a separate bowl.
First, take your cooked chicken—make sure it’s shredded or diced. I like to use rotisserie chicken for ease. Next, add the chopped cranberries and coarsely chopped pecans into a large mixing bowl. Mix these ingredients well. This gives your salad a nice blend of flavors and textures.
In another bowl, whisk together the Greek yogurt, mayonnaise, and Dijon mustard. This creamy mix adds richness and a tangy kick. Once smooth, set it aside for the next step.
Mixing the Ingredients
- Add celery and onion to yogurt mixture.
- Season with salt and pepper to taste.
Now, finely chop a celery stalk and a quarter of a red onion. These will add crunch and flavor. Fold them into the creamy yogurt mixture. Don’t forget to season with salt and pepper to make it pop. Taste it! Adjust the seasoning to your liking.
Assembling the Wraps
- Lay tortillas flat and add spinach.
- Spoon chicken salad mixture onto tortillas.
- Roll and slice for serving.
Grab four large whole wheat tortillas. Lay them flat on a clean surface. Add a handful of fresh spinach leaves to each tortilla. This adds freshness and color.
Spoon a generous amount of your chicken salad mixture right onto the spinach. Leave some space at the edges for easy folding.
Now, fold in the sides of each tortilla and roll it up from the bottom. Make sure to encase the filling well. For serving, slice each wrap in half diagonally. This way, you can see all the colorful ingredients inside!
Tips & Tricks
Enhancing Flavor
To make your chicken salad shine, season well. Use salt and pepper to taste. You can also add garlic powder for a savory touch. Fresh herbs like parsley or dill boost flavor too. Try a dash of lemon juice for zing.
Ensuring Perfect Wraps
Folding wraps can be tricky. Start by laying your tortilla flat. Place filling in the center, leaving space on the edges. Fold the sides in first. Then, roll it from the bottom up. This keeps your filling secure and prevents spills.
Time-Saving Tips
Cooking can be quick with some prep. Chop your ingredients ahead of time. You can use rotisserie chicken for an even faster meal. Just shred it and mix with your other ingredients. This saves time and still tastes great.

Variations
Alternative Ingredients
You can switch out chicken for turkey or tuna. Both options taste great. Turkey gives a nice texture. Tuna adds a rich flavor. You can also use different nuts or seeds. Try walnuts or sunflower seeds for a new twist. Each nut adds its own unique crunch and flavor.
Vegetarian Option
If you prefer a veggie meal, replace chicken with chickpeas or tofu. Chickpeas add protein and fiber. Tofu soaks up flavors well. For a creamy base, use vegan mayo or yogurt. These alternatives keep your wrap tasty and plant-based.
Seasonal Variations
You can make your wraps even more fun with seasonal fruits. In fall, try adding crisp apples. In summer, grapes add a sweet touch. These fruits brighten the dish and add freshness. Adjust your flavors to fit the season for a delightful twist.
Storage Info
Refrigeration Guidelines
To store leftover wraps, wrap them in plastic wrap or foil. This keeps them fresh. Place the wrapped wraps in an airtight container to avoid moisture loss. They stay good in the fridge for up to three days. After that, the flavors may fade.
Freezing Instructions
If you want to freeze pre-made wraps, wrap each one tightly in plastic wrap. Then, place them in a freezer-safe bag. They can freeze for up to three months. When you want to eat them, thaw in the fridge overnight. To reheat without losing texture, heat in a pan for a few minutes. This keeps the wrap soft and the filling warm.
Portioning for Meal Prep
For easy lunches, cut the wraps in half or quarters. This makes them simple to grab. Use clear containers to store them, so you can see what’s inside. A good size is about 4 to 6 cups for each meal. This way, you can enjoy a tasty wrap whenever you need a quick bite!
FAQs
How can I make Cranberry Pecan Chicken Salad Wraps ahead of time?
You can prepare the chicken salad a day in advance. Just mix the cooked chicken, cranberries, pecans, Greek yogurt, mayonnaise, mustard, celery, and onion. Store this mixture in an airtight container in the fridge. When you’re ready to eat, just assemble the wraps with fresh spinach and tortillas. This keeps the tortillas from getting soggy.
What can I serve with these wraps?
These wraps pair well with many sides. Here are some ideas:
- Fresh vegetable sticks like carrots, cucumbers, or bell peppers
- A light side salad with mixed greens, cherry tomatoes, and a simple dressing
- Crispy chips or baked pita chips for crunch
- A refreshing drink like iced tea or lemonade
Can I make these wraps gluten-free?
Yes, you can make these wraps gluten-free! Simply choose gluten-free tortillas. Many brands offer great options that taste good. You can also replace the yogurt and mayo with dairy-free versions. This way, everyone can enjoy the delicious flavors.
This blog post shared a simple chicken salad wrap recipe. You learned the main ingredients and key steps. We covered tips for better flavor and perfect wraps. You also explored variations and storage ideas.
In closing, these wraps offer great flavor and nutrition. They fit well in meal prep. Enjoy making them your own with different ingredients and flavors!


![- 4 boneless, skinless chicken thighs - 2 cups long-grain rice - 4 tablespoons unsalted butter, divided - 5 cloves garlic, finely minced - 1 medium onion, finely chopped - 1 teaspoon dried oregano - 1 teaspoon paprika - Salt and freshly ground black pepper, to taste - 3 cups chicken broth - 1 cup frozen peas - Fresh parsley, chopped (for garnish) When I prepare Garlic Butter Chicken and Rice, I love the way the flavors mix. The chicken thighs bring a juicy texture. Long-grain rice soaks up all the savory chicken broth. Unsalted butter adds a rich taste. Aromatics play a big role here. Garlic cloves and onion give a sweet aroma. Dried oregano and paprika add warmth and depth. I always use fresh black pepper and salt to make the dish pop. For a splash of color, I toss in frozen peas. They keep their bright green shade when cooked. Fresh parsley adds a nice finish. It makes the dish look inviting and fresh. If you want to try this dish, check the Full Recipe for all the steps! You'll enjoy making it, and even more, eating it. 1. Start by melting 2 tablespoons of butter in a large skillet over medium heat. This will create a rich base for your dish. 2. Once the butter melts, add the chopped onion. Sauté it for about 5 minutes until it turns soft and fragrant. 3. Next, add 5 cloves of minced garlic to the skillet. Cook it for 1 minute, just until the garlic smells good but isn’t browned. 4. While the onion and garlic are cooking, season 4 chicken thighs on both sides. Use 1 teaspoon of oregano, 1 teaspoon of paprika, salt, and pepper. This will add a lot of flavor. 5. Move the onion and garlic to one side of the skillet. Place the seasoned chicken thighs in the center. Cook each side for 6-7 minutes until they turn golden brown. Once done, take the chicken out and set it aside. 1. In the same skillet, add the remaining 2 tablespoons of butter. Let it melt completely. 2. Now, stir in 2 cups of long-grain rice. Toast the rice for 2-3 minutes, stirring often. This step brings out the nutty flavor. 3. Pour 3 cups of chicken broth over the toasted rice. Gently stir to coat all the grains. Increase the heat to bring the mixture to a boil. 1. Once the broth is boiling, lower the heat to a simmer. Nestle the cooked chicken thighs on top of the rice. Cover the skillet with a lid and let it cook for 15-20 minutes. The rice should absorb most of the broth and become tender. 2. For the last 5 minutes of cooking, sprinkle 1 cup of frozen peas directly over the rice. Do not stir. This will keep the peas bright and fresh. 3. After cooking, remove the skillet from the heat. Leave it covered for an extra 5 minutes. This helps the rice fluff up nicely. 4. Finally, use a fork to fluff the rice and mix in the peas. Serve warm, with fresh parsley on top for color and flavor. This simple process makes Garlic Butter Chicken and Rice a fun and tasty comfort meal. For the complete recipe, check out the [Full Recipe]. To boost the flavor of your garlic butter chicken and rice, consider adding fresh herbs. Thyme, rosemary, or basil can bring new notes to the dish. You can also mix in some red pepper flakes for a little heat. Adjust the spices to fit your taste. If you like it spicy, add more paprika or even cayenne pepper. Remember, always taste as you go to find your perfect balance. Sautéing is key for great flavor. Start with a medium heat to avoid burning the garlic and onions. Stir them often to help them cook evenly. When cooking the chicken, ensure it's golden and cooked through. Use a meat thermometer to check the internal temperature. It should reach 165°F (75°C) for safe eating. This way, you get juicy chicken every time. For a beautiful presentation, serve your garlic butter chicken and rice on a large platter. Sprinkle fresh parsley on top for a pop of color. You can also add lemon wedges on the side. This adds a zesty touch when served. Pair your meal with a simple green salad or steamed vegetables. For drinks, try a light white wine or sparkling water with lemon. Enjoy your delicious creation! You can find the full recipe [here](#). {{image_4}} You can make this dish lighter by swapping rice for cauliflower rice. Cauliflower rice offers a low-carb option that still tastes great. It cooks quickly and absorbs flavors well. Using skinless chicken breasts instead of thighs is another healthy choice. Breasts have less fat but still provide protein. Spice things up by adding cayenne pepper for heat. A pinch can really enhance the dish. You can also try Italian seasoning for a different twist. Adding veggies like bell peppers or carrots boosts nutrition and color. They add crunch and sweetness that pairs well with garlic butter. If you need gluten-free options, use gluten-free chicken broth. It keeps the dish flavorful while meeting dietary needs. For those avoiding dairy, there are great butter substitutes. Look for dairy-free spreads made from plant oils. They work well in this recipe without losing taste. To keep your Garlic Butter Chicken and Rice fresh, store any leftovers in airtight containers. This helps lock in the flavor and moisture. Make sure to let the dish cool down before sealing it up. For longer storage, you can freeze it. Divide the dish into smaller portions to make thawing easier later. When it's time to reheat, use a skillet or a microwave. If using a skillet, add a splash of chicken broth to keep it moist. Heat it over low to medium heat, stirring gently. In the microwave, cover the dish with a damp paper towel. This keeps moisture in and avoids a dry result. Remember, you want your chicken and rice to stay tender. In the fridge, your Garlic Butter Chicken and Rice lasts about 3 to 4 days. Always check for signs before eating. Look for any off smells or changes in color. If it smells funny or looks slimy, it’s best to toss it. Always trust your senses to keep your meals safe and tasty. To amp up the flavor, try adding fresh herbs like thyme or rosemary. You can also mix in spices such as garlic powder or onion powder for extra depth. A splash of lemon juice at the end brightens the dish. For a spicy kick, consider adding crushed red pepper flakes. These little changes can make a big taste difference. Yes, you can! To adapt this recipe, first, brown the chicken thighs in a skillet. This step gives great flavor. Then, place the chicken, onions, garlic, and rice into the slow cooker. Add chicken broth and spices. Cook on low for 4-6 hours. Check the rice for doneness. Slow cooking makes this dish very tender and delicious. This dish pairs well with a side of steamed vegetables like broccoli or green beans. A fresh salad with vinaigrette is also nice. For drinks, consider serving iced tea or a light white wine. These choices balance the rich flavors of the chicken and rice. Absolutely! You can make this dish ahead of time. Store the chicken and rice in separate containers to keep them fresh. It lasts up to four days in the fridge. When ready to eat, simply reheat in the microwave or on the stovetop. This makes it a perfect option for busy weekdays. For the full recipe, check out the link above. This article guides you through making Garlic Butter Chicken and Rice. You learned about key ingredients like chicken thighs, long-grain rice, and garlic. I shared easy steps for cooking flavorful meals, plus tips to enhance taste and presentation. In conclusion, this dish is tasty and versatile. You can adjust it to fit your diet or mood. Enjoy experimenting with flavors and make it your own! Happy cooking!](https://dishtreats.com/wp-content/uploads/2025/05/2b69aced-7351-4258-8c9e-dc4a3c9f0304-768x768.webp)


