
Creamy Tomato Basil Tortellini Delightful and Simple

Craving a warm, comforting dish that’s both simple and delicious? You’ll love this Creamy Tomato Basil Tortellini! With rich flavors and a creamy sauce, it’s perfect for a quick dinner or a cozy meal. I’ll guide you through the easy steps to create this delightful dish at home. Let’s dive into the ingredients, cooking method, and some tasty tips for enhancing your pasta experience!
Ingredients
Main Ingredients for Creamy Tomato Basil Tortellini
To make this tasty dish, you need a few key items. Here’s what to gather:
- 12 oz cheese tortellini (fresh or frozen)
- 2 tablespoons extra virgin olive oil
- 3 cloves garlic, finely minced
- 1 can (14 oz) diced tomatoes, undrained
- 1 cup heavy cream
- 1/2 cup freshly grated Parmesan cheese
- 1/4 cup fresh basil leaves, chopped
- Salt and freshly ground black pepper, to taste
- 1/2 teaspoon red pepper flakes (optional)
These main ingredients form the base of the creamy sauce. The tortellini adds heartiness, while fresh basil brings a bright flavor.
Optional Garnishes
While the dish is great as is, some garnishes can add a fun twist. Consider these options:
- Extra fresh basil leaves for a fresh touch
- Toasted pine nuts for a crunchy bite
These garnishes make your dish look lovely and add extra layers of flavor.
Recommended Tools and Utensils
Having the right tools makes cooking easier. Here’s what you should use:
- Large skillet for cooking the sauce
- Pot for boiling tortellini
- Colander for draining pasta
- Wooden spoon for stirring
- Knife and cutting board for chopping
These tools help you prepare the dish quickly and smoothly. They also ensure your meal comes out just right.
Step-by-Step Instructions
Cooking the Tortellini
Start by boiling water in a large pot. Add salt to the water to enhance the flavor. Once it reaches a rolling boil, toss in 12 ounces of cheese tortellini. You can use fresh or frozen tortellini. Cook them according to the package directions, usually around 3-5 minutes. When they float to the top, they are done. Drain the tortellini well and set them aside for later.
Preparing the Sauce
In a large skillet, pour in 2 tablespoons of extra virgin olive oil over medium heat. Add 3 cloves of finely minced garlic. Sauté the garlic for 1-2 minutes until it smells amazing. Be careful not to let it brown, as it can taste bitter. Next, open a 14-ounce can of diced tomatoes and add it with the juices to the skillet. Increase the heat to bring it to a gentle simmer. Stir it every so often for about 5 minutes to blend the flavors. Lower the heat and stir in 1 cup of heavy cream. Let this mixture simmer for 3-4 minutes. The cream should meld with the tomato base. After that, add in ½ cup of freshly grated Parmesan cheese. Stir until the cheese melts and the sauce becomes creamy.
Combining and Serving
Now it’s time to mix everything together. Gently toss the cooked tortellini into the sauce. Also, add ¼ cup of chopped fresh basil, salt, black pepper, and red pepper flakes if you want a bit of heat. Mix everything well so the tortellini gets coated in that rich sauce. Cook for an additional 2-3 minutes over low heat. This lets all the flavors blend together. Serve the creamy tomato basil tortellini right away. Garnish it with extra fresh basil leaves and toasted pine nuts for a nice crunch, if you like. Enjoy your delightful meal!
Tips & Tricks
How to Enhance Flavor
To make your creamy tomato basil tortellini pop, focus on fresh ingredients. Use ripe tomatoes for a sweet base. Fresh basil adds bright notes. Try adding a squeeze of lemon juice for zing. You can also sprinkle some freshly cracked black pepper for depth. If you love heat, mix in red pepper flakes while cooking. Adjust these flavors to suit your taste.
Making It Gluten-Free or Vegan
To make this dish gluten-free, swap regular tortellini for gluten-free pasta. Many brands offer tasty options. For a vegan version, replace cheese tortellini with a plant-based variety. Use coconut cream or cashew cream instead of heavy cream. Nutritional yeast can replace Parmesan for a cheesy flavor. Always check labels to ensure your ingredients meet your dietary needs.
Perfecting the Creaminess
The key to a creamy sauce is the right balance of ingredients. Start with heavy cream for richness. Stir in freshly grated Parmesan cheese slowly. This ensures it melts smoothly into the sauce. If the sauce is too thick, add a splash of pasta water to thin it out. For a lighter version, use half-and-half or milk, but the texture will change. Always taste and adjust until it feels just right.

Variations
Adding Protein Options
You can easily add protein to your creamy tomato basil tortellini. Chicken is a great choice. Simply cook diced chicken in the skillet before adding the garlic. Cook until it’s no longer pink. Shrimp also works well. Just add them after sautéing the garlic. Cook until they turn pink and opaque. For a plant-based option, try adding chickpeas. Rinse and drain a can, then mix them in with the tortellini.
Vegetable Additions for Extra Nutrition
Boost the nutrition of this dish with some veggies. Spinach is a fantastic option. Add fresh spinach to the sauce just before mixing in the tortellini. It wilts quickly and adds color. Bell peppers add crunch and sweetness. Dice them and sauté with the garlic. Mushrooms also fit well. Cook sliced mushrooms until they are soft before adding the tomatoes.
Alternative Sauces and Cheeses
You can try different sauces for a fun twist. For a lighter version, use a tomato basil sauce instead of cream. This keeps the flavor but cuts down on calories. If you love spice, use a spicy arrabbiata sauce for a kick. For cheese, consider using mozzarella for a gooey texture. Feta cheese can add a tangy flavor. Crumble it on top before serving for a fresh taste.
Storage Info
How to Store Leftovers
To keep your creamy tomato basil tortellini fresh, store it in an airtight container. Make sure it cools to room temperature before sealing. This helps keep the flavors intact. You can store leftovers in the fridge for up to three days. If you notice any signs of spoilage, it’s best to discard it.
Reheating Instructions
When you’re ready to enjoy your leftovers, reheating is simple. You can use the microwave or the stove. For the microwave, place your tortellini in a bowl and cover it. Heat it for two to three minutes, stirring halfway through. On the stove, warm it in a skillet over low heat. Stir in a splash of cream or water to keep it creamy. This avoids any drying out.
Freezing Tips
If you want to save some for later, freezing works well. First, let the dish cool completely. Then, transfer it to a freezer-safe container. You can freeze it for up to three months. When you’re ready to eat, thaw it overnight in the fridge. Reheat it gently, adding a bit of cream as needed to restore the creamy texture. Enjoy your delicious tortellini anytime!
FAQs
Can I use dried tortellini instead of fresh or frozen?
Yes, you can use dried tortellini. Just cook it according to the package directions. Dried tortellini may take longer to cook than fresh or frozen. It will still taste great in the creamy sauce. Adjust the cooking time so the tortellini is tender.
Is creamy tomato basil tortellini healthy?
This dish can be part of a healthy diet. It features cheese tortellini, tomatoes, and basil. Tomatoes provide vitamins and antioxidants. Basil adds flavor and some health benefits. Use less cream or cheese for a lighter version. You can also add vegetables to boost nutrition.
What can I serve with this dish?
You can serve salad or garlic bread with this dish. A fresh green salad pairs well with the creaminess. Garlic bread adds a tasty crunch. Consider pairing it with a light white wine, like Pinot Grigio. For a vegetarian option, add roasted vegetables on the side.
This blog post covered how to make creamy tomato basil tortellini. You learned about the key ingredients and tools needed. I shared step-by-step instructions for cooking, preparing sauce, and serving. We also explored tips for flavor enhancement and making it gluten-free or vegan. I provided variations with protein and veggies. Finally, I included storage tips and answered common questions.
With these details, you can enjoy this tasty dish, tweak it to your liking, and store it for later. Happy cooking!

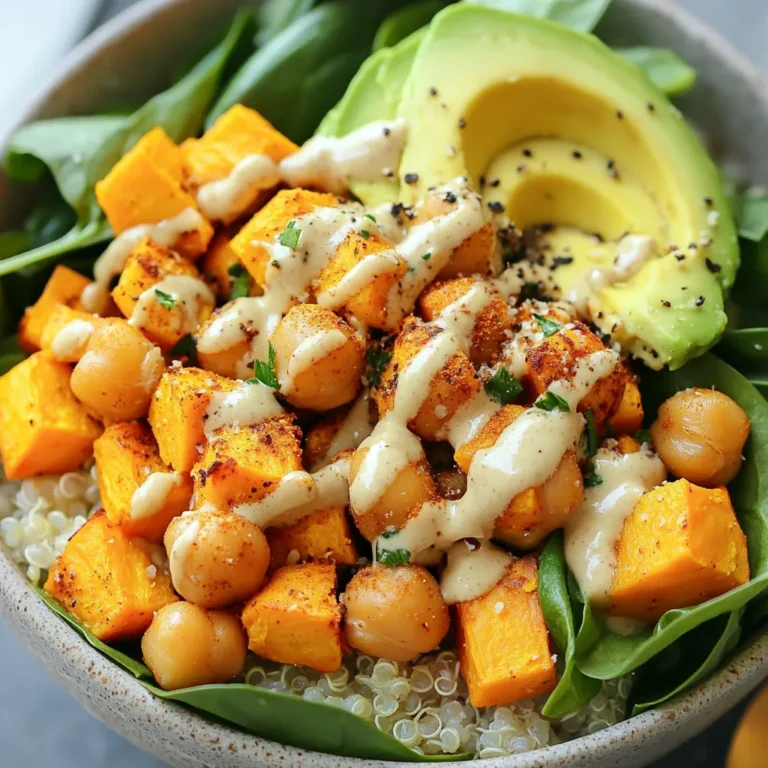
![To make a delicious Sweet Potato and Kale Hash, gather the following ingredients: - 2 medium sweet potatoes, peeled and diced into 1/2-inch cubes - 1 tablespoon extra virgin olive oil - 1 small onion, finely chopped - 2 cloves fresh garlic, minced - 1 bell pepper of your choice (red, green, or yellow), diced - 4 cups fresh kale, stems removed and leaves chopped - 1 teaspoon smoked paprika for a smoky flavor - 1/2 teaspoon ground cumin for warmth - Salt and freshly cracked pepper to taste - 2 large eggs (optional, for added protein) - Fresh parsley, chopped, for garnish These ingredients combine to create a hearty, flavorful dish. The sweet potatoes provide natural sweetness, while kale adds nutrition and color. The spices bring warmth and depth to the meal. If you choose to add eggs, they can make your hash more filling. This recipe celebrates whole, fresh foods that everyone will enjoy. For the full recipe, be sure to check out the detailed instructions! - Heating the oil: Start by placing a large skillet over medium heat. Add 1 tablespoon of extra virgin olive oil. Let the oil warm for about one minute. - Cooking sweet potatoes: Once the oil shimmers, add 2 medium sweet potatoes, peeled and diced into 1/2-inch cubes. Season them with salt and pepper. Sauté for 10-12 minutes. Stir occasionally until the sweet potatoes become tender and golden brown. - Sautéing onions and peppers: Next, add 1 small onion, finely chopped, and 1 bell pepper, diced. Cook for another 5 minutes. Stir often until the onion turns soft and translucent. - Adding aromatics: Stir in 2 cloves of minced garlic, 1 teaspoon of smoked paprika, and 1/2 teaspoon of ground cumin. Let this cook for 1-2 minutes. Stir frequently until the garlic smells fragrant and the spices blend well. - Incorporating kale: Add 4 cups of chopped kale to the skillet. Mix it well with the other ingredients. Cook for about 2-3 minutes until the kale wilts and softens. - Cooking eggs (optional): If you want to add protein, create small wells in the hash using the back of a spoon. Crack 2 large eggs into each well. Cover the skillet. Cook for 4-5 minutes, or until the egg whites are set but the yolks remain runny. - Finishing touches: Remove the skillet from heat. Taste the hash and adjust the seasoning with more salt and pepper if needed. Serve warm, garnished with fresh parsley. This dish is a wholesome meal in itself, packed with flavors and nutrients. For the full recipe, check out the detailed instructions above. - Ensuring even cooking for sweet potatoes Cut the sweet potatoes into even 1/2-inch cubes. This helps them cook at the same rate. When you sauté them, keep the heat at medium. Stir them occasionally to prevent sticking and promote browning. - Using fresh versus dried spices Fresh spices give a brighter taste. Try to use fresh garlic and smoked paprika for the best flavor. If you only have dried spices, use them but adjust the amount. Dried spices are stronger, so use less. - Best practices for sautéing kale Add the kale last, as it cooks quickly. Stir it in with the other ingredients for a couple of minutes. Cook until it wilts but remains bright green. This keeps the nutrients intact and enhances the dish's visual appeal. - Suggested pairings for the hash Serve the sweet potato and kale hash with toasted whole-grain bread. A slice of avocado on the side adds creaminess. You can also top it with salsa for a fresh kick. - Combining with proteins for a full meal Add eggs for protein. Cook them sunny-side up directly in the hash. You can also serve it with grilled chicken or turkey sausage for a hearty breakfast or brunch. For the complete recipe, check out the [Full Recipe]. {{image_4}} You can easily switch up the vegetables in this hash. Instead of sweet potatoes, try using: - Butternut squash for a sweeter taste. - Zucchini for a lighter option. - Mushrooms for added umami flavor. If you want a vegan dish, skip the eggs. You can still enjoy a hearty meal by adding: - Avocado for creaminess. - Tofu for protein. - Chickpeas for a filling option. The spices in this dish can change the whole flavor. You can adjust the seasoning to suit your taste: - Use curry powder for an Indian twist. - Try Italian herbs like oregano and basil for a Mediterranean flavor. If you like heat, you can add: - Red pepper flakes for a gentle kick. - Hot sauce for a bold flavor boost. These swaps keep your sweet potato and kale hash exciting and new each time! For the full recipe, check out the detailed instructions above. To keep your sweet potato and kale hash fresh, store it in an airtight container. This helps prevent moisture loss and keeps the flavors intact. The hash will stay good in the fridge for about 3 to 5 days. Make sure it cools down before sealing it. This way, it won’t steam inside the container. When it's time to reheat, you have a few good options. The best way is to use a skillet over medium heat. Add a touch of olive oil or water to keep it moist. Stir gently as it warms up. This method helps keep the texture just right. If you're in a hurry, you can use the microwave. Place the hash in a microwave-safe bowl. Cover it loosely with a paper towel to trap steam. Heat in short bursts, stirring in between, until warm. To refresh the dish, consider adding a squeeze of lemon or a sprinkle of fresh herbs. This adds brightness and makes the flavors pop again. Enjoy your meal! Yes, you can prepare this dish in advance. Cook the hash, let it cool, and store it in an airtight container. It will stay fresh in the fridge for up to three days. When you're ready to eat, just reheat it on the stove or in the microwave. Kale is a superfood packed with vitamins A, C, and K. It has lots of fiber, which helps digestion. Eating kale can boost your immune system and keep your bones strong. It also contains antioxidants, which help fight inflammation. To enhance the flavor of your hash, try adding different spices. A bit of chili powder can add heat. Fresh herbs like thyme or cilantro add freshness. You can also squeeze some lemon juice on top for a zesty kick. Consider using smoked salt for a deeper flavor. Absolutely! This hash works great for meal prep. You can make a big batch and separate it into containers. It’s easy to heat up for breakfast or lunch throughout the week. Plus, it tastes just as good reheated! For the full recipe, check out Savory Sweet Potato and Kale Hash. This blog post detailed how to create a tasty sweet potato and kale hash. I outlined the key ingredients and shared step-by-step cooking instructions. I also provided helpful tips and variations to fit your taste. In the end, this dish is simple and offers great nutrition. You can easily adjust it to suit your needs. Enjoy making this hash and feel free to get creative!](https://dishtreats.com/wp-content/uploads/2025/06/6b9629fe-c0a6-4f89-abcf-b289cc15d1fb-768x768.webp)


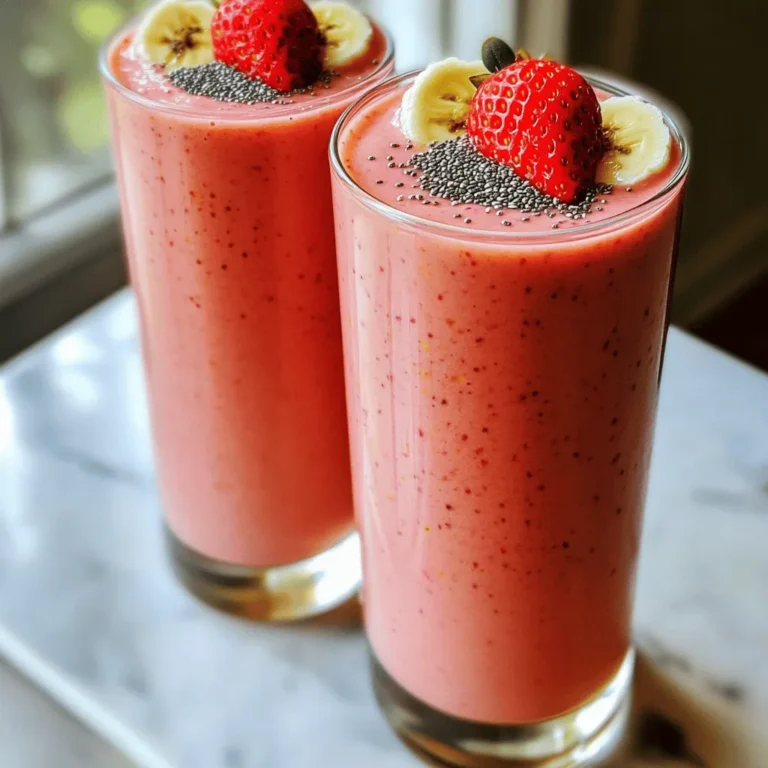
![- 1/2 cup rolled oats - 1 tablespoon cocoa powder - 1 tablespoon peanut butter - 1 cup almond milk - 1 tablespoon maple syrup - 1/2 teaspoon vanilla extract - A pinch of salt To create a bowl of chocolate peanut butter overnight oats, you need simple ingredients. Start with rolled oats; they act as the base. Cocoa powder adds rich chocolate flavor. Peanut butter gives a smooth, nutty taste. Use almond milk as a creamy liquid. Maple syrup sweetens the dish naturally. A touch of vanilla extract enhances the flavors. Finally, a pinch of salt brings everything together. - Sliced bananas - Chocolate chips - Crushed peanuts - Assorted fresh berries You can elevate your oats with fun toppings. Sliced bananas add sweetness and texture. Chocolate chips bring extra chocolate goodness. Crushed peanuts offer a nice crunch. Fresh berries brighten the dish with color and flavor. Choose your favorites or mix them up for a tasty treat. For the complete recipe, check out the [Full Recipe]. - Step 1: Combine dry ingredients in a bowl. In a medium mixing bowl, add 1/2 cup rolled oats and 1 tablespoon cocoa powder. Stir these together. This mix gives your oats a deep chocolate flavor. - Step 2: Whisk together wet ingredients separately. In another bowl, mix 1 cup almond milk, 1 tablespoon peanut butter, 1 tablespoon maple syrup, 1/2 teaspoon vanilla extract, and a pinch of salt. Make sure the peanut butter blends in well. - Step 3: Mix dry and wet ingredients thoroughly. Pour the wet mix over the dry oats. Stir with a spoon until every oat is coated. This step ensures creamy and rich oats. - Step 4: Transfer mixture to a jar or container. Carefully spoon the mixed oats into a clean jar. Choose a jar with a lid for best results. - Step 5: Seal and refrigerate overnight. Close the lid tightly. Place the jar in the fridge. Let it chill overnight or for at least 4 hours. The oats will soak up the flavors and soften. - Step 6: Stir before serving. When you’re ready to eat, take the jar out of the fridge. Stir the oats well. If they seem thick, add a little more milk to loosen them up. - Step 7: Add your choice of toppings. Top your oats with sliced bananas, chocolate chips, crushed peanuts, or fresh berries. These toppings add fun flavors and textures to your dish. Enjoy your creamy, chocolatey breakfast! For the full recipe, check out the complete guide. - For creamier oats, use whole milk or a milk alternative. - Allow oats to soak longer for a softer texture. Using whole milk adds richness. If you prefer a lighter option, almond or oat milk works well too. The key is to find what you love. Soaking longer lets the oats absorb more liquid. This makes them softer and more enjoyable to eat. - Try different nut butters like almond or cashew. - Experiment with sweeteners like agave or stevia. Feel free to swap peanut butter with almond or cashew butter for new flavors. Each nut butter brings its own taste. Use different sweeteners to find your perfect balance. Agave has a light flavor, while stevia is sugar-free. - Serve in a clear jar for visual appeal. - Drizzle extra peanut butter on top. Serving in a clear jar lets everyone see those delicious layers. It makes your dish look fancy! A drizzle of peanut butter on top adds a nice touch. It makes it more inviting and tasty. For an added twist, include colorful toppings like fresh berries or chocolate chips. Enjoy crafting your perfect chocolate peanut butter overnight oats! For the complete recipe, check the Full Recipe section. {{image_4}} You can switch up your chocolate peanut butter overnight oats with fun flavors. - Chocolate Banana Overnight Oats: Mash a ripe banana into the mix. The banana adds natural sweetness and a creamy texture. - Mocha Peanut Butter Overnight Oats: Add a teaspoon of instant coffee or espresso powder. This gives your oats a rich coffee flavor. Got dietary needs? No problem! You can easily modify this recipe. - Gluten-free option: Use certified gluten-free oats. This way, everyone can enjoy a tasty breakfast. - Vegan alternative: Swap regular milk for almond milk or oat milk. Use maple syrup or agave for sweetness. Change your oats with the seasons for exciting new tastes. - Adding pumpkin spice for fall: Mix in a teaspoon of pumpkin spice. This brings warmth and a cozy flavor to your oats. - Incorporating fresh berries in summer: Toss in some strawberries or blueberries. Fresh fruit brightens up your oats and adds nutrients. These variations keep your breakfast fun and exciting! You can find the full recipe here to make your own delicious creation. To keep your chocolate peanut butter overnight oats fresh, use an airtight container. This helps prevent moisture and odors from mixing in. Store the container in the refrigerator. Your oats will stay good for up to 5 days. This means you can make a batch and enjoy it throughout the week. Can you freeze overnight oats? Yes, you can freeze them! Freezing is a great way to save extra servings. Just make sure to use a freezer-safe container. How to thaw overnight oats for future use: To thaw, move the container to the fridge the night before you want to eat them. This will help them thaw slowly and evenly. You can also use the microwave if you’re in a hurry. Just heat it in short bursts, stirring in between. Best methods to reheat if desired: If you prefer warm oats, reheat them in the microwave. Place your oats in a microwave-safe bowl and cover it. Heat for 30 seconds, then stir. Repeat until warm enough. You can also reheat on the stove. Just add a splash of milk to a saucepan and warm it over low heat, stirring often. Enjoy your delicious oats however you like! What is the texture of overnight oats supposed to be? Overnight oats should be creamy and thick. They absorb the liquid overnight. This makes them soft but not mushy. You want a nice balance. If they seem too watery, add less milk next time. Can I use steel-cut oats instead of rolled oats? Yes, but steel-cut oats will need more time to soak. They take longer to soften. I recommend soaking them overnight to get a good texture. You may need to adjust the liquid and soaking time. How can I make my overnight oats thicker or creamier? To make your oats thicker, use less milk. You can also add chia seeds. They help absorb liquid and add fiber. Another tip is to let them sit longer in the fridge. Are overnight oats healthy? Yes, overnight oats are very healthy. They offer fiber and protein. This can help keep you full. They also provide vitamins and minerals. Plus, they are low in sugar if you control the toppings. What are the nutritional benefits of using peanut butter? Peanut butter adds healthy fats and protein. It helps keep your energy up. It also has vitamins like E and B. Just make sure to choose a natural peanut butter with no added sugar. What to pair with chocolate peanut butter overnight oats? You can pair them with fresh fruit. Bananas and berries taste great. Nuts or seeds also add a nice crunch. For extra sweetness, consider a drizzle of honey or maple syrup. Can overnight oats be eaten warm? Yes, you can eat them warm if you like. Just heat them gently in the microwave. Add a splash of milk to keep them creamy. Enjoy your warm treat any time of the day! You can create tasty and healthy overnight oats with simple ingredients. We discussed the main ingredients, preparation steps, and optional toppings. You learned tips for customization, serving, and storing your oats. Remember, you can adjust flavors and textures to suit your taste. Try different ingredients and enjoy your meals. Keep experimenting with toppings and variations. This way, overnight oats will always feel new and exciting. Enjoy every delicious bite and make it your own!](https://dishtreats.com/wp-content/uploads/2025/07/90d151b9-6d0c-4c1c-ba31-37512e57091e-768x768.webp)