
Loaded Southwest Sweet Potato Skins Flavorful Delight

If you love flavorful snacks, you’re in for a treat! My Loaded Southwest Sweet Potato Skins are a perfect mix of spicy and sweet. These tasty bites not only look great but pack a punch with every bite. And don’t worry; they’re easy to make! In this post, I’ll share all the tips, tricks, and variations so you can enjoy them anytime. Let’s dive in and create this delicious delight together!
Ingredients
List of Ingredients
- 2 large sweet potatoes
- 1 tablespoon olive oil
- 1 teaspoon ground cumin
- 1 teaspoon smoked paprika
- Salt and black pepper to taste
- 1 cup canned black beans, rinsed and drained
- 1 cup corn kernels (can use frozen or fresh)
- 1/2 cup red bell pepper, diced
- 1/2 cup red onion, diced
- 1 cup sharp cheddar cheese, shredded
- 1/2 cup Greek yogurt or sour cream
- Fresh cilantro, chopped, for garnish
- Lime wedges, for serving
Ingredient Notes and Substitutions
Sweet potatoes give a sweet flavor and soft texture. You can use white potatoes if needed, but they change the taste. Olive oil adds richness, but you can use avocado oil as a swap. Ground cumin and smoked paprika create a warm and smoky taste. If you want heat, add chili powder instead.
Black beans are great for protein. You can switch them for pinto beans or chickpeas. Corn adds sweetness and crunch. Frozen corn is just fine. Red bell pepper and onion offer color and zest. Yellow or green peppers can work too.
Cheddar cheese makes this dish creamy. Try Mexican blend cheese or pepper jack for a twist. Greek yogurt or sour cream adds tang. You can skip this if you want a lighter version.
Recommended Brands for Key Ingredients
- Sweet Potatoes: Look for organic options from your local market.
- Olive Oil: I prefer California Olive Ranch for its flavor.
- Canned Black Beans: Goya is a reliable choice for quality.
- Corn Kernels: Del Monte offers great frozen corn.
- Cheddar Cheese: Cabot Creamery has a sharp flavor that I love.
- Greek Yogurt: Chobani is a trusted brand with a creamy texture.
Step-by-Step Instructions
Prepping Sweet Potatoes
Start by preheating your oven to 400°F (200°C). Wash the sweet potatoes well. Use a fork to poke holes all over them. This helps steam escape. Place the sweet potatoes on a baking sheet lined with parchment paper. Bake them for about 45-50 minutes. They are done when a fork goes in easily. Let them cool for about 10 minutes after baking.
Next, slice each sweet potato in half lengthwise. Carefully scoop out some of the flesh, leaving about a 1/4 inch on the skin. Keep the scooped-out sweet potato. You will use it for the filling.
Creating the Filling Mixture
In a mixing bowl, combine the reserved sweet potato flesh with these ingredients:
- 1 cup canned black beans, rinsed and drained
- 1 cup corn kernels
- 1/2 cup diced red bell pepper
- 1/2 cup diced red onion
- 1 tablespoon olive oil
- 1 teaspoon ground cumin
- 1 teaspoon smoked paprika
- Salt and black pepper to taste
Mix everything well until combined. This filling is packed with flavor and nutrients.
Assembling and Baking the Skins
Now, spoon the filling back into each sweet potato skin. Pack it in well to make it tasty. Sprinkle shredded cheddar cheese over the top of each potato half.
Put the stuffed sweet potato skins back in the oven. Bake them for 15-20 minutes. You want the cheese to melt and bubble, creating a nice golden crust.
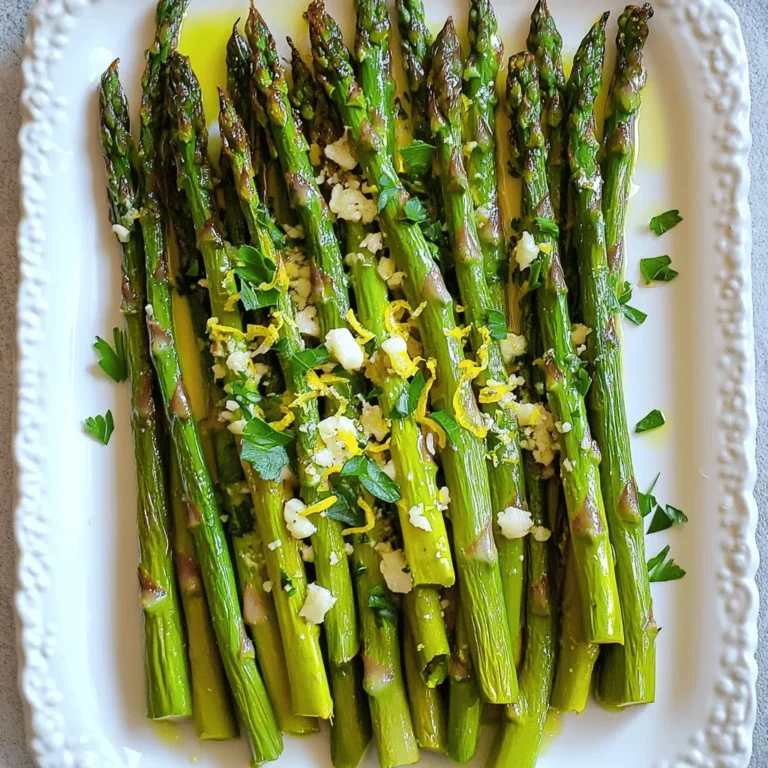
After baking, let them cool for a few minutes. Top each skin with a dollop of Greek yogurt or sour cream. Add fresh cilantro for a burst of color. Serve with lime wedges on the side for extra zest. Enjoy your Loaded Southwest Sweet Potato Skins!
Tips & Tricks
Perfecting the Cooking Process
To make great Loaded Southwest Sweet Potato Skins, start with the right sweet potatoes. Choose large, firm ones. Wash them well to remove dirt. Use a fork to poke holes all over. This step helps steam escape while baking. Bake them at 400°F for 45-50 minutes. They should be soft but not mushy. Let them cool for a few minutes before cutting. This makes them easier to handle. When scooping out the flesh, leave some on the skin. This gives your skins strength to hold the filling.
Enhancing Flavor Profiles
Flavor is key in this dish. For the filling, mix the sweet potato flesh with black beans and corn. Add diced red bell pepper and red onion for crunch and color. Season with olive oil, cumin, and smoked paprika. These spices bring warmth and depth. Taste the mixture and adjust salt and pepper. You want each bite to burst with flavor. To finish, top with sharp cheddar cheese. It melts nicely and adds richness. Don’t skip the Greek yogurt or sour cream on top. It adds creaminess and balances the spices.
Presentation Suggestions
Presentation can elevate your dish. Serve the loaded sweet potato skins on a bright platter. This makes the colors pop. Drizzle extra Greek yogurt or sour cream on top. Add a sprinkle of fresh cilantro for a fresh touch. Place lime wedges around the platter for a zesty look. This also invites guests to squeeze lime over their skins. A beautiful presentation makes the dish more appealing, and it tastes even better! Enjoy your creation and share with friends!

Variations
Vegetarian and Vegan Options
To make your Loaded Southwest Sweet Potato Skins vegetarian or vegan, swap the cheese and yogurt. Use a plant-based cheese for that melty goodness. For the yogurt, try cashew cream or coconut yogurt. These options keep the dish creamy and delicious without dairy. You can still enjoy the rich flavors of cumin and smoked paprika.
Adding Proteins or Other Veggies
If you want to boost the protein in these sweet potato skins, consider adding cooked chicken, turkey, or tofu. Shredded rotisserie chicken works great and saves time. You can also add other veggies like zucchini or spinach. Simply chop them small and mix them in with the filling. This adds color and nutrients to your dish.
Flavor Twists with Different Seasonings
Looking to spice things up? Change the seasoning to fit your taste. Try adding chili powder for heat or taco seasoning for a bold kick. You can also use fresh herbs like oregano or thyme for a different flavor. A squeeze of lime juice adds freshness and brightness to every bite. Explore different combinations to find your favorite!
Storage Info
How to Store Leftovers
To keep your loaded southwest sweet potato skins fresh, store them in an airtight container. Place parchment paper between layers if stacking them. This keeps the skins from getting soggy. Store them in the fridge for up to three days. If you want to keep them longer, freezing is a good option.
Reheating Instructions
Reheat your sweet potato skins in the oven for the best taste. Preheat the oven to 350°F (175°C). Place the skins on a baking sheet lined with foil or parchment paper. Heat them for about 10-15 minutes or until they’re warm and the cheese is melted again. You can also use a microwave, but the skins may lose some crispness.
Freezing Guidelines for Sweet Potato Skins
If you want to freeze your loaded sweet potato skins, let them cool completely first. Wrap each skin tightly in plastic wrap. Then, place them in a freezer-safe bag or container. They can last for up to three months in the freezer. When ready to eat, thaw them in the fridge overnight before reheating. This way, you can enjoy this flavorful delight anytime!
FAQs
Can I make Loaded Southwest Sweet Potato Skins ahead of time?
Yes, you can make Loaded Southwest Sweet Potato Skins ahead of time. Prepare the sweet potatoes and filling in advance. Bake the potatoes and let them cool. Then, scoop out the flesh and mix it with your other ingredients. You can store the filling in the fridge for up to two days. When ready to eat, assemble and bake them. This saves time and makes meal prep easy.
What can I substitute for cheddar cheese?
If you need a substitute for cheddar cheese, try Monterey Jack or Pepper Jack cheese. Both melt well and add great flavor. You can also use vegan cheese for a dairy-free option. Nutritional yeast is another choice for a cheesy flavor without using cheese.
How do I make these sweet potato skins spicier?
To spice up your sweet potato skins, add diced jalapeños to the filling. You can also sprinkle cayenne pepper or chili powder for heat. Another option is to use spicy cheese, like Pepper Jack. For an extra kick, serve with a spicy salsa on the side. Adjust the spice level to your liking!
In this article, we explored the delicious world of loaded sweet potato skins. We covered essential ingredients and helpful tips for perfecting your dish. You learned how to prepare, assemble, and bake your sweet potato skins. We also shared fun variations and smart storage hacks.
By following these steps, you can impress anyone at your next meal. Enjoy experimenting with flavors and toppings. These sweet potato skins can be a hit at any table!


![- 1 cup all-purpose flour - 2 tablespoons granulated sugar - 2 teaspoons baking powder - ½ teaspoon baking soda - ¼ teaspoon salt - 1 cup buttermilk - 1 large egg, lightly beaten - 2 tablespoons unsalted butter, melted - 2 teaspoons pure vanilla extract - 1 tablespoon ground cinnamon - 3 tablespoons brown sugar, packed - 1 cup powdered sugar - 3 tablespoons cream cheese, softened to room temperature - 2-3 tablespoons milk (to achieve desired icing consistency) When I make these pancakes, I always start with the dry ingredients. This step is key. I mix the flour, sugar, baking powder, baking soda, and salt in a bowl. It’s important to whisk these well. This ensures even rising and sweetness. Next, I move to the wet ingredients. I pour the buttermilk into a separate bowl. Then, I add the beaten egg, melted butter, and vanilla extract. Whisk until smooth. This mixture is crucial for the pancake’s fluffiness. Now, let's talk about the cinnamon filling. In a small bowl, I combine ground cinnamon and brown sugar. This mix gives the pancakes their sweet, spicy swirl. Finally, for the icing, I beat together powdered sugar and softened cream cheese. I add milk slowly until I reach the right consistency. Drizzling this icing over the warm pancakes is pure bliss. For the full recipe, check out the complete guide. Enjoy your cooking adventure! 1. In a mixing bowl, combine the all-purpose flour, granulated sugar, baking powder, baking soda, and salt. Mix well until the dry ingredients are blended. 2. Take another bowl and whisk together the buttermilk, the lightly beaten egg, melted butter, and vanilla extract. Make sure this mixture is smooth. 1. Gradually pour the wet ingredients into the bowl with the dry ingredients. Stir gently until just combined. It’s okay if there are a few lumps; this helps keep your pancakes fluffy. 2. Be careful not to overmix. Overmixing can make the pancakes tough. 1. In a small bowl, combine the ground cinnamon and packed brown sugar. Mix them well to combine. This mixture will create a sweet swirl in your pancakes. 1. Preheat a non-stick skillet or griddle over medium heat. Pour about ¼ cup of pancake batter onto the skillet for each pancake. 2. When the batter starts bubbling on the surface (about 1-2 minutes), sprinkle about a teaspoon of the cinnamon filling mixture onto the pancake before flipping it. 3. Flip the pancake carefully and cook for another 1-2 minutes, until golden brown. Repeat this process with the remaining batter and filling. 1. In a small bowl, mix the powdered sugar, softened cream cheese, and enough milk to reach your desired icing consistency. Blend until the mixture is smooth. Now you're ready to enjoy your delicious cinnamon roll pancakes! For precise measurements and more tips, check the Full Recipe. To make fluffy pancakes, avoid overmixing the batter. When you mix too much, the pancakes can turn tough. You want a few lumps in the batter; that is okay! Use fresh baking powder and baking soda. Old leavening agents may not make your pancakes rise well. Check the expiration date on the package to be sure. Heat is key when cooking pancakes. Adjust the heat as needed to prevent burning. If your skillet is too hot, the pancakes may burn on the outside and stay raw inside. A non-stick skillet helps with easy flipping. It also allows you to use less oil. Always preheat the skillet before pouring your batter. The icing makes these pancakes special. To achieve your desired thickness, adjust the milk quantity. Start with 2 tablespoons and add more if needed. Drizzle icing over warm pancakes for best results. The warmth helps the icing melt into the pancakes, making each bite delightful. {{image_4}} Cinnamon roll pancakes are fun! You can change them up in many ways. Let’s explore some tasty options. You can add chopped walnuts or pecans to the batter. This nutty addition gives a lovely crunch. It also adds healthy fats and protein. Just mix in about ½ cup of nuts before cooking. You will love the extra texture and flavor. Want a fruity twist? Add diced apples or berries to the batter. They add sweetness and freshness. Try using about 1 cup of fruit. Blueberries or chopped strawberries work great. Apples give a nice cinnamon flavor when cooked. Your pancakes will be more colorful and tasty! Feel free to experiment with spices. Adding nutmeg or cardamom can change the taste. Start with ¼ teaspoon of each spice. You will enjoy the new flavors. These spices pair well with cinnamon and make your pancakes special. For the complete recipe, check out the [Full Recipe]. Enjoy your cooking adventure! You can store leftover cinnamon roll pancakes in an airtight container. They will stay fresh in the refrigerator for up to 3 days. This keeps them moist and ready for a quick breakfast or snack. To freeze your pancakes, lay them in a single layer on a baking sheet. Once frozen, transfer them to a freezer-safe bag. This method keeps them from sticking together. You can pull out as many as you need later. When you are ready to enjoy your pancakes again, simply microwave or toast them. If you want to make them even better, add extra icing on top while they warm up. This gives them a fresh taste and makes them feel special again. Yes, you can use whole wheat or gluten-free flour. However, this may change the texture of your pancakes. Whole wheat flour adds a nutty flavor and denser texture. Gluten-free flour can make them lighter but may need extra moisture. To make these pancakes dairy-free, swap buttermilk for almond milk. Use a dairy-free butter alternative in the recipe. This ensures you keep the great taste while avoiding dairy. Cinnamon roll pancakes are delicious on their own. However, they pair well with fresh fruits, like strawberries or bananas. Whipped cream can add a light and fluffy touch. You can also drizzle on more maple syrup for added sweetness. For the full recipe, check out the details above. Cinnamon Roll Pancakes are simple and fun to make. We combined dry and wet ingredients with cinnamon filling for a tasty treat. Use tips for fluffiness, cooking, and icing to ensure success. You can customize these pancakes by adding nuts or fruits. Remember to store leftovers well for future enjoyment. Try new variations each time for a delightful twist. These pancakes can impress anyone and become a family favorite. Enjoy your cooking adventure!](https://dishtreats.com/wp-content/uploads/2025/06/80f0c7ad-2155-4787-b1f4-2bdd3b819c66-768x768.webp)
![- 12 ounces of spaghetti or linguine - 4 cups of vegetable broth - 1 tablespoon of olive oil - 6 cloves of garlic, finely minced - 1 teaspoon of red pepper flakes - Zest of 1 lemon - Juice of 2 fresh lemons - 1 cup of cherry tomatoes, halved - 1 cup of fresh spinach leaves - 1/2 cup of grated Parmesan cheese - Salt and freshly ground black pepper to taste - Fresh parsley, chopped for garnish Gathering the right ingredients is key for One-Pot Lemon Garlic Pasta. Each item plays a role in creating a bright and tasty dish. The spaghetti or linguine serves as the base. The vegetable broth gives it depth and flavor. Olive oil adds richness, while garlic brings a punch. Red pepper flakes add just a hint of heat. Next, the lemon zest and juice bring brightness. Cherry tomatoes offer sweetness and color. Fresh spinach adds a pop of green and nutrition. Parmesan cheese gives a creamy finish. Finally, don’t forget salt and pepper to enhance all the flavors. - Use nutritional yeast instead of Parmesan cheese for a vegan option. - Try gluten-free pasta like brown rice or quinoa pasta. If you want to make this dish vegan, swap out the cheese for nutritional yeast. It adds a similar nutty flavor without dairy. For those who need gluten-free options, plenty of pasta choices exist. You can use brown rice or quinoa pasta for a tasty alternative. This recipe stays flexible while keeping its delicious essence. Enjoy exploring these options as you cook! First, heat one tablespoon of olive oil in a large pot over medium heat. Once the oil is hot, add six cloves of finely minced garlic and one teaspoon of red pepper flakes. Sauté this mix for about one to two minutes. Stir it often to avoid burning the garlic. Burnt garlic can ruin the flavor of your dish. Next, pour in four cups of vegetable broth. Then, add the zest of one lemon and the juice of two fresh lemons. Stir gently to mix everything well. The lemon adds a bright flavor that makes this dish special. Now, bring the mixture to a rolling boil. Carefully add twelve ounces of spaghetti or linguine. Make sure the pasta is fully submerged in the broth. This helps it cook evenly. Reduce the heat to a gentle simmer. Cook the pasta while stirring occasionally for about ten to twelve minutes. You want it to be al dente, which means it should be firm to the bite. Most of the liquid should be absorbed by now. After the pasta is cooked, add one cup of halved cherry tomatoes and one cup of fresh spinach. Cook for an additional two to three minutes. Stir until the spinach wilts and the tomatoes soften slightly. Remove the pot from the heat. Stir in half a cup of grated Parmesan cheese. This will give your pasta a creamy texture. Taste it and season with salt and freshly ground black pepper as needed. Allow the pasta to rest for a couple of minutes in the pot. This helps it thicken slightly before serving. For the full recipe, check out the details provided above. Enjoy your flavorful one-pot lemon garlic pasta! To cook pasta al dente, follow these steps: - Use plenty of water for boiling. - Check the pasta package for cooking times. - Taste a piece a minute before the time is up. To avoid burnt garlic, do this: - Keep the heat at medium. - Stir the garlic often. - As soon as it smells good, move to the next step. If you want a zesty kick, add more lemon juice. - Start with an extra half lemon. - Taste and add more if needed. To balance spices, try adding fresh herbs. - Basil or thyme work well. - Chop them finely and mix in before serving. For best pairings, serve with a crisp salad. - A simple green salad brightens the meal. - Garlic bread makes a great side, too. For a nice presentation, use shallow bowls. - Garnish with parsley and extra cheese. - A sprinkle of red pepper flakes adds color. Check the Full Recipe for more details and tips on making this dish shine! {{image_4}} You can make One-Pot Lemon Garlic Pasta even more filling by adding protein. Grilled chicken is a great choice. Just slice it thin and mix it in before serving. Shrimp is another tasty option. Simply cook the shrimp in the pot for a few minutes until they turn pink. If you want a plant-based option, try chickpeas. They are easy to add and packed with protein. Use a can of chickpeas, rinse them, and stir them in with the pasta. They will soak up the lemon flavor and add a nice texture. Using seasonal vegetables can brighten your dish. Fresh veggies add color and nutrition. In spring, consider asparagus or peas. In summer, zucchini or bell peppers work well. You can also substitute spinach with kale or arugula. These greens offer a different taste and texture. Just chop them and add them in the last few minutes of cooking. You can change the sauce to suit your taste. For a creamy lemon sauce, add a splash of cream after cooking. This gives the pasta a rich flavor. If you prefer a dairy-free option, use coconut milk instead. Another way to deepen the flavor is by adding a splash of white wine. Pour it in before the broth. This adds a nice depth that complements the lemon. Just let it cook down for a minute before adding the rest of the ingredients. These variations will keep your One-Pot Lemon Garlic Pasta exciting and new each time you make it. For the complete recipe, check out [Full Recipe]. You can store One-Pot Lemon Garlic Pasta in the fridge for about three days. To keep it fresh, place it in an airtight container. When reheating, add a splash of water or broth to prevent it from drying out. Heat it gently on the stove or in the microwave, stirring often. This keeps the pasta creamy and tasty. If you want to freeze One-Pot Lemon Garlic Pasta, let it cool completely first. Transfer it to a freezer-safe container. It can last for up to three months in the freezer. When you are ready to eat, move it to the fridge to thaw overnight. Reheat it on the stove with a little broth or water. This helps regain its original texture and flavor. Enjoy your meal without fuss! I recommend using spaghetti or linguine for this dish. These shapes cook well and absorb the lemon-garlic flavors nicely. You can also try fettuccine or thin spaghetti if you like. Choose your favorite type based on what you have at home. Yes! You can use gluten-free pasta like brown rice or chickpea pasta. These options hold up well in the dish and taste great. Be sure to check the cooking time, as gluten-free pasta may vary. If you want less heat, simply reduce the red pepper flakes. You can start with half a teaspoon and add more if you want. You can also replace them with a pinch of black pepper for flavor without the heat. This pasta pairs well with a fresh salad or garlic bread. A simple green salad with lemon vinaigrette adds a nice touch. You can also serve it with grilled vegetables or a light protein like chicken or shrimp. Enjoy your meal! This blog post shared a simple recipe for One-Pot Lemon Garlic Pasta. You learned about the key ingredients, including pasta, broth, and fresh veggies. I offered tips on cooking techniques, flavor enhancements, and ways to add protein. You also found storage tips and answers to common questions. This dish is easy to make and great for any meal. Enjoy experimenting with your favorite ingredients and variations!](https://dishtreats.com/wp-content/uploads/2025/07/777f1442-06da-446c-8bc8-b5c2e5ded698-768x768.webp)
