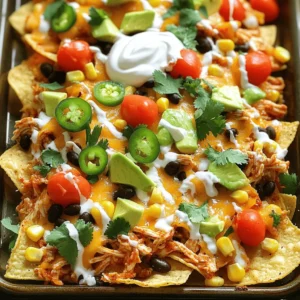
Cajun Chicken Sheet Pan Nachos Flavorful and Easy Dish

Are you ready to transform nachos into a full meal? My Cajun Chicken Sheet Pan Nachos are packed with flavor and super easy to make! With just one pan, you get a delicious blend of spices, cheese, and fresh toppings. In this post, I’ll guide you through simple steps, key tips, and tasty variations. Get ready to impress your family and friends with this crowd-pleasing dish!
Ingredients
List of Ingredients
- 2 boneless, skinless chicken breasts
- 1 tablespoon Cajun seasoning
- 1 tablespoon olive oil
- 1 bag (10 oz) tortilla chips
- 1 cup shredded mozzarella cheese
- 1 cup shredded cheddar cheese
- 1 cup black beans, drained and rinsed
- 1 cup corn (canned or frozen, thawed)
- 1 jalapeño, thinly sliced
- 1/2 cup cherry tomatoes, halved
- 1 avocado, diced
- Sour cream, for drizzling
- Fresh cilantro, chopped, for garnish
Important Notes on Ingredients
When choosing chicken, fresh is best. It stays juicy and tender. Use good-quality tortillas for great crunch. The Cajun seasoning gives a kick. Feel free to adjust the amount based on your taste. Fresh veggies add color and flavor. Make sure to rinse black beans to reduce sodium. For cheese, use a mix of mozzarella and cheddar for creaminess and flavor.
Substitutions and Additions
If you can’t find Cajun seasoning, use a mix of paprika, garlic powder, and black pepper. For a vegetarian option, replace chicken with grilled veggies or tofu. You can use different cheeses like pepper jack for more heat. Swap out black beans for pinto beans if you prefer. Add diced bell peppers or olives for extra flavor. Want more crunch? Top with crispy tortilla strips!
Step-by-Step Instructions
Preparation Steps
First, we need to get things ready. Start by preheating your oven to 400°F (200°C). This heat will melt the cheese and make the nachos crisp. Next, take the chicken breasts and drizzle them with olive oil in a bowl. Make sure to coat them well. Then, sprinkle the Cajun seasoning all over the chicken. This spice mix gives the chicken its tasty kick!
Cooking Process
Now it’s time to cook the chicken. Place the seasoned chicken on a baking sheet. Bake it in the oven for 20-25 minutes. Check that the chicken is fully cooked. The juices should run clear, and there should be no pink inside. Once done, let it rest for a few minutes. After resting, shred the chicken into bite-sized pieces using two forks.
Final Assembly and Baking
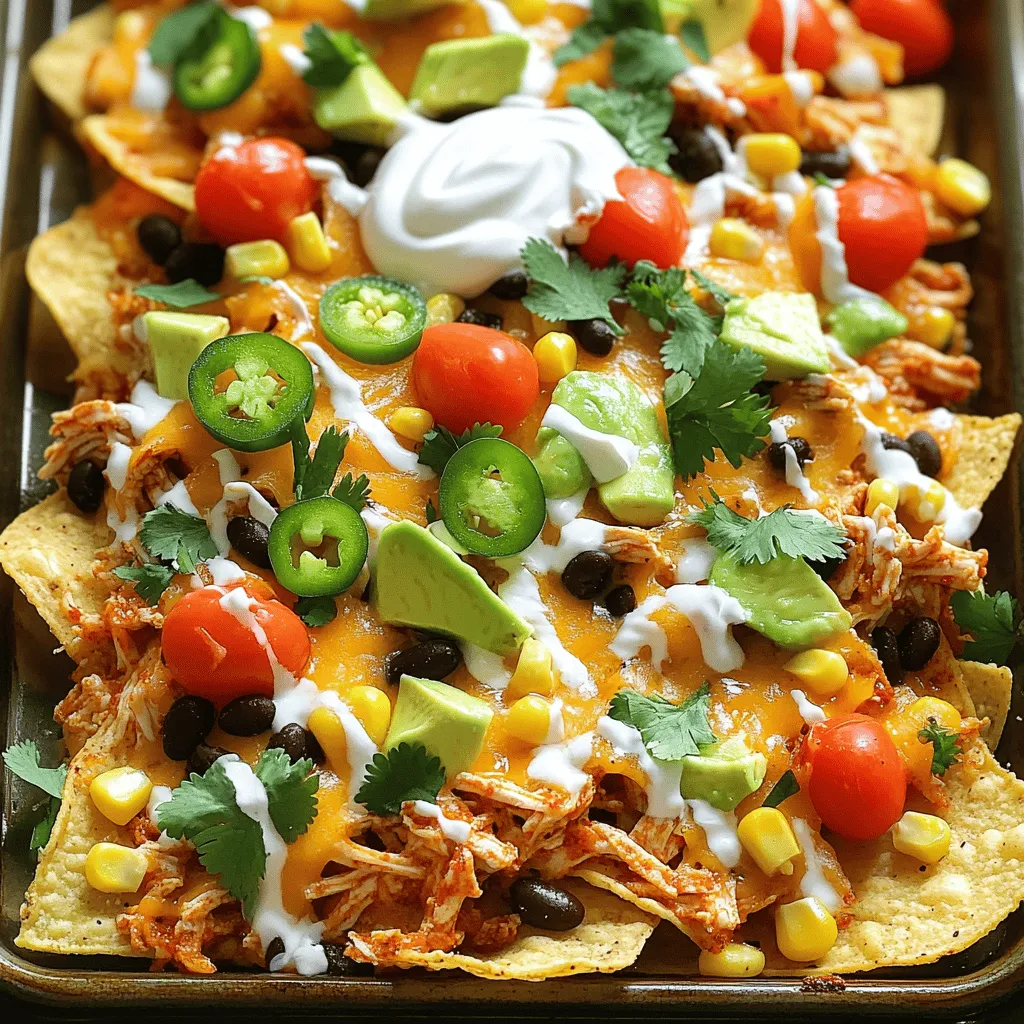
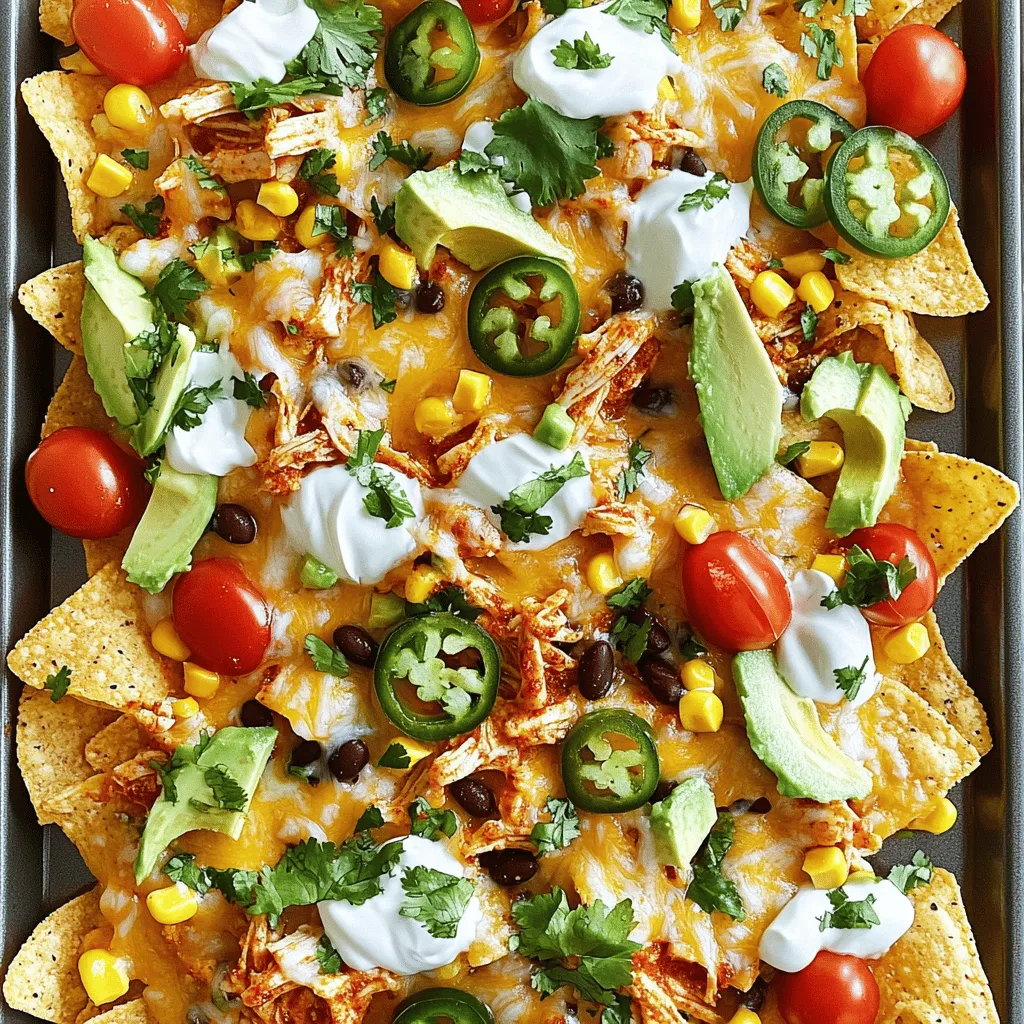
Let’s build our nachos! On a clean baking sheet, spread out the tortilla chips in a single layer. Then, evenly distribute the shredded chicken on top. Next, add the black beans, corn, jalapeño slices, and halved cherry tomatoes. Don’t forget the cheese! Sprinkle the mozzarella and cheddar generously over the top. After layering, pop the nachos back in the oven for 10-15 minutes. Watch for the cheese to melt and bubble. Once it’s golden and delicious, take it out carefully. Drizzle sour cream on top, add diced avocado, and finish with chopped cilantro. Enjoy your tasty creation!
Tips & Tricks
Achieving the Best Flavor
To get the best flavor from your Cajun chicken sheet pan nachos, start with good seasoning. Use fresh Cajun seasoning for a bold taste. Mix it well with olive oil before coating the chicken. This helps the spices stick and boosts the flavor. When you bake the chicken, make sure it reaches 165°F (75°C) for safety. Shredding the chicken after baking makes it easier to spread over the nachos.
Layer your nachos wisely. Start with tortilla chips as a base, then add the seasoned chicken, black beans, and corn. Make sure to distribute the toppings evenly. This way, every bite is packed with flavor. Top it off with plenty of cheese for a gooey finish.
Common Mistakes to Avoid
One common mistake is overcrowding the nachos. If you pile on too many toppings, the chips can get soggy. Keep a good balance between chips and toppings. Also, be mindful of the baking time. If you bake the nachos too long, they can burn. Watch for the cheese to melt and bubble but not brown too much.
Another mistake is using low-quality cheese. Stick with good mozzarella and cheddar for the best melt and flavor. Lastly, don’t skip the fresh toppings. Adding diced avocado, cherry tomatoes, and cilantro right before serving makes the dish pop with color and taste.
Presentation Tips
For a beautiful presentation, serve the nachos straight from the baking sheet. This gives a casual, fun vibe. Drizzle sour cream on top for a white contrast against the colors. Scatter diced avocado and cilantro to add freshness.
Consider adding lime wedges on the side. This gives a zesty touch and looks appealing. You can also serve extra sour cream in a small bowl for dipping. These small touches make the dish feel special and inviting.

Variations
Vegetarian Option
You can swap the chicken for your favorite veggies. Try using roasted bell peppers, zucchini, and mushrooms. Toss them in Cajun seasoning for that spicy kick. Use black beans and corn to add protein and flavor. Top with mozzarella and cheddar cheese as usual. These nachos will still pack a punch!
Spicy Version
If you love heat, add more jalapeños or use spicy cheese. You can also mix in diced green chilies for an extra kick. Try using pepper jack cheese instead of mozzarella. The spiciness will make each bite exciting. Serve with hot sauce for those who crave more heat.
Low-Carb Adaptation
For a low-carb dish, skip the tortilla chips. Instead, use cauliflower florets or celery sticks as a base. Shred the chicken and layer it over the veggies. Add cheese, black beans, and corn for flavor. This version keeps the taste but reduces carbs. Enjoy all the flavors without the extra carbs!
Storage Info
How to Store Leftovers
To keep your Cajun chicken sheet pan nachos fresh, first allow them to cool. Then, place any leftovers in an airtight container. Store them in the fridge for up to three days. Avoid stacking the nachos too high to prevent sogginess.
Reheating Instructions
When you want to enjoy the leftovers, preheat your oven to 350°F (175°C). Spread the nachos on a baking sheet in a single layer. Heat them for about 10 minutes, or until everything is warm and the cheese melts again. If you prefer a microwave, heat them in short bursts, checking often to avoid overcooking.
Freezing Tips
Freezing nachos is tricky since the texture can change. If you want to freeze them, store the chicken, beans, and cheese separately from the chips. Wrap each item tightly in plastic wrap, then place them in a freezer bag. You can freeze them for up to three months. To eat, thaw them in the fridge overnight and reassemble before reheating.
FAQs
What is the best cheese for nachos?
For nachos, I recommend using a mix of cheeses. Mozzarella melts well and gives a creamy texture. Cheddar adds a sharp flavor that makes the dish pop. You can also add Monterey Jack for extra creaminess. Mixing these cheeses creates a great balance of taste and texture.
Can I use pre-cooked chicken?
Yes, you can use pre-cooked chicken. This saves time and makes the recipe easier. Just shred the chicken and mix it with Cajun seasoning. You can heat it slightly before adding it to the nachos. This way, you still get that spicy flavor without cooking anew.
How can I make this recipe ahead of time?
To make nachos ahead, prep the chicken and toppings first. Cook the chicken and shred it, then store it in the fridge. You can also slice the jalapeños, chop the tomatoes, and dice the avocado. When you are ready to serve, layer the chips and toppings, then bake. This keeps everything fresh and tasty.
This blog post covered the key ingredients for your recipe, along with important notes. It explained step-by-step how to prepare, cook, and assemble your dish. I shared tips to boost flavor and avoid mistakes. You learned about variations to suit different diets and how to store leftovers.
Remember, great cooking is about joy and creativity. Use these steps to make your dish shine! Enjoy each bite and happy cooking!


![- 8 oz rotini or fusilli pasta - 1 cup cherry tomatoes, halved - 1 cucumber, diced - 1 cup Kalamata olives, pitted and halved - 1/2 red onion, finely chopped - 1 bell pepper, diced - 1 cup feta cheese, crumbled - 1/4 cup fresh parsley, chopped - 1/4 cup extra virgin olive oil - 3 tablespoons red wine vinegar - 1 teaspoon dried oregano - Salt and pepper, to taste - Substitute red wine vinegar with apple cider vinegar - Add other vegetables like bell peppers or spinach This salad bursts with color and flavor. The main ingredients bring freshness. Each bite is full of crunch and zest. The pasta holds the dressing well, creating a tasty mix. The dressing is simple but packs a punch. Extra virgin olive oil adds richness. Red wine vinegar gives a tangy taste. Dried oregano adds a hint of earthiness. Salt and pepper enhance all the flavors. Want to mix it up? Try adding apple cider vinegar instead of red wine vinegar. You can also throw in extra veggies like spinach. This salad is flexible and lets your creativity shine. For the full recipe, check out the Zesty Greek Pasta Salad with Feta & Olives. To start, bring salted water to a rolling boil. Add 8 ounces of rotini or fusilli pasta. Cook for 8-10 minutes until al dente. Once cooked, drain the pasta in a colander. Rinse it under cold water to stop the cooking. Set the drained pasta aside for later. While your pasta cooks, wash and chop your vegetables. Use 1 cup of cherry tomatoes, 1 cucumber, 1/2 red onion, and 1 bell pepper. Dice these into bite-sized pieces. Also, chop 1/4 cup of fresh parsley. Once chopped, place all the vegetables into a large mixing bowl. This creates a colorful and fresh base for your salad. Now it’s time to mix things! Add the cooled pasta and 1 cup of Kalamata olives to the bowl of vegetables. This combination adds a nice salty flavor. In a separate bowl, prepare the dressing. Mix together 1/4 cup of olive oil, 3 tablespoons of red wine vinegar, and 1 teaspoon of dried oregano. Add salt and pepper to taste. Whisk until well combined. Drizzle the dressing over the pasta and vegetable mixture. Gently fold in 1 cup of crumbled feta cheese. Make sure all the ingredients are evenly coated with the dressing. This step is key for great flavor in every bite. Cover the salad with plastic wrap or a lid. Place it in the refrigerator for 30 minutes. This chilling time helps the flavors meld together. You can serve your pasta salad cold or at room temperature. For the full recipe, check out the details above. Serve your Greek pasta salad in a vibrant bowl for visual appeal. A colorful dish draws people in. You can also use individual plates for a fresh look. Garnish each serving with extra feta and parsley. This adds a pop of color and flavor. Let your salad chill longer in the fridge. This helps the flavors blend and deepen. If you love herbs, try adding basil or dill. Fresh herbs boost the taste and aroma. Prep your ingredients in advance. Chop vegetables and cook the pasta ahead of time. This makes assembly quick and easy. When storing leftovers, use an airtight container. It keeps the salad fresh and tasty for days. For the best flavor, consume within three to five days. {{image_4}} There are many fun ways to switch up your Easy Greek Pasta Salad. Try a Mediterranean twist for a new taste. Here are some ideas: - Add sun-dried tomatoes for a sweet, tangy flavor. - Toss in artichoke hearts for extra texture. - For protein, add grilled chicken or chickpeas. Both options make it filling. If you need to change the recipe for your diet, here are some tips: - Use gluten-free pasta to make it gluten-free. - For a vegan option, skip the feta cheese or try a vegan substitute. Enjoy seasonal ingredients by mixing in fresh veggies: - In summer, add zucchini for a crunchy touch. - Use roasted vegetables for deeper flavors. Roasting brings out their natural sweetness. These variations keep your Easy Greek Pasta Salad fresh and exciting! Check out the [Full Recipe] for the base you can customize. To keep your Easy Greek Pasta Salad fresh, place it in an airtight container. You can store it in the refrigerator for about 3-5 days. This salad tastes best when you enjoy it fresh. I do not recommend freezing this salad. Freezing can change its texture, making it less enjoyable. If you prepare a large batch, store the dressing separately. This keeps the flavors bright and fresh. This pasta salad is best served cold. However, you can also enjoy it at room temperature. Before serving, gently toss the salad. This helps mix the flavors evenly throughout. For the full recipe, check back to the beginning. Yes, it can be prepared a day in advance for flavor enhancement. This allows all the tastes to blend and become more rich. Just keep it in the fridge until you are ready to serve. You can use vegan feta or other cheese alternatives. This makes the dish suitable for various diets. You might want to try a creamy cheese for a nice texture. Yes, it’s perfect for picnics and potlucks if kept properly chilled. The fresh ingredients hold up well. Just pack it in a cooler or insulated bag to keep it fresh. Consider adding grilled chicken, shrimp, or canned chickpeas. These options make the salad more filling. They also add great taste and texture to the mix. This salad combines fresh pasta with vibrant vegetables, feta, and a simple dressing. Using easy steps, you can create a delightful dish that's perfect for any gathering. Remember, you can adjust flavors and ingredients to fit your taste. Meal prep helps save time, and eating fresh is best. Enjoy your colorful pasta salad, whether at a picnic or a family dinner!](https://dishtreats.com/wp-content/uploads/2025/06/42921458-26d8-4100-967d-b17bfbbdb796-768x768.webp)
![- Medium head of cauliflower - Garlic cloves - Grated Parmesan cheese - Extra virgin olive oil - Garlic powder - Smoked paprika - Salt and pepper - Fresh parsley To convert cups to grams, remember that 1 cup of cauliflower is about 100 grams. For cheese, 1 cup of grated Parmesan is around 100 grams too. If you want more garlic flavor, you can add extra garlic cloves. Adjust the garlic powder to your taste. Using fresh ingredients makes a big difference. Fresh cauliflower offers better taste and texture. Fresh garlic gives a stronger flavor. For those with dietary needs, you can swap Parmesan cheese with a vegan version made from nuts or nutritional yeast. Always choose high-quality olive oil for a rich flavor. Quality ingredients lead to a better dish! First, break down the cauliflower. Remove the leaves and stem. Cut the head into bite-sized florets. Make sure they are all similar in size. This step helps them cook evenly. Next, take six cloves of garlic and finely mince them. You want the garlic to blend well with the cauliflower. Gather the other ingredients: olive oil, garlic powder, smoked paprika, salt, and pepper. Now, preheat your oven to 425°F (220°C). This temperature is perfect for roasting. While the oven heats, grab a large bowl. Add the cauliflower florets, minced garlic, olive oil, garlic powder, smoked paprika, salt, and pepper. Toss everything together with your hands or a spoon. Ensure each floret is well-coated. Line a large baking sheet with parchment paper for easy cleanup. Spread the cauliflower in a single layer on the sheet. Place the baking sheet in the preheated oven. Roast the cauliflower for about 20 to 25 minutes. Stir halfway through to achieve a nice golden brown. After roasting, take the baking sheet out of the oven. Sprinkle the grated Parmesan cheese over the hot cauliflower. The heat will melt the cheese beautifully. Return it to the oven for another five minutes. Wait until the cheese is bubbly and delicious. When it's done, let it cool for a few minutes. For a fresh touch, garnish with finely chopped parsley before serving. If you want to explore the full recipe, check it out here: [Full Recipe]. To ensure even roasting, spread the cauliflower in a single layer. This allows the hot air to circulate around each floret. Use a large baking sheet lined with parchment paper for easy cleanup. Keep an eye on your cauliflower as it roasts. Aim for a golden color and tender texture. Stir the florets halfway through the cooking time to promote uniform browning. You can boost the flavor with extra spices and herbs. Consider adding a pinch of cayenne for heat or thyme for an earthy touch. If you want deeper flavor, try marinating the cauliflower in olive oil and spices before roasting. This helps the flavors soak in, making each bite delicious. This roasted garlic Parmesan cauliflower pairs great with many main dishes. I love it with grilled chicken or fish. For best practices in garnishing, sprinkle fresh parsley on top before serving. This adds color and freshness to your dish. Serve it in a rustic bowl or a beautiful platter. A drizzle of olive oil enhances its appeal. Enjoy your flavorful roasted garlic Parmesan cauliflower as a delightful side dish! For the full recipe, check out the details. {{image_4}} You can easily change a few ingredients in this dish. If you're looking for a vegan option, use nutritional yeast instead of Parmesan. This swap gives you a cheesy flavor without dairy. For other veggies, try broccoli or Brussels sprouts. Both will roast nicely and absorb the garlic flavor. If you want a different taste, you can grill the cauliflower. Grilling brings a smoky flavor that pairs well with garlic. Another option is using an air fryer. It cooks faster and makes the cauliflower crispy. Both methods keep the dish delicious. You can adjust ingredients based on the season. In fall, add some pumpkin spice for warmth. In spring, include fresh herbs like dill or tarragon. For holiday meals, mix in some cranberries or nuts for a festive twist. These changes keep the recipe fresh and exciting. To store leftovers, place the cauliflower in an airtight container. This keeps it fresh and tasty. Use it within three days for the best flavor. Glass or BPA-free plastic containers work well for storage. They seal tightly and prevent moisture loss. For reheating, the oven is your best friend. Preheat it to 350°F (175°C). Spread the cauliflower on a baking sheet and bake for about 10 minutes. This method keeps it crispy. Microwaving works too, but it can make the cauliflower soggy. To avoid this, place a paper towel over the dish to absorb excess moisture. You can freeze the cauliflower before cooking. Just toss it with the oil and seasonings, then spread it in a single layer on a baking sheet. Freeze until solid, then transfer to a freezer bag. To cook from frozen, no need to thaw. Just roast it at 425°F (220°C) for 30-35 minutes, adding the cheese in the last five minutes. This method keeps the flavors locked in. How can I make this dish ahead of time? You can prepare the cauliflower ahead. Simply season it and spread it on a baking sheet. Cover the sheet tightly with plastic wrap. Store it in the fridge for up to a day. When ready, roast it as per the recipe. This saves time and keeps flavors fresh. What can I serve with roasted garlic Parmesan cauliflower? This dish pairs well with many meals. It complements grilled chicken or fish nicely. You can also serve it with a hearty salad. For a vegetarian option, try it with quinoa or rice. The flavors enhance any meal you create. Is this recipe gluten-free? Yes, this recipe is gluten-free. All the ingredients are safe for those on a gluten-free diet. Just ensure that the Parmesan cheese is labeled gluten-free. This makes it easy for everyone to enjoy. Can I make this dish low-carb? Absolutely! Cauliflower is a great low-carb choice. It’s naturally low in carbs and high in fiber. You can enjoy this dish without worry. It fits perfectly into a low-carb meal plan. What to do if it's too soggy? If your cauliflower is too soggy, it may need more roasting time. Make sure to spread the florets out on the baking sheet. This helps them roast evenly and stay crisp. You can also reduce the olive oil slightly for less moisture. Why isn’t the cheese melting properly? If the cheese isn’t melting, check the oven temperature. It should be hot enough at 425°F (220°C). Make sure to add the cheese right after roasting. This lets it melt smoothly over the hot cauliflower. If needed, give it a few extra minutes in the oven. This dish combines fresh ingredients and simple steps. You learned how to prepare, roast, and serve roasted garlic Parmesan cauliflower. I shared tips for enhancing flavor and ideas for swapping ingredients. Remember to store leftovers correctly to keep them fresh. Whether you want a quick snack or a tasty side, this recipe works well. You can easily adjust it to suit your tastes. Enjoy cooking and making this dish your own!](https://dishtreats.com/wp-content/uploads/2025/06/e2797ad0-ebfe-4fec-85bd-8200cd052b8d-768x768.webp)
