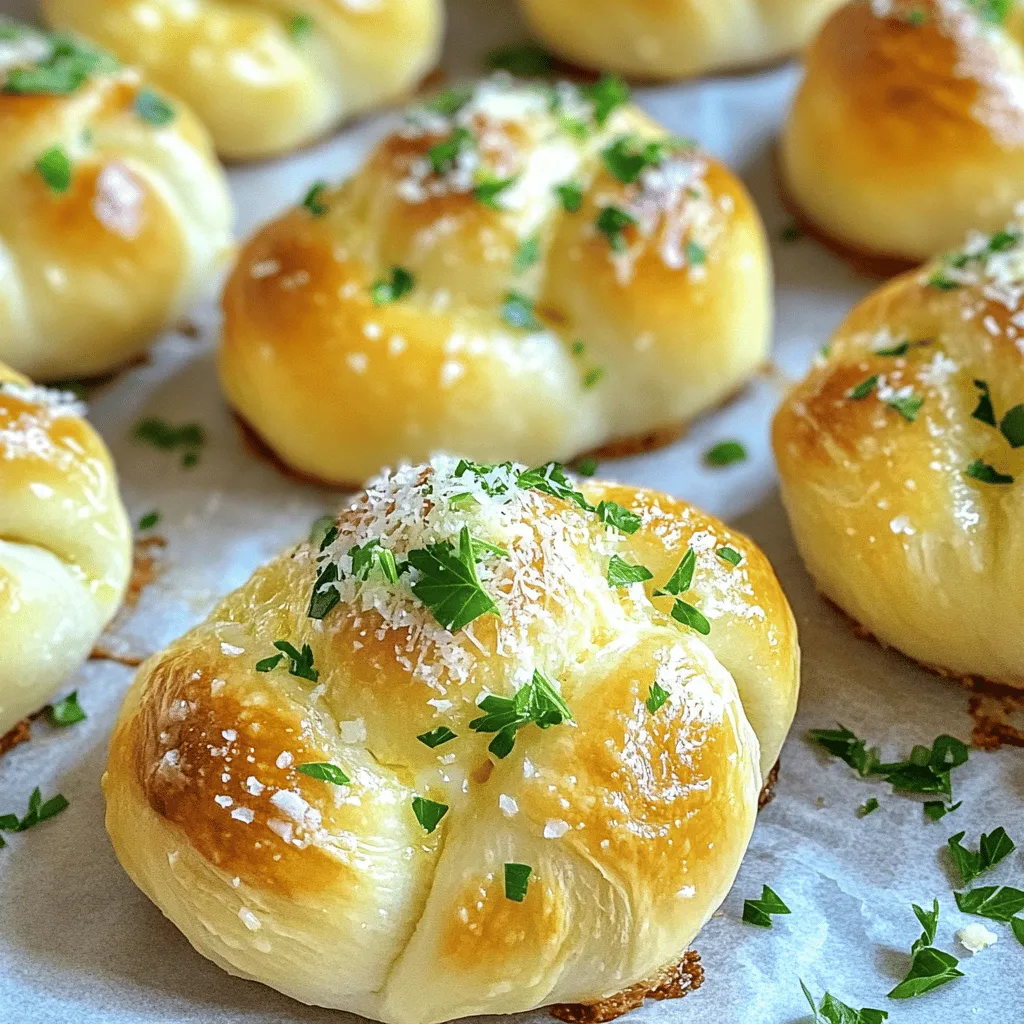
Garlic Butter Knots Easy and Flavorful Recipe
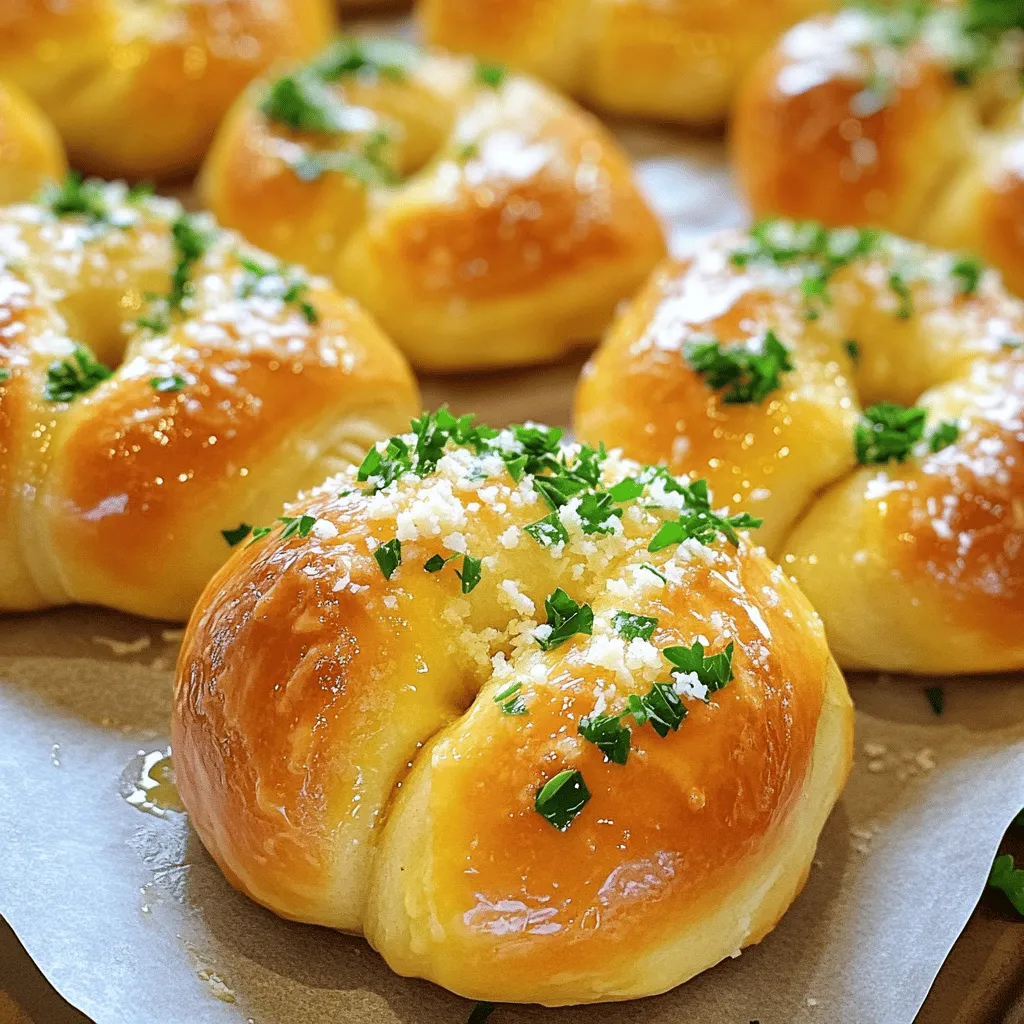
If you love warm, buttery bread, then you’re in for a treat! Garlic Butter Knots are easy to make and packed with flavor. Picture this: soft, doughy knots brushed in rich garlic butter, ready to dip in your favorite sauces. In this recipe, I’ll show you how to create these delicious bites step-by-step, using simple ingredients and techniques. Get ready to impress your friends and family with these tasty treats!
Ingredients
List of Ingredients
- 1 package (1.5 lbs) refrigerated pizza dough
- ½ cup unsalted butter, melted
- 4 cloves garlic, finely minced
- 2 tablespoons fresh parsley, finely chopped
- 1 teaspoon garlic powder
- ½ teaspoon salt
- ½ teaspoon freshly ground black pepper
- ½ cup freshly grated Parmesan cheese
Measurement Details
For the best flavor in your garlic butter knots, stick to these specific amounts:
- Use 1.5 lbs of refrigerated pizza dough. This amount makes about 12 knots.
- Melt ½ cup of unsalted butter for a rich taste.
- Finely mince 4 cloves of fresh garlic. Fresh garlic adds a strong, tasty kick.
- Measure 2 tablespoons of fresh parsley. This herb brightens the dish.
- Use 1 teaspoon of garlic powder to enhance the garlic flavor.
- Add ½ teaspoon of salt and black pepper for balance.
- Grate ½ cup of fresh Parmesan cheese for a savory finish.
These measurements ensure every bite is packed with flavor. Adjust them based on your taste. If you love garlic, feel free to add more!
Step-by-Step Instructions
Preparation Steps
1. Preheat the Oven: Start by preheating your oven to 375°F (190°C). Line a baking sheet with parchment paper. This helps prevent sticking and makes cleanup easy.
2. Roll Out the Dough: On a lightly floured surface, roll out the pizza dough. Aim for a flat rectangle about 1/4-inch thick. This thickness makes it easier to cut and form knots.
3. Cut the Dough: Use a sharp knife or pizza cutter to slice the dough into strips. Each strip should be about 1 inch wide. This size is perfect for making knots.
Knot Formation
1. How to Tie the Dough into Knots: Take each strip of dough and tie it into a knot. Make sure to tuck the ends underneath. This makes the knots look neat and keeps them together while baking. Place the knots on the prepared baking sheet, leaving space between them.
Garlic Butter Preparation
1. Making the Garlic Butter Mixture: In a small saucepan over medium heat, combine the melted butter, minced garlic, garlic powder, salt, and black pepper. Stir the mixture for 2-3 minutes. You want the garlic to become fragrant. This step is key for adding flavor.
Final Baking Steps
1. Brushing Knots and Adding Cheese: Use a pastry brush to generously coat each knot with the garlic butter mixture. Save a little butter for later. Then, sprinkle grated Parmesan cheese and chopped parsley on top of the knots. This adds extra flavor.
2. Baking Time and Temperature: Place the baking sheet in the oven and bake for 15-20 minutes. Watch for a golden brown color. Once they look perfect, take them out. Immediately brush the remaining garlic butter on top for added flavor.
Tips & Tricks
Achieving Perfect Knots
To tie perfect knots, start with strips of dough. Each strip should be about one inch wide. Grab a strip and make a loop. Then, take one end and tuck it through the loop. Pull to tighten. This keeps the knot neat. For an even bake, space the knots apart on the baking sheet. This allows hot air to flow around them. Rotate the baking sheet halfway through baking. This also helps them brown evenly.
Flavor Enhancements
You can adjust the garlic levels to your taste. If you love garlic, add more minced garlic. For a milder flavor, use less. You can also try garlic powder for a different taste. If you need to swap butter, use olive oil or vegan butter. This can change the flavor, but it works well too.
Serving Suggestions
These garlic butter knots shine when served warm. Pair them with marinara sauce for dipping. You can also serve them with a side of olive oil or balsamic vinegar. For a beautiful presentation, lay the knots on a rustic wooden board. Garnish with fresh parsley for a pop of color. A cloth napkin in a bread basket adds charm and warmth.
Variations
Herb Variations
You can make garlic butter knots even better by adding herbs. Rosemary and thyme are great choices. Simply chop them finely and mix them into your garlic butter. This adds a fresh taste and aroma. You can try other herbs too, like oregano or basil. Each herb gives a unique flavor. Experiment until you find your favorite mix!
Cheese Variations
While Parmesan is delicious, you can switch it up with other cheeses. Mozzarella melts well and adds creaminess. Cheddar brings a sharp flavor that’s equally tasty. Try a mix of cheeses for a fun twist. Just remember to adjust the amount based on your cheese choice. You might discover a new favorite combination!
Dietary Adjustments
Need gluten-free or vegan options? You can easily adapt this recipe. For gluten-free knots, use gluten-free pizza dough. Many stores sell good options. If you want vegan knots, swap the butter for vegan butter. You can also skip the cheese or use a dairy-free alternative. These adjustments let everyone enjoy this tasty treat!
Storage Info
Storing Leftover Knots
Once you finish enjoying your garlic butter knots, cool them down. Place them on a wire rack to let air circulate. This helps them stay crisp. After they cool completely, wrap them tightly in plastic wrap or foil. You can also use an airtight container. This keeps them fresh for a few days.
Reheating Instructions
When you want to eat the leftover knots, reheating them is easy. You can use an oven or a microwave. For the oven, preheat it to 350°F (175°C). Place the knots on a baking sheet and cover them with foil. Heat for about 10-15 minutes. This keeps them warm and crispy. If you choose the microwave, heat them for 15-20 seconds. Check to see if they are warm enough, then enjoy!
Freezing Recommendations
If you want to save garlic butter knots for later, freezing is a great option. After cooling, place the knots in a single layer on a baking sheet. Freeze them for about an hour. Once they are firm, transfer them to a freezer-safe bag. Label the bag with the date. You can freeze them for up to three months. To thaw, just leave them in the fridge overnight. Then, reheat them as described above.
FAQs
How long do Garlic Butter Knots last?
Garlic butter knots are best eaten fresh. If you store them right, they can last 2-3 days. Keep them in an airtight container at room temperature. For longer storage, refrigerate them for up to a week. Just be sure to reheat them well before serving.
Can I make Garlic Butter Knots ahead of time?
Yes, you can make garlic butter knots ahead of time! Prepare the knots but don’t bake them. Place them on a baking sheet and cover with plastic wrap. You can store them in the fridge for up to 24 hours. When ready, simply bake them for 15-20 minutes.
What can I serve with Garlic Butter Knots?
Garlic butter knots pair well with many dishes. Some popular options include:
- Marinara sauce for dipping
- Creamy ranch dressing
- Fresh salad
- Pasta dishes
- Soup, especially minestrone or tomato
What variations can I try?
There are many fun ways to change up garlic butter knots. Here are some ideas:
- Add rosemary or thyme for an herbal twist
- Swap Parmesan for mozzarella or feta cheese
- Mix in crushed red pepper for a spicy kick
- Use different types of bread dough for a unique taste
How to make Garlic Butter from scratch?
Making garlic butter is simple. Here’s how to do it:
1. In a small saucepan, melt ½ cup of unsalted butter over medium heat.
2. Add 4 cloves of finely minced garlic.
3. Stir for 2-3 minutes until fragrant.
4. Optionally, add herbs like parsley or thyme for extra flavor.
5. Let it cool slightly before using.
Garlic butter knots are simple to make and taste great. We covered all the ingredients, step-by-step instructions, and helpful tips. You learned how to tie dough knots and create the perfect garlic butter. Variations and storage methods will keep your knots fresh and exciting. Explore new flavors and enjoy sharing these tasty bites. Now, gather your ingredients and start making your own garlic butter knots today! They’ll be a hit with everyone.


![To make classic chocolate brownies, you need the following ingredients: - 1 cup (2 sticks) unsalted butter - 2 cups granulated sugar - 4 large eggs, at room temperature - 1 teaspoon pure vanilla extract - 1 cup all-purpose flour - 1 cup unsweetened cocoa powder - ½ teaspoon baking powder - ½ teaspoon sea salt - 1 cup semi-sweet chocolate chips - Optional: ½ cup chopped walnuts or pecans for added crunch You can use margarine if you need a butter alternative. For a deeper flavor, try using dark cocoa powder instead of regular cocoa. If you want to make this recipe gluten-free, swap the all-purpose flour with a gluten-free blend. Feel free to customize your brownies with these fun ideas: - Nuts: Consider using walnuts or pecans for extra texture. Almonds also work great. - Chocolate types: Mix semi-sweet and dark chocolate chips for rich flavor. - Flavor variations: Add a teaspoon of mint extract or some orange zest for a twist. These add-ins can enhance the taste and make your brownies unique. Mixing flavors can lead to exciting new experiences in every bite. To make the brownie batter, follow these steps: 1. Melt the butter: Start by melting 1 cup of unsalted butter in a medium saucepan over low heat. Stir often until it’s fully melted. 2. Add sugar: Once the butter is melted, remove it from the heat. Stir in 2 cups of granulated sugar until it looks smooth. 3. Add eggs: Crack 4 large eggs into the butter-sugar mix. Add them one at a time. Mix well after each egg, so the batter combines nicely. 4. Mix in vanilla: Add 1 teaspoon of pure vanilla extract. This gives the brownies a nice flavor. 5. Combine dry ingredients: In another bowl, sift together 1 cup of all-purpose flour, 1 cup of unsweetened cocoa powder, ½ teaspoon of baking powder, and ½ teaspoon of sea salt. This helps mix the dry ingredients well. 6. Fold dry into wet: Gently fold the dry mix into the wet mix. Use a spatula to combine until just mixed. Do not overmix, or the brownies won’t be fudgy. 7. Add chocolate chips: Toss in 1 cup of semi-sweet chocolate chips. If you like, add ½ cup of chopped walnuts or pecans for crunch. Mix until they are spread evenly in the batter. 8. Prepare the pan: Grease a 9x13-inch baking pan or line it with parchment paper. This makes it easy to remove the brownies later. 9. Pour batter: Pour the brownie batter into the pan. Use a spatula to spread it evenly. Now, it’s time to bake! 1. Preheat oven: Set your oven to 350°F (175°C). This ensures even baking. 2. Bake brownies: Place the pan in the oven. Bake for 30 to 35 minutes. 3. Check for doneness: To check, insert a toothpick into the center. It should come out with a few moist crumbs. If it’s wet, bake a little longer. Avoid overbaking for that perfect fudgy texture. After baking, let’s cool and cut the brownies. 1. Cool in the pan: Allow the brownies to cool in the pan for at least 15 minutes. This helps them firm up. 2. Transfer to wire rack: After 15 minutes, move the brownies to a wire rack. Let them cool completely before cutting. 3. Cutting tips: Use a sharp knife for clean cuts. Wipe the knife after each cut for neat squares. 4. Serving size: Cut into generous squares. Each piece should be a lovely bite of fudgy goodness. For a special touch, dust the brownies with powdered sugar before serving. Enjoy these delightful treats with a scoop of vanilla ice cream for extra indulgence. For the complete recipe, refer to the Full Recipe. To make the best fudgy brownies, focus on mixing. After melting the butter, stir in the sugar until smooth. Add eggs one at a time. Mix well after each egg. This helps create a rich texture. Don't overmix the dry and wet ingredients. Fold them gently just until combined. Common mistakes include overbaking and using too much flour. Overbaking leads to dry brownies. Aim for a toothpick with few moist crumbs. If you use too much flour, your brownies will be cake-like. Measure carefully for the best results. Brownies keep well at room temperature. Store them in an airtight container for up to five days. If you want to keep them longer, the fridge is a good option. Just remember, cold brownies can lose some flavor. To revive leftovers, warm them in the microwave for 10-15 seconds. This restores their fudgy goodness. You can also serve them with a scoop of ice cream for a tasty treat. For the full recipe, check out the [Full Recipe]. {{image_4}} For a gluten-free treat, try flourless brownies. You can use almond flour or ground oats instead of regular flour. These options add a nice texture and flavor. You should also reduce baking time. Check them after 25 minutes to avoid dryness. If you want a lighter version, use less sugar. You can swap half of the sugar with unsweetened applesauce. This keeps the brownies moist. For fats, use avocado or coconut oil. These substitutes make the brownies healthier but still tasty. To spice things up, add a dash of coffee or a pinch of sea salt. These flavors enhance the chocolate taste. You can also use extracts like almond or orange for a lovely twist. Just a little goes a long way in changing the flavor profile. Serving classic chocolate brownies is easy and fun. You can serve them warm with a scoop of ice cream. Vanilla ice cream works great, but try mint or coffee flavors for a twist. You can also top brownies with whipped cream. A sprinkle of chocolate shavings adds a nice touch. For a beautiful presentation, cut the brownies into squares. Place them on a decorative plate. Dust with powdered sugar for a fancy look. Add fresh berries or a sprig of mint beside each brownie. These details make the dish more appealing. Brownies are versatile and can be served in many ways. One fun idea is a brownie sundae. Start with a warm brownie, add a scoop of ice cream, and drizzle chocolate sauce on top. Finish with whipped cream and a cherry for a delightful treat. You can pair brownies with drinks too. A strong cup of coffee complements the rich chocolate flavor. Hot cocoa or milk also works well. For a unique twist, serve brownies with a side of fresh fruit. The sweetness of the fruit balances the rich brownies. For more ideas, check out the Full Recipe to explore all the delicious details! To check if your brownies are done, look for a few signs. The top should look set and slightly shiny. When you insert a toothpick in the center, it should come out with a few moist crumbs. This means your brownies are fudgy and perfect. If the toothpick comes out with wet batter, they need more time. Keep a close watch in the last few minutes of baking to avoid overbaking. Yes, you can freeze brownies! To freeze them, let them cool completely first. Cut your brownies into squares, then wrap each piece in plastic wrap. Place them in a freezer bag or container. They can last up to three months in the freezer. When you're ready to eat them, thaw them in the fridge overnight or at room temperature for a few hours. For neat cuts, use a sharp knife. First, let the brownies cool completely in the pan. For even cleaner cuts, wipe the knife with a damp cloth after each cut. This way, you have smooth edges. You can also use a pizza cutter for quick slicing. If you want, line your baking pan with parchment paper. This makes it easy to lift out the brownies for cutting. You’ve learned how to make classic chocolate brownies, from ingredients to serving tips. Whether you prefer fudgy or flourless, options abound to suit your taste. Remember, small changes can create big flavors. Experiment with add-ins or healthier swaps to make them your own. With these steps, you can enjoy delicious brownies any time. Happy baking!](https://dishtreats.com/wp-content/uploads/2025/07/8475203d-ada8-4920-a61c-065e4c50bd3f-768x768.webp)