
Brownie Batter Dip Delicious and Easy Dessert Recipe
Craving something sweet but quick? This Brownie Batter Dip is your answer! It’s a rich, delicious treat perfect for any occasion. With simple ingredients like cocoa powder, brown sugar, and cream cheese, you can whip this up in no time. Serve it with your favorite snacks and impress your guests. Let’s dive into this easy dessert recipe that satisfies your chocolate cravings without the fuss!
Ingredients
Detailed Ingredient List
- 1 cup all-purpose flour (heat-treated)
- 1/2 cup unsweetened cocoa powder
- 1 cup brown sugar, packed
- 1/2 cup granulated sugar
- 1/2 cup unsalted butter, softened at room temperature
- 1 teaspoon pure vanilla extract
- 1/4 teaspoon sea salt
- 1/2 cup cream cheese, softened
- 2 tablespoons milk (adjust more if needed for desired consistency)
- 1/2 cup mini chocolate chips
Making brownie batter dip is simple and fun. Gather the ingredients first. I use heat-treated flour for safety. This step helps eliminate any risk from raw flour. You need unsweetened cocoa powder for that rich chocolate taste. Brown sugar adds sweetness and depth. Don’t forget granulated sugar to balance the flavors.
Softened unsalted butter is key for a creamy texture. It mixes well and makes everything smooth. Pure vanilla extract brings warmth to the dip. A pinch of sea salt enhances the chocolate flavor. Cream cheese adds a rich, velvety quality.
Milk is important for the right consistency. You can add more if the dip is too thick. Finally, mini chocolate chips add extra chocolatey bites. Now, you have all you need for this delightful treat.
Step-by-Step Instructions
Preparation Steps
- Step 1: Creaming the Base
In a large bowl, mix the softened butter and cream cheese. Add the brown sugar and granulated sugar. Use an electric mixer on medium speed. Beat until smooth and creamy, about 2-3 minutes.
- Step 2: Adding Vanilla
Pour in the pure vanilla extract. Continue mixing until it blends well into the creamy mixture. The aroma will be delightful!
- Step 3: Preparing Dry Ingredients
In a separate bowl, whisk together the heat-treated flour, cocoa powder, and sea salt. Make sure there are no lumps. This step is key for a smooth dip.
- Step 4: Mixing Everything Together
Gradually add the dry ingredients to the creamy mixture. Mix on low speed until just combined. Be careful not to overmix. You want it fluffy, not dense.
- Step 5: Achieving the Perfect Consistency
Pour in the milk and stir gently. Adjust the milk amount to get your desired creamy texture. The dip should be thick but spreadable.
- Step 6: Incorporating Mini Chocolate Chips
Fold in the mini chocolate chips with a spatula. Make sure they are evenly spread throughout the dip. This adds a delightful crunch.
- Step 7: Serving the Dip
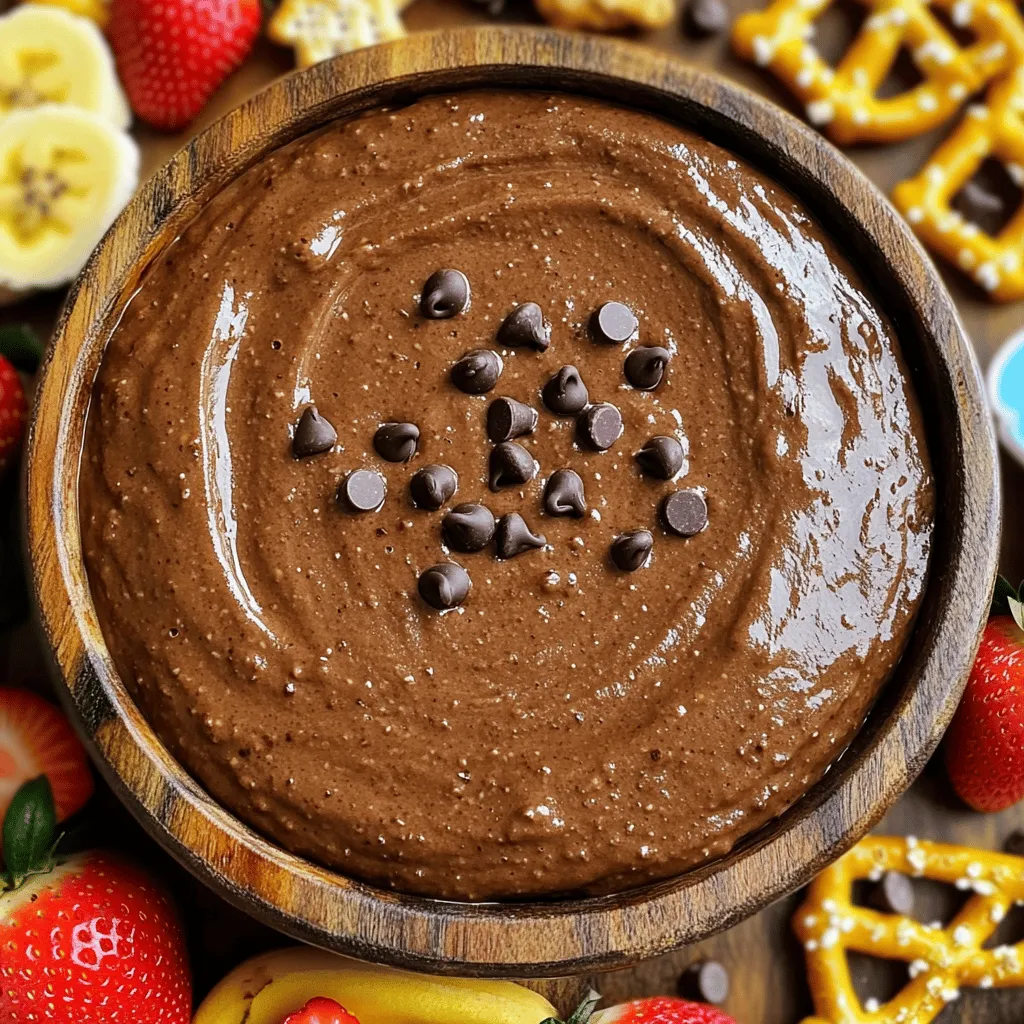
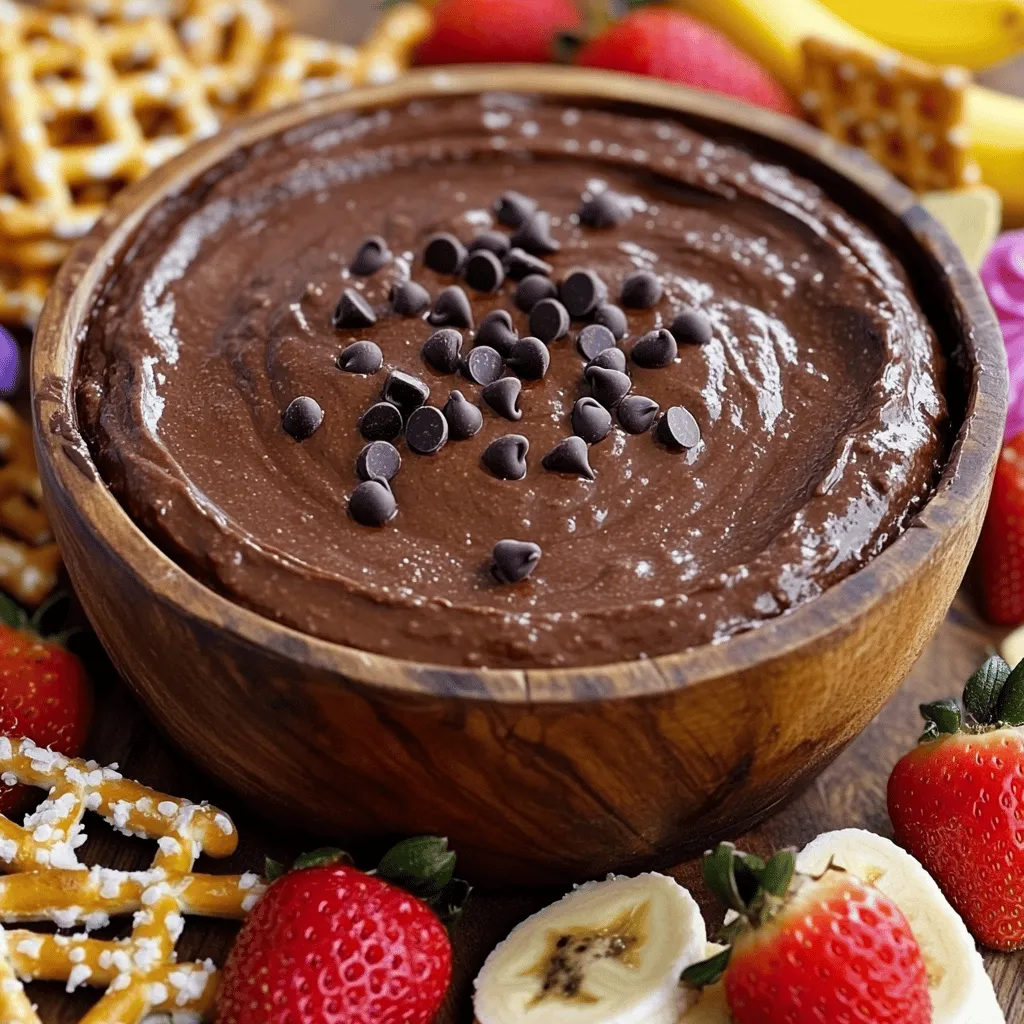
Transfer the brownie batter dip to a nice serving bowl. You can top it with extra mini chocolate chips for a fun look. Serve with crunchy pretzels, fresh strawberries, and graham crackers for dipping. Enjoy your treat!
Tips & Tricks
Perfecting Your Brownie Batter Dip
- Recommended Mixing Techniques: Start by mixing the butter and cream cheese together. Use an electric mixer on medium speed. This creates a smooth and creamy base. Beat it for about 2-3 minutes. Then, add the sugars and vanilla. Mix until it’s well combined.
- Adjusting Consistency with Milk: After mixing in the dry ingredients, pour in the milk. This helps to reach your desired dip consistency. If it seems too thick, add a bit more milk. Stir gently until you achieve a creamy texture.
- Avoiding Overmixing: When you add the dry mix, use low speed. Mix just until combined. Overmixing can make the dip tough. You want a light and fluffy texture. Fold in the chocolate chips gently to keep their shape.
Presentation Tips
- Creative Dippable Pairings: Serve your brownie batter dip with fun dippers. Use crunchy pretzels for a sweet-salty mix. Fresh strawberries and sliced bananas add a fruity touch. Classic graham crackers are also a great choice.
- Garnishing Ideas: For a pretty finish, scatter some extra mini chocolate chips on top. You can also add a drizzle of melted chocolate. This makes the dip look fancy and inviting.
Variations
Flavor Enhancements
You can boost the flavor of your brownie batter dip in fun ways.
- Adding Peanut Butter or Nutella: Swirling in peanut butter or Nutella makes it rich. Just mix in 1/4 cup of either. It adds a creamy texture and a nutty sweetness.
- Infusing Other Flavor Extracts: A few drops of almond or mint extract can change the taste. Try 1/2 teaspoon for a new twist. These flavors blend well with chocolate and give a fresh kick.
Dietary Alternatives
You can enjoy brownie batter dip even if you have special diets.
- Gluten-Free Options: Use gluten-free flour instead of all-purpose flour. This keeps the dip tasty and safe for everyone. Many brands work well as substitutes.
- Vegan Version of Brownie Batter Dip: To make it vegan, swap the butter and cream cheese for plant-based options. Use coconut oil and vegan cream cheese. This way, you can enjoy the dip without dairy.
These variations let you customize your dip. You can make it richer or fit different diets. Enjoy exploring these options!
Storage Info
Short-Term Storage
To keep your brownie batter dip fresh, store it in the fridge. Use an airtight container for the best results. This keeps the dip creamy and tasty. It can stay fresh for up to five days. Before serving, give it a quick stir. If it thickens in the fridge, add a splash of milk to make it smooth again.
Long-Term Storage
For longer storage, you can freeze brownie batter dip. Use a freezer-safe container, leaving some space at the top. This dip can last for about three months in the freezer. When ready to eat, let it thaw overnight in the fridge. After thawing, stir it well. You may need to add a bit of milk to regain that perfect creamy texture. Enjoy your sweet treat whenever you like!
FAQs
Can I make Brownie Batter Dip ahead of time?
Yes, you can make Brownie Batter Dip ahead of time. This dip tastes even better after chilling. Just cover it well and place it in the fridge. Make it a day in advance for the best flavor.
How long does Brownie Batter Dip last in the fridge?
Brownie Batter Dip lasts about 3 to 5 days in the fridge. Store it in an airtight container to keep it fresh. If you notice any change in smell or texture, it’s best to toss it.
What can I serve with Brownie Batter Dip?
You can serve it with many fun dippables. Some tasty options include:
- Crunchy pretzels
- Fresh strawberries
- Sliced bananas
- Graham crackers
Feel free to mix and match for added fun!
Is Brownie Batter Dip safe to eat with raw flour?
Using heat-treated flour makes it safe to eat. Cooking the flour kills any harmful bacteria. Always ensure your ingredients are safe before enjoying this delicious dip.
How can I make my dip thicker or creamier?
To make your dip thicker, add more cream cheese. If you want it creamier, stir in more milk. Adjust slowly until you reach your desired texture.
This blog post covered how to make a tasty Brownie Batter Dip. We explored key ingredients and step-by-step instructions, offering tips for the best results. You can make it your own with fun variations or dietary tweaks.
Now, enjoy this dip with friends or family. Remember, the right dips make snacks fun. Use your creativity for great presentations. Keep experimenting, and you’ll find what works best for you. Happy dipping!


![The Sun-Dried Tomato Chickpea Salad is simple to make and full of flavor. Here’s what you need: - 1 can (15 oz) chickpeas, thoroughly drained and rinsed - 1/2 cup sun-dried tomatoes, roughly chopped - 1/4 cup red onion, finely diced - 1/2 cucumber, peeled and diced - 1/4 cup feta cheese, crumbled into small pieces - 2 tablespoons fresh parsley, finely chopped - 2 tablespoons extra virgin olive oil - 1 tablespoon freshly squeezed lemon juice - 1 teaspoon dried oregano - Salt and freshly ground black pepper, to taste This mix of ingredients creates a bright, fresh dish. Chickpeas add protein and fiber. Sun-dried tomatoes give a sweet and tangy taste. The red onion adds a sharp bite, while cucumber brings crunch. Feta cheese adds creaminess to the salad. Fresh parsley brightens the flavors. Make sure to use high-quality extra virgin olive oil for the best taste. Fresh lemon juice adds a zesty kick. Dried oregano brings an earthy flavor that ties everything together. Adjust salt and pepper to your liking for a perfect balance. For the full recipe, follow the steps to enjoy this delightful salad. It's quick to prepare and great for lunch or dinner! To make this salad, start with a large mixing bowl. Combine the following ingredients: - 1 can (15 oz) chickpeas, thoroughly drained and rinsed - 1/2 cup sun-dried tomatoes, roughly chopped - 1/4 cup red onion, finely diced - 1/2 cucumber, peeled and diced - 1/4 cup feta cheese, crumbled into small pieces Gently stir the ingredients together. This ensures an even distribution of flavors and textures. In a separate small bowl, whisk together the dressing ingredients: - 2 tablespoons extra virgin olive oil - 1 tablespoon freshly squeezed lemon juice - 1 teaspoon dried oregano - Salt and freshly ground black pepper, to taste Mix until well combined. You want the oil and lemon juice to emulsify, meaning they blend into a smooth mixture. Drizzle the dressing over the salad base. Toss gently to coat everything evenly. Be careful not to break the chickpeas or feta cheese. After mixing, sprinkle the freshly chopped parsley on top. Give it one last gentle toss. Cover the salad and let it rest for at least 15 minutes. This time allows the flavors to meld together, enhancing the taste. You can serve it chilled or at room temperature for the best experience. For the full recipe, check the ingredients and instructions above. To make your Sun-Dried Tomato Chickpea Salad stand out, choose a nice serving bowl. A colorful bowl can catch the eye and add to the meal. You can layer the salad to show off its colors. Start with chickpeas at the bottom, then add layers of sun-dried tomatoes, cucumbers, and red onions. For garnishing, sprinkle extra parsley leaves on top. This adds a fresh touch. You can also add a few crumbles of feta cheese over the top. This gives a nice contrast to the vibrant colors of the salad. If you want to impress, serve it with crusty bread or pita on the side. You can make this salad ahead of time. Store it in the fridge for a quick meal later. After you mix it, cover the salad well. It stays fresh for 2 to 3 days. The flavors will deepen as it sits. For meal prepping, divide the salad into single-serving containers. This makes it easy to grab and go. Keep the dressing separate until you are ready to eat. This keeps the salad crisp and fresh. Enjoy your meal! For the full recipe, check out the details above. {{image_4}} You can switch out chickpeas for other beans. Black beans or kidney beans work well. They add a different taste and texture. If you want to try lentils, they can also be good. For a dairy-free option, use a vegan feta cheese. There are many brands available. You can also skip the cheese and add more vegetables. This keeps the salad fresh and tasty. To boost the flavor, add spices like cumin or paprika. These spices can take your salad to a new level. You could also add bell peppers or corn for a nice crunch. If you want more protein, add grilled chicken or tofu. These options make the salad heartier. You can even mix in some nuts or seeds for added texture. For the full recipe, check out the details above and create your own delicious twist! To keep your Sun-Dried Tomato Chickpea Salad fresh, use these tips: - Store in an airtight container. - Layer ingredients to prevent sogginess. - Keep dressing separate until serving. - Use glass containers for better preservation. Glass keeps the salad fresh longer. It also helps you see the colorful layers. Your salad lasts up to three days in the fridge. After that, it may lose its crunch. Watch for these signs of spoilage: - Change in smell or color. - Soft or mushy chickpeas. - Feta cheese that appears slimy. If you notice these signs, it's best to throw it away. Enjoy the salad while it's fresh for the best taste! For the full recipe, click [Full Recipe]. To make this salad, start by gathering your ingredients. You need chickpeas, sun-dried tomatoes, red onion, cucumber, feta cheese, parsley, olive oil, lemon juice, oregano, salt, and pepper. 1. In a large bowl, mix the chickpeas, sun-dried tomatoes, cucumber, onion, and feta. 2. In a small bowl, whisk olive oil, lemon juice, oregano, salt, and pepper together. 3. Pour the dressing over the salad and toss gently. 4. Add the parsley and mix lightly. 5. Let the salad rest for 15 minutes. This helps the flavors blend well. You can find the full recipe above for detailed steps. Yes! This salad is perfect for meal prep. You can prepare it a day in advance. Just store it in an airtight container in the fridge. The flavors will deepen, making it taste even better. Make sure to keep the salad covered to keep it fresh. This salad pairs well with many dishes. Here are some ideas: - Grilled chicken or fish for added protein. - Crusty bread or pita to scoop up the salad. - A light soup like tomato basil for a cozy meal. - Roasted vegetables for a colorful plate. These options will enhance your meal and make it even more enjoyable! This blog post detailed how to create a refreshing Sun-Dried Tomato Chickpea Salad. We covered the necessary ingredients, simple steps to prepare, and tips for presentation. You can enhance this salad with various substitutes or flavors. Proper storage ensures freshness and keeps meals tasty longer. Remember, this salad is not just easy to make—it's also adaptable. Enjoy making it your own, and delight your taste buds with every bite. Your next meal can be both fun and healthy!](https://dishtreats.com/wp-content/uploads/2025/07/f0fe0f85-1842-4358-ad7f-ac591425fdaf-768x768.webp)