
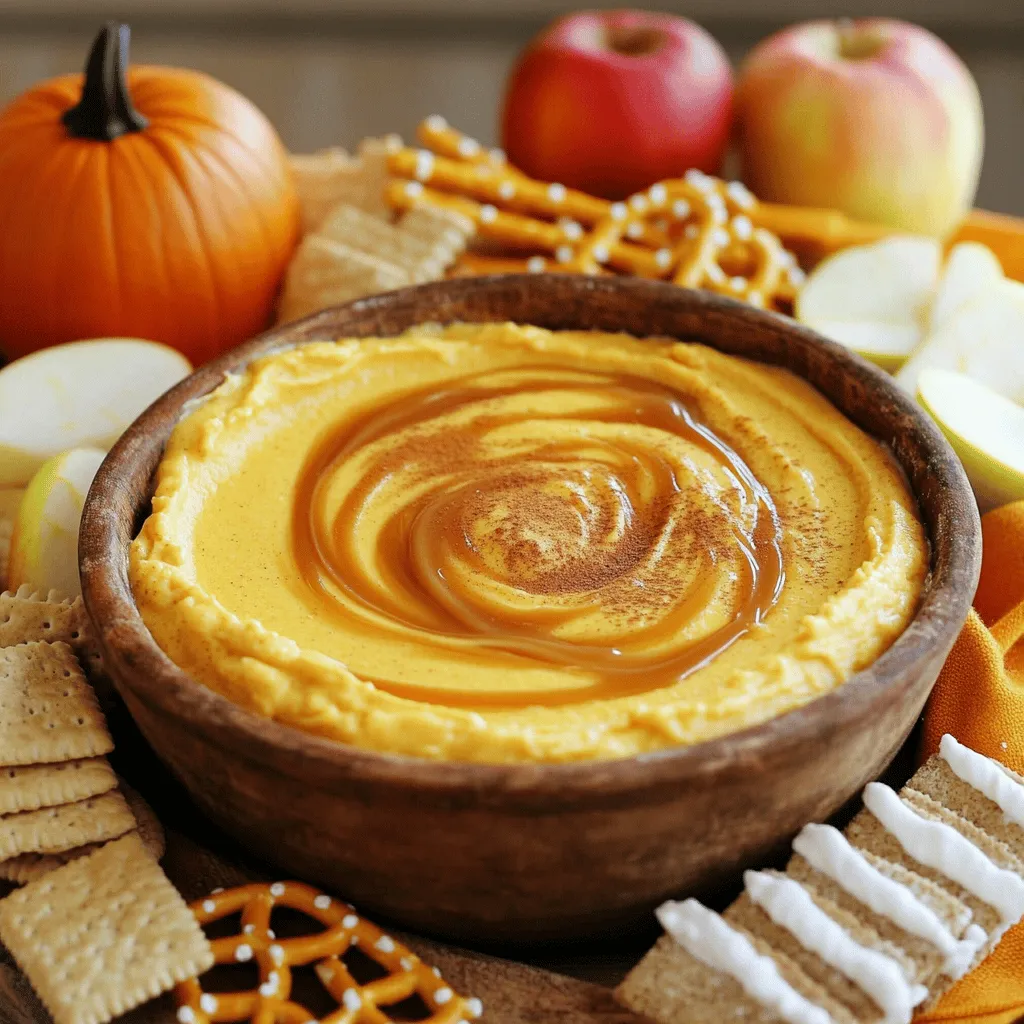
Caramel Pumpkin Cheesecake Dip Creamy and Easy Treat
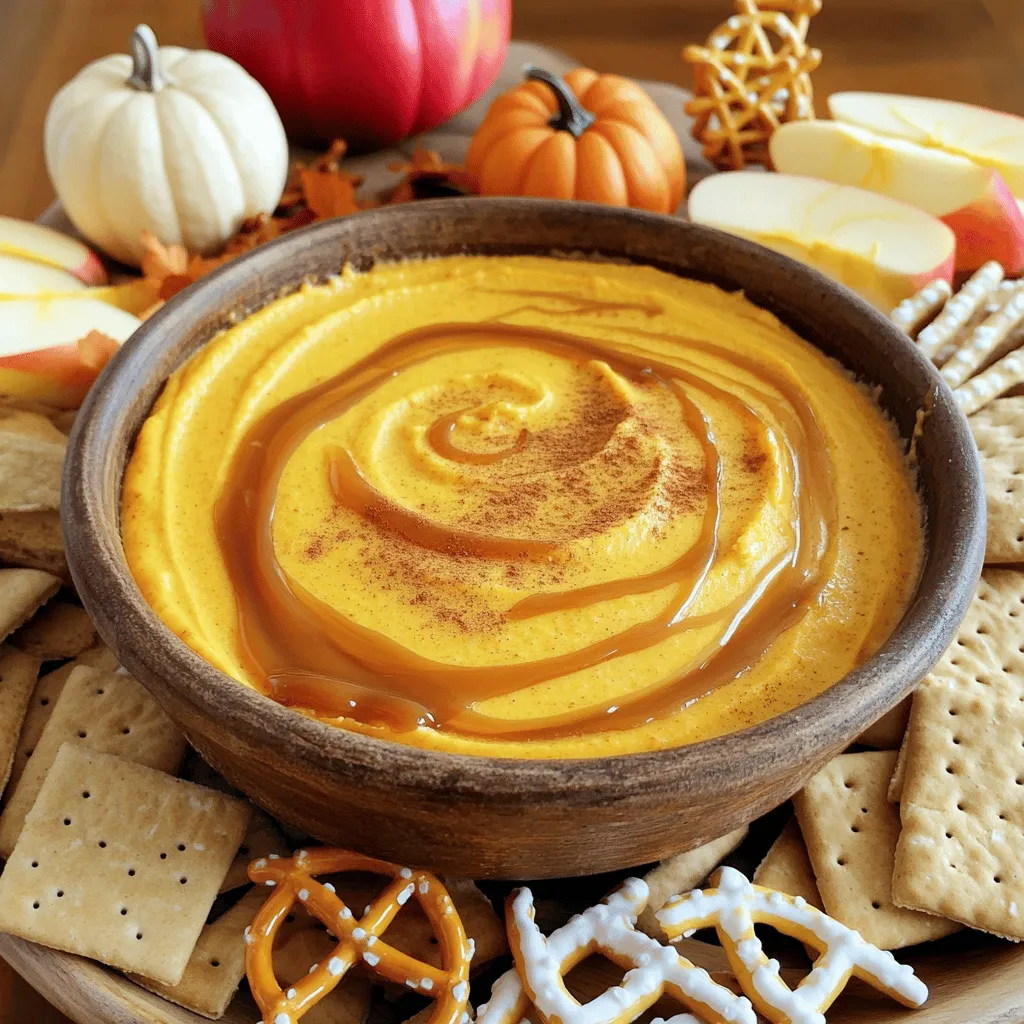
If you love fall flavors, you’ll adore this Caramel Pumpkin Cheesecake Dip! This creamy treat combines rich cream cheese with smooth pumpkin and sweet caramel. It’s easy to make and perfect for parties or cozy nights at home. Grab some graham crackers or apple slices, and let’s dive into this delicious dessert that’s as fun to make as it is to devour!
Ingredients
List of Ingredients
- 8 oz cream cheese, softened to room temperature
- 1 cup pure pumpkin puree
- 1/2 cup powdered sugar, sifted
- 1/4 cup brown sugar, packed
- 1 teaspoon pure vanilla extract
- 1 teaspoon ground cinnamon
- 1/2 teaspoon ground nutmeg
- 1/4 teaspoon ground ginger
- 1/4 cup caramel sauce (plus extra for drizzling)
- Optional dippers: graham crackers, apple slices, pretzel sticks, vanilla wafers
When I make this dip, I start with cream cheese. It must be soft. This helps it blend well. Then, I add pure pumpkin puree. Make sure it is not pumpkin pie filling. Next, I sift powdered sugar and brown sugar into the bowl. This step makes the dip smooth.
I always include vanilla extract and spices. Ground cinnamon, nutmeg, and ginger add warmth and flavor. These spices make the dip taste like fall. Finally, I add caramel sauce. Save some for drizzling later.
For dippers, I love graham crackers or apple slices. Pretzel sticks also work great. Vanilla wafers add a nice touch. Choose what you like best. Enjoy the mix of flavors and textures.
Step-by-Step Instructions
Mixing the Base
- Combine 8 oz of softened cream cheese with 1 cup of pure pumpkin puree in a bowl.
- Beat with a hand mixer until the mix is smooth and creamy. This step is key to a great texture.
Incorporating Sugars
- Gradually add 1/2 cup of sifted powdered sugar and 1/4 cup of packed brown sugar.
- Mix on low speed until the dip is lump-free. This ensures a sweet and creamy base.
Adding Flavor
- Stir in 1 teaspoon of pure vanilla extract, 1 teaspoon of ground cinnamon, 1/2 teaspoon of ground nutmeg, and 1/4 teaspoon of ground ginger.
- Mix well to blend all the flavors. Each spice adds a warm touch to the dip.
Final Touches
- Gently fold in 1/4 cup of caramel sauce, saving a bit for later.
- Transfer the dip to a serving bowl and drizzle with the reserved caramel. This makes it look and taste even better!
Tips & Tricks
Achieving Optimal Consistency
To get the best dip, start with cream cheese that is at room temperature. Cold cheese mixes poorly and can cause lumps. Use a hand mixer on medium speed. This will help blend everything smoothly, so you avoid any lumps.
Flavor Enhancements
Want a bolder taste? Add more spices! Extra cinnamon or even some cloves can make a big difference. You can also mix in chocolate chips for a sweet twist. They will add a nice texture and flavor.
Serving Suggestions
Choose a stylish bowl for serving to make the dip look great. A rustic bowl can add charm. Arrange your dippers around the bowl. Think graham crackers, apple slices, or pretzel sticks. For decoration, sprinkle cinnamon on top and add small pumpkins nearby. This will make your dip even more inviting!
Variations
Alternative Ingredients
You can change the cream cheese to flavored options. Try using pumpkin spice cream cheese to boost the flavor. You can also use flavored cream cheese like maple or vanilla for a new taste.
For a dairy-free version, swap the cream cheese with coconut milk. Use a thick coconut yogurt or a cream alternative. This will keep the dip creamy and tasty.
Seasonal Add-ins
Want to add a festive touch? Toss in some dried cranberries. They add a pop of red and a sweet-tart flavor. Use them as a mix-in or sprinkle them on top for color.
Instead of brown sugar, try maple syrup. It gives the dip a unique taste. Just reduce the amount of other liquids to keep the dip thick.
Different Presentation Styles
Serving in mini jars is a fun way to present this dip. Each guest gets their own jar, making it easy to share. You can also decorate the jars with twine or cute labels.
For a themed look, use bowls that match autumn or Halloween. A pumpkin-shaped bowl or one with fall colors adds charm. This way, your dip looks as great as it tastes!
Storage Info
Proper Storage Techniques
To keep your caramel pumpkin cheesecake dip fresh, follow these steps:
- Refrigerate Right Away: Place any leftovers in the fridge soon after serving.
- Use Airtight Containers: Store the dip in a clean, airtight container. This helps keep out air and moisture.
Shelf Life
This dip lasts about 3 to 5 days in the fridge. Always look for signs that it may have spoiled:
- Smell: If it smells sour or off, it’s time to toss it.
- Texture: If the dip becomes watery or grainy, it has likely gone bad.
- Color: Any discoloration may indicate spoilage.
Keep these tips in mind to enjoy your dip at its best!
FAQs
Can I make this dip ahead of time?
Yes, you can make this dip early. It stays fresh in the fridge for about three days. For best taste, cover it tightly with plastic wrap. You can also drizzle the caramel sauce on top just before serving. This keeps the dip looking fresh and pretty.
What can I use instead of pumpkin puree?
If you cannot find pumpkin puree, use sweet potato puree or even butternut squash puree. Both options have a similar taste and texture. Just make sure they are unsweetened. This keeps the flavor balance right in your dip.
How do I make the dip sweeter?
To make the dip sweeter, add more powdered sugar. Start with a tablespoon and mix well. Taste it after each addition to find your favorite level of sweetness. You could also drizzle in more caramel sauce for added sweetness and flavor.
Is this recipe gluten-free?
Yes, this recipe can be gluten-free. Just choose gluten-free dippers like apple slices or gluten-free graham crackers. Always check labels to ensure all your ingredients are safe for gluten-free diets. Enjoy every creamy bite without worry!
This blog post explored a delightful pumpkin dip recipe. We covered the key ingredients, step-by-step instructions, and helpful tips. You also learned about variations and how to store leftovers.
This dip is easy to make and perfect for gatherings. Feel free to experiment with flavors and presentation. Enjoy creating your perfect pumpkin dip!

![- 1 cup green or brown lentils - 1 tablespoon olive oil - 1 medium onion, finely chopped - 2 cloves garlic, minced - 2 medium carrots, diced into bite-size pieces - 2 stalks celery, diced - 1 red bell pepper, diced - Ground cumin - Smoked paprika - Turmeric - Salt - Black pepper - 6 cups vegetable broth (preferably low-sodium) - 1 (14-ounce) can diced tomatoes, including their juices - 2 tablespoons fresh lemon juice In this vegan lentil soup, I love using green or brown lentils. They add a hearty feel. The olive oil helps to sauté the veggies, making them soft and full of flavor. The mix of vegetables is key. You need an onion for sweetness. Garlic adds a nice kick. Carrots and celery give texture. The red bell pepper adds color and sweetness. For spices, I use ground cumin and smoked paprika. They bring warmth and depth. A bit of turmeric adds a lovely golden hue. Salt and black pepper round out the flavors. Liquid ingredients are vital too. I use vegetable broth for a rich base. Diced tomatoes add acidity and sweetness. Lastly, fresh lemon juice brightens the dish. You can find the full recipe above for all the details! - Rinse the lentils and chop the vegetables. - Heat olive oil and sauté onion and garlic. Start by rinsing one cup of green or brown lentils under cold water. This helps remove any dirt or debris. While the lentils drain, chop your vegetables. You will need one medium onion, two cloves of garlic, two medium carrots, two stalks of celery, and one red bell pepper. Next, in a large pot, heat one tablespoon of olive oil over medium heat. Add the chopped onion and cook for about five minutes. Stir until it becomes soft and clear. Then, add the minced garlic. Cook for one more minute to release its wonderful aroma. - Incorporate remaining vegetables and spices. - Add lentils, broth, and tomatoes, bring to a boil. Now, add the diced carrots, celery, and red bell pepper to the pot. Cook for another five to seven minutes. Stir often until the vegetables become tender. To build flavor, sprinkle in one teaspoon of ground cumin, one teaspoon of smoked paprika, and half a teaspoon of turmeric. Mix well and cook for one more minute. After the spices bloom, add the rinsed lentils, six cups of vegetable broth, and one can of diced tomatoes with their juices. Increase the heat and bring this mixture to a boil. Once it boils, reduce the heat and cover the pot. Let it simmer for 25 to 30 minutes, or until the lentils are soft but not mushy. - Simmer and add kale. - Season and serve. Once the lentils are cooked, stir in two cups of chopped kale. Let it simmer for an additional five to seven minutes. The kale should turn bright green and wilted. Now, season your soup with salt, freshly ground black pepper, and two tablespoons of fresh lemon juice. The lemon juice adds a nice zing. Taste it and adjust the seasoning as needed. Serve the soup hot, garnished with fresh parsley for a hint of color and flavor. For a full recipe, please see the [Full Recipe]. Enjoy your warm and nourishing vegan lentil soup! To boost the taste of your vegan lentil soup, consider these tips: - Add spices: Try bay leaf for depth or chili flakes for heat. - Sauté longer: Cook your vegetables a bit more. This gives a richer, deeper flavor. This soup shines when paired with the right sides. Here are my favorite ways: - Bread: Serve it with homemade bread for a warm, cozy meal. - Garnishes: Top it with nutritional yeast for a cheesy flavor or creamy avocado for richness. Lentils are packed with nutrients. Here’s why they are great: - Nutritional benefits: They provide protein, fiber, and iron, making them a healthy choice. - Leafy greens: Adding kale boosts vitamins and minerals. It also adds color and texture. For the full experience, check out the Full Recipe. These tips will help you create a dish that's not just tasty but also nourishing! {{image_4}} You can switch lentils for other beans or pulses. Black beans or chickpeas work well. Each bean adds a unique taste and texture to the soup. You can also use seasonal vegetables. Try zucchini in summer or butternut squash in fall. These swaps keep your soup fresh and exciting. To make your soup creamier, add coconut milk. It gives a rich texture and a hint of sweetness. You can also use fresh herbs like basil or cilantro. They add bright flavors and an herbal kick. A sprinkle of fresh herbs before serving makes a big difference. If you want a faster option, try an Instant Pot. Cook the soup on high pressure for about 15 minutes. You can also use a slow cooker. Simply set it on low for 6-8 hours. For a creamy version, use a blender. Blend half the soup and mix it back in. This makes the soup thick and smooth. Explore the [Full Recipe] for more ideas on making this soup your own! After enjoying your vegan lentil soup, you can store leftovers easily. Let the soup cool down first. Then, transfer it to airtight containers. Glass or plastic containers work well for this. Store it in the fridge for up to five days. For longer storage, freeze the soup. Use freezer-safe containers or bags to prevent freezer burn. The soup can last up to three months in the freezer. When it’s time to enjoy the soup again, reheat it gently. You can use a pot on the stove or a microwave. If using a pot, heat it over medium-low until warm. Stir occasionally to prevent sticking. In the microwave, use a microwave-safe bowl. Heat in short bursts, stirring in between. This helps heat evenly. Avoid overcooking, as the lentils may become mushy. Preparing for future meals is smart and easy with this soup. Chop your vegetables ahead of time, like onion, garlic, and carrots. Store them in the fridge for quick use. You can also rinse your lentils in advance and keep them in a container. Making larger batches is a great idea too. This way, you always have a warm, nourishing meal ready. Just follow the full recipe and freeze extra portions for busy days. Green and brown lentils are great for soup. They hold their shape well. Green lentils have a slightly peppery taste. Brown lentils are milder and cook faster. Both work well in this vegan lentil soup. Yes, you can adapt this recipe. If you prefer meat, try adding cooked chicken or sausage. For dairy, a splash of cream or some cheese can add richness. Just remember, this makes it less vegan. To thicken your soup, you have a few options. You can mash some lentils against the pot. Adding a spoonful of tomato paste also helps. If you want a creamier feel, blend a portion of the soup. These techniques will help you achieve the perfect consistency. For more details, check the full recipe. This blog post covers the key aspects of making a hearty lentil soup. We discussed the essential ingredients, including lentils, vegetables, and spices. I shared step-by-step instructions for preparing and cooking the soup. We explored tips for enhancing flavors and serving suggestions. You can create variations with different ingredients and learn best practices for storing and reheating leftovers. Lentil soup is a healthy, versatile meal that is easy to make. Enjoy experimenting with your own flavors and keep discovering new ways to make it.](https://dishtreats.com/wp-content/uploads/2025/06/c46bc7f1-46e5-4579-b786-1848127316df-768x768.webp)


![- 2 cups cooked chicken, shredded - 1 cup black beans, rinsed and drained - 1 cup corn kernels (fresh or frozen) - 2 cups shredded Mexican cheese blend - 1 cup salsa (mild or spicy) - 8 large flour tortillas - 1 teaspoon ground cumin - 1 teaspoon chili powder - 1/2 teaspoon garlic powder - 1/2 teaspoon onion powder - Salt and pepper, to taste - 1/4 cup fresh cilantro, chopped - Sour cream and diced avocado for serving When I prepare this Chicken and Cheese Quesadilla Casserole, I love the bold flavors in every bite. The main ingredients create a hearty meal that feels special. Shredded chicken adds protein, while black beans and corn give it a nice texture. The Mexican cheese blend brings everything together with its melty goodness. I often choose salsa based on my mood. A mild salsa suits those who prefer less heat, while a spicy option adds an exciting kick. The seasonings are key to making this dish flavorful. Ground cumin and chili powder add warmth and depth. Garlic and onion powders give it that savory touch. Don’t forget to season with salt and pepper to elevate the taste. For garnishes, fresh cilantro brightens the dish. I like to add a dollop of sour cream and diced avocado on the side. They balance the flavors and add a creamy texture. This meal is so satisfying, and you can find the full recipe to make it yourself! - Preheat the oven to 350°F (175°C). - In a large bowl, mix the chicken, black beans, corn, cheese, salsa, cumin, chili powder, garlic powder, onion powder, salt, and pepper. Stir well until all ingredients are combined. - Grease a 9x13 inch baking dish with cooking spray or olive oil. - Place one tortilla at the bottom of the dish. Spoon some of the chicken and cheese mixture on top. Add another tortilla and repeat this layering. Finish with a tortilla and sprinkle remaining cheese on top. - Cover the dish with foil. Bake for 20 minutes. - After 20 minutes, remove the foil. Bake again for 10-15 minutes, until the top is golden and bubbling. For the full recipe, check out the detailed ingredients and tips! To boost the taste, pick a salsa that fits your spice level. For a kick, go for spicy salsa. If you prefer mild, a smooth, mild salsa works well. You can also mix salsas for layered flavors. For cheese, try different blends. While a Mexican cheese blend is great, cheddar or pepper jack adds unique taste. Mixing cheeses can create a delightful texture and flavor. Letting your casserole rest is key. This step helps the layers set. Cutting too soon can cause a messy serving. Wait about 5 minutes for the best results. To get a perfectly melted cheese crust, cover with foil while baking. Remove the foil near the end to let the cheese brown. This creates a crunchy top that contrasts the soft filling. Serving on colorful plates makes a big difference. Bright colors enhance the meal's appeal. After cutting the casserole, place each piece on a vibrant dish. For garnishing, fresh cilantro adds a pop of green. Diced avocado gives a creamy touch. A dollop of sour cream on the side adds a lovely finish. Try these tips for a beautiful and tasty presentation! For the full recipe, refer to [Full Recipe]. {{image_4}} You can easily make this dish fit your taste. For a vegetarian twist, try adding more veggies. Bell peppers, zucchini, or spinach work great. They add color and nutrients. You still get a hearty meal without meat. If you want more protein, use ground beef or turkey instead of chicken. Cook the meat first, then mix it into the filling. This change adds a different flavor. It's a fun way to switch things up! Cheese makes this casserole even better. While I love using a Mexican cheese blend, feel free to change it. Cheddar adds a sharp taste. Pepper jack gives a spicy kick. You can even mix different types for a rich flavor. Try combining mozzarella for creaminess and a touch of parmesan for depth. These options create layers of taste. The cheese pulls are so satisfying! You can adapt this recipe to a slow cooker. Just layer the ingredients as you would in the oven. Set it on low for about 4 hours. This method yields a warm, hearty casserole with a different texture. If you own an Instant Pot, you're in luck! Use the sauté function to cook your meat and veggies. Then add the rest of the ingredients. Seal the lid and cook on high pressure for 10 minutes. Quick and easy, this method saves time without losing flavor. For more details, check out the Full Recipe! To keep your Chicken and Cheese Quesadilla Casserole fresh, store it properly. First, let it cool down to room temperature. Then, place the leftovers in an airtight container. This helps lock in moisture and flavor. Use shallow containers for quicker cooling. I recommend glass or sturdy plastic containers. These work well for storage and reheating. You can freeze this casserole before or after baking. For freezing before baking, assemble the casserole in a freezer-safe dish. Cover it tightly with plastic wrap and aluminum foil. When you're ready to bake it, remove the wrap, and bake from frozen. It may take longer to cook. For freezing after baking, let it cool, then slice it into portions. Wrap each slice in plastic wrap and place in a freezer bag. For the best results, consume it within three months. Leftovers can last in the fridge for about 3-4 days. Always check for signs of spoilage before eating. Look for changes in color or texture. If it smells off, it’s best to discard it. When stored properly, frozen portions can stay safe for about three months. Always label the containers with the date for easy tracking. This way, you can enjoy your delicious casserole without worries. You can use low-carb tortillas if you want fewer carbs. Corn tortillas are also a great option. They add a nice flavor and texture to the dish. Yes, you can prep this casserole in advance. Just assemble it and cover it tightly. Store it in the fridge for up to 24 hours. When you are ready to bake, just add extra time if it's cold from the fridge. Look for bubbling cheese and a golden crust on top. You can also insert a knife in the center. If it comes out hot, the casserole is ready to serve. This blog post guides you through making a delicious chicken casserole. We covered the main ingredients, seasonings, and the steps to prepare and bake your dish. I shared tips and tricks for perfect results and ideas for variations based on your taste. Remember, cooking is about creativity. Don't hesitate to make this recipe your own! Enjoy the process, and savor every bite. Happy cooking!](https://dishtreats.com/wp-content/uploads/2025/06/5fb0e458-6070-46a1-b713-1d8a90ab3212-768x768.webp)

. First, preheat your oven to 400°F (200°C). This sets the perfect baking temp for our scones. While the oven heats up, line a baking sheet with parchment paper. This keeps the scones from sticking and makes cleanup easy. In a large bowl, mix the dry ingredients. Add 2 cups of flour, 1/3 cup of sugar, 1 tablespoon of baking powder, and 1/2 teaspoon of salt. Whisk these together until they are well blended. Next, add in 1/2 cup of cold, diced butter. Use your fingers or a pastry cutter to mix the butter in until it looks like coarse crumbs. Now, add 1 cup of blueberries and the zest of 1 lemon. Gently fold these into the mix without squishing the berries. In another bowl, prepare the wet ingredients. Whisk together 1/4 cup of heavy cream, 1 large egg, 1 teaspoon of vanilla extract, and 1 tablespoon of fresh lemon juice. Once mixed, pour this into the dry mix. Stir gently until the dough just comes together. It should feel a bit sticky. Turn the dough out onto a floured surface. Knead it gently a few times, just until it holds together. Pat the dough into a round shape about 1 inch thick. Use a sharp knife to cut the dough into 8 wedges. Place these on your lined baking sheet, leaving space between them. Now, they are ready for the oven. For the full recipe, check the details provided above. Enjoy making your lemon blueberry scones! To make your scones fluffy and flaky, keep your butter cold. When you mix the butter with the dry ingredients, it should stay in small chunks. This creates pockets of steam while baking, giving you that perfect texture. Also, avoid overmixing the dough. Mix just until everything comes together. A little stickiness is okay. One common mistake is using warm butter. Always use chilled butter for best results. Another mistake is overworking the dough. If you knead too much, your scones may become tough. Lastly, don’t skip chilling the dough before baking. This helps the scones hold their shape. You can boost the flavor of your scones easily. Try adding a pinch of cinnamon for warmth. Diced strawberries or raspberries can replace some blueberries for a twist. For more zing, add a teaspoon of lemon zest to the wet mix. You can also mix in some chopped nuts for crunch. These small changes can elevate your Lemon Blueberry scones and make them even more delightful. For the complete recipe, check out the Full Recipe section. {{image_4}} You can change the flavor by using other fruits. Raspberries, strawberries, or blackberries work well. Just swap them for the blueberries in the recipe. Each fruit adds a unique twist. For a mixed berry scone, combine different berries together. This gives you a colorful and tasty treat. If you need a gluten-free option, use a 1:1 gluten-free flour blend. Make sure it has xanthan gum for the right texture. The process stays the same, and you can enjoy scones that fit your diet. The taste will still be delightful and fresh. You can also spice things up with flavors. A pinch of cinnamon or nutmeg adds warmth to your scones. If you like nuts, try adding chopped walnuts or pecans. These add a nice crunch and depth of flavor. Mix these ingredients in when you add the blueberries and lemon zest. For more ideas, check the Full Recipe to explore how you can make these scones your own! To keep your leftover scones fresh, place them in an airtight container. This helps them stay soft and moist. You can add a slice of bread to the container. The bread helps keep the scones from drying out. If you want to freeze your scones, wrap each one tightly in plastic wrap. Then, place them in a freezer bag. Press out any extra air before sealing the bag. You can freeze them for up to three months. When you're ready to eat them, just thaw them in the fridge overnight. To reheat your scones, preheat your oven to 350°F (175°C). Place the scones on a baking sheet and warm them for about 5 to 10 minutes. This makes them soft and fresh again. You can also use a microwave. Heat them for about 15 to 20 seconds. Enjoy your warm lemon blueberry scones with a cup of tea! For the full recipe, check out the earlier section. Fluffy scones come from the right balance of dry and wet ingredients. You need to use cold butter and avoid overmixing. The butter creates air pockets as it melts, which helps the scones rise. Baking powder also plays a key role. It gives the scones lift during baking, making them light and airy. Yes, you can make these scones ahead. Prepare the dough and cut it into wedges. Then, wrap them well and place them in the fridge for up to 24 hours. When you're ready to bake, just pop them in the oven. If you want to freeze them, wrap the unbaked scones tightly and store them for up to three months. Bake straight from the freezer; they may need a few extra minutes. Serve these scones warm for the best taste. You can add a drizzle of glaze made with powdered sugar and lemon juice. Pair them with butter or clotted cream for a rich flavor. For a fun twist, enjoy them with fresh fruit or a dollop of jam. These scones shine as a breakfast treat or afternoon snack. Scones come from the UK, with roots in Scotland. People often served them with tea. The lemon blueberry version is a modern twist that adds bright flavor. This combination reflects a love for fresh fruit and citrus in baked goods. Now, you can find these scones in cafes and bakeries worldwide, making them a beloved treat for many. This blog post covers all you need for perfect lemon blueberry scones. We discussed ingredients, offering substitutes when needed. I shared steps for mixing and shaping your dough, plus tips for a flaky texture. You learned how to store and reheat your scones. Enjoy the flexibility of variations and try different fruits or gluten-free options. Baking should be fun, so don’t stress about mistakes. With practice, you’ll create sunny, delicious scones every time. Now, gather your ingredients and get baking!](https://dishtreats.com/wp-content/uploads/2025/06/d51723ca-834e-49ab-95e6-d1b73b522f9f-768x768.webp)