Creamy Taco Pasta Skillet Quick and Easy Meal
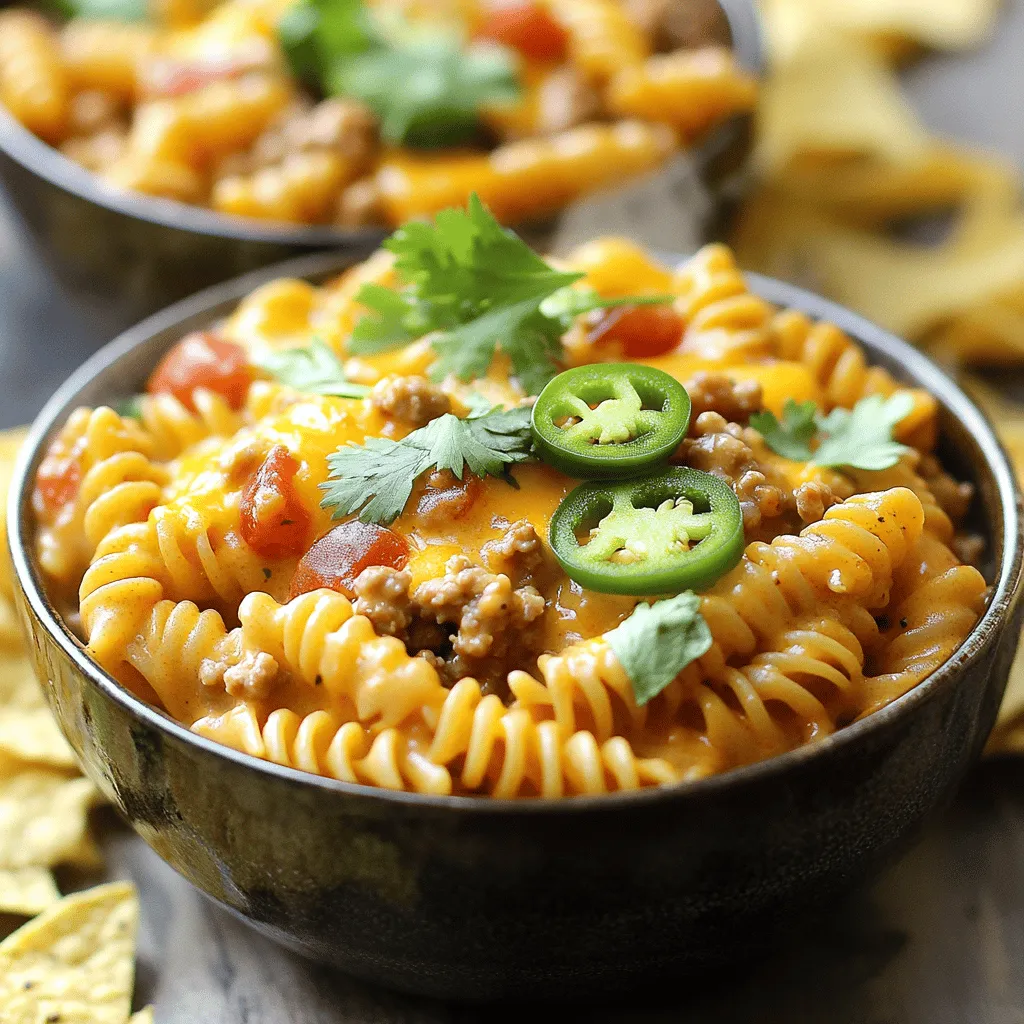
Are you ready for a quick and tasty meal that will impress the whole family? This Creamy Taco Pasta Skillet combines the flavors of your favorite taco night with the comfort of pasta. In just 30 minutes, you can whip up a dish loaded with creamy goodness, seasoned meat, and melty cheese. Let’s dive in and get cooking! Your new favorite weeknight meal awaits!
Ingredients
Complete List of Ingredients
- 8 ounces fusilli or rotini pasta
- 1 pound ground turkey or lean ground beef
- 1 tablespoon olive oil
- 1 small onion, diced
- 2 cloves garlic, minced
- 1 packet taco seasoning
- 1 can (15 ounces) diced tomatoes with green chilies
- 1 cup chicken or vegetable broth
- 1 cup heavy cream
- 1 cup shredded cheddar cheese
- 1 cup corn kernels (fresh or frozen)
- Salt and pepper to taste
- Fresh cilantro, chopped (for garnish)
- Sliced jalapeños (optional, for an extra kick)
Gather all these ingredients before you start cooking. This makes the process smooth and easy. The pasta is the base of the dish. You can use fusilli or rotini, which hold the sauce well. Ground turkey or lean beef gives it protein and flavor. Olive oil helps cook the meat and adds richness.
Onions and garlic bring depth to the dish. Taco seasoning gives it that classic taco taste. Diced tomatoes with green chilies add a nice kick. Chicken or vegetable broth keeps the pasta moist and flavorful. Heavy cream makes the sauce rich and creamy.
Shredded cheddar cheese adds a gooey texture. Corn kernels add sweetness and color. Finally, season with salt and pepper. Fresh cilantro brightens the dish. If you like heat, add jalapeños for extra spice.
By prepping these ingredients, you’ll make a delicious creamy taco pasta. This meal is quick, tasty, and perfect for busy nights. Enjoy cooking!
Step-by-Step Instructions
Cooking the Pasta
- Bring a large pot of salted water to a boil.
- Add 8 ounces of fusilli or rotini pasta.
- Cook until al dente, about 8-10 minutes.
- Drain the pasta and set it aside.
Preparing the Meat
- Heat 1 tablespoon of olive oil in a large skillet.
- Add 1 pound of ground turkey or lean ground beef.
- Brown the meat for 5-7 minutes, breaking it apart as it cooks.
- Drain any excess fat from the skillet if needed.
Building the Flavor
- Stir in 1 small diced onion and 2 minced garlic cloves.
- Sauté for about 3 minutes until the onion is tender.
- Mix in 1 packet of taco seasoning, stirring well to combine.
Combining Ingredients
- Pour in 1 can of diced tomatoes with green chilies.
- Add 1 cup of chicken or vegetable broth.
- Mix everything and bring to a gentle simmer for 4-5 minutes.
- Carefully stir in 1 cup of heavy cream, letting it thicken.
Final Steps
- Add the cooked pasta and 1 cup of corn kernels.
- Mix in 1 cup of shredded cheddar cheese until melted.
- Season with salt and pepper to taste, mixing well.
- Garnish with chopped cilantro and sliced jalapeños if desired.
Tips & Tricks
Ensuring Perfect Texture
To cook pasta to al dente, start with a large pot of salted water. Bring it to a boil before adding your fusilli or rotini. Cook according to package directions, usually about 8-10 minutes. Check the pasta a minute or two before the time is up. It should be firm yet tender. Drain the pasta right away to stop cooking.
To avoid a greasy skillet, drain excess fat after browning the meat. Use a leaner meat option like ground turkey. This keeps the dish lighter and lets the flavors shine.
Flavor Boosting Suggestions
For depth, add extra spices. You might try chili powder, cumin, or paprika. These spices enhance the taco flavor. You can also mix in a pinch of cayenne for heat.
Using fresh herbs can elevate your dish. Add cilantro or parsley right before serving. The fresh taste brightens the rich creaminess. You can also sprinkle some lime juice for a zesty kick.
Presentation Ideas
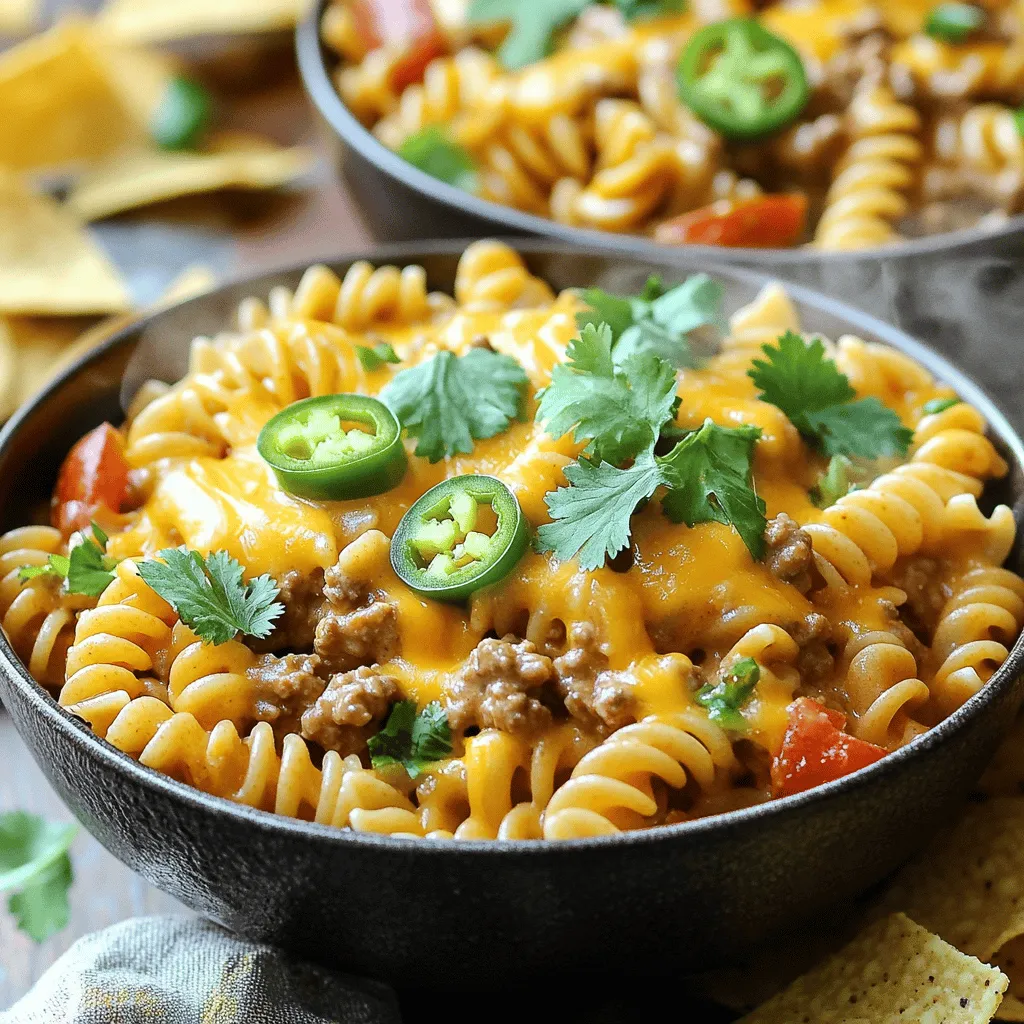
For serving, consider deep bowls over plates. This helps keep the pasta warm and lets the sauce pool at the bottom.
Adding garnishes boosts visual appeal. Top with extra cheddar cheese and a few sprigs of cilantro. You can also add sliced jalapeños for color and spice. Serve with tortilla chips on the side for a delightful crunch.
Variations
Protein Substitutes
You can switch the meat in this dish easily. Ground chicken works well for a leaner choice. If you prefer plants, use lentils or a meat substitute. These options cater to different diets. They keep the dish tasty while meeting your needs.
Sauce Alternatives
Changing the cheese can change the dish’s flavor. Try pepper jack for a spicy kick. You can also use mozzarella for a milder taste. If you need dairy-free, swap heavy cream for coconut milk. It adds creaminess without the dairy.
Pasta Variations
Not a fan of wheat pasta? Use gluten-free pasta. There are many options, like rice or quinoa pasta. You can even try whole grain for more fiber. Different shapes, like penne or bowties, can make this dish fun. Mix it up to keep things interesting!
Storage Info
Best Storage Practices
To store leftovers, let the creamy taco pasta cool first. Once cooled, place it in an airtight container. This keeps it fresh and tasty. Use shallow containers to help it cool faster. I recommend glass or BPA-free plastic containers. They are durable and safe for food storage.
Reheating Instructions
To reheat, use a skillet on low heat. This warms the pasta gently. Stir often to keep it from sticking. You can also use a microwave. Heat it in short bursts, stirring in between. Add a splash of cream if it seems too thick. This helps keep the creaminess intact.
Freezing Tips
Yes, you can freeze creamy taco pasta! Store it in an airtight container. Leave some space at the top for expansion. When you want to eat it, take it out of the freezer. Thaw it overnight in the fridge. Reheat it in a skillet or microwave as mentioned above. Just remember, the texture may change slightly after freezing.
FAQs
Common Questions About Creamy Taco Pasta Skillet
How long does it take to make Creamy Taco Pasta Skillet?
It takes about 30 minutes to make this dish. You spend 15 minutes on prep and 15 minutes cooking.
Can I use different types of meat?
Yes! Ground turkey and lean ground beef work well. You can also use ground chicken or tofu for a meatless option.
Is this recipe suitable for leftovers?
Absolutely! This pasta skillet keeps well in the fridge. Store it in an airtight container for up to three days.
What are the best sides to serve with it?
Tortilla chips make a great side. You can also serve a fresh salad or some steamed veggies for balance.
Can I make this dish in advance?
Yes, you can prep it ahead of time. Just cook and combine the ingredients, then store it in the fridge. Reheat before serving.
This blog post shared a simple recipe for Creamy Taco Pasta Skillet. We covered each ingredient, from pasta to protein. I outlined step-by-step instructions and provided tips for texture and flavor. You can also adapt the recipe with various proteins and sauces. For storage, I included best practices to keep your dish fresh.
Enjoy cooking and savoring this tasty meal! Whether you share it or keep it for yourself, it’s a winner.



![- 2 cups cooked chicken, shredded - 4 cups mixed salad greens - 1 cup cherry tomatoes - 1 cup corn - 1 ripe avocado - 1/2 cup red onion - 1 cup shredded cheddar cheese - 1/2 cup ranch dressing - BBQ sauce - Salt and freshly ground black pepper - Crispy tortilla strips, fresh cilantro leaves When making BBQ Ranch Chicken Salad, start with fresh, quality ingredients. The chicken brings protein and heartiness. I love using shredded chicken that is moist and flavorful. Mixed salad greens add crunch and color. You can choose your favorites like romaine, arugula, or baby spinach. Cherry tomatoes bring sweetness. Always cut them in half to make them easy to eat. Corn adds a pop of sweetness too, and you can use canned or fresh. I prefer fresh corn when it’s in season for the best taste. The avocado adds creaminess. A ripe avocado makes the salad smooth and rich. Red onion gives a nice bite. Keep it thinly sliced so it does not overpower. Shredded cheddar cheese adds a delightful sharpness, making each bite even tastier. The ranch dressing is creamy and tangy, tying everything together. Pair it with BBQ sauce for a smoky flavor boost. This combo is truly delicious. For seasoning, use salt and freshly ground black pepper. These simple touches really enhance the flavors. Lastly, crispy tortilla strips add a fun crunch. Fresh cilantro leaves not only look great but also add a fresh taste. You can find the full recipe [Full Recipe]. Enjoy mixing these ingredients for a vibrant, tasty salad! - Combine shredded chicken with BBQ sauce. - Use a large bowl for easy mixing. - Season with salt and black pepper to taste. - Mix until the chicken is fully coated. This step is key. The BBQ sauce gives the chicken a sweet and smoky flavor. It makes the salad pop with taste. - Create the salad base with mixed greens. - Spread the greens evenly in a large bowl. - Layer fresh ingredients: tomatoes, corn, avocado, and onion. - Arrange each ingredient for a colorful look. The vibrant colors make the salad appealing. Each bite brings a different taste, making it fun to eat! - Top with BBQ chicken and cheddar cheese. - Spoon the chicken evenly over the fresh veggies. - Drizzle with ranch dressing, adjusting to your liking. - Toss gently with clean hands or tongs to mix. This salad is now ready to impress! The creamy ranch dressing and savory chicken blend perfectly. Check the [Full Recipe] for more tips! To make your BBQ Ranch Chicken Salad shine, adjust the ranch dressing to your taste. If you love creamy flavors, add more dressing. For a lighter touch, use less. This lets you control how rich the salad feels. Make sure all ingredients mix well. This way, each bite has a bit of everything. An even spread of chicken, veggies, and cheese creates balance. For a lovely presentation, serve the salad in individual bowls or on a large platter. This makes it easy for everyone to take their share. Add some cilantro leaves and crispy tortilla strips on top. These toppings not only look great but also add flavor and crunch. A colorful display of greens and toppings makes the salad more appealing. Feel free to experiment with different seasonings. A dash of chili powder can add a nice kick. You might also try garlic powder or smoked paprika for depth. Also, think about adding extra ingredients for more variety. Black beans, diced peppers, or even fresh corn can bring new tastes. Each addition offers a chance to create your perfect salad blend. For more details on making this delicious salad, check out the Full Recipe. {{image_4}} You can easily change the protein in this salad. If you want a different taste, use pulled pork or tofu instead of chicken. Both options add great flavor. For a seafood twist, grilled shrimp works well. The shrimp adds a nice, light touch to the salad. While ranch dressing is a favorite, you can swap it out. Blue cheese dressing gives a strong flavor. A vinaigrette adds a tangy kick that brightens the salad. You can also make your own dressing blends. Mix yogurt with herbs for a fresh taste. Don't be afraid to add more veggies. Bell peppers, cucumbers, and radishes give a nice crunch. You can also roast vegetables like zucchini or carrots. Roasting adds a warm, rich taste that contrasts nicely with the cool salad. For a full recipe, check out the BBQ Ranch Chicken Salad with a Crunchy Twist. Store your BBQ Ranch Chicken Salad in an airtight container. This keeps it fresh and tasty. For best results, eat it within 2-3 days. The longer it sits, the soggier it may get. If you want to freeze some, consider freezing the chicken separately. This helps keep the chicken tasty when you eat it later. Avoid freezing the salad with dressing. The dressing makes the greens soggy, and nobody likes that! To refresh your leftovers, toss them with fresh greens. This adds crunch and makes it feel new again. If you want to reheat the BBQ chicken, do it separately. This keeps it warm without making the salad wilt. To make BBQ Ranch Chicken Salad, follow these simple steps: 1. Prepare the BBQ Chicken: Mix shredded chicken with BBQ sauce in a big bowl. Add salt and black pepper. Stir until the chicken is well coated. 2. Build the Salad Base: In another large bowl, spread the mixed greens evenly. This is your salad's base. 3. Layer Fresh Ingredients: Add halved cherry tomatoes, corn, diced avocado, and sliced red onion on top of the greens. This creates a colorful layer. 4. Top with BBQ Chicken: Spoon the BBQ chicken evenly over the fresh layers. This ensures every bite has flavor. 5. Add Creamy Cheese: Sprinkle shredded cheddar cheese over the salad. Let it melt slightly into the warm chicken. 6. Drizzle with Dressing: Pour ranch dressing over the salad. Adjust the amount to fit your taste. 7. Toss Gently: Use clean hands or tongs to mix everything. Make sure the ranch dressing coats all the ingredients. 8. Taste Test: Before serving, taste the salad. Add more salt or black pepper if needed. 9. Add Crunch and Garnish: Top with crispy tortilla strips and fresh cilantro for a nice finish. This process makes a delicious and colorful salad. For the complete recipe, check the Full Recipe above. Yes, you can prep this salad ahead of time. Here are some tips: - Cook the Chicken: You can cook and shred the chicken a day in advance. Store it in the fridge with BBQ sauce. - Chop Veggies: Cut the vegetables, like tomatoes and onions, a few hours before serving. Keep them in airtight containers. - Store Dressing Separately: Keep the ranch dressing separate until serving. This keeps the greens fresh and crisp. - Combine Before Serving: Mix everything together just before you eat. This keeps your salad from becoming soggy. This BBQ Ranch Chicken Salad goes great with several side dishes. Here are some ideas: - Crusty Bread: A nice loaf of bread pairs well and adds a hearty touch. - Chips: Tortilla chips or potato chips add crunch and fun. - Fruit Salad: A fresh fruit salad adds sweetness and a refreshing taste. - Grilled Veggies: Grilled vegetables complement the salad's flavors. - Coleslaw: A crunchy coleslaw gives a nice contrast to the salad. These sides enhance your BBQ Ranch Chicken Salad experience. Enjoy! We explored a tasty BBQ Ranch Chicken Salad. You learned about the main and optional ingredients, along with step-by-step instructions for making it. You also picked up tips for perfecting the salad and ideas for variations. Don’t forget to check the storage info for leftovers. This salad is easy to adjust, making it a fun dish for everyone. Enjoy this recipe and make it your own!](https://dishtreats.com/wp-content/uploads/2025/07/4c564630-ecab-497d-8bae-b951c19ef4f1-768x768.webp)