Avocado Lime Ranch Dip Creamy Flavorful Delight
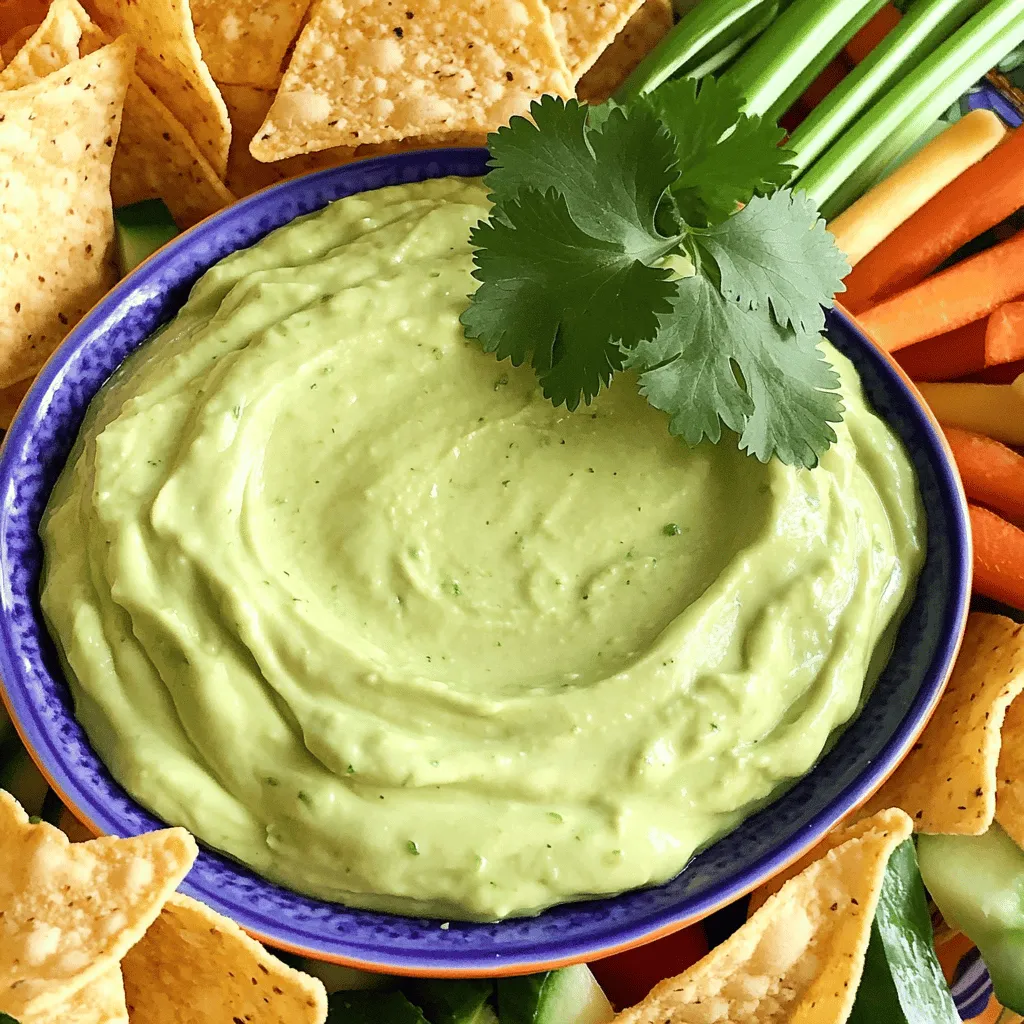
Looking for a creamy, flavorful dip to spice up your snacks? You’ve come to the right place! I’m excited to share my recipe for Avocado Lime Ranch Dip, packed with fresh flavors and simple ingredients. This dip is perfect for any occasion, from game day to family gatherings. Let’s dive into how you can make this delightful treat and impress your friends and family with your culinary skills!
Ingredients
List of Ingredients
To make this creamy avocado lime ranch dip, gather the following items:
- 2 ripe avocados
- 1 cup plain Greek yogurt
- 1/4 cup mayonnaise
- 1 tablespoon freshly squeezed lime juice
- 1 teaspoon garlic powder
- 1 teaspoon onion powder
- 1 teaspoon dried dill
- 1/2 teaspoon sea salt
- 1/2 teaspoon freshly cracked black pepper
- 1/4 teaspoon smoked paprika
- Fresh cilantro, finely chopped for garnish
Ingredient Substitutions
You can swap ingredients based on what you have. Here are some ideas:
- Use sour cream instead of Greek yogurt for a tangy taste.
- Replace mayonnaise with more Greek yogurt for a lighter dip.
- Lime juice can be replaced with lemon juice for a different zing.
- Fresh herbs like parsley can take the place of cilantro if you prefer.
Nutritional Information
This dip serves 6-8 people. Each serving has approximately:
- Calories: 100
- Protein: 3g
- Fat: 8g
- Carbohydrates: 6g
- Fiber: 3g
- Sodium: 200mg
This creamy avocado lime ranch dip is not only tasty but also packed with nutrients. Avocados provide healthy fats, while Greek yogurt adds protein. Enjoy this dip guilt-free!
Step-by-Step Instructions
Preparation Steps
Start by slicing the ripe avocados in half. Be careful as you remove the pit. Use a spoon to scoop out the soft, green flesh into a medium bowl. This is where the magic begins! Next, add one cup of plain Greek yogurt. This will make your dip creamy and rich. Then, measure out a quarter cup of mayonnaise and add it to the bowl. This adds even more creaminess.
Now, squeeze one tablespoon of fresh lime juice over the mix. The lime will add a bright and zesty flavor. Sprinkle in one teaspoon of garlic powder and one teaspoon of onion powder for depth. Then, add one teaspoon of dried dill, half a teaspoon of sea salt, and half a teaspoon of freshly cracked black pepper. Finally, add a quarter teaspoon of smoked paprika for a hint of smokiness.
Mixing Techniques
Using a fork or a hand mixer, blend all the ingredients together. Mix until you see a smooth and creamy texture. It’s okay to leave some small chunks of avocado for texture. Taste your dip to see if it needs more seasoning. You can add a little more salt, pepper, or lime juice if you like.
Final Serving Preparation
Once your dip tastes just right, transfer it to a nice serving bowl. To make it look pretty, sprinkle fresh cilantro on top. This adds a pop of color and freshness. For the best taste, cover the bowl with plastic wrap. Chill the dip in the fridge for at least 30 minutes. This helps the flavors blend together. Serve it with tortilla chips, veggie sticks, or crackers on the side. Enjoy the creamy and flavorful delight of your Avocado Lime Ranch Dip!
Tips & Tricks
How to Choose Ripe Avocados
To make the best avocado lime ranch dip, you need ripe avocados. Look for avocados that feel slightly soft when you press them gently. The skin should be dark green or almost black. If the skin is too green, the avocado may not be ripe yet. If it feels too mushy, it might be overripe. Store unripe avocados at room temperature until they soften. You can speed up ripening by placing them in a paper bag with a banana.
Adjusting Spiciness and Flavor
You can customize the dip’s flavor to fit your taste. If you like more spice, add a dash of hot sauce or more black pepper. For a zestier dip, squeeze more lime juice into the mix. Taste your dip as you go, so you get just the right flavor. This way, you can make it as mild or as bold as you like. Balancing flavors is key to a great dip.
Common Mistakes to Avoid
Avoid these common mistakes to ensure your dip shines. First, don’t skip the lime juice. It adds freshness and prevents the avocado from browning. Second, mix too much; you want some chunks for texture. Finally, be careful with salt. Start small and add more if needed. Remember, you can always adjust, but you can’t take away.

Variations
Spicy Avocado Lime Ranch Dip
To kick up the heat, add diced jalapeños or a splash of hot sauce. Start with one tablespoon of diced jalapeños. Mix it in with the other ingredients. Taste it, and add more if you want more spice. The extra heat pairs well with the creamy avocado.
Vegan Version of the Dip
For a vegan twist, swap the Greek yogurt and mayonnaise for plant-based options. Use 1 cup of vegan yogurt and 1/4 cup of vegan mayo. This keeps the dip creamy while making it plant-based. You can also add a bit of nutritional yeast for a cheesy flavor.
Adding Extra Flavors and Ingredients
Experiment with other herbs and spices to make the dip your own. Try adding fresh chives or parsley for a fresh taste. You can also include diced tomatoes or peppers for sweetness and crunch. A little cumin or chili powder can give it a nice earthiness as well. Always taste as you go to find the perfect mix!
Storage Info
How to Store Leftover Dip
After enjoying your Avocado Lime Ranch Dip, you may have some left. To store it, place the dip in an airtight container. Press plastic wrap directly onto the dip’s surface before sealing the lid. This helps keep it fresh and prevents browning. Store the container in the fridge. It will stay tasty for a few days.
Freezing Tips for the Dip
You can freeze this dip for future snacks! Use a freezer-safe container. Leave some space at the top because the dip expands when frozen. It’s best to freeze it without the cilantro garnish. You can add fresh cilantro when you thaw and serve the dip later. To thaw, place it in the fridge overnight before using.
Shelf Life and Signs of Spoilage
The dip can last in the fridge for about 3 to 5 days. If you notice any brown spots or an off smell, it’s best to throw it away. Always check for mold or a change in texture. If the dip looks or smells strange, don’t risk it. Enjoy your dip while it’s fresh for the best taste!
FAQs
Can I make this dip ahead of time?
Yes, you can make this dip ahead of time. I often prepare it a few hours before serving. It tastes even better after the flavors blend. Just store it in an airtight container in the fridge. This way, it stays fresh and ready for your guests.
What to serve with Avocado Lime Ranch Dip?
You have many great options to serve with this dip. Here are a few ideas:
- Tortilla chips
- Fresh veggie sticks like carrots and celery
- Crunchy crackers
- Pita bread or chips
- Sliced bell peppers
These pair well and add a nice crunch to the creamy dip.
How long does the dip last in the fridge?
The dip lasts about 3 to 5 days in the fridge. Store it in an airtight container. If you see any brown spots on top, just stir it before serving. Keep an eye on its smell and texture, too. If it changes, it’s best to toss it out.
We explored how to create a delicious Avocado Lime Ranch Dip. I shared key ingredients and substitutions. You learned preparation steps, mixing techniques, and final touches for serving. Tips helped you choose ripe avocados and adjust flavors. We also discussed exciting variations and smart storage methods. For questions, the FAQs will guide you on timing and pairings. Enjoy making your dip, and let it impress your friends at your next gathering!


![- 8 oz. elbow macaroni - 1 lb. ground beef or ground turkey - 1 packet taco seasoning mix - 1 cup diced tomatoes (fresh or canned) - 1 cup canned black beans, drained and rinsed - 1 cup corn (can be frozen or canned) - 2 cups shredded cheddar cheese (divided) - 1 cup salsa (your choice of spiciness) - 1/2 cup sour cream - 1 tablespoon olive oil - Salt and pepper to taste - Chopped green onions and fresh cilantro for garnish Gather these ingredients before you start cooking. This will make the process smooth and fun! The elbow macaroni is the base of this dish. It holds the cheesy sauce very well. Ground beef or turkey adds a hearty touch. You can use either, depending on your taste. The taco seasoning mix gives the pasta that classic taco flavor. Diced tomatoes bring freshness and moisture, while black beans boost protein and fiber. Corn adds a nice sweetness. Cheddar cheese is key for that melty, gooey goodness. Salsa adds a kick; choose your preferred heat level. Sour cream makes the dish creamy and rich. Olive oil helps cook the meat and adds flavor. Finally, salt, pepper, and garnishes like green onions and cilantro make it all pop. When you have everything ready, the fun part starts! You’ll see how these simple ingredients blend into a delicious dish. For the complete recipe, check out the Full Recipe section. To start, cook the elbow macaroni. Follow the package instructions carefully. Aim for al dente texture, which means the pasta should be firm when bitten. This keeps it from getting mushy later. Once done, drain the pasta in a colander and set it aside in a large bowl. While the pasta cooks, heat the olive oil in a large skillet over medium heat. Add the ground beef or turkey. Cook for about 5-7 minutes, stirring often to break up the meat. Look for a nice brown color. After browning, drain any extra fat from the skillet. Next, add the taco seasoning mix, diced tomatoes, black beans, corn, and salsa. Stir well and let the mixture simmer for about 5 minutes. This helps the flavors come together. After simmering, gently fold the cooked macaroni into the skillet. Make sure the pasta gets well-coated with the tasty mixture. Lower the heat to low, then add 1 1/2 cups of shredded cheddar cheese. Stir until the cheese melts into a creamy coating. Remove the skillet from the heat and add the sour cream. Mix it well until fully blended. Taste your dish and add salt and pepper to your liking. For the full recipe, refer to the instructions above. Enjoy your cheesy taco pasta! To get the best taco flavor, use a high-quality taco seasoning mix. It gives a bold taste. I often mix in extra spices, like garlic powder or cumin, for depth. For a creamy texture, add the cheese slowly. Let it melt fully before adding sour cream. This step ensures a smooth, rich sauce. Garnish your cheesy taco pasta with fresh green onions and cilantro. They add color and freshness. You can also use sliced avocado or jalapeños for extra flair. For a complete meal, pair the pasta with a simple side salad or tortilla chips. The crunch complements the creamy pasta well. You can find the full recipe [here]. {{image_4}} You can change up the protein in this dish. Ground turkey is a lighter choice. Ground chicken also works well. If you prefer plant-based options, try meat substitutes made from soy or lentils. Each option gives a unique flavor, but they all blend well with taco spices. If you need gluten-free pasta, many brands offer great options. Just look for gluten-free elbow macaroni. For those avoiding dairy, you can find dairy-free cheese and sour cream at most stores. These alternatives melt nicely and keep the dish creamy. Don’t be afraid to play with flavors! Different salsas add unique twists. You can also add jalapeños for heat. Hot sauce can give it an extra kick, too. These simple changes can make your cheesy taco pasta even more exciting. For the full recipe, check out the Cheesy Taco Pasta Extravaganza. To store your Cheesy Taco Pasta, let it cool first. Place leftovers in an airtight container. This keeps the dish fresh and tasty. It will last in the fridge for about 3 to 4 days. Always check for smells or mold before eating. When you’re ready to eat, reheat the pasta on the stove. Pour the pasta into a skillet over low heat. Stir it often to ensure even heating. You can also add a splash of water or broth to keep it creamy. Microwave is another option. Use a microwave-safe dish and cover it. Heat in short bursts, stirring every minute until it’s hot. Freezing Cheesy Taco Pasta is a great way to enjoy it later. First, let it cool completely. Then, transfer it to a freezer-safe container. Make sure to leave some space for expansion. You can freeze it for up to 2 months. When you are ready to eat, defrost it overnight in the fridge. Reheat it on the stove, just like before, to keep the flavor and texture. Cheesy Taco Pasta can last for about 3 to 5 days in the fridge. To keep it fresh, store it in an airtight container. Look for signs of spoilage like a sour smell or mold. If you see either, it’s best to toss it out. Yes, you can make Cheesy Taco Pasta ahead of time. Cook it and let it cool. Then, store it in the fridge for up to 2 days before serving. When ready to eat, just reheat it in a pan or microwave. Add a splash of water or broth to keep it moist. If you don’t have elbow macaroni, you can use other pasta shapes. Options include rotini, penne, or even gluten-free pasta. Quinoa or rice can also work if you want a grain instead. Just adjust cooking times as needed. We explored a tasty Cheesy Taco Pasta recipe, packed with flavor and fun. You learned about the key ingredients, easy steps for cooking, and tips to nail that taco taste. We also talked about variations to fit your needs, storage tips, and answers to common questions. This dish is not just simple; it’s a crowd-pleaser. Enjoy cooking and sharing your delicious creation!](https://dishtreats.com/wp-content/uploads/2025/07/060fa6b2-3df9-47e4-b794-a1b6a0be3885-768x768.webp)