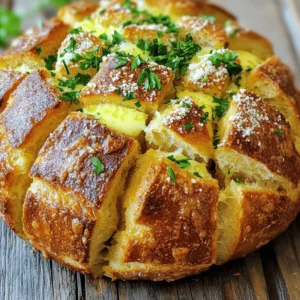
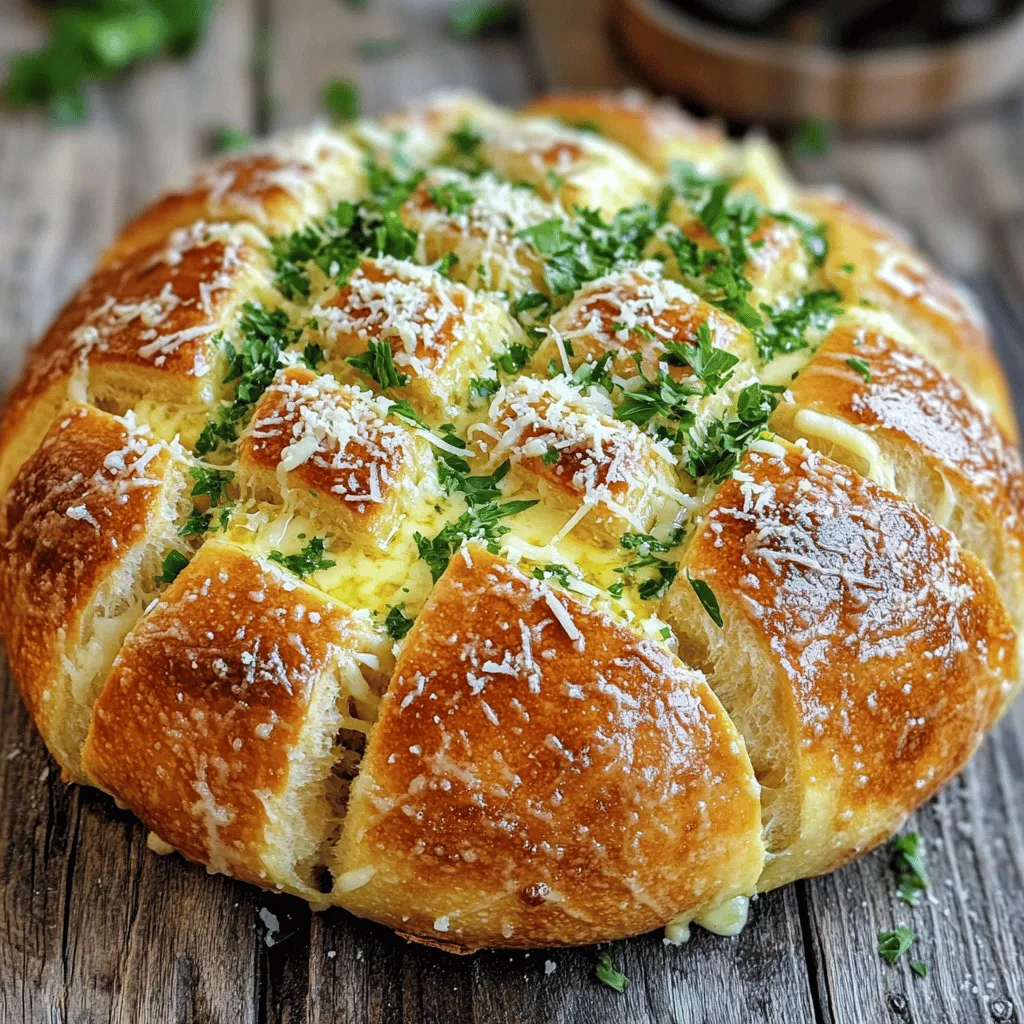
Garlic Parmesan Pull-Apart Bread Tasty and Simple Dish

Are you ready to impress your guests or treat yourself with a delicious snack? Garlic Parmesan Pull-Apart Bread is both tasty and simple to make! This warm, cheesy, and buttery bread will be the star of any meal or party. In this post, I’ll guide you through easy steps, ingredient tips, and flavors to try. Let’s dive in and uncover the joy of making this crowd-pleaser!
Step-by-Step Instructions
Preparing the Oven and Bread
Start by preheating your oven to 375°F (190°C). This temperature helps the bread cook evenly. While the oven heats, take your loaf of fresh Italian bread. Use a sharp knife to cut the top in a grid pattern. Don’t cut all the way through; leave the bottom intact. This will let you pull the pieces apart easily later.
Making the Garlic Butter Mixture
In a small mixing bowl, combine the melted butter and minced garlic. Add the Italian seasoning, sea salt, black pepper, and red pepper flakes if you want some heat. Stir the mixture well. You want every bit of flavor to blend together. This garlic butter will give your bread a rich taste.
Coating and Baking the Bread
Use a pastry brush to spread the garlic butter into the cuts on the bread. Make sure to coat every small crevice. This step is key for flavor. Next, sprinkle the freshly grated Parmesan cheese over the bread. Press down lightly so the cheese sticks. Place the bread on a baking sheet lined with parchment paper. Cover it loosely with aluminum foil to stop it from browning too fast.
Bake the bread in your preheated oven for 15 minutes. After that, carefully remove the foil. Bake it for another 10 to 15 minutes until it turns golden brown and crispy. The smell will fill your kitchen!
Serving Suggestions
Once the bread is done, take it out of the oven. Sprinkle the chopped parsley on top for some color and extra flavor. Serve the warm pull-apart bread right away. It’s fun for guests to pull apart the pieces. Enjoy every bite of the cheesy, garlicky goodness. For a nice touch, serve it on a wooden board with extra garlic butter for dipping.
Tips & Tricks
Tips for the Perfect Pull-Apart Texture
To get that soft, pull-apart texture, follow these tips:
- Use fresh bread: Fresh Italian bread works best.
- Cut carefully: Make deep cuts, but do not slice all the way through.
- Drench in garlic butter: Fill every cut with garlic butter for flavor and moisture.
- Cover while baking: Use foil to keep the bread soft at first.
Common Mistakes to Avoid
Avoid these common errors for the best outcome:
- Not preheating the oven: Always preheat for even baking.
- Skipping the butter: Do not skip the garlic butter. It adds flavor.
- Not pressing the cheese: Press the cheese into the cuts to help it melt.
- Overbaking: Bake until golden brown, but don’t let it burn.
Enhancing Flavor with Additional Ingredients
You can boost the flavor of your pull-apart bread with these ideas:
- Add herbs: Try fresh basil or thyme for extra taste.
- Cheese variety: Mix in mozzarella for a gooey texture.
- Spicy kick: Include red pepper flakes for heat.
- Roasted garlic: Use roasted garlic for a sweeter flavor.

Variations
Different Cheese Options
Using different cheeses can change the taste of your pull-apart bread. While Parmesan is classic, you can try mozzarella for a gooey texture. Cheddar adds a sharp flavor, making every bite unique. For a twist, use a mix of cheeses. This creates layers of flavor that will surprise your guests.
Herb Variations for Unique Flavors
Herbs can add depth to your bread. Try using fresh basil or oregano for an Italian vibe. For a more earthy taste, add thyme or rosemary. You can mix in a pinch of dill for a fresh twist. Each herb brings its own flair, so feel free to experiment.
Serving with Dips and Sauces
Serving your bread with dips can enhance the experience. Garlic butter is a great choice for dipping. You can also try marinara sauce for a classic Italian feel. For a spicy kick, serve it with a hot pepper dip. These options will make your meal more exciting.
Storage Info
Best Practices for Storing Leftovers
After enjoying your Garlic Parmesan Pull-Apart Bread, you’ll want to store leftovers properly. First, let the bread cool completely at room temperature. Then, wrap it tightly in plastic wrap or aluminum foil. This helps keep the bread soft and fresh. You can also place it in an airtight container. It can last for up to three days on the counter. If you live in a humid area, keep it in the fridge to prevent mold.
How to Reheat Pull-Apart Bread
When it’s time to enjoy leftover bread, reheating is key. Preheat your oven to 350°F (175°C). Remove any plastic wrap or foil. Place the bread on a baking sheet. Cover it loosely with aluminum foil. Bake for about 10 to 15 minutes. This warms the bread and keeps it from drying out. If you want a crispy exterior, remove the foil for the last 5 minutes.
Freezing Options and Tips
Freezing is a great way to save your Garlic Parmesan Pull-Apart Bread for later. First, wrap the cooled bread tightly in plastic wrap. Then, place it in a freezer-safe bag or container. Make sure to remove excess air. This will help prevent freezer burn. You can freeze it for up to three months. To enjoy, thaw it overnight in the fridge. Then, reheat it in the oven as mentioned above.
FAQs
Can I use a different type of bread?
Yes, you can use other types of bread. A French baguette works great. You can also try sourdough for a tangy twist. Just make sure the bread is fresh. It should be sturdy enough to hold the toppings.
How to make this recipe vegan-friendly?
To make it vegan, swap the butter with vegan butter or olive oil. Use a plant-based cheese instead of Parmesan. There are many good options available today. This way, you still get that yummy taste without dairy.
What can I serve Garlic Parmesan Pull-Apart Bread with?
This bread pairs well with many dishes. Serve it with pasta, soups, or salads. It also works great as an appetizer at parties. You can even enjoy it alone, as it is so tasty.
Can I prepare the bread in advance?
Yes, you can prepare the bread ahead of time. Cut the bread and add the garlic butter mixture. Wrap it tightly and keep it in the fridge. Bake it fresh when you’re ready to serve. This saves time and keeps it warm.
How do I keep the bread from getting soggy?
To prevent sogginess, do not soak the bread in the garlic butter. Brush it lightly instead. Also, bake it right after preparing it. If you have leftovers, store them in a paper bag, not plastic. This helps keep the crust crispy.
In this post, we covered every step for making Garlic Parmesan Pull-Apart Bread. You learned about the key ingredients and options for flavor. I shared tips for that perfect texture and common mistakes to avoid. You now know how to store leftovers and reheat them, too.
This bread is a fun treat for any meal. It’s easy to customize and share. So, gather your ingredients and start baking today! Enjoy the cozy, garlicky goodness.


![To make a tasty and healthy crispy chickpea salad, you need these main ingredients: - 1 can (15 oz) chickpeas, drained and rinsed - 2 tablespoons olive oil - 1 teaspoon smoked paprika - 1/2 teaspoon garlic powder - 1/2 teaspoon ground cumin - Salt and freshly ground pepper to taste - 4 cups mixed greens (spinach, arugula, and lettuce blend) - 1 cup cherry tomatoes, halved - 1/2 cucumber, diced - 1/4 red onion, thinly sliced Add some optional ingredients to enhance the flavor and texture of your salad: - 1/4 cup feta cheese, crumbled (optional) - A handful of fresh parsley, chopped (for garnish) You will also need a few kitchen tools to make this salad: - A medium-sized mixing bowl for the chickpeas - A large bowl for the salad - A baking sheet lined with parchment paper - A whisk for the dressing - A separate small bowl for mixing the tahini dressing Using these ingredients and tools, you can create a delicious crispy chickpea salad. Try the full recipe for a step-by-step guide! First, preheat your oven to 400°F (200°C). This makes sure the chickpeas get crispy. Line a baking sheet with parchment paper. This helps with easy cleanup later. In a bowl, mix the drained chickpeas with olive oil. Add smoked paprika, garlic powder, ground cumin, salt, and pepper. Make sure each chickpea is well coated. This blend gives them a tasty kick. Spread the seasoned chickpeas evenly on the baking sheet. Don’t crowd them; they need space to get crispy. Bake for 25-30 minutes. Shake the pan halfway through to help them cook evenly. They should turn golden and crunchy. While the chickpeas bake, prepare the salad base. In a large bowl, toss together mixed greens, halved cherry tomatoes, diced cucumber, and thinly sliced red onion. Mixing them now lets the flavors combine as you assemble. In a small bowl, whisk tahini, fresh lemon juice, and a pinch of salt and pepper. If you want a thinner dressing, add a splash of water. This dressing ties the salad together, adding a rich flavor. Once the chickpeas are crispy, take them out and let them cool for a minute. Top your salad with these warm chickpeas. Drizzle the tahini dressing over everything. Add crumbled feta cheese for creaminess, if you like. Finish with fresh parsley for color. Enjoy your Crispy Chickpea Delight Salad! For the complete recipe, check the [Full Recipe]. To make your chickpeas extra crispy, dry them well before cooking. Drain and rinse the canned chickpeas, then lay them on a paper towel. Pat them gently to remove excess moisture. The drier the chickpeas, the crunchier they will be. Toss them with olive oil and spices right before baking. Spread them out on your baking sheet. Avoid crowding them; it helps with airflow and crispiness. Bake at 400°F for 25 to 30 minutes, shaking the pan halfway through. This step ensures even cooking and crispiness. If you have leftovers, store the salad and chickpeas separately. Place the salad in an airtight container in the fridge. Keep the chickpeas in another container. This will help prevent sogginess. When you want to eat the leftovers, reheat the chickpeas in the oven for a few minutes. This will revive their crisp texture. The salad will stay fresh for about two days in the fridge. For the best taste, serve the salad immediately after assembling. The warm chickpeas add a nice contrast to the cool greens. Drizzle the tahini dressing right before serving. This way, it coats the ingredients nicely. You can also sprinkle some feta cheese on top for extra creaminess. Fresh herbs like parsley can brighten the dish. Try adding avocado for creaminess or nuts for crunch. Each addition enhances the flavor and texture of your salad. Enjoy experimenting! {{image_4}} You can swap out greens to change the salad's taste. Try using kale for a hearty crunch. Baby spinach offers a soft, mild flavor. You can even mix in some crunchy cabbage for more texture. Each option adds its unique twist while still pairing well with crispy chickpeas. If you want to make the salad more filling, add protein. Grilled chicken works great with the chickpeas. You can also try adding sliced hard-boiled eggs for richness. For a vegetarian option, toss in some quinoa or black beans. These choices will help boost the meal's nutrients. While tahini dressing is fantastic, don’t be afraid to experiment. A lemon vinaigrette adds a bright zing. You could also try a yogurt-based dressing for creaminess. If you like a kick, a spicy harissa dressing works wonders too. Each dressing brings a new flavor that can change your salad experience. For the full recipe, check out the Crispy Chickpea Delight Salad 🥗. To store leftover salad, first, let it cool down. Place it in an airtight container. This keeps the salad fresh. Add the crispy chickpeas on top only when serving. This way, they stay crunchy. If you mix them in, they can get soggy. If you have leftover crispy chickpeas, you can reheat them. Preheat your oven to 350°F (175°C). Spread the chickpeas on a baking sheet. Bake them for about 10 minutes. This brings back their crunch. You can also use an air fryer for a quicker option. The salad can last up to three days in the fridge. Chickpeas stay good for about a week if stored well. Fresh veggies have a shorter shelf life. Use them within three to five days. Always check for freshness before eating. For a detailed recipe, refer to the Full Recipe. Yes, you can use dried chickpeas. They need soaking and cooking first. To prepare, soak them overnight in water. Cook them until they are tender. This can take about 1 to 2 hours. Then, follow the same steps as with canned chickpeas in the recipe. This salad is packed with nutrients. Chickpeas provide protein and fiber. Mixed greens bring vitamins A and C. Tomatoes offer antioxidants, while cucumbers add hydration. Olive oil is a healthy fat. Feta cheese, if used, adds calcium. Overall, it is a well-balanced meal. To make this salad vegan, skip the feta cheese. The rest of the ingredients are already plant-based. You can also add more veggies or nuts for extra flavor and nutrition. Try adding avocado for creaminess or nuts for crunch. Yes, you can prep it ahead of time. Store the crispy chickpeas in an airtight container. Keep the salad ingredients separate until you are ready to eat. This keeps everything fresh and crispy. Just assemble when you want to enjoy your meal. This salad pairs well with many dishes. Serve it alongside grilled chicken or fish for protein. It also goes great with a warm pita or flatbread. If you want a lighter meal, enjoy it as a stand-alone dish. You can find the Full Recipe for more details. In summary, this blog post covered how to make a crispy chickpea salad. We explored the main ingredients and added options to boost flavor. I shared step-by-step cooking instructions and tips for the perfect crunch. You learned about storage methods and how to customize the dish. Enjoy this salad any time for a tasty and healthy meal. With its simple steps, you can make it again and again!](https://dishtreats.com/wp-content/uploads/2025/06/a0161600-1d29-449f-a743-39fb8b2e717a-768x768.webp)