Almond Joy Energy Bites Delicious and Easy Recipe
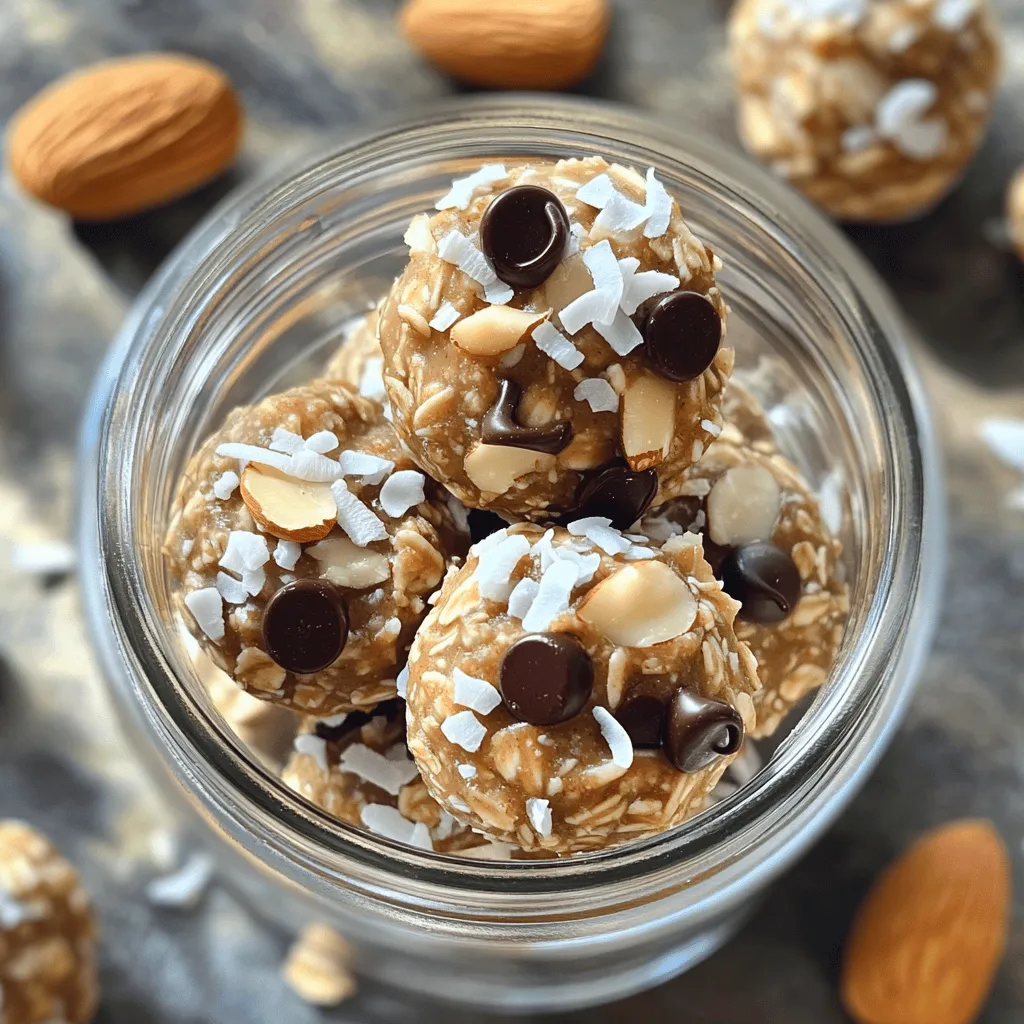
Looking for a quick and tasty snack? Almond Joy Energy Bites combine rich chocolate, crunchy almonds, and tropical coconut for a delightful treat. This easy recipe is perfect for busy days when you need a boost. I’ll guide you through the simple steps and share tips for making this delicious snack. Let’s dive into the world of Almond Joy Energy Bites and discover how you can make them today!This no-bake recipe combines oats, almond butter, coconut, and chocolate. It takes just 15 minutes to prep and 30 minutes to chill. You will have 12 to 15 energy bites ready to enjoy.
Detailed Ingredient List
Here’s what you need for the recipe:
- 1 cup rolled oats
- 1 cup creamy almond butter
- 1/2 cup shredded unsweetened coconut
- 1/4 cup honey or pure maple syrup
- 1/4 cup mini dark chocolate chips
- 1/4 cup finely chopped almonds
- 1 teaspoon pure vanilla extract
- 1/2 teaspoon sea salt
Suggested Substitutions
If you have allergies or want to switch things up, here are some options:
- Use peanut butter instead of almond butter for a different flavor.
- Swap honey with agave syrup for a vegan choice.
- Use quick oats if you don’t have rolled oats.
- Replace mini dark chocolate chips with white chocolate or dried fruit for a new twist.
These swaps can help you make a version that suits your taste!
Step-by-Step Instructions
Preparation Steps
Start by gathering all your ingredients. You need rolled oats, almond butter, shredded coconut, honey, mini dark chocolate chips, chopped almonds, vanilla extract, and sea salt. This makes the process smooth and quick. Measure each item carefully. It helps to have everything ready before you mix.
Mixing the Ingredients
In a large bowl, combine the rolled oats, creamy almond butter, shredded coconut, honey, and vanilla extract. Use a spatula or wooden spoon to mix well. You want all the ingredients to stick together nicely. Once mixed, gently fold in the mini dark chocolate chips, chopped almonds, and sea salt. This step adds crunch and flavor. Make sure everything is evenly distributed for a tasty bite.
Forming and Chilling the Bites
Now, scoop out small portions of the mixture, about one inch wide. Roll them into balls using your hands. Place each ball on a parchment-lined baking sheet. Leave a little space between them. Once you form all the bites, put the baking sheet in the fridge. Chill them for at least 30 minutes. This helps them firm up and hold their shape. After chilling, store them in an airtight container. They will stay fresh for about one week. Enjoy these tasty snacks anytime!
Tips & Tricks
Best Practices for Mixing
When you mix the ingredients, start with the dry ones first. This helps them blend well. Add the nut butter and honey next. Use a spatula or spoon to combine everything. Mix until it’s sticky and holds together. You want even flavor in each bite. If it feels too dry, add a splash of almond milk.
Chilling Time Recommendations
Chilling is key for these bites. I suggest at least 30 minutes in the fridge. This time helps them firm up. If you can wait longer, that’s even better! They will hold their shape well. Just remember to cover them or use an airtight container.
Presentation Tips
Make your energy bites look appealing! Use a clear glass jar for serving. This lets the colorful layers shine through. You can also sprinkle some extra coconut on top. A few chopped almonds can add charm too. These little touches make them fun to eat!

Variations
Alternative Flavor Profiles
You can change the flavor of your Almond Joy Energy Bites easily. Try adding almond extract instead of vanilla. This gives a stronger nutty flavor. You can also use different nut butters. Sunflower seed butter or cashew butter works well. For a tropical twist, add dried pineapple or mango. This adds a sweet, fruity taste.
Vegan and Gluten-Free Options
Making these bites vegan is simple. Just replace honey with maple syrup. Use certified gluten-free oats to keep it gluten-free. This way, everyone can enjoy them. Check labels to ensure all ingredients meet your dietary needs.
Add-Ins and Dietary Modifications
You can customize your bites with fun add-ins. Try chia seeds for extra fiber or protein powder for a boost. You can swap mini chocolate chips for cacao nibs for a richer taste. If you want a crunch, add more chopped nuts or seeds. Mix in some dried fruit too, like cranberries or raisins. This makes your bites more exciting and nutritious.
Storage Info
How to Store Almond Joy Energy Bites
To keep your Almond Joy Energy Bites fresh, use an airtight container. Place them in the refrigerator. They will stay good for up to one week. This makes them great for quick snacks or a tasty treat.
Freezing Tips for Longer Storage
If you want to store them longer, freezing is a great option. Place the energy bites in a single layer on a baking sheet. Make sure they do not touch each other. Freeze them for about two hours. Once frozen, transfer the bites to a freezer-safe bag. They will keep well for up to three months.
Shelf Life and Freshness Tips
The bites taste best when fresh, but they still hold flavor when stored. Check for any changes in smell or texture before eating. If they seem dry or hard, they may not be as enjoyable. For the best taste, eat them within the suggested time.
FAQs
Can I use peanut butter instead of almond butter?
Yes, you can use peanut butter. It adds a great taste. The texture will stay similar. Just keep in mind it changes the flavor a bit. Almond butter gives a nutty taste that matches the recipe well.
How do I know when the energy bites are done chilling?
You can tell they are done chilling when they feel firm. Press one lightly with your finger. If it holds its shape, they are ready. Chilling helps them stay together. Aim for at least 30 minutes in the fridge.
Are Almond Joy Energy Bites healthy?
Yes, Almond Joy Energy Bites are quite healthy! They have good fats from almond butter and nuts. The oats provide fiber, which is great for digestion. Dark chocolate adds antioxidants too. Just keep portion sizes in mind, as they contain natural sugars. This snack can fit well in a balanced diet.
In this post, I covered everything about Almond Joy Energy Bites. We discussed the ingredients and substitutions, guiding you in making them your own. I shared step-by-step instructions to simplify the process. Tips and tricks helped ensure your bites turn out perfect every time, while variations offered fun flavor options.
Remember, these bites are not just tasty but also healthy. Enjoy making them, storing them, and sharing them. You’ll love the joy they bring!


 for more details and tips. Start by preheating your oven to 375°F (190°C). This ensures even baking. While the oven heats, grab your donut pan. Lightly grease it or use non-stick cooking spray. This step keeps the donuts from sticking. In a medium bowl, whisk together 1 ½ cups of all-purpose flour, 1 teaspoon of baking powder, and ½ teaspoon of baking soda. Add ½ teaspoon of ground cinnamon, ¼ teaspoon of ground nutmeg, and ¼ teaspoon of salt. Mix until everything is well combined. Set this dry mix aside. In a large bowl, combine ½ cup of granulated sugar with 1 cup of cooked and mashed sweet potato. Use a fork or mixer to blend until smooth. Next, add 1 large egg, ¼ cup of milk (dairy or non-dairy), ¼ cup of melted unsalted butter, and 1 teaspoon of vanilla extract. Stir gently until it’s creamy and lump-free. Now, gradually fold the dry mixture into your sweet potato mix. Use a spatula to combine without overmixing. This keeps your donuts light and fluffy. To fill the donut pan, use a piping bag or ziplock bag with a snipped corner. Fill each cavity about ¾ full with batter. Bake the donuts for 12 to 15 minutes. Check for doneness with a toothpick; it should come out clean. Once baked, let them rest in the pan for about 5 minutes. Then, transfer the donuts to a wire rack to cool completely. While they cool, prepare your cinnamon sugar. In a shallow bowl, mix ¼ cup of granulated sugar with 1 tablespoon of ground cinnamon. Once the donuts are cool, brush each with melted butter. Roll or toss them in the cinnamon sugar mixture for a sweet finish. Enjoy your Cinnamon Sugar Sweet Potato Donuts! For a more detailed guide, refer to the Full Recipe. Making these donuts can be fun, but some mistakes can ruin them. Here are a few to watch out for: - Overmixing the batter: This can make your donuts tough. Mix until just combined. - Not measuring ingredients: Use precise measurements for the best results. - Skipping the cooling step: Donuts need to cool before coating. This helps the sugar stick better. Texture is key for these donuts. To get it just right, follow these tips: - Use fresh sweet potatoes: They should be soft and creamy when mashed. - Check your oven temp: An oven thermometer can help. Donuts bake best at 375°F. - Fill the pan correctly: Don’t overfill. Aim for ¾ full for the best rise. How you serve these donuts can make them even better. Here are some creative ideas: - Garnish with extra cinnamon sugar: Just a light sprinkle adds a nice touch. - Serve warm: Warm donuts taste best and melt in your mouth. - Pair with coffee or tea: The flavors blend perfectly for a delightful treat. For the full recipe, don’t forget to check the complete guide! {{image_4}} To make these donuts gluten-free, swap all-purpose flour with a gluten-free blend. Look for one that has xanthan gum for better texture. For a vegan option, replace the egg with a flaxseed or chia seed mixture. Mix 1 tablespoon of ground seeds with 2.5 tablespoons of water and let it sit for 5 minutes. Use almond milk or any plant-based milk instead of regular milk. These swaps keep the donuts tasty and light. You can add fun flavors to your donuts. Try stirring in a pinch of ginger or cloves for a warm taste. You can also add chocolate chips or nuts for a nice crunch. Dried fruits like cranberries or raisins add sweetness and chewiness. During the fall, consider a dash of pumpkin spice for a seasonal twist. Mix and match to create your perfect donut flavor! If you want to dress up your donuts, try a simple icing. Mix powdered sugar with a splash of milk to make a glaze. You can add vanilla or almond extract for extra flavor. Drizzle it over the warm donuts for a sweet touch. For a chocolate glaze, melt dark chocolate and dip the tops of the donuts. This makes them extra special. Don’t forget to sprinkle some crushed nuts on top for added crunch! For the complete process, check the Full Recipe. To keep your donuts fresh, store them in an airtight container. Place parchment paper between layers to prevent sticking. Keep the container at room temperature. They will stay good for up to three days. If you need them to last longer, consider freezing. To freeze the donuts, first let them cool completely. Wrap each donut in plastic wrap. Then place the wrapped donuts in a freezer-safe bag. They can last up to three months in the freezer. When ready to eat, just thaw them at room temperature. To reheat, preheat your oven to 350°F (175°C). Place the donuts on a baking sheet. Heat for about 5-7 minutes, just until warm. This helps keep them soft and tasty. Avoid using the microwave, as it can make the donuts tough. Cinnamon Sugar Sweet Potato Donuts last about 2-3 days at room temperature. Keep them in an airtight container to stay fresh. You can also place them in the fridge for up to a week. Just remember, cold donuts may not taste as good! Yes, you can use other types of sweet potatoes. Look for varieties like purple or white sweet potatoes. Each type will add a different flavor and color. Just make sure to cook and mash them first for the best results. To make these donuts ahead of time, you can bake them a day early. Store the cooled donuts in an airtight container. You can also freeze them. Just thaw and warm them before serving. This way, they stay fresh and tasty! Using a donut pan is the best way to shape these donuts. It helps them bake evenly and hold their form. If you don’t have a donut pan, you can use a muffin tin. Just know that the shape and texture will differ a bit. These Cinnamon Sugar Sweet Potato Donuts are fun to make and tasty to eat. We covered the key ingredients and shared tips for perfect texture. Consider swapping ingredients for healthier versions, and don’t forget to explore flavor variations. Proper storage helps keep leftovers fresh, making your treats last longer. Finally, remember that you can adjust the recipe to fit your needs. Enjoy baking these delightful donuts and sharing them with others!](https://dishtreats.com/wp-content/uploads/2025/07/04b40064-aac7-4876-84c8-c93335adf97c-768x768.webp)