
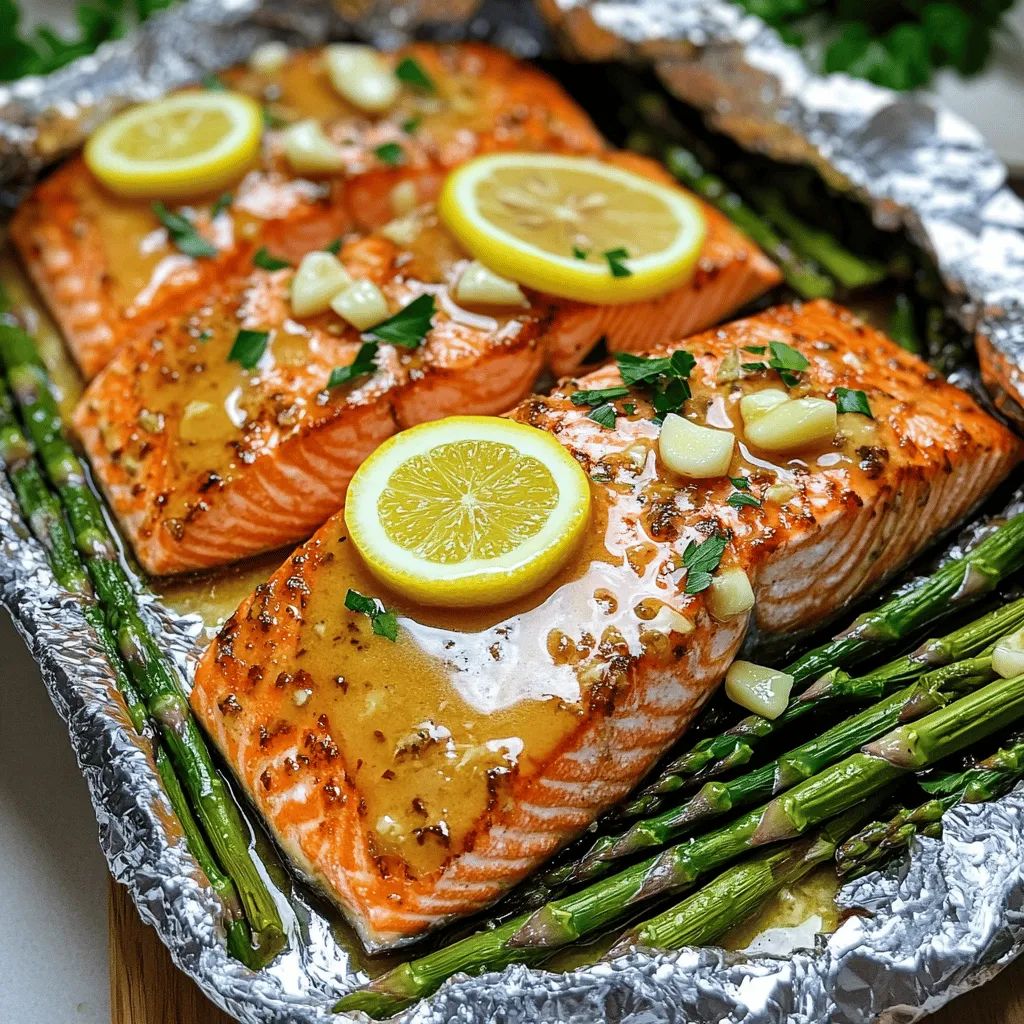
Garlic Butter Lemon Salmon Foil Packs Quick and Tasty
 for Garlic Butter Lemon Salmon Foil Packs. In this article, you learned how to make Garlic Butter Lemon Salmon Foil Packs. We covered the main ingredients, step-by-step cooking instructions, and helpful tips to ensure success. You can also explore flavor variations and storage options for leftovers. This dish is simple yet delicious, making it perfect for dinner. With these techniques, you can impress friends and family with your cooking. Enjoy your meal and feel proud of your kitchen skills!](https://dishtreats.com/wp-content/uploads/2025/07/636e4153-d701-4cda-a9a1-5094e2b11f0e.webp)
If you’re seeking a quick and tasty meal, you’ve found it! Garlic Butter Lemon Salmon Foil Packs are perfect for busy nights. These delicious packs are easy to make and packed with flavor. You only need a few simple ingredients, plus less cleanup. Ready to wow your family with a dish that’s both healthy and satisfying? Let’s dive into this quick guide to creating your own foil packs!
Ingredients
Main Ingredients for Garlic Butter Lemon Salmon Foil Packs
- 4 salmon fillets (approximately 6 ounces each)
- 4 tablespoons unsalted butter, melted
- 4 cloves garlic, finely minced
- 2 lemons (one lemon sliced into rounds, the other juiced)
- 1 teaspoon dried oregano
- Salt and freshly ground black pepper to taste
The main stars of this dish are the salmon fillets. They bring a rich flavor and healthy fats. I love using unsalted butter for that creamy, savory touch. Garlic adds a punch of flavor, while fresh lemon keeps things bright. The oregano adds warmth and depth. Don’t forget the salt and pepper! They help to enhance the natural taste of the salmon.
Optional Ingredients
- 1 cup asparagus, trimmed and cut into 2-inch pieces (optional)
- Fresh parsley for garnish
Asparagus makes a great addition. It cooks well with the salmon and adds color. The fresh parsley on top adds a nice touch. It brightens the plate and gives a fresh taste. You can skip these if you want, but they make the dish even better.Enjoy cooking!
Step-by-Step Instructions
Preparing Your Oven and Foil
Start by preheating your oven to 400°F (200°C). This makes sure your salmon cooks evenly and quickly. Next, tear off four large pieces of heavy-duty aluminum foil. Each piece should be about 12 inches long. This size is perfect for wrapping your salmon and veggies.
Mixing the Garlic Butter Mixture
In a small mixing bowl, combine the melted butter, minced garlic, and lemon juice. Also, add the dried oregano, salt, and pepper. Mix all these ingredients well until they are fully blended. A good mix ensures that all flavors come together in each bite.
Assembling the Foil Packs
Take one piece of foil and place a salmon fillet in the center. If you want to add asparagus, divide it evenly around the salmon. This adds color and nutrition. Then, drizzle the garlic butter mixture generously over each fillet. Make sure to coat them well for the best taste. Layer lemon slices on top of each fillet for a fresh citrus kick. Now, fold the foil sides over the salmon and veggies. Seal the packets tightly so the steam stays in.
Cooking the Foil Packs
Arrange the foil packets on a baking sheet. Bake them in your preheated oven for 15 to 20 minutes. You’ll know they are done when the salmon flakes easily with a fork. When you open the foil packets, be careful of the hot steam that escapes. Serve the salmon and veggies on plates, and add some chopped parsley for a nice touch. Enjoy this quick and tasty meal!
Tips & Tricks
Making the Best Garlic Butter Mixture
Using fresh ingredients makes a big difference. Fresh garlic adds punch. Fresh lemons boost flavor. If you have herbs like parsley or thyme, toss them in. Adjust your seasoning to match your taste. Like it spicy? Add red pepper flakes. Prefer it mild? Skip the spice.
Cooking Variations
Feel free to add different veggies. Bell peppers, zucchini, or cherry tomatoes work great. They absorb the garlic butter flavor. Adjust the cook time based on the thickness of your salmon fillets. Thicker fillets need more time. Check for doneness by gently flaking with a fork.
Serving Suggestions
Pair your salmon with rice or a fresh salad. These sides bring balance to the meal. For presentation, serve the salmon in the foil for a fun touch. Add a sprinkle of fresh parsley on top for color. This simple step makes your dish look gourmet.
Variations
Flavor Variations
You can change the taste of your garlic butter lemon salmon foil packs by using different herbs and spices. For a fresh twist, try fresh dill or thyme. These herbs add unique flavors that pair well with salmon. If you want a kick, add red pepper flakes. You can also swap lemon for lime or orange. This small change brings a new, zesty note to your dish.
Cooking Methods
You can cook these foil packs in different ways. Grilling is a fun option. Just place the foil packs on the grill. Cook them for about 10-15 minutes until the salmon is flaky. This method gives a nice smoky flavor to the fish.
Another fun way is cooking on a campfire. Place the foil packs on hot coals or in a grill basket. This method can bring a great outdoor taste to your meal. You’ll enjoy the warmth and flavors of cooking over an open flame.
Storage Info
Storing Leftovers
To keep your Garlic Butter Lemon Salmon Foil Packs fresh, store them properly. After your meal, let the foil packs cool to room temperature. Then, transfer any leftovers to an airtight container. You can store them in the refrigerator for up to three days.
If you want to keep them longer, freezing is a great option. Place the cooled salmon in a freezer-safe container or wrap it tightly in plastic wrap. Make sure to label the container with the date. Frozen salmon can last for up to three months.
Reheating Tips
When it comes to reheating, the best method is the oven. Preheat your oven to 350°F (175°C). Place the salmon in an oven-safe dish and cover it with foil. Heat for about 10-15 minutes, or until warmed through.
You can also use a microwave for quick reheating. Place the salmon on a microwave-safe plate, cover it with a damp paper towel, and heat in short bursts of 30 seconds. This helps keep the salmon moist.
To preserve flavor and texture, avoid reheating too long. Overheating can dry out the salmon. Always check if it’s warm all the way through before serving.
FAQs
How long to bake Garlic Butter Lemon Salmon Foil Packs?
Bake the foil packs for 15-20 minutes at 400°F (200°C). The salmon should be cooked through and flake easily with a fork. For thicker fillets, add a few extra minutes. Keeping the packs sealed helps steam the fish, making it tender and juicy.
Can I use frozen salmon fillets?
Yes, you can use frozen salmon fillets. Just remember to thaw them first. Thawing helps them cook evenly. If you use frozen fillets, bake the packs for an extra 5 minutes. Always check for doneness to ensure they are fully cooked.
What to serve with Garlic Butter Lemon Salmon Foil Packs?
These foil packs pair well with many side dishes.
In this article, you learned how to make Garlic Butter Lemon Salmon Foil Packs. We covered the main ingredients, step-by-step cooking instructions, and helpful tips to ensure success. You can also explore flavor variations and storage options for leftovers. This dish is simple yet delicious, making it perfect for dinner. With these techniques, you can impress friends and family with your cooking. Enjoy your meal and feel proud of your kitchen skills!
 for Garlic Butter Lemon Salmon Foil Packs. In this article, you learned how to make Garlic Butter Lemon Salmon Foil Packs. We covered the main ingredients, step-by-step cooking instructions, and helpful tips to ensure success. You can also explore flavor variations and storage options for leftovers. This dish is simple yet delicious, making it perfect for dinner. With these techniques, you can impress friends and family with your cooking. Enjoy your meal and feel proud of your kitchen skills!](https://dishtreats.com/wp-content/uploads/2025/07/636e4153-d701-4cda-a9a1-5094e2b11f0e-300x300.webp)
. - Ensure even space on the baking sheet for optimal roasting. - Toss halfway through cooking for uniform caramelization. Roasting carrots and chickpeas makes them sweet and crunchy. When you spread them out, they cook evenly. If they touch, they steam instead of roast. This can make them soggy and less tasty. Tossing the mixture halfway is key. It helps to brown all sides well. This step adds more flavor and a lovely texture. - Experiment with different citrus juices like lime or orange. - Substitute tahini with Greek yogurt for a creamy dressing. The dressing can change the whole dish. Use lime juice for a zesty twist. Orange juice gives a sweet touch. Both add freshness and brightness. If you want a creamy option, use Greek yogurt instead of tahini. It makes the dressing rich and smooth. This swap gives a fun flavor change too. - Serve in individual bowls for a refined presentation. - Add a lemon wedge for guests to use. Presenting this salad in bowls looks nice. It makes each serving feel special. Guests can enjoy their own portion. Adding a lemon wedge on the side is a great idea. It lets everyone add a splash of fresh juice. This brightens the salad even more. For the full recipe, check the details above. Enjoy your cooking! {{image_4}} You can make this salad even better. Try adding other roasted veggies. Bell peppers bring sweetness. Sweet potatoes add creaminess. Both enhance flavor and texture. You can also toss in nuts or seeds. Almonds or sunflower seeds add a nice crunch. They make the salad more filling and fun. If you want more protein, try grilled chicken or tofu. Both options work well with roasted carrots and chickpeas. Grilled chicken adds a savory touch, while tofu keeps it plant-based. You can also use canned tuna. It gives the salad a different flavor and makes it heartier. Want to boost flavor? Experiment with fresh herbs. Cilantro or mint can brighten the taste. They add freshness that complements the roasted veggies. You can also spice it up with hot sauce. Just a dash gives the salad a nice kick. It’s a fun way to change the flavor profile. For the complete recipe, check out the Full Recipe section above. Store leftovers in an airtight container in the fridge. They are best consumed within 2-3 days. After that, the carrots may lose their crunch, and the flavors fade. Freezing this salad is not recommended. The dressing may separate when frozen. This can change the texture and taste of your salad. You can enjoy this salad cold or at room temperature. If you prefer, reheat in the oven. This helps retain the texture of the roasted carrots and chickpeas. Yes, use maple syrup instead of honey and omit the feta cheese. This keeps the flavors rich and plant-based. You won’t miss the cheese, trust me. The roasted carrots and chickpeas bring enough taste and texture to satisfy everyone. You can use black beans or white beans as alternatives. Both options provide protein and fiber. They also add a nice twist to the taste. Black beans bring a bit of earthiness, while white beans offer a creamier texture. Serve the dressing on the side to keep the greens crisp until serving. This way, they stay fresh and crunchy. Drizzle the dressing just before you eat for the best taste and texture. Spinach, arugula, or chopped kale work well for base greens. Each option adds a different flavor. Spinach is mild, arugula is peppery, and kale adds a hearty bite. Choose what you like best! This blog post shares a tasty recipe featuring roasted carrots and chickpeas on fresh greens. It walks through each step, from prep to assembly, and includes tips for perfect results. You can even tweak the dressing and add your favorite proteins. Don’t hesitate to make this salad your own. Experimenting with flavors makes cooking fun! Enjoy your healthy, vibrant salad that brings flavor and nutrition to your table.](https://dishtreats.com/wp-content/uploads/2025/07/15b40619-46f3-4baf-96e6-94c974b2a42a-768x768.webp)
. To make One-Pan Garlic Herb Salmon, I start by gathering all my ingredients. This way, I avoid running around the kitchen. I always preheat my oven to 400°F (200°C). This ensures the salmon cooks evenly. I make sure to have a large baking dish or a lined baking sheet ready for the salmon. 1. First, I whisk together the olive oil, garlic, oregano, thyme, smoked paprika, salt, and pepper in a mixing bowl. This creates a tasty marinade. 2. Next, I place the salmon fillets skin-side down in the baking dish. I use a brush or spoon to coat each fillet with the marinade. I want to make sure each piece is well covered. 3. I then arrange lemon slices, halved cherry tomatoes, and zucchini around the salmon. I drizzle any leftover marinade over the veggies for extra flavor. 4. After that, I transfer the dish to the oven and bake for 12 to 15 minutes. The salmon should flake easily when done, and the veggies should look vibrant. 5. Once cooked, I take the dish out and let it rest for a few minutes. This helps the flavors blend better. 6. Just before serving, I sprinkle fresh parsley on top for a nice touch. To get the best salmon, I recommend using high-quality fillets. Fresh salmon tastes better than frozen. Keep an eye on the cooking time. Overcooking can dry out the fish. If you like crispy skin, place the salmon skin-side up under the broiler for the last minute. This gives it a nice crunch. If you're looking for the full recipe, check out the Full Recipe section. Enjoy your meal! To get crispy skin on your salmon, dry it well before cooking. Pat the skin with paper towels to remove moisture. This step helps the skin crisp up nicely. Use high-quality olive oil in your marinade. This oil helps the skin get golden and crunchy. Bake the salmon skin-side down, and avoid flipping it. This keeps the skin intact and crispy. For added flavor, try using fresh herbs instead of dried. Fresh parsley or dill adds a bright taste. Lemon zest is another great addition. It brings a fresh zing that pairs well with salmon. You can also add a splash of white wine to the baking dish. This adds depth to the sauce and enhances the overall flavor. One common mistake is overcrowding the pan. Make sure each salmon fillet has space around it. This helps the heat circulate and cook evenly. Another mistake is not checking for doneness. Salmon should flake easily with a fork. If you overcook it, it may become dry. Lastly, don’t skip the resting step after baking. Letting it rest helps the juices redistribute, leading to a juicier fillet. For the complete recipe, check out the Full Recipe section. {{image_4}} You can change up the veggies in this dish. Try using asparagus, bell peppers, or broccoli. These vegetables cook well and add color. They also provide different flavors. For a twist, add spinach or kale near the end of cooking. This keeps them bright and fresh. This recipe is naturally gluten-free and dairy-free. If you need to avoid gluten, ensure your ingredients are certified gluten-free. You can use coconut oil instead of olive oil for a different flavor. This keeps the dish healthy and tasty. You can cook this salmon in several ways. Besides baking, try grilling it for a smoky taste. To do this, preheat your grill and cook the salmon on medium heat. You can also pan-sear it on the stovetop. Just heat a non-stick pan and cook the salmon for about 4-5 minutes per side. Each method gives you a unique flavor and texture. For the full recipe, check out the One-Pan Garlic Herb Salmon Delight. After you enjoy your One-Pan Garlic Herb Salmon, store leftovers quickly. Place the salmon and veggies in an airtight container. This keeps them fresh and tasty. Make sure to cool them to room temperature before sealing. Store in the fridge for up to three days. If you want to keep it longer, freezing is a great option. When you're ready to eat leftovers, avoid the microwave if you can. It can dry out the salmon. Instead, preheat your oven to 350°F (175°C). Place the salmon and veggies on a baking sheet. Cover them with foil to keep moisture in. Heat for about 10 to 15 minutes, or until warm. You can also reheat in a skillet over low heat, adding a bit of olive oil to keep it moist. Freezing is a smart way to save your One-Pan Garlic Herb Salmon. To freeze, wrap each salmon fillet in plastic wrap, then place them in a freezer-safe bag. Remove as much air as possible before sealing. The veggies can go in the same bag or a separate one. This meal can last in the freezer for up to three months. When you're ready to eat, thaw it overnight in the fridge before reheating. Enjoy! You can tell salmon is cooked when it flakes easily with a fork. The fish should change from translucent to a light pink color. The internal temperature should reach 145°F (63°C). Always use a food thermometer for the best results. Yes, you can use frozen salmon! Just make sure to thaw it first. Place the salmon in the fridge overnight or use a quick method by sealing it in a bag and running it under cold water. This keeps the fish safe and helps it cook evenly. You can serve this dish with many sides. Try steamed rice, quinoa, or a fresh salad. Roasted vegetables pair well too. For a full meal, consider serving garlic bread or a light pasta. You can find the Full Recipe for One-Pan Garlic Herb Salmon here, which gives a complete picture of this delightful dish. In this blog post, we explored the best ingredients for making One-Pan Garlic Herb Salmon. I shared quality recommendations, possible substitutions, and step-by-step cooking instructions. You learned tips for achieving crispy skin and enhancing flavors. We discussed variations using different vegetables and cooking methods, along with storage and reheating tips. Remember, cooking salmon can be easy and fun. Stick to the tips and enjoy your meal! Check out the full recipe for detailed steps.](https://dishtreats.com/wp-content/uploads/2025/06/57d74547-3b02-425a-a5fa-1ca9189b97a5-768x768.webp)

![- 2 medium zucchinis, grated - 1 can (15 oz) black beans, drained and rinsed - 1 cup corn kernels (fresh or frozen) - 1 small red onion, finely chopped - 2 cloves garlic, minced - 1 teaspoon ground cumin - 1 teaspoon smoked paprika - 1 cup enchilada sauce (store-bought or homemade) - 8 whole wheat tortillas - 1 cup shredded cheese (cheddar or a vegan alternative) - 2 tablespoons olive oil - Salt and pepper, to taste - Fresh cilantro, chopped, for garnish - Cooking timeline (Prep time: 15 mins, Total time: 40 mins) - Serving Size information (Servings: 4) When I gather ingredients for zucchini and black bean enchiladas, I love how simple it is. Fresh zucchinis are key for flavor and texture. Black beans add protein and fiber. You can use frozen corn or fresh, depending on what you have. A small red onion gives a sweet taste, while garlic adds a nice kick. Spices like cumin and smoked paprika bring warmth and depth to the dish. I like using enchilada sauce from the store to save time, but homemade is always a treat. Whole wheat tortillas provide a hearty base, and shredded cheese ties everything together. Olive oil helps cook the veggies and adds richness. Adding salt and pepper to taste is important. Finally, a sprinkle of fresh cilantro on top makes the dish pop with color and flavor. For the full recipe, check out the details above. - Step 1: Preheat your oven to 375°F (190°C). This helps your enchiladas cook evenly. - Step 2: Heat 2 tablespoons of olive oil in a skillet over medium heat. Add 1 small red onion, finely chopped. Sauté for about 3-4 minutes, until the onion turns soft and clear. - Step 3: Add 2 cloves of minced garlic to the skillet. Cook for 1 minute, stirring often. The garlic should smell strong but not brown. - Step 4: Mix in 2 medium zucchinis, grated, 1 can of black beans (drained and rinsed), and 1 cup of corn. Sprinkle in 1 teaspoon of ground cumin, 1 teaspoon of smoked paprika, salt, and pepper. Cook this mix for 5-7 minutes. The zucchini should be tender and well mixed. - Step 5: Remove the skillet from heat. Stir in half of the 1 cup of enchilada sauce, making sure everything is coated well. - Step 6: Take a whole wheat tortilla and place it flat. Spoon some of the zucchini mixture down the center. Roll it tightly, then place it seam-side down in a baking dish. Repeat this for all tortillas. - Step 7: Once all tortillas are rolled, pour the remaining enchilada sauce evenly over the top. - Step 8: Sprinkle 1 cup of shredded cheese over the enchiladas. Make sure to cover them well. - Step 9: Cover the baking dish with foil. Bake for 20 minutes to let the flavors blend. - Step 10: Remove the foil and bake for another 10 minutes. The cheese should be melted and slightly golden. Feel free to check the Full Recipe for more details and tips! To keep your zucchini filling just right, follow these tips. First, grate your zucchini and then salt it lightly. Let it sit for about ten minutes. This step helps draw out excess moisture. After that, squeeze the zucchini to remove the water. This way, your filling stays firm, not soggy. Next, adjust the seasoning to match your taste. Start with the suggested spices, but feel free to add more cumin or paprika if you want a stronger flavor. A dash of lime juice can also brighten up the dish. When serving these enchiladas, presentation is key. Use a colorful plate to make the dish pop. A sprinkle of fresh cilantro on top adds a nice touch. You can also add a wedge of lime for extra flair. Pair these enchiladas with a simple salad or some fluffy rice. Both options complement the flavors well. Try a side of avocado or a dollop of sour cream to make it even better. Avoid overstuffing the tortillas. If you pack too much filling in, they may tear. Just a good spoonful is enough. Also, let the enchiladas cool for a few minutes after baking. This step helps them set up nicely. If you serve them too hot, the filling may spill out. Trust me, waiting a bit is worth it! If you want the full recipe, remember to check out the [Full Recipe]. {{image_4}} You can change the beans in this dish. Pinto or kidney beans work great too. They add a different taste while keeping it healthy. You can also add other veggies. Bell peppers or spinach can give your enchiladas a new twist. Just chop them up and mix them in with the other filling. If you need gluten-free options, you can use corn tortillas instead of wheat ones. They taste great and work well with the filling. For a dairy-free version, try vegan cheese. It melts nicely and keeps the dish creamy without the dairy. Want more kick? Add spices or hot sauce to the filling. A bit of chili powder or cayenne can spice things up. You can also try different types of enchilada sauce. Green sauce or mole sauce can change the whole flavor profile. Experiment to find what you love best! To keep your zucchini and black bean enchiladas fresh, store them in the fridge. Place them in an airtight container. This will help seal in flavors and moisture. If you have a lot of leftovers, you can freeze them too. Wrap each enchilada tightly in plastic wrap, then place them in a freezer-safe bag. This method prevents freezer burn and keeps them tasty. When it comes to reheating, I recommend using the oven. Preheat it to 350°F (175°C). Place the enchiladas in a baking dish. Cover them with foil to keep the moisture in. Heat for about 20 minutes. This way, they won’t dry out. You can also use a microwave, but they might lose some texture. If you use the microwave, heat in short bursts to check the warmth. In the fridge, these enchiladas last for about 3 to 4 days. Make sure to eat them before then for the best taste. If you freeze them, they can last for up to 3 months. Just remember to label your bags with dates. This helps you keep track of how long they’ve been there. For the best flavor, try to eat frozen enchiladas within that time frame. You can prep the filling in advance. Just cook the zucchini, black beans, and spices as described in the recipe. Allow it to cool, then store it in the fridge for up to two days. When you’re ready to eat, just assemble the enchiladas with the tortillas and sauce. You can also roll the enchiladas and place them in the baking dish. Cover them tightly and refrigerate. Bake them when you're ready to serve. This method saves time and keeps flavors fresh. Yes, you can. To make cheese-free enchiladas, simply skip the cheese or use a plant-based option. You can add extra veggies or a sprinkle of nutritional yeast for a cheesy flavor. Another option is to serve guacamole or a creamy avocado sauce on top after baking. This adds richness and pairs well with the enchiladas. There are several great options! For a low-carb choice, use large lettuce leaves like romaine or kale. You can also use thinly sliced zucchini or eggplant as a gluten-free alternative. If you want something heartier, try using corn tortillas or even large portobello mushrooms. Each option gives a unique flavor and texture to the dish. Yes, you can use frozen zucchini. Just remember to thaw it first and drain any excess water. This helps keep your filling from becoming too watery. Frozen zucchini is convenient and still delivers great taste in the enchiladas. Just follow the same cooking steps as fresh zucchini. It’s an easy way to enjoy this dish anytime. For the full recipe, refer to the earlier section. In this post, we explored how to make tasty zucchini and black bean enchiladas. I shared a simple recipe, with clear steps and helpful tips. You learned about ingredient choices, cooking methods, and ways to store leftovers. Always remember to check the filling, so it stays moist but not soggy. These enchiladas are not just easy to make; they also fit various diets. Enjoy creating your own version and delight in the flavors! Your kitchen adventure starts here.](https://dishtreats.com/wp-content/uploads/2025/07/2cd92dac-f668-457e-8990-b41595643bf1-768x768.webp)