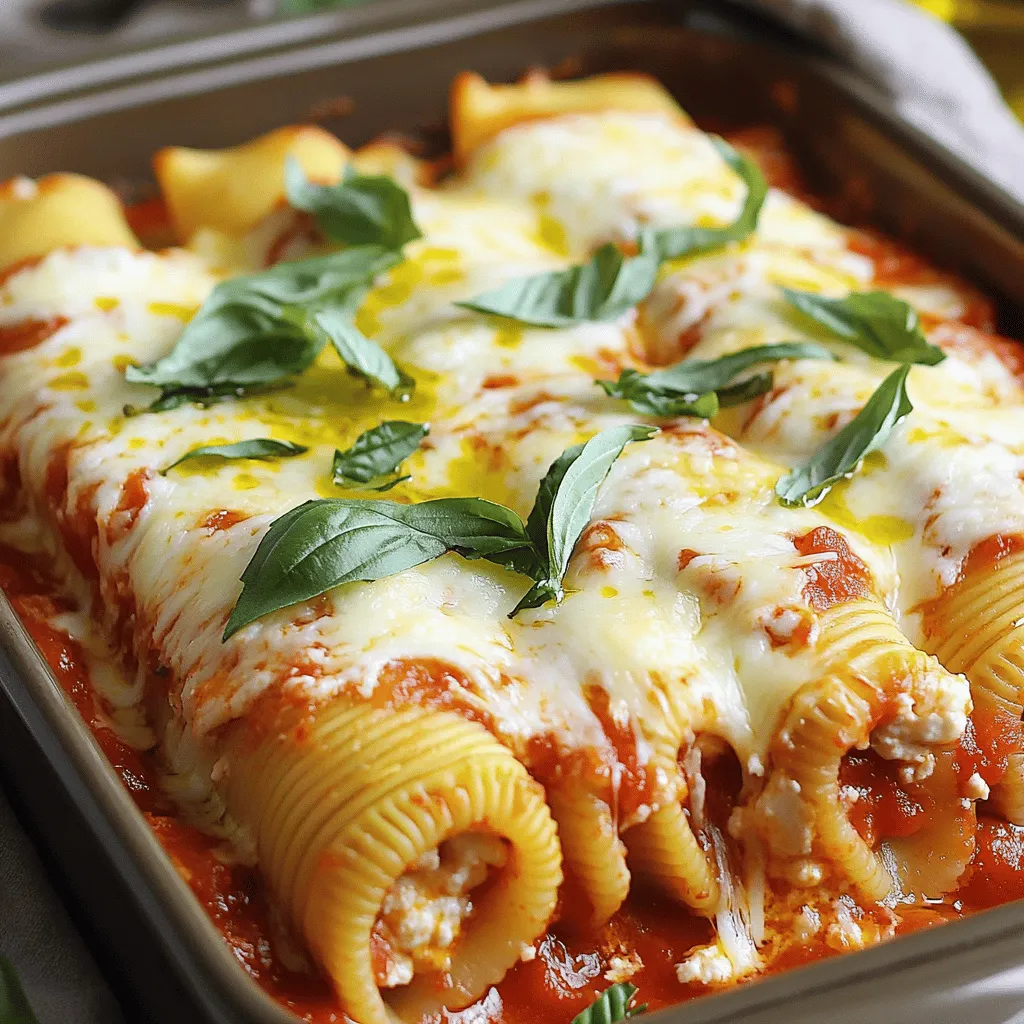
Three Cheese Manicotti Flavorful and Satisfying Dish

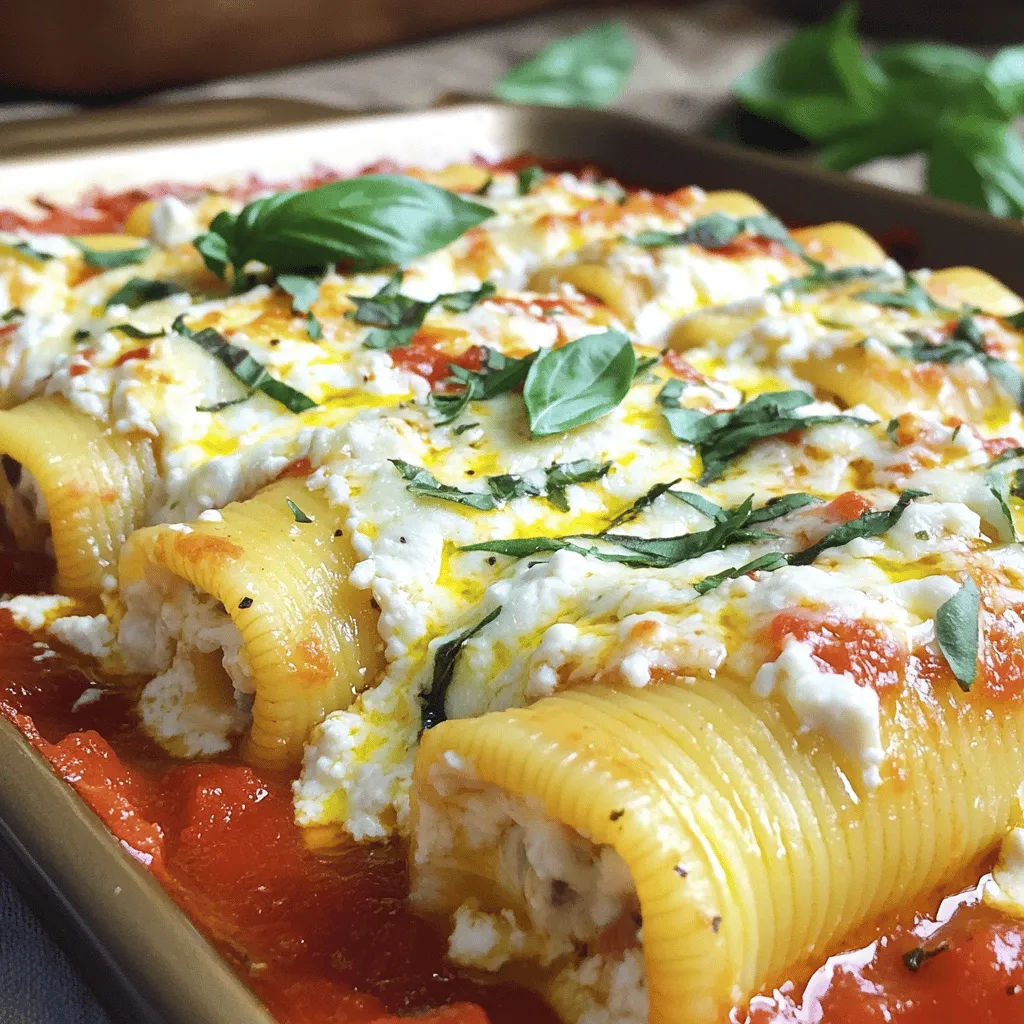
If you’re craving a dish that’s both hearty and tasty, look no further than Three Cheese Manicotti. This delightful meal combines creamy ricotta, melty mozzarella, and sharp parmesan, all wrapped in tender pasta shells. Whether for a family dinner or a special gathering, this recipe will impress everyone at the table. Let me guide you through the ingredients and steps to create this mouth-watering dish that’s sure to be a hit!
Ingredients
Main Ingredients for Three Cheese Manicotti
- 12 manicotti shells
- 1 cup ricotta cheese
- 1 cup mozzarella cheese, shredded
- ½ cup parmesan cheese, grated
Additional Ingredients
- 2 cups marinara sauce (homemade or store-bought)
- 1 egg, beaten
- 1 tablespoon fresh basil, chopped (or 1 teaspoon dried)
- 1 teaspoon garlic powder
- Salt and pepper to taste
- Olive oil for drizzling
- Fresh basil or parsley for garnish
To make a great Three Cheese Manicotti, you need quality ingredients. The manicotti shells hold the cheese filling well, making them perfect for this dish. Ricotta cheese gives a creamy base that complements the other cheeses. Shredded mozzarella adds a melty texture, while grated parmesan gives a nice sharp flavor.
For the sauce, you can use homemade marinara or a store-bought option. Choose what suits your time and taste. The beaten egg helps bind the cheese filling. Fresh or dried basil adds an aromatic touch. Garlic powder enhances the overall flavor. Season with salt and pepper to suit your taste. A drizzle of olive oil adds richness, and fresh herbs make a lovely garnish.
Step-by-Step Instructions
Preparing the Oven and Manicotti
- Preheat your oven to 375°F (190°C).
- Cook the manicotti shells according to package instructions until al dente.
- Drain them and let them cool for a bit. This helps when filling.
Making the Cheese Filling
- In a big bowl, mix ricotta, ¾ cup of mozzarella, and half of the parmesan.
- Add the beaten egg, chopped basil, garlic powder, salt, and pepper.
- Stir until the mix is smooth and creamy. This is the heart of our dish.
Filling and Arranging
- Use a piping bag or a spoon to fill each manicotti shell.
- Be careful not to overstuff; this keeps the filling from spilling out.
- Spread a thin layer of marinara sauce on the bottom of a baking dish.
- Place the filled shells in a single layer on top of the sauce.
Assembly and Baking
- Pour the remaining marinara sauce over the filled shells evenly.
- Sprinkle the rest of the mozzarella and parmesan cheese on top.
- Drizzle a little olive oil over everything for extra flavor.
- Cover the dish with foil and bake for 25 minutes.
- After 25 minutes, remove the foil and bake for another 15 minutes.
- Check that the cheese is bubbling and golden.
After this, your three cheese manicotti will be ready to enjoy!
Tips & Tricks
Perfecting Your Three Cheese Manicotti
To enjoy a great manicotti, pay attention to the shells. Cook the manicotti shells just until they are al dente. If you overcook them, they can break easily. After cooking, let them cool slightly. This makes filling easier. Use a small spoon or a piping bag to fill each shell. Be sure not to overstuff them. If you overfill, the cheese will ooze out while baking.
Serving Suggestions
Manicotti pairs well with simple sides. A fresh salad with a light vinaigrette is a great choice. Garlic bread adds a nice crunch and flavor. For drinks, consider a glass of red wine. Chianti or Merlot suit the dish well and enhance the flavors.
Enhancing the Flavor
To boost flavor, add herbs to your filling. Fresh basil or parsley brings freshness. Try a pinch of red pepper flakes for a kick. If you want a different sauce, consider pesto instead of marinara. A creamy alfredo sauce can also be delightful.

Variations
Cheese Variations
You can change up the flavors by using different cheeses. Try feta for a tangy twist. Blend in some goat cheese for creaminess. You can also add veggies like spinach or mushrooms. This adds nutrition and flavor. Simply chop them and mix them in the cheese filling.
Sauce Options
Switching sauces can elevate your manicotti. A creamy white sauce gives a rich taste. You might prefer pesto for a bright, herby flavor. If you like heat, try a spicy marinara. Just add red pepper flakes to your marinara sauce for a kick.
Dietary Adjustments
For vegetarian options, ensure all products are meat-free. You can use plant-based cheese for a dairy-free dish. If gluten is a concern, look for gluten-free manicotti shells. They work just as well and taste great. Just follow the cooking instructions on the package.
Explore these variations to make your Three Cheese Manicotti truly your own!
Storage Info
Storing Leftovers
When you have leftover Three Cheese Manicotti, store it right. Use an airtight container. This keeps the flavors fresh and prevents drying out. Place the manicotti in the fridge within two hours of cooking. It lasts up to three days in the fridge. Just remember to keep the marinara sauce with it for extra moisture.
Freezing Tips
Freezing manicotti is easy. First, let the dish cool completely. Then, wrap it tightly in plastic wrap. Follow that with aluminum foil to prevent freezer burn. Label it with the date and type of dish. You can freeze it for about three months.
When you’re ready to enjoy your frozen manicotti, take it out of the freezer. Let it thaw overnight in the fridge. For the best results, reheat it in the oven. Preheat to 375°F (190°C) and bake for about 30 minutes. Check that it’s hot all the way through before serving. Enjoy the creamy goodness!
FAQs
How can I prevent the manicotti from breaking during cooking?
To prevent the manicotti from breaking, handle them gently. Cook the shells in salted water until they are al dente. Avoid overcooking, as this makes them soft. After cooking, drain the shells and rinse them with cold water. This stops the cooking process and cools them down. Let them cool slightly before filling. Use a light touch when filling them to keep their shape.
Can I make manicotti ahead of time?
Yes, you can make manicotti ahead of time. Prepare the dish as usual, but do not bake it. Cover it with plastic wrap and store it in the fridge for up to 24 hours. When ready to bake, remove the wrap and cover it with foil. Bake at 375°F (190°C) until heated through. This makes for a great meal prep option.
What can I substitute for the cheeses?
If you need cheese substitutes, there are options available. You can use cottage cheese instead of ricotta for a lighter choice. For mozzarella, consider using vegan cheese if you want a dairy-free option. Nutritional yeast can add a cheesy flavor without dairy. Parmesan can be replaced with a nut-based cheese for a similar taste. Always check for any allergens.
Is there a way to make this recipe gluten-free?
Yes, you can make this recipe gluten-free. Look for gluten-free manicotti shells at your local store. They are often made from rice or quinoa flour. Make sure to check the label to confirm they are gluten-free. If you cannot find shells, try using zucchini or eggplant slices as a substitute. They provide a great flavor and keep the dish healthy.
Three Cheese Manicotti blends cheesy goodness with rich marinara sauce. We covered each step, from the key ingredients to baking tips. You can make variations and even adjust for dietary needs. Remember, the right cheese and filling methods make a big difference. Enjoying this dish is all about flavor. With the tips shared, you can create the perfect meal. Try experimenting with your own twist on it. This dish will surely impress!


. Yes, you can use fresh black beans. - Preparation: You must soak the beans overnight. This helps them cook evenly. - Cooking Time: Fresh beans take longer to cook. Boil them for about 1-1.5 hours before adding to the chili. Using fresh beans gives a great texture and taste, but it requires more time. To add spice, try these methods: - Chili Powder: Increase the amount of chili powder. - Jalapeños: Add diced jalapeños when you sauté the vegetables. - Hot Sauce: Drizzle hot sauce on top before serving. Feel free to adjust the spice level to fit your taste! This chili is packed with nutrients: - Sweet Potatoes: High in vitamins A and C. Great for your immune system. - Black Beans: A good source of protein and fiber. They help keep you full. - Vegetables: Onions and peppers add vitamins and minerals without many calories. Enjoying this chili means you get a tasty meal that’s also good for you. Yes, you can make this chili ahead of time. - Meal Prep: Cook the chili and let it cool. Store in a container. - Best Practices: Refrigerate for up to 3 days. For longer storage, freeze it in portions. Reheat in the microwave or on the stove before serving. Making it in advance saves time and enhances flavors! This blog post covered everything you need for Sweet Potato Black Bean Chili. We explored the main and optional ingredients, provided step-by-step instructions, and shared useful tips. Remember, using fresh ingredients boosts flavor and health benefits. Feel free to adjust spices or try different variations to make it your own. Enjoy this comforting dish, whether you serve it plain or dressed with toppings! Happy cooking!](https://dishtreats.com/wp-content/uploads/2025/06/d8445fbe-e2a0-4bb7-bab4-282b1fdf418c-768x768.webp)


![To make crispy sweet and sour chicken, you need some key ingredients. Here’s what to gather: - 1 lb (450g) chicken breast, cut into bite-sized pieces - 1 cup cornstarch - 2 large eggs, beaten - Oil for frying - Salt and black pepper to taste These ingredients form the base of your dish. The chicken gives protein, while cornstarch creates that crispy texture. Eggs help the cornstarch stick to the chicken. Adding vibrant colors and fresh flavors is easy with the right vegetables and fruits. Here’s what you’ll need: - 1 cup bell peppers, chopped (mix of colors for visual appeal) - 1 cup pineapple chunks (fresh or canned) - 1 cup onion, chopped - 3 cloves garlic, minced The bell peppers and onions add crunch and sweetness. Pineapple brings a juicy burst of flavor. Garlic adds depth to the dish. The sweet and sour sauce makes this dish memorable. Gather these components: - 1/2 cup ketchup - 1/4 cup apple cider vinegar - 1/4 cup brown sugar - 2 tablespoons soy sauce - 1 tablespoon cornstarch mixed with 2 tablespoons water (for slurry) This sauce balances sweetness and tang. Ketchup gives a rich base, while apple cider vinegar adds a zesty kick. Brown sugar enhances the sweetness, and soy sauce adds umami. The cornstarch slurry thickens the sauce perfectly. For the full recipe, check out the complete list of steps to follow. Happy cooking! Start by seasoning the chicken pieces with salt and pepper. This simple step adds great flavor. Next, dredge each piece in cornstarch. Make sure to shake off any extra cornstarch. This helps create a nice, crispy crust. After that, dip the chicken pieces into the beaten eggs. This coating will help the cornstarch stick well. In a large skillet, heat oil over medium-high heat. You want the oil to shimmer before adding the chicken. Fry the chicken in batches. Avoid crowding the pan to keep the chicken crispy. Cook each piece for about 4-5 minutes per side. When golden brown, use a slotted spoon to remove the chicken. Place it on paper towels to drain any excess oil. Lower the heat to medium. In the same pan, add chopped onions and bell peppers. Sauté them for about 3-4 minutes or until soft. This brings out their sweetness. Then, add minced garlic and cook for another minute. The aroma will fill your kitchen and make your mouth water. In a bowl, whisk together the sauce ingredients: ketchup, apple cider vinegar, brown sugar, and soy sauce. Combine these until smooth. Pour this sweet and tangy sauce over the sautéed vegetables. Stir gently to mix everything together. The colors and smells will be inviting. Raise the heat slightly and bring the sauce to a gentle simmer. This helps blend the flavors. Once it simmers, add pineapple chunks for sweetness. Then, mix the cornstarch slurry and pour it in. Stir continuously until the sauce thickens, which takes about 2-3 minutes. You want it to coat the chicken well. Add the crispy chicken back into the pan. Carefully fold it into the thickening sauce. Toss everything gently to coat each piece of chicken. Once warmed through, the dish is ready to serve. For a great presentation, plate it over fluffy rice or steamed quinoa. You can also garnish it with sesame seeds and green onions for extra flair. To get that perfect crispy texture, start with your oil. Heat it well, around 350°F (175°C) is ideal. If the oil isn't hot enough, your chicken will soak up oil and get soggy. Fry the chicken in batches to avoid crowding. This keeps the oil temperature steady. Once fried, place the chicken on paper towels. This helps drain off any extra oil. For a twist on the classic sauce, try adding a splash of orange juice. It brightens the flavor. You can also swap brown sugar with honey for a different sweetness. Using fresh ginger in your sauce will give an extra kick. Remember to taste as you mix. Adjust salt and pepper to suit your taste buds. Presentation makes your dish look more appealing. Serve your crispy sweet and sour chicken over fluffy white rice or quinoa. Sprinkle sesame seeds on top for crunch. Finely chopped green onions add a pop of color. You can even add a few slices of fresh pineapple on the side for a tropical touch. This will make your meal look vibrant and inviting. {{image_4}} You can switch up the protein in this dish. Shrimp works great and cooks fast. Just sauté it until it turns pink. Tofu is another good option. Use firm tofu for the best texture. Cut it into cubes and fry until golden. Pork also fits well. Use pork tenderloin or chops, cut into bite-sized pieces. Each protein adds its own flavor, keeping things exciting. You can mix in different veggies for added nutrition. Broccoli is a great choice. It adds a nice crunch and color. Carrots give a sweet flavor and vibrant look. Snap peas are another fun option. They stay crisp and add a pop of freshness. Feel free to combine any of these for a colorful plate. It makes your meal more appealing and nutritious. You can easily tweak the sauce to match your taste. If you like heat, add some red pepper flakes or sriracha. This will spice up the dish nicely. For sweetener options, you can swap brown sugar for honey or maple syrup. This change adds a different flavor twist. Adjust the acidity by adding more vinegar or a squeeze of lime juice. Each change can create a new experience with this classic dish. For the full recipe, check out the detailed instructions earlier. After enjoying your crispy sweet and sour chicken, store any leftovers in an airtight container. This keeps the dish fresh for up to three days. Before storing, let the chicken cool down to room temperature. This prevents condensation, which can make the chicken soggy. If you have sauce left over, store it separately to keep the chicken crispy. To freeze your crispy sweet and sour chicken, place it in a freezer-safe container or bag. Make sure to remove as much air as possible. This helps avoid freezer burn. It can stay good for about one month. When you're ready to eat, thaw it overnight in the fridge. For the best taste and texture, reheat your chicken in an oven. Preheat the oven to 350°F (175°C). Spread the chicken on a baking sheet and cover with foil. Heat for about 15-20 minutes or until warm. This method helps keep the chicken crispy. You can also reheat it in a skillet over medium heat. Just add a splash of water to the pan to create steam, which helps warm it without drying out. Enjoy your leftovers just as much as the first time! To make crispy sweet and sour chicken, start with these steps: 1. Prep Chicken: Cut chicken breast into bite-sized pieces. Season with salt and pepper. Dredge in cornstarch, then coat in beaten eggs. 2. Fry Chicken: Heat oil in a skillet over medium-high heat. Fry chicken pieces until golden brown, about 4-5 minutes per side. Drain on paper towels. 3. Sauté Vegetables: Lower heat and add chopped onion and bell peppers to the same pan. Cook for 3-4 minutes. Add minced garlic and cook for another minute. 4. Prepare Sauce: Mix ketchup, apple cider vinegar, brown sugar, and soy sauce in a bowl. Pour this mixture over the vegetables in the pan. 5. Thicken Sauce: Bring the sauce to a gentle simmer. Add pineapple chunks and cornstarch slurry. Stir until the sauce thickens, about 2-3 minutes. 6. Combine Chicken and Sauce: Add the fried chicken back into the pan. Toss gently to coat the chicken in the sauce. 7. Serve: Let the dish rest for a minute. Serve it over rice or quinoa for a complete meal. Yes, you can prepare some parts in advance. Cook the chicken and the sauce ahead of time. Store them separately in airtight containers in the fridge. You can keep the chicken for up to three days. The sauce will last about a week. When ready to serve, reheat the chicken and sauce together in a pan. This keeps the chicken crispy and the sauce fresh. Yes, you can make a vegetarian version! Use tofu instead of chicken. Press the tofu to remove excess moisture, then cut it into cubes. Coat and fry the tofu pieces just like you would with chicken. You can also use seitan or tempeh for a similar texture. The sauce remains the same, giving you that sweet and sour flavor. I love serving crispy sweet and sour chicken with steamed rice or quinoa. You can also pair it with: - Fried rice - Noodles - Steamed broccoli - A fresh cucumber salad These sides complement the dish well and add color to your plate. Enjoy your meal! For the complete recipe, check the [Full Recipe]. Crispy sweet and sour chicken is a delightful dish. We explored key ingredients, cooking methods, and tips for perfecting it. You learned how to achieve that crispy texture and enhance flavors. Remember, try different proteins and veggies for variety. Proper storage keeps leftovers fresh. This dish is not only tasty but also versatile. Enjoy making and sharing it with friends and family. Let your kitchen creativity shine with this classic recipe!](https://dishtreats.com/wp-content/uploads/2025/05/ffc138cc-1bdb-4282-b515-13f85bd5dbd6-768x768.webp)
