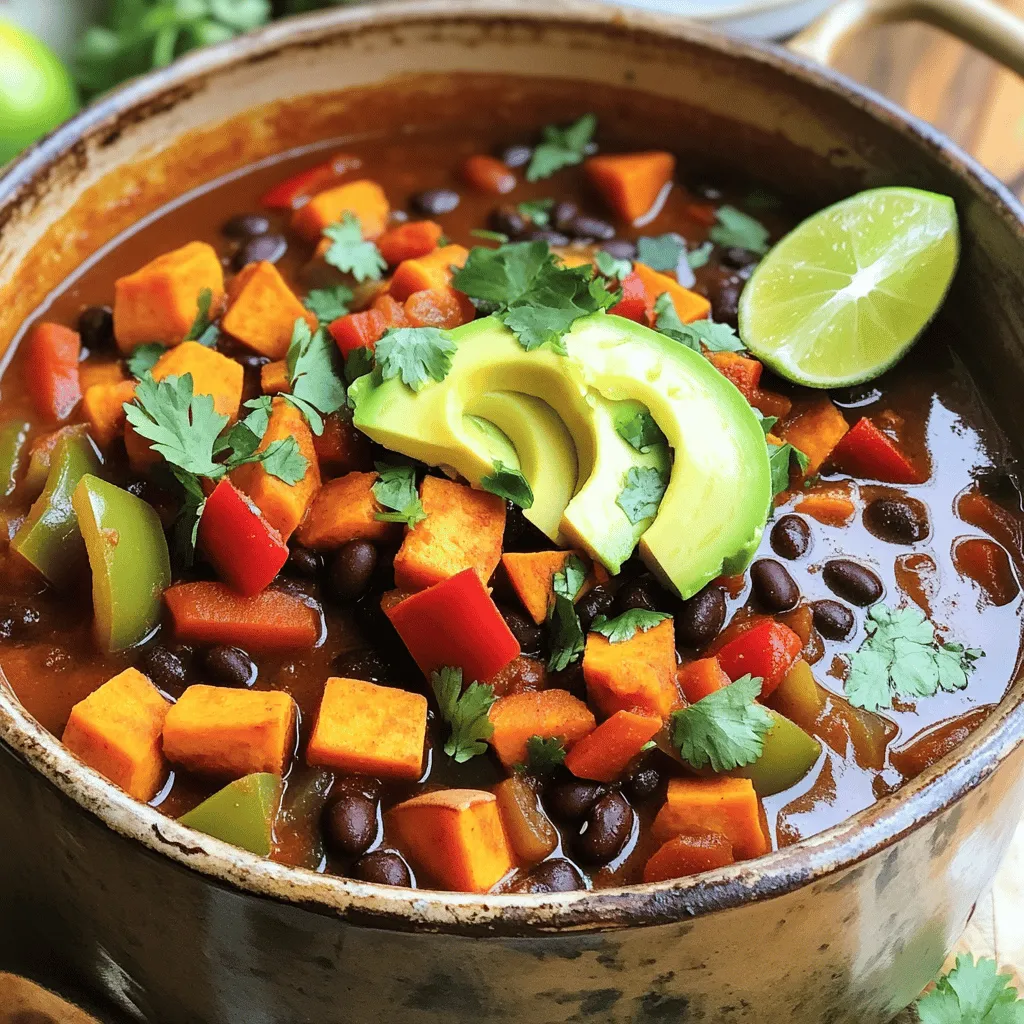
Sweet Potato Black Bean Chili Hearty and Flavorful Dish
. You’ll find all the details to make this delicious dish! This blog covered how to make delicious Sweet Potato Black Bean Chili. We explored ingredients, cooking steps, and tips for the best flavor. You can easily change this recipe to fit your taste. Try different veggies or beans to create new dishes. Remember to store leftovers properly and heat them right for maximum flavor. Enjoy your cooking and share this hearty chili with family and friends. It’s tasty, healthy, and satisfying!](https://dishtreats.com/wp-content/uploads/2025/07/29cb1591-b5b7-4cc4-a611-b282edbacc0b.webp)
Looking for a dish that’s both hearty and full of flavor? Sweet Potato Black Bean Chili is the answer! This tasty meal offers a warm blend of sweet potatoes, black beans, and spices that come together for a delightful experience. Plus, it’s simple to make! Whether you’re a seasoned chef or a beginner, I’ll guide you step-by-step. Let’s dive into this comforting recipe and make your kitchen smell amazing!
Ingredients
To make Sweet Potato Black Bean Chili, you need these tasty ingredients:
- 2 large sweet potatoes, peeled and cut into 1-inch cubes
- 1 can (15 oz) black beans, thoroughly drained and rinsed
- 1 can (14 oz) diced tomatoes, including their juice
- 1 medium onion, finely chopped
- 2 cloves garlic, finely minced
- 1 red bell pepper, diced
- 1 green bell pepper, diced
- 2 cups vegetable broth
- 2 tablespoons chili powder
- 1 tablespoon ground cumin
- 1 teaspoon smoked paprika
- Salt and freshly ground black pepper, to taste
- 1 tablespoon extra virgin olive oil
- Optional toppings: sliced avocado, fresh cilantro leaves, lime wedges, shredded cheese
Each ingredient adds its own flavor and texture. Sweet potatoes bring a creamy sweetness. Black beans add protein and a hearty feel. Diced tomatoes give a juicy base. Onions and garlic create a strong aroma. Bell peppers add crunch and color. Vegetable broth ties everything together with warmth.
Using fresh spices like chili powder, cumin, and smoked paprika makes this dish shine. They bring a nice kick and depth. Olive oil adds richness and helps cook the veggies to perfection. Adjust the salt and pepper to fit your taste.
Feel free to explore optional toppings! They can enhance your chili. Avocado adds creaminess, while cilantro gives a fresh touch. Lime juice brightens every bite. Shredded cheese can make it extra special.
Step-by-Step Instructions
Preparing the Base
First, heat the olive oil in a large pot over medium heat. Once the oil is hot, add the chopped onion. Sauté the onion for about 5 minutes. It should be soft and clear when done.
Building Flavor
Next, add the minced garlic and diced red and green bell peppers to the pot. Stir them in and cook for 3-4 minutes. The peppers should get soft and release their nice smell.
Adding Sweet Potatoes and Spices
Now, toss in the diced sweet potatoes. Stir them well to coat with the flavors. Cook for another 2 minutes. This step helps the sweet potatoes absorb the taste of the other veggies.
Then, sprinkle in the chili powder, ground cumin, smoked paprika, salt, and pepper. Mix everything well so the spices cover the veggies evenly. This is where the magic begins!
Adding Liquids and Simmering
Next, pour in the diced tomatoes with their juice and the vegetable broth. Stir gently to combine. Bring this mixture to a vigorous boil. Once it boils, reduce the heat to low. Let it simmer uncovered for 25-30 minutes. You want the sweet potatoes to be fork-tender and creamy.
Final Touches
Finally, stir in the rinsed black beans. Let the chili simmer for another 5-10 minutes. This warms everything through and lets the flavors meld. Before serving, taste the chili. Adjust with more salt, pepper, or spices if you want.Enjoy this warm, hearty dish that feels like a big hug on a cold day!
Tips & Tricks
Common Cooking Tips
- Ensuring even cooking: Cut your sweet potatoes into uniform cubes. This helps them cook at the same time. Stir the pot often to heat everything evenly.
- Perfect seasoning balance: Add spices gradually. Start with a little chili powder, cumin, and smoked paprika. Taste as you go to find your ideal flavor. You can always add more if needed.
Serving Suggestions
- Best toppings for chili: Top your chili with sliced avocado for creaminess. Fresh cilantro adds a burst of flavor. A squeeze of lime juice brightens the dish. You can also sprinkle some shredded cheese on top for extra richness.
- Pairing ideas with sides: Serve your chili with warm cornbread or tortilla chips. A side salad with fresh greens works well too. These sides add a nice crunch and balance to the meal.
Nutritional Information
- Breakdown of calories and nutrients per serving: One serving of Sweet Potato Black Bean Chili contains about 300 calories. It is rich in fiber, protein, and vitamins A and C.
- Health benefits of key ingredients: Sweet potatoes are packed with beta-carotene, which is great for your eyes. Black beans provide protein and fiber, helping you feel full. Tomatoes add antioxidants, which are good for your heart.

Variations
Vegan & Vegetarian Options
You can easily make this chili vegan. Just ensure all your ingredients are plant-based. For instance, use vegetable broth instead of chicken broth. If you want a creamier touch, try cashew cream instead of cheese. You can also adjust spice levels. If you like it mild, reduce the chili powder. For more heat, add jalapeños or cayenne pepper.
Ingredient Swaps
Feel free to swap beans or veggies to suit your taste. You can use kidney beans or pinto beans instead of black beans. If you want more color, try adding corn or carrots. For potatoes, you can use regular potatoes or even butternut squash. Each swap adds a unique flavor and texture to your chili.
Cooking Methods
You have options for cooking this chili. To use a slow cooker, first sauté the onion and garlic in a pan. Then, add all your ingredients to the slow cooker. Cook on low for 6-8 hours or high for 3-4 hours. For an Instant Pot, just add all your ingredients to the pot. Set it to manual for 10 minutes. Let it naturally release for 10 minutes, then quick release. Both methods yield a rich and hearty dish.
Storage Info
How to Store Leftovers
To keep your Sweet Potato Black Bean Chili fresh, store it properly.
- Refrigerating: Put leftovers in an airtight container. Your chili will last up to five days in the fridge. Make sure it cools first before sealing it up. This helps keep the flavors intact.
- Freezing tips: If you want to save it longer, freezing is a great option. Use freezer-safe containers or bags. Your chili can last up to three months in the freezer. Just remember to leave some space in the container for expansion as it freezes.
Reheating Recommendations
When it’s time to enjoy your chili again, reheating is key.
- Microwave vs stovetop: The microwave is quick and easy. Just heat it in short bursts, stirring in between. However, the stovetop gives you better flavor. Heat it in a pot over medium heat. Stir often to ensure it warms evenly.
- Ensuring flavor retention: To keep the chili’s taste vibrant, add a splash of vegetable broth or water if it seems thick. This helps bring back that creamy texture and rich flavor. Enjoy your warm bowl of chili just as much as the first time!
FAQs
How long does Sweet Potato Black Bean Chili last in the fridge?
Sweet Potato Black Bean Chili lasts about 4 to 5 days in the fridge. To store it, keep it in an airtight container. Cool the chili to room temperature before sealing the container. This helps keep it fresh and safe.
Can I make this chili ahead of time?
Yes, making this chili ahead of time is a great idea. It often tastes even better the next day. The flavors blend well together when it sits. Just store it in the fridge and reheat when you’re ready to eat.
What can I serve with Sweet Potato Black Bean Chili?
You can serve this chili with several tasty sides. Some great options include:
- Cornbread
- Rice or quinoa
- Tortilla chips
- A fresh green salad
- Avocado and lime wedges for garnish
These sides add extra flavor and texture to your meal.
Is this recipe gluten-free?
Yes, this recipe is naturally gluten-free. The main ingredients, like sweet potatoes and black beans, do not contain gluten. Always check labels on any canned goods, like beans or tomatoes, to ensure they are gluten-free.You’ll find all the details to make this delicious dish!
This blog covered how to make delicious Sweet Potato Black Bean Chili. We explored ingredients, cooking steps, and tips for the best flavor. You can easily change this recipe to fit your taste. Try different veggies or beans to create new dishes. Remember to store leftovers properly and heat them right for maximum flavor. Enjoy your cooking and share this hearty chili with family and friends. It’s tasty, healthy, and satisfying!
. You’ll find all the details to make this delicious dish! This blog covered how to make delicious Sweet Potato Black Bean Chili. We explored ingredients, cooking steps, and tips for the best flavor. You can easily change this recipe to fit your taste. Try different veggies or beans to create new dishes. Remember to store leftovers properly and heat them right for maximum flavor. Enjoy your cooking and share this hearty chili with family and friends. It’s tasty, healthy, and satisfying!](https://dishtreats.com/wp-content/uploads/2025/07/29cb1591-b5b7-4cc4-a611-b282edbacc0b-300x300.webp)


![To make this dish, you need some key items. Gather the following ingredients: - 3 cups cooked rotini pasta - 2 cups cooked chicken, shredded - 1 cup fresh mushrooms, sliced (white or cremini) - 2 cups heavy cream - 1 cup grated Parmesan cheese - 1 cup shredded mozzarella cheese - 2 cloves garlic, minced - 1 tablespoon olive oil - 1 teaspoon dried Italian herbs (such as oregano, basil, and thyme) - Salt and freshly ground black pepper, to taste - Fresh parsley, chopped (for garnish) These ingredients come together to create a creamy, rich dish that warms the soul. You can add more fun to your Chicken and Mushroom Alfredo Bake. Here are some optional items to consider: - Sun-dried tomatoes for a tangy twist - Spinach or kale for added greens - Cooked bacon for extra flavor - More cheese for a cheesier bake These add-ins make the dish your own and can enhance its taste and texture. Seasonings can elevate the dish. Here are some suggestions: - Fresh thyme or rosemary for bright flavor - Crushed red pepper flakes for heat - Extra Parmesan or mozzarella on top for a golden crust - A drizzle of truffle oil for a gourmet touch These toppings can take your Chicken and Mushroom Alfredo Bake to the next level. For the full recipe, follow the steps closely, and enjoy this creamy delight! Start by preheating your oven to 375°F (190°C). This step is key for even cooking. While the oven warms up, take a 9x13-inch baking dish. Grease it lightly with cooking spray or a bit of olive oil. This will help the pasta bake not stick to the dish. Next, grab a large skillet and heat 1 tablespoon of olive oil over medium heat. Once hot, add 2 cloves of minced garlic. Sauté this for about 1 minute. You want it fragrant but not brown. Now, toss in 1 cup of sliced mushrooms. Cook these for around 5 minutes, stirring often. They should become tender and release their juices. Add salt and black pepper to boost their flavor. In a big mixing bowl, combine 3 cups of cooked rotini pasta and 2 cups of shredded chicken. Next, add the sautéed mushrooms and 2 cups of heavy cream. Sprinkle in half of the 1 cup of grated Parmesan cheese and 1 teaspoon of dried Italian herbs. Mix everything well until it’s all coated in that creamy goodness. Pour the mixture into the greased baking dish. Spread it out evenly. Top it with the rest of the Parmesan and 1 cup of shredded mozzarella cheese for a cheesy finish. Now you are ready for the next steps in your Chicken and Mushroom Alfredo Bake journey! For the full recipe, make sure to check the details provided earlier. To get the best flavor, use fresh mushrooms. They add a rich taste to the dish. I recommend cremini or white mushrooms for this recipe. Make sure you shred the chicken finely. This helps mix it well with the pasta and sauce. For a truly creamy bake, let your pasta cool slightly before mixing it with the sauce. This prevents the cheese from clumping. Use heavy cream for the richest texture. It helps create a smooth, velvety sauce that coats the pasta perfectly. Stir the sauce gently to keep it creamy. If you want to lighten it up a bit, you can mix in some milk, but it may not be as thick. Adding a bit of reserved pasta water can also help if the sauce seems too thick. Baking at 375°F (190°C) is ideal for even cooking. Cover the dish with foil for the first part of baking. This ensures the pasta heats through without drying out. After 25 minutes, remove the foil for the last 15 minutes. This allows the cheese to brown nicely and become bubbly. Always let the dish sit for a few minutes before serving. This helps everything set and makes for easier serving. For the full recipe, check the earlier sections! {{image_4}} You can boost your Chicken and Mushroom Alfredo Bake by adding veggies. Try spinach, broccoli, or bell peppers. These veggies add color and nutrition. You can also use different proteins. Swap chicken for shrimp or cooked sausage for a new twist. Each protein brings its own flavor, making this dish more exciting. If you need gluten-free options, use gluten-free pasta. Many brands offer great choices that taste good. For a low-carb version, replace pasta with zucchini noodles or cauliflower rice. This change keeps the dish light and healthy while still being creamy and satisfying. To change the flavor, add herbs and spices to your bake. Fresh basil or parsley adds a nice touch. You can also try crushed red pepper for heat or smoked paprika for a deeper flavor. Experiment with these options to find your perfect taste. Each adjustment can make your Chicken and Mushroom Alfredo Bake feel new and fun. Check [Full Recipe] for more ideas. After enjoying your Chicken and Mushroom Alfredo Bake, store leftovers properly for the best taste. Let the dish cool down first. Then, transfer it to an airtight container. You can keep it in the fridge for up to three days. Be sure to label the container with the date. To reheat, place the leftovers in a baking dish. Cover it with foil to keep moisture in. Preheat your oven to 350°F (175°C) and bake for about 20 minutes. Stir halfway through to heat evenly. You can also microwave individual portions for a quick meal. Just add a splash of cream or milk to keep it creamy. If you want to freeze your Chicken and Mushroom Alfredo Bake, it’s easy! Use a freezer-safe container or wrap it tightly in plastic wrap and foil. You can freeze it for up to three months. When you’re ready to eat, thaw it in the fridge overnight. Bake it at 350°F (175°C) until heated through, about 30 minutes. Enjoy every creamy bite from the Full Recipe! You can prepare Chicken and Mushroom Alfredo Bake ahead of time by following these steps. First, make the dish up to the point of baking. Once you mix the pasta, chicken, and sauce, place it in your greased baking dish. Cover it tightly with plastic wrap or aluminum foil. Store it in the fridge for up to 24 hours. When ready to bake, preheat your oven to 375°F (190°C). Remove the covering and bake as directed in the Full Recipe. You may need to add a few extra minutes to the baking time. Yes, you can use different cheese in your Chicken and Mushroom Alfredo Bake. If you want a sharper flavor, try using aged cheddar or gouda. For a creamier texture, consider using cream cheese or ricotta. Blend different cheeses for a unique taste. Just ensure that the total amount of cheese stays the same for best results. Your bake will still come out tasty and creamy. You can serve many tasty sides with Chicken and Mushroom Alfredo Bake. Garlic bread is a classic choice and adds a nice crunch. A fresh green salad with a light vinaigrette pairs well too. You can add steamed vegetables like broccoli or green beans for a healthy touch. These sides balance the richness of the bake and round out your meal nicely. This blog post covered how to make a delicious Chicken and Mushroom Alfredo Bake. You learned about the main ingredients, steps to prepare, and tips for the best results. I shared ways to adapt the recipe to your liking and how to store leftovers. With these tools, you can make a creamy dish that satisfies every time. Cooking can be fun and easy when you follow simple steps. Enjoy experimenting and making this recipe your own!](https://dishtreats.com/wp-content/uploads/2025/06/8d8b4d23-05f5-46f0-9917-116c769775c3-768x768.webp)

![- 1 lb (450g) chicken breast, thinly sliced - 1 cup fresh Thai basil leaves, packed - 3 cloves garlic, minced - 2 red Thai chili peppers, thinly sliced (adjust based on your spice preference) For this dish, I prefer chicken breast. It cooks quickly and stays juicy. Fresh Thai basil gives this meal its unique flavor. Garlic adds a nice aroma, and Thai chili peppers bring heat. You can control the spice by adding more or less chili. - 2 tablespoons soy sauce - 1 tablespoon oyster sauce (or substitute with mushroom sauce for vegetarian) - 1 tablespoon fish sauce (or an extra tablespoon of soy sauce for vegetarian) - 1 teaspoon sugar (to balance flavors) - 1 tablespoon vegetable oil (for frying) These sauces are key to great taste. Soy sauce offers saltiness, while oyster and fish sauces add depth. Sugar balances the salty flavors, making everything taste better. - 1 bell pepper, sliced (your choice of color for visual appeal) - 1 small onion, sliced into thin wedges - Optional: other vegetables for added nutrition I like using bell pepper and onion for color and crunch. You can add other veggies like carrots or snap peas. They bring more nutrition and flavor, making the dish more vibrant. For the full recipe, refer to the [Full Recipe]. To start, you need to combine the chicken with the sauces. In a medium bowl, add the sliced chicken breast, soy sauce, oyster sauce, fish sauce, and sugar. Mix these ingredients well so the chicken gets all the flavor. Let it marinate for 15 minutes. This short time helps the chicken absorb the tasty sauces. Next, heat the vegetable oil in a large skillet or wok over medium-high heat. You want the oil to shimmer before adding anything. Then, add the minced garlic and sliced Thai chili peppers. Stir-fry them for about 30 seconds until they smell amazing. Be careful not to burn the garlic. Now, add the marinated chicken to the pan. Spread it out evenly for even cooking. Stir-fry for about 5 to 7 minutes. Cook until the chicken is no longer pink and has a nice brown color. After that, toss in the sliced bell pepper and onion. Stir-fry for another 3 to 4 minutes. This will make the vegetables tender but still crisp. Once the chicken and veggies are done, take the skillet off the heat. Gently fold in the fresh Thai basil leaves. They will wilt quickly from the heat and add a lovely aroma. Serve the dish hot, over a bed of fluffy jasmine rice. This rice complements the stir-fry well. Enjoy your Thai Basil Chicken Stir-Fry! For the full recipe, check out the details above. Using fresh ingredients makes a big difference. Fresh Thai basil gives a sweet and fragrant flavor to the dish. Always choose bright green basil leaves. They should smell strong and sweet. The chicken should be fresh, too. This keeps your stir-fry tasty and safe to eat. For the best flavor, cook on high heat. A hot pan helps to sear the chicken. This adds a nice caramel color and enhances the taste. When you add garlic and chili, cook them quickly. This brings out their strong flavors without burning them. You can change the heat level easily. If you want it milder, remove the seeds from the chili peppers. You can also use fewer peppers or substitute with sweet bell peppers. If you like a kick but want it less spicy, try adding sugar. It balances the heat. You can also use a bit of honey for sweetness without heat. Pair your Thai basil chicken stir-fry with jasmine rice. The rice absorbs the sauce well. You can also add a side of steamed veggies for extra nutrition. For garnishes, consider adding lime wedges or crushed peanuts. They add color and crunch. Fresh cilantro or extra basil leaves also make it pop. Enjoy your meal with these simple touches! For the full recipe, check out the details above. {{image_4}} For a vegetarian or vegan version, you can swap chicken for tofu or tempeh. These options give a nice texture. Use mushroom sauce instead of oyster sauce. It brings depth and umami flavor. For the fish sauce, simply add an extra tablespoon of soy sauce. This keeps the taste bold. To maintain flavor, marinate the tofu or tempeh just like chicken. Allow it to soak up the sauces. When cooking, make sure to press out excess moisture. This helps achieve that nice, crispy texture we all love. If you want to try something new, switch the chicken for shrimp or beef. Shrimp cooks quickly, so cut down the cooking time to about 3-4 minutes. Beef takes longer. Slice it thin and cook it for about 6-8 minutes. Remember, cooking times change based on what protein you use. Always make sure your protein is fully cooked before adding in the veggies. Want to shake things up? Add sauces like teriyaki or sriracha for an exciting twist. Teriyaki gives a sweet flavor, while sriracha adds heat. You can even mix both for a sweet and spicy kick. Feel free to experiment with herbs and spices too. Adding cilantro or mint can brighten the dish. Try a sprinkle of lime juice for an extra zest. These tiny changes can create a whole new taste experience. For the full recipe, check the section above. Enjoy cooking! To keep your Thai basil chicken stir-fry fresh, store it in an airtight container. Refrigerate the leftovers within two hours of cooking. If you want to save it longer, freeze the stir-fry. Make sure to cool it completely before freezing. This method helps retain flavor and texture. When you reheat your stir-fry, use a skillet for the best results. Heat it over medium warmth and stir often. This keeps the chicken juicy and prevents it from drying out. For rice, add a splash of water and cover it. This helps the rice steam and become fluffy again. In the fridge, your Thai basil chicken stir-fry lasts up to four days. If frozen, it can last for about three months. Always check for off smells or changes in color. If you see these, it's best to discard it for safety. Thai Basil Chicken Stir-Fry has roots in Thai street food. This dish reflects the vibrant flavors of Thai cuisine. It showcases fresh herbs, bold spices, and simple cooking techniques. Thai basil, known for its unique flavor, is key to this dish. It adds a sweet and slightly spicy note that enhances the chicken. This meal represents the balance of sweet, salty, and spicy tastes typical in Thai dishes. Each bite transports you to bustling markets in Thailand. Yes, you can prepare Thai basil chicken stir-fry in advance. Cook and store it in the fridge for up to three days. To keep it fresh, store it in an airtight container. When you are ready to eat, simply reheat it on the stove. This dish tastes even better the next day as flavors meld. Serve it over freshly cooked jasmine rice for a quick meal. If you cannot find Thai basil, you have options. Sweet basil or holy basil works well as a substitute. Sweet basil offers a milder flavor, while holy basil is spicier. You can also mix in a bit of mint for a fresh twist. While these substitutes change the taste slightly, they still create a tasty dish. Just remember, the flavor will differ from the original recipe. The spice level of Thai Basil Chicken Stir-Fry can vary. It depends on the number of Thai chili peppers you use. Typically, this dish has a mild to medium heat. If you prefer a milder dish, use fewer chilis or remove the seeds. For those who love heat, add extra chilis or a dash of hot sauce. Adjusting spice levels allows everyone to enjoy this flavorful meal. Thai Basil Chicken Stir-Fry is a simple yet flavorful dish. You learned about the key ingredients, like fresh basil and chicken. The step-by-step instructions make cooking easy, even for beginners. We explored tips to enhance flavor and adjust spice levels to suit your taste. You can even try fun variations with different proteins or herbs. Enjoy making it your own, and savor the fresh flavors. Every bite will bring joy to your table.](https://dishtreats.com/wp-content/uploads/2025/06/20a2f9de-1755-4b6a-ade1-393123d10e24-768x768.webp)