
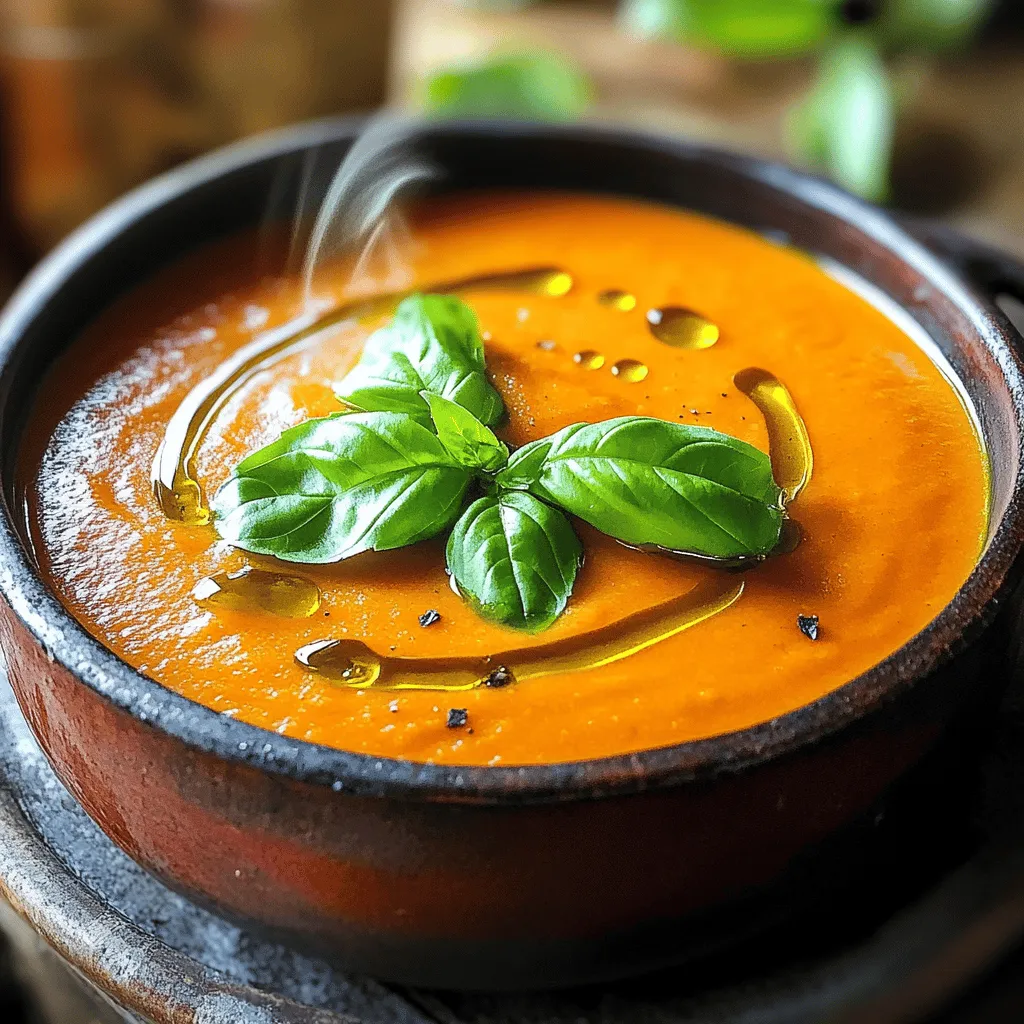
Creamy Roasted Red Pepper Soup Simple and Tasty Meal

If you’re craving a warm, delicious bowl of soup, this Creamy Roasted Red Pepper Soup is for you. With just a handful of simple ingredients, you can whip up a meal that’s rich in flavor and comfort. Whether you’re looking for something easy for dinner or a tasty dish to impress guests, this soup ticks all the boxes. Ready to dive into this delightful recipe? Let’s get started!
Ingredients
List of Ingredients
- 4 large red bell peppers
- 1 medium onion
- 3 cloves garlic
- 2 cups vegetable broth
- 1 cup heavy cream (or coconut cream)
- 1 tablespoon olive oil
- 1 teaspoon smoked paprika
- Salt and black pepper
- Fresh basil leaves
Ingredient Substitutions
You can replace heavy cream with coconut cream. This gives a rich, creamy flavor. If you want a different taste, try using herbs like thyme or oregano instead of smoked paprika.
Tips for Selecting Fresh Ingredients
When choosing bell peppers, look for ones that are bright and firm. Avoid any with soft spots. Fresh peppers taste better and have more nutrients. For broth, pick a brand that has no added sugars or preservatives. This ensures a clean, rich taste in your soup.
Step-by-Step Instructions
Preparation Steps
Preheating the oven
Start by preheating your oven to 400°F (200°C). This step is key for roasting. A hot oven helps the peppers become tender and sweet.
Roasting the red bell peppers
Next, slice the red bell peppers in half and remove the seeds. Place them cut side down on a baking sheet. Drizzle a little olive oil on top. This oil adds flavor and helps them roast better. Roast the peppers for about 25-30 minutes. Look for blistered skins and soft peppers.
Cooking the Soup
Sautéing onions and garlic
While the peppers roast, grab a large pot. Heat some olive oil over medium heat. Once hot, add the chopped onion. Sauté until the onion turns translucent, about 5-7 minutes. Stir often to prevent burning. Then, add minced garlic and smoked paprika. Cook for 1-2 more minutes until fragrant.
Combining ingredients and simmering
After the peppers are done roasting, let them cool for a few minutes. Peel off the blistered skins and chop the peppers into smaller pieces. Add these pieces to the pot with onions and garlic. Pour in the vegetable broth and stir well. Bring the mixture to a simmer and cook for 10 minutes. This lets all the flavors blend nicely.
Blending and Finishing Touches
Using an immersion blender vs. standard blender
For a smooth soup, use an immersion blender directly in the pot. This method is quick and easy. If you don’t have one, carefully transfer the soup to a standard blender in batches. Blend until smooth.
Adding cream and seasoning to taste
Once the soup is blended, return it to the pot if needed. Stir in the heavy cream. This adds richness and creaminess to your soup. Season with salt and black pepper to taste. Heat gently over low heat until warm. Avoid boiling, as this can change the texture.Enjoy your creamy roasted red pepper soup with a garnish of fresh basil!
Tips & Tricks
Enhancing Flavor
To boost the taste of your creamy roasted red pepper soup, add spices like cumin or cayenne. These spices add warmth and depth. You can also try fresh herbs like thyme or oregano for a fresh twist. Always taste as you go. This helps you find the right balance.
Making Ahead and Freezing
You can prepare your soup a day ahead. Just let it cool and store it in the fridge. For freezing, pour the cooled soup into airtight containers. Leave some space at the top for expansion. This soup keeps well for up to three months. When you’re ready to eat, thaw it overnight in the fridge.
Presentation Ideas
For a lovely presentation, serve the soup in bright bowls. Drizzle a bit of cream on top for a swirl effect. Add fresh basil leaves for color and flavor. You can also serve it with crusty bread for a nice crunch. This makes your meal feel special and inviting.
Variations
Vegan Version
To make a vegan version of creamy roasted red pepper soup, you can easily swap heavy cream. Use coconut cream instead. It gives a nice creamy texture without dairy. You can also add plant-based ingredients like cashews or silken tofu. Both will enhance richness and add protein.
Spicy Twist
If you love heat, add chili or red pepper flakes. Start with a small amount and adjust to your taste. You can also mix in different peppers, like jalapeños or serranos, for a unique kick. This will give your soup a fun and fiery twist.
Creamy Roasted Red Pepper Soup with Quinoa
Adding quinoa to your soup is a great idea. Quinoa gives it a nice texture and makes the dish heartier. To do this, cook the quinoa separately and stir it in before serving. Quinoa is also packed with nutrients, making your meal more balanced. It’s a win-win for flavor and health.
Storage Info
Refrigeration
To keep your creamy roasted red pepper soup fresh, store leftovers in airtight containers. This helps prevent the soup from absorbing other flavors in your fridge. When you want to reheat, pour the soup into a pot. Heat it over low to medium heat until warm. Stir often to ensure even heating.
Freezing
If you want to save some soup for later, freezing is a great option. First, let the soup cool completely. Then, pour it into freezer-safe containers. Leave some space at the top, as soup expands when frozen. To thaw, place the container in the fridge overnight. When ready to eat, reheat it on the stovetop or microwave until hot.
Shelf Life
In the fridge, your soup will last about 3-5 days. If you freeze it, it can last for up to 3 months. For best taste, eat it sooner rather than later. Always check for any off smells or changes in color before enjoying your soup.
FAQs
Can I use roasted red peppers from a jar?
Yes, you can use jarred roasted red peppers. They save time and are easy to find. However, fresh roasted peppers have a deeper flavor. Jarred peppers may be softer and can alter the soup’s texture. If you choose jarred, drain them well before use.
How do I make this soup spicier?
To add spice, consider these options:
- Add red pepper flakes during cooking.
- Stir in diced jalapeños for heat.
- Use a spicy broth instead of vegetable broth.
Start with a small amount, and taste as you go.
Can I use other types of peppers?
Absolutely! You can mix or replace the red bell peppers with:
- Yellow or orange bell peppers for sweetness.
- Poblano peppers for a smoky flavor.
- Green bell peppers for a sharper taste.
Each pepper gives a unique twist to the soup.
How to make this soup gluten-free?
To keep this soup gluten-free, use a gluten-free vegetable broth. Check all ingredients, especially spices and cream. Most heavy cream and coconut cream are naturally gluten-free, but always read labels to be sure.
Is it possible to make this soup in a slow cooker?
Yes, you can use a slow cooker. Roast the peppers first, then add them to the pot with other ingredients. Cook on low for 6-8 hours or on high for 3-4 hours. Blend well before serving for a creamy texture.
What to serve with creamy roasted red pepper soup?
This soup pairs nicely with:
- Crusty bread for dipping.
- A fresh green salad for crunch.
- Grilled cheese sandwiches for comfort.
These sides create a complete, satisfying meal.
In this blog post, we explored how to make creamy roasted red pepper soup. We covered the essential ingredients, tips for selecting the best produce, and step-by-step cooking instructions. Variations like vegan options and how to add spice were also discussed.
Finally, remember that making this soup is about your flavor preferences. Use fresh ingredients and enjoy the process. A warm bowl of this soup is a comforting dish you can customize.


![- 1 cup uncooked jasmine rice - 1 pound shrimp, peeled and deveined - 2 tablespoons vegetable oil - 3 tablespoons soy sauce - 1 tablespoon sesame oil - Salt and pepper, to taste - 1 cup mixed vegetables - 2 cloves garlic, minced - Fresh green onions, for garnish When I make Easy Shrimp Fried Rice, I always start with the main ingredients. The jasmine rice gives a lovely aroma and texture. For the shrimp, I prefer fresh, peeled, and deveined ones. They cook quickly and taste great. Seasonings are key to this dish. Soy sauce adds umami, while sesame oil gives a nutty flavor. Always remember to season with salt and pepper to bring out the taste. I love adding optional ingredients for extra flavor and color. Mixed veggies like peas and carrots add a nice crunch. Minced garlic gives it a punch, and fresh green onions on top make it look beautiful. For the full recipe, check out the details. Enjoy cooking! - First, rinse 1 cup of jasmine rice under cold water. Use your hands to stir the rice as you rinse. This helps remove excess starch. Keep rinsing until the water runs clear. Drain the rice well. - Next, take a medium saucepan. Add the rinsed rice along with 2 cups of water or low-sodium chicken broth. Bring it to a boil over high heat. Once it boils, lower the heat. Cover the pot with a lid and let it simmer for 15 minutes. The rice will absorb the liquid and become tender. When done, fluff the rice with a fork and set it aside to cool. - Now, heat 2 tablespoons of vegetable oil in a large skillet or wok over medium-high heat. Add 2 cloves of minced garlic and 1 small finely chopped onion. Sauté them for 2-3 minutes. The garlic should smell nice, and the onion will turn clear. - Then, add 1 pound of peeled and deveined shrimp to the skillet. Spread them out evenly. Cook for 2-3 minutes, until the shrimp turn pink and opaque. Once cooked, take them out and set them aside on a plate. - In the same skillet, toss in 1 cup of mixed vegetables. Stir-fry them for 2-3 minutes. They should soften but stay colorful. - Next, push the cooked vegetables to one side of the skillet. Pour in 2 large lightly beaten eggs on the other side. Scramble them until fully cooked and a bit golden. - Now, add the cooled jasmine rice to the skillet. Mix it in with the scrambled eggs and vegetables. Gently fold in the cooked shrimp, ensuring everything combines well. - Drizzle 3 tablespoons of soy sauce and 1 tablespoon of sesame oil over the rice mixture. Stir everything well. Season with salt and freshly ground black pepper to taste. Cook for another 2-3 minutes to let the flavors mix. - Finally, take the skillet off the heat. Garnish with sliced green onions for a fresh touch before serving. This is how you create a delicious shrimp fried rice. For the full recipe, check the section above! - Rinse rice for fluffiness: Rinsing jasmine rice helps remove excess starch. This keeps the rice from becoming sticky. Rinse it until the water runs clear. - Avoid overcooking shrimp: Cook shrimp until they turn pink and opaque. Overcooked shrimp can become rubbery. Remove them from heat as soon as they are done. - Use low-sodium soy sauce: This allows you to control salt levels. It makes your fried rice taste good without too much sodium. - Add extra vegetables for nutrition: Toss in broccoli, peas, or bell peppers. This boosts fiber and vitamins, making your meal healthier. - Recommended garnishes: Fresh green onions add color and taste. You can also sprinkle sesame seeds for a fun crunch. - Pairing options for a complete meal: Serve with a side of steamed veggies or a light salad. This makes your meal balanced and tasty. If you want to dive deeper into the recipe, check out the Full Recipe. {{image_4}} You can easily switch out shrimp in this dish. Try using chicken or tofu instead. Both options work great. For chicken, use bite-sized pieces and cook until golden. For tofu, press it to remove water and then cube it. Sauté until crispy. These changes keep the meal tasty and fun! If you want a vegetarian dish, just leave out the shrimp. Increase the number of vegetables instead. You can add more peas, carrots, bell peppers, or even broccoli. This makes the dish colorful and healthy. Plus, you still get a yummy meal that fills you up! Want to make your fried rice pop with flavor? Add spices like chili or ginger. These spices add heat and depth. You can also mix in some citrus zest, like lemon or lime. This adds a fresh, bright taste that enhances the dish. These little changes make a big difference! Check out the Full Recipe for more ideas. To store shrimp fried rice, let it cool first. Place it in an airtight container. This keeps the rice fresh and prevents it from drying out. You can refrigerate it for up to three days. When you want to eat it, check for any off smells or changes in texture. If you want to freeze shrimp fried rice, portion it into small containers. Make sure to leave some space at the top for expansion. This dish can last in the freezer for about one month. When ready to eat, thaw it in the fridge overnight for best results. For reheating, the stovetop is ideal. Add a splash of water or broth to keep it moist. Heat over medium heat, stirring often. You can also use the microwave. Heat in 30-second intervals, stirring in between. This way, your shrimp fried rice will taste fresh and full of flavor. For more cooking tips, you can check the [Full Recipe]. To boost flavor, use fresh ingredients. Fresh garlic, ginger, and green onions add depth. Try adding a splash of fish sauce for umami. A sprinkle of lime juice brightens the dish. For heat, add chili flakes or sriracha. Lastly, use low-sodium soy sauce to control saltiness. These tips help create a tasty, vibrant meal. Yes, you can prepare shrimp fried rice ahead of time. Cook the rice and shrimp, then store them separately. Keep everything in airtight containers in your fridge. When ready to eat, combine and reheat in a skillet. Add a splash of water or broth to keep it moist. This method ensures your dish stays fresh and delicious. You can use many veggies to add color and crunch. Consider bell peppers, broccoli, or snap peas. Zucchini and mushrooms also work well. Toss in some corn for sweetness or spinach for extra greens. Feel free to mix and match based on your taste. This allows for fun, creative variations. Yes, shrimp fried rice can be gluten-free. Use tamari instead of soy sauce. Check labels on other sauces to ensure they are gluten-free. Most vegetables are naturally gluten-free too. By choosing the right ingredients, you can enjoy this dish without worry. It makes for a tasty option for everyone! You learned how to make shrimp fried rice from scratch. We covered the key ingredients, step-by-step cooking instructions, and helpful tips. You can easily customize this dish with different proteins and veggies. Remember to store leftovers properly for future meals. Enjoying this dish should be fun and easy. With these steps, you can impress your family and friends. Happy cooking!](https://dishtreats.com/wp-content/uploads/2025/06/9ac088a4-5695-4856-8853-65ac7e0439f3-768x768.webp)
