Maple Roasted Brussels Sprouts Perfectly Crispy Recipe

If you want to impress guests with a tasty side dish, try my Maple Roasted Brussels Sprouts! This recipe gives you crispy, sweet, and savory bites. With just a few simple ingredients, you can create a dish that delights everyone at the table. I’ll walk you through easy steps and share helpful tips to make sure your Brussels sprouts turn out perfect every time. Are you ready to get cooking?
Ingredients
List of Ingredients for Maple Roasted Brussels Sprouts
To make this tasty dish, gather these ingredients:
- 1 pound Brussels sprouts, trimmed and halved
- 3 tablespoons extra virgin olive oil
- 2 tablespoons pure maple syrup
- 1 teaspoon balsamic vinegar
- 1 teaspoon garlic powder
- 1/2 teaspoon coarse sea salt
- 1/2 teaspoon freshly ground black pepper
- 1/4 cup chopped pecans (optional, for added crunch)
- 1/4 cup dried cranberries (optional, for a burst of sweetness)
Optional Ingredients for Enhanced Flavor
You can add more flavor with these extras:
- Crushed red pepper flakes for heat
- Fresh herbs like thyme or rosemary
- Grated Parmesan cheese for a savory twist
Ingredient Substitutions for Dietary Preferences
If you have dietary needs, try these swaps:
- Use avocado oil instead of olive oil for a different taste.
- Swap maple syrup with honey or agave for sweetness.
- Replace pecans with walnuts or sunflower seeds if needed.
Step-by-Step Instructions
Preparation Steps for Maple Roasted Brussels Sprouts
Start by gathering all your ingredients. You need a pound of Brussels sprouts, olive oil, maple syrup, balsamic vinegar, garlic powder, salt, and pepper. If you like, add pecans and cranberries for extra flavor. Trim and halve the Brussels sprouts. This helps them cook evenly and get crispy.
Detailed Cooking Instructions and Timing
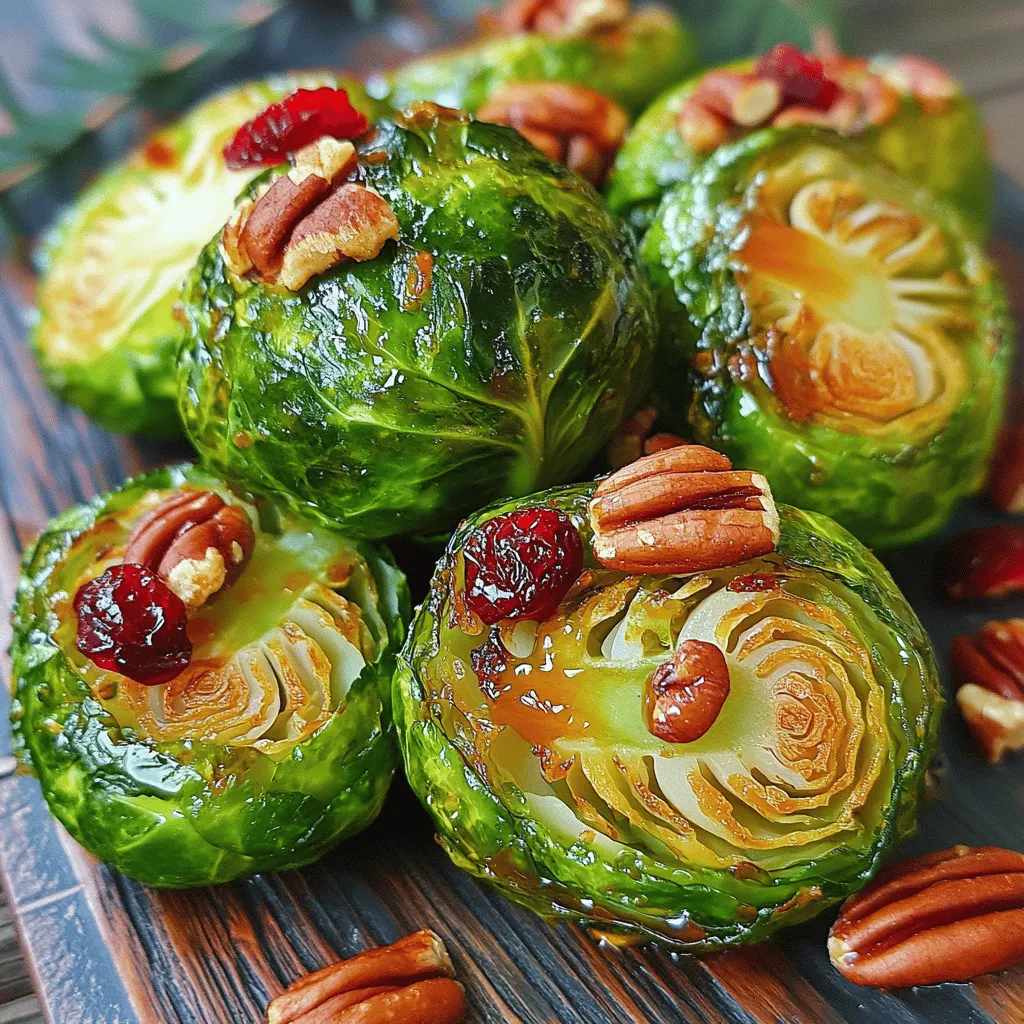
Preheat your oven to 400°F (200°C). In a large bowl, whisk together the olive oil, maple syrup, balsamic vinegar, garlic powder, salt, and pepper. This mix is key for flavor. Add the halved Brussels sprouts. Toss them well until each sprout is coated. Line a baking sheet with parchment paper. Spread the sprouts in a single layer on the sheet. Roast them for 20-25 minutes. Stir halfway through for even cooking. They should be fork-tender and golden brown. If using pecans, add them during the last 5 minutes. They will add a nice crunch. After roasting, toss in the cranberries if desired.
Tips for Achieving Perfectly Roasted Sprouts
To get that crispy texture, make sure not to crowd the baking sheet. Give the sprouts space to breathe. Use fresh ingredients for the best taste. If you want more caramelization, turn the oven up to 425°F (220°C) for the last few minutes. Always check for doneness by piercing a sprout with a fork. It should feel tender. For a great presentation, serve the sprouts on a platter with a drizzle of maple syrup and extra pecans. This makes your dish look special and inviting.
Tips & Tricks
Best Practices for Roasting Brussels Sprouts
To get the best results, select fresh Brussels sprouts. They should feel firm and bright green. Always cut them in half for even cooking. The flat side browns better and adds flavor. Make sure to space them out on the baking sheet. Crowded sprouts steam instead of roast. Stir them halfway through for even crispiness.
Flavor Profile Enhancements
To boost the flavor, try adding spices. A pinch of cayenne pepper gives heat. Smoked paprika adds a nice depth. Consider mixing in some lemon zest for brightness. You can also swap out the maple syrup for honey or agave. For a savory touch, add crumbled feta or parmesan cheese after roasting.
Troubleshooting Common Issues
If your Brussels sprouts are soggy, they were likely too crowded. Ensure they are dry before roasting. If they burn, your oven may be too hot. Adjust the temperature down a bit. For undercooked sprouts, extend the roasting time by a few minutes. Just keep an eye on them to avoid burning.
Variations
Alternative Add-Ins and Flavor Combinations
You can make Maple Roasted Brussels sprouts even more delicious by adding extras. Try mixing in some crispy bacon for a savory twist. This adds a salty flavor that pairs well with the sweetness of maple. You can also sprinkle in some red pepper flakes for a bit of heat. If you love cheese, goat cheese crumbles add creaminess and tang.
Seasonal Variations to Try
In fall, add roasted sweet potatoes for a heartier dish. The sweet potatoes will complement the maple flavor. In winter, toss in some sliced apples or pears. Their natural sweetness works well with Brussels sprouts. In spring, consider adding fresh herbs like thyme or rosemary for a bright flavor.
Serving Suggestions for Different Meals
These Brussels sprouts shine as a side dish for any meal. Serve them with roast chicken for a comforting dinner. They also pair well with grilled salmon for a healthy option. Try them as a topping on your favorite grain bowl too! For a festive touch, serve them during holiday dinners. Their bright color makes any plate look more inviting.
Storage Info
How to Properly Store Leftovers
After you enjoy your maple roasted Brussels sprouts, let them cool. Once cool, place them in an airtight container. This keeps them fresh for up to three days in the fridge. To prevent sogginess, do not stack them too high. Store them flat, if possible.
Reheating Tips for Optimal Taste
When you’re ready to enjoy leftovers, preheat your oven to 350°F (175°C). Spread the Brussels sprouts on a baking sheet. Heat them for about 10-15 minutes or until warmed through. This method helps keep them crispy. Avoid using the microwave, as it can make them mushy.
Freezing Guidelines for Long-Term Storage
You can freeze Brussels sprouts for later use. First, cool them completely after roasting. Then, place them in a freezer-safe bag or container. Remove as much air as possible to avoid freezer burn. They can last for up to three months in the freezer. When ready to eat, thaw in the fridge overnight before reheating. For the best quality, use them sooner rather than later.
FAQs
How long to roast Brussels sprouts?
Roast Brussels sprouts for 20 to 25 minutes at 400°F (200°C). This time allows them to cook fully and get that desired crispiness. Stir them halfway through to help them brown evenly. You want them to be tender and golden brown when done.
Can I use frozen Brussels sprouts for this recipe?
Yes, you can use frozen Brussels sprouts. However, they may not get as crispy as fresh ones. Thaw them first and pat them dry. This helps remove excess moisture. Keep in mind that the cooking time may vary.
Is this recipe suitable for meal prep?
Absolutely! Maple roasted Brussels sprouts are great for meal prep. They keep well in the fridge for up to four days. Store them in an airtight container. You can reheat them in the oven or microwave before serving.
Can I make Maple Roasted Brussels Sprouts in advance?
You can prepare the Brussels sprouts in advance. Toss them in the maple mixture and store them in the fridge. Roast them just before serving for the best texture. If you like, you can roast them earlier and reheat them. Just remember, they taste best fresh out of the oven.
Maple roasted Brussels sprouts are easy and delicious. We’ve covered the key ingredients, including options for flavor and substitutes. You learned the simple steps for prepping and cooking them perfectly. I shared tips for roasting and ways to add variety. Lastly, I explained how to store and reheat them well.
With this recipe, you can enjoy a tasty dish anytime. Try these ideas to make your cooking fun and flavorful. Enjoy your time in the kitchen!
![- 1 cup all-purpose flour - 1 cup whole wheat flour - 1 tablespoon baking powder - 1/2 teaspoon baking soda - 1/4 teaspoon salt I love using both all-purpose and whole wheat flour. The all-purpose flour gives the muffins a light texture. The whole wheat adds a nutty flavor and a bit of extra fiber. Mixing these flours helps balance taste and nutrition. - 1 cup plain Greek yogurt - 1/2 cup granulated sugar - 1/4 cup honey - 2 large eggs - 1 teaspoon vanilla extract - Zest of 1 lemon - Juice of 1 lemon Greek yogurt is key for moisture. It makes the muffins rich and creamy. The combination of sugar and honey gives a nice sweetness. The eggs help bind everything together. Lemon juice and zest brighten the flavor, making each bite fresh and zesty. - 1 cup fresh or frozen blueberries - 2 tablespoons melted coconut oil or butter Blueberries are the star of this recipe. They burst with flavor and add a great texture. You can use fresh or frozen. If you use frozen, they still work well! The melted coconut oil or butter adds richness, but you can skip it if you prefer a lighter muffin. You can find the full recipe for these delightful muffins online. Happy baking! First, preheat your oven to 375°F (190°C). This step is key for even baking. Next, prepare your muffin tin by lining it with paper liners or greasing the cups. This helps with easy muffin removal later. Now, let’s mix the dry ingredients. In a large bowl, combine: - 1 cup all-purpose flour - 1 cup whole wheat flour - 1 tablespoon baking powder - 1/2 teaspoon baking soda - 1/4 teaspoon salt Whisk these dry ingredients well. Make sure there are no lumps. In another bowl, add the wet ingredients. You will need: - 1 cup plain Greek yogurt - 1/2 cup granulated sugar - 1/4 cup honey - 2 large eggs - 1 teaspoon vanilla extract - Zest of 1 lemon - Juice of 1 lemon Whisk these until smooth. This helps blend all the flavors together. Now, it’s time to combine the two mixtures. Gently fold the wet ingredients into the dry ones using a spatula. Stir slowly. This helps keep your muffins light and fluffy. Don’t overmix! Overmixing makes the muffins dense. Once you see a few floury spots, stop mixing. Next, it’s time for the blueberries. Add: - 1 cup fresh or frozen blueberries - 2 tablespoons melted coconut oil or butter Fold these in gently. You want to keep the blueberries whole for bursts of flavor. Now, scoop the batter into your prepared muffin cups. Fill each cup about two-thirds full. This allows space for the muffins to rise. Place the muffin tin in your preheated oven. Bake for 18-20 minutes. To check for doneness, insert a toothpick into the center of a muffin. If it comes out clean, they are ready! After baking, let the muffins cool in the tin for about 5 minutes. This helps them set. Then, move them to a wire rack to cool completely. These steps will lead you to a batch of delicious Blueberry Lemon Yogurt Muffins. For the complete recipe, see [Full Recipe]. To get the best muffins, do not overmix the batter. Mixing too much can make the muffins tough. When you mix, just combine until you see no dry flour. This way, your muffins stay light and fluffy. When folding in the blueberries, do it gently. If you stir too hard, the berries will burst and color the batter. Just use a spatula and fold them in lightly. This keeps the berries whole and gives you lovely pops of flavor in each bite. You can add even more flavor to your muffins. Consider adding lemon zest for a bright taste. You might like to include nuts, like walnuts or pecans, for crunch. When it comes to blueberries, fresh berries taste great, but frozen ones work too. If you use frozen berries, do not thaw them first. This helps keep your batter cold, giving you a better rise. Using the right tools helps a lot. A non-stick muffin tin is your best bet. You can also use paper liners for easy cleanup. For mixing, a large bowl works well. I suggest a sturdy spatula for folding the batter. This combo makes mixing fun and easy. With the right tools, your baking will be smooth and enjoyable. For the full recipe, check out the details above. {{image_4}} You can make these muffins gluten-free. Simply replace the all-purpose flour with a gluten-free flour blend. Many blends work well, so pick one you like. Just ensure it has a good balance of starches and protein to mimic regular flour. This way, you can enjoy the same tasty muffins without the gluten. Want to mix it up? Try adding chocolate chips or walnuts for a delightful twist. They add a nice crunch and richness. You can also use other fruits like raspberries or cranberries. They pair well with the lemon and blueberry flavors. Each fruit adds its own unique taste, making each batch special. You can switch up the yogurt too. Use flavored yogurts like vanilla or lemon for extra taste. If you prefer dairy-free options, there are many great alternatives available. Look for coconut or almond-based yogurts. They keep the muffins moist and tasty, making it fun to experiment with flavors. For the full recipe, check out the details above. To keep your blueberry lemon yogurt muffins fresh, store them in an airtight container. This will keep them moist and tasty. You can keep them at room temperature for up to three days. If you want them to last longer, put them in the fridge. They can stay fresh for about a week in the refrigerator. Freezing muffins is a great way to keep them longer. To freeze, let the muffins cool completely. Then, wrap each muffin in plastic wrap. Place them in a freezer bag or container. This method helps prevent freezer burn. You can enjoy them for up to three months. When you're ready to eat a frozen muffin, take it out and let it sit at room temperature for about 30 minutes. For a warm treat, heat it in the microwave for 15-20 seconds. This will make it soft and delicious again. Blueberry lemon yogurt muffins are perfect for any time of day. I love having them for breakfast or as a snack. They also make a great dessert. To make it even better, try pairing these muffins with yogurt or a drizzle of honey. This adds a nice touch and enhances the flavor. Enjoy your muffins fresh from the oven or at room temperature! If you want to explore more recipes, check out the Full Recipe for even more delicious ideas. Blueberry lemon yogurt muffins stay fresh for about 2 to 3 days at room temperature. Keep them in an airtight container to maintain their moisture. If you store them in the fridge, they can last for up to a week. Just make sure to seal them well to prevent them from drying out. Yes, you can easily swap ingredients. If you want less sugar, use less granulated sugar or honey. For flour, you can mix all-purpose flour with whole wheat flour or use a gluten-free blend. You can also use flavored yogurt instead of plain yogurt for a fun taste twist. If your muffins turn out dense, check your mixing technique. Overmixing can cause this issue. Make sure to mix just until combined. You can also try adding a bit more baking powder or soda to lighten the texture. Lastly, ensure your ingredients are fresh, especially baking powder. To make these muffins healthier, reduce the sugar by a third. You can also replace some all-purpose flour with whole wheat flour to add fiber. Adding oats or ground flaxseed can boost nutrition without changing the flavor much. Enjoy these muffins while keeping health in mind! For the full recipe, refer to the earlier section. This blog post covered how to make delicious Blueberry Lemon Yogurt Muffins. We explored ingredients, step-by-step instructions, and tips for perfect texture. Variations like gluten-free options and different mix-ins add fun twists. Proper storage helps keep your muffins fresh. These muffins are a tasty way to enjoy healthy snacks or breakfast. Remember, baking is about having fun and experimenting. Enjoy every bite!](https://dishtreats.com/wp-content/uploads/2025/06/d36ee35c-287f-4b25-b661-333d5a68e192-768x768.webp)
![- 2 boneless, skinless chicken breasts, sliced into thin strips - 2 tablespoons honey - 4 cloves garlic, minced - 2 tablespoons low-sodium soy sauce - 1 tablespoon sesame oil - 1 red bell pepper, thinly sliced - 1 cup broccoli florets - 1 cup snap peas - 1 carrot, julienned - 2 tablespoons vegetable oil - Salt and pepper to taste I love using fresh chicken for this dish. It cooks well and tastes great. Honey adds a sweet touch, while garlic gives it a nice punch. You can pick any colorful veggies you like. I usually choose bell peppers, broccoli, and snap peas for their crunch. - Sesame seeds - Sliced green onions Garnishes make your meal pop! Sesame seeds add a nutty flavor. Green onions give a fresh, sharp taste. They make the dish look fancy, too. - Skillet or wok - Mixing bowl - Whisk A large skillet or wok is best for stir-frying. It helps cook everything quickly and evenly. You’ll also need a mixing bowl for the sauce. A whisk is handy to mix your sauce smoothly. For the full recipe and cooking instructions, check the [Full Recipe]. - How to prepare the sauce To make the sauce, grab a small mixing bowl. Add 2 tablespoons of honey and 4 minced garlic cloves. Pour in 2 tablespoons of low-sodium soy sauce and 1 tablespoon of sesame oil. Whisk these ingredients well until they blend smoothly. This sauce will be full of flavor! - How to season the chicken Take 2 sliced chicken breasts and place them in a bowl. Lightly sprinkle salt and pepper over the chicken. Toss it gently to coat every piece evenly. This step is key to making sure your chicken tastes great. - Cooking the chicken Heat a large skillet or wok over medium-high heat. Add 1 tablespoon of vegetable oil. Once the oil shimmers, add the seasoned chicken strips. Cook them for about 5-7 minutes. Look for a golden color and make sure they are cooked all the way through. Remove the chicken and set it aside on a plate. - Stir-frying the vegetables In the same skillet, add another tablespoon of vegetable oil. Throw in the sliced red bell pepper, 1 cup of broccoli florets, 1 cup of snap peas, and 1 julienned carrot. Stir-fry these vegetables for 3-4 minutes. You want them to stay vibrant and crisp-tender. - Combining and flavoring the dish Now, return the cooked chicken to the skillet. Pour the honey garlic sauce over everything. Stir it well to coat all the chicken and vegetables. Cook for an extra 2-3 minutes. This allows the sauce to thicken and stick to your meal. - How to garnish and serve Once done, take the skillet off the heat. Sprinkle sesame seeds and sliced green onions over the stir fry. This adds a nice crunch and fresh flavor. For an appealing look, serve it in shallow bowls on a bed of rice or noodles. Enjoy your tasty Honey Garlic Chicken Stir Fry! Check the Full Recipe for more details! For the best stir-fry, set your heat to medium-high. This helps to cook the chicken fast and keep it juicy. When cooking, work in batches if your pan is small. This way, the chicken won’t steam. To get crisp veggies, don’t overcrowd the pan. Just like the chicken, cook the veggies fast. Stir them often, about three to four minutes will do. Add some red pepper flakes for a spicy kick. You can also try fresh ginger for a nice zing. Balancing sweet and savory is key. If it’s too sweet, add a dash more soy sauce. Taste as you go to find the perfect mix. Serve your stir fry in shallow bowls. Place it on a bed of rice or noodles for a great look. Top with extra sesame seeds and sliced green onions. A lime wedge on the side adds color and flavor! {{image_4}} You can switch the chicken for other proteins. Tofu works great for a vegetarian dish. Just press and cube the tofu, then cook it like the chicken. Shrimp is another tasty option. It cooks fast and adds a nice flavor. Feel free to mix up the veggies. Bell peppers, zucchini, and green beans all taste amazing. Seasonal flavors add fun too! Use fresh corn in summer or squash in fall. These choices bring color and taste to your meal. You can change the sauce to fit your taste. If you want less sweetness, use less honey. To make it salty, add more soy sauce. Want some heat? Toss in red chili flakes or chopped peppers. This will spice up your stir fry and make it unique. To store your honey garlic chicken stir fry, cool it down first. Place the leftovers in an airtight container. This helps keep out air and moisture. I recommend using glass or BPA-free plastic containers. They are safe and durable. Make sure to refrigerate within two hours of cooking. This keeps the dish fresh and safe to eat. Yes, you can freeze honey garlic chicken stir fry! It freezes well and saves time for future meals. To freeze, use a freezer-safe container or a zip-top bag. Remove as much air as possible before sealing. For best results, eat it within three months. When you're ready to eat, thaw it in the fridge overnight. Reheat it in a skillet over medium heat until hot. This keeps the chicken and veggies tender. Leftovers will last about three to four days in the fridge. Always check for signs of spoilage before eating. If it smells off or has a strange color, it’s best to toss it. You'll want to avoid any food safety risks. Remember, good storage means enjoying your tasty meal later! To cut the sweetness, reduce the honey. Use one tablespoon instead of two. You can also add more soy sauce to balance the flavor. Adding a splash of rice vinegar or lime juice helps too. These add tang without making it too sweet. You can also use low-sugar honey or a sugar-free sweetener. Yes, you can prepare the chicken and veggies ahead of time. Slice the chicken and chop the vegetables. Store them in the fridge until you're ready to cook. You can also mix the sauce in advance. Just keep it in a sealed container. When you are ready to eat, cook it all together for a quick meal. Some good side dishes include: - Steamed rice - Fried rice - Noodles - Quinoa - A fresh green salad These sides add more texture and flavor to your meal. They also help soak up the tasty sauce. - Full Recipe: Detailed cooking instructions for easy reference. In this blog post, we explored the key ingredients and cooking steps for honey garlic chicken stir fry. We covered how to prepare the sauce, cook the chicken, and stir-fry the veggies. I shared useful tips on enhancing flavors and balancing taste. Plus, we discussed variations and storage methods for your leftovers. Cooking can be fun and rewarding. With these skills, you can create tasty meals. Enjoy trying new ingredients and discovering your favorites. Happy cooking!](https://dishtreats.com/wp-content/uploads/2025/07/ad7e2fa8-e610-4152-a96e-e496d4740468-768x768.webp)