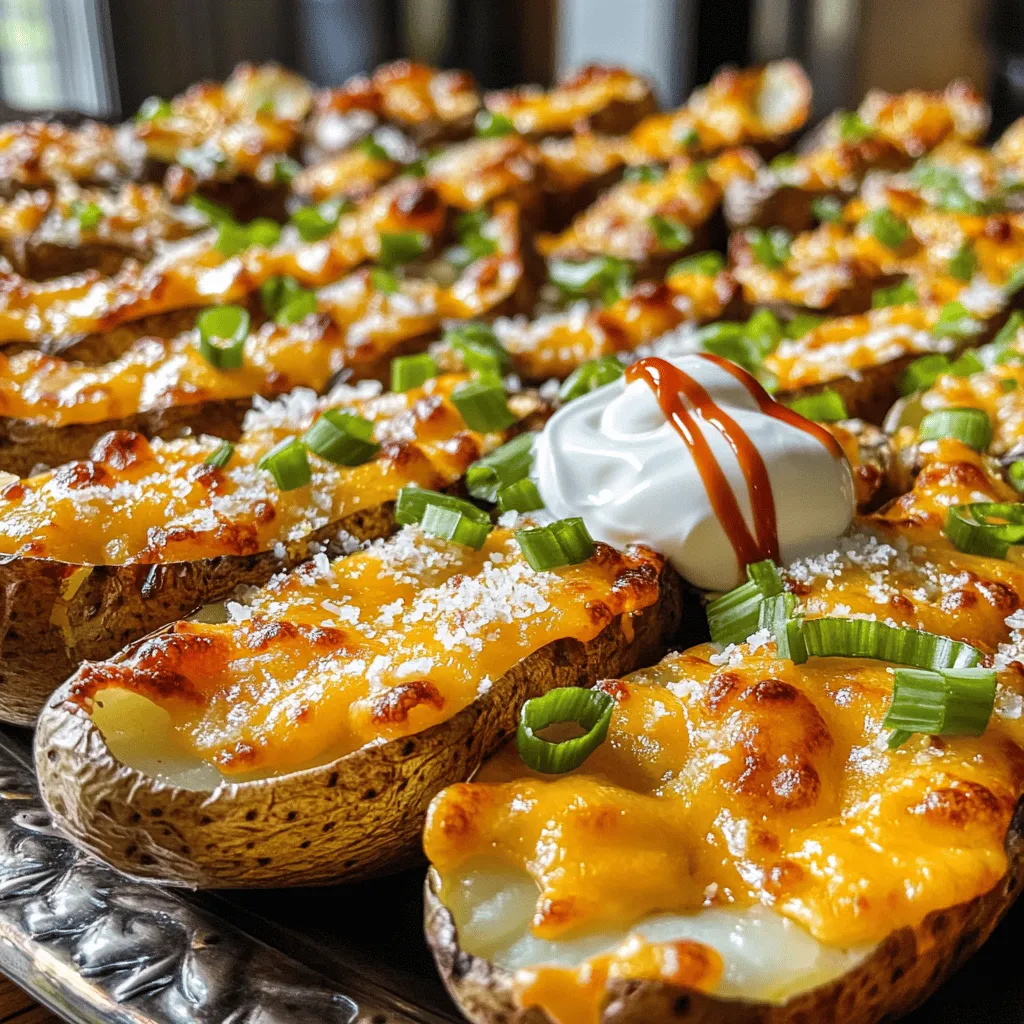
Crispy Parmesan Ranch Potato Skins Tasty Snack Recipe

If you’re craving a delicious snack that’s crunchy and packed with flavor, you’ve come to the right place! My Crispy Parmesan Ranch Potato Skins are easy to make and perfect for sharing. With just a few key ingredients and simple steps, you’ll create a mouthwatering treat that will impress anyone. Let’s dive into the ingredients and get cooking! Your taste buds will thank you later!
Ingredients
Essential Ingredients for Crispy Parmesan Ranch Potato Skins
To make Crispy Parmesan Ranch Potato Skins, you need these key items:
- 4 medium russet potatoes
- 1 tablespoon olive oil
- 1 teaspoon garlic powder
- 1 teaspoon onion powder
- 1 teaspoon dried parsley
- ½ teaspoon salt
- ¼ teaspoon black pepper
- ½ cup grated Parmesan cheese
- ½ cup shredded cheddar cheese
- ½ cup sour cream
- 2 green onions, finely sliced
- Optional: hot sauce for drizzling
These ingredients come together to create a tasty snack that everyone will love. The russet potatoes give a great base. Olive oil helps achieve that golden, crispy texture.
Optional Toppings to Enhance Flavor
You can add a few extra toppings for more flavor. Here are some ideas:
- Crispy bacon bits
- Jalapeño slices for heat
- Fresh herbs like chives or cilantro
These toppings can make your potato skins even more exciting. They add different tastes and textures, making your snack feel gourmet.
Key Equipment Needed
You will need some basic kitchen tools to prepare this recipe:
- Baking sheet
- Mixing bowls
- Fork for piercing potatoes
- Spoon for scooping out the insides
Using the right tools helps make the process smooth. Having everything ready means you can focus on creating a delicious dish.
Step-by-Step Instructions
Prepping the Potatoes
Start by washing your russet potatoes well. Make sure to scrub off any dirt. After that, pierce each potato several times with a fork. This helps steam escape while baking. It’s key to avoid burst potatoes. Next, place the potatoes on a baking sheet.
Baking the Potato Skins
Set your oven to preheat at 400°F (200°C). Bake the potatoes for 45 to 60 minutes. They should feel tender when you poke them with a fork. Once done, take them out and let them cool for about 10 minutes. This makes them easier to handle. Then, cut each potato in half lengthwise. Use a spoon to scoop out some of the insides. Leave about a ¼-inch shell. This keeps them sturdy.
Adding Seasoning and Cheese
Brush the inside and outside of each potato skin with olive oil. This helps achieve a nice crisp. In a bowl, mix garlic powder, onion powder, dried parsley, salt, and black pepper. Stir until blended well. Sprinkle this seasoning mix inside each potato skin. Add a generous amount of grated Parmesan cheese and shredded cheddar cheese on top. Place the potato skins back on the baking sheet with cheese-side up. Bake for another 15 to 20 minutes. You want the cheese to be bubbly and golden. The edges should turn crispy. Finally, remove them from the oven and let them cool a bit. Top each skin with sour cream and sliced green onions. If you like heat, drizzle hot sauce for that extra kick.
Tips & Tricks
Achieving Maximum Crispiness
To get the best crispiness from your potato skins, follow these tips:
- Use russet potatoes. Their starch content helps create a crispy texture.
- Bake them until fork-tender. This ensures they are soft inside, which helps when scooping.
- Brush with olive oil. A good layer of oil makes a big difference in crispness.
- Bake again after adding cheese. This final bake allows the cheese to bubble and brown.
How to Select the Best Potatoes
Choosing the right potatoes is key to great potato skins. Here’s what to look for:
- Look for medium-sized russets. They have the right thickness for sturdy skins.
- Check for smooth skin. Avoid potatoes with blemishes or soft spots.
- Choose firm potatoes. This indicates freshness and will help them hold up during baking.
Serving Suggestions for Appetizers
When serving your crispy potato skins, consider these ideas:
- Serve warm. Warm skins are best for tasting the melted cheese.
- Add a variety of dips. Sour cream, ranch, or even guacamole pairs well.
- Garnish with fresh herbs. Chopped parsley or cilantro adds color and flavor.
- Create a platter. Arrange them on a large dish for a fun sharing experience.
Variations
Different Cheese Options to Consider
You can switch up the cheese in your potato skins. While Parmesan and cheddar work great, try mozzarella for a gooey texture. Goat cheese adds a tangy twist. For a sharper taste, use aged cheddar. Mixing cheeses can create a richer flavor.
Vegetarian-Friendly Alternatives
If you want a vegetarian option, skip the cheese or use plant-based cheese. You can load the skins with veggies. Try adding spinach, mushrooms, or bell peppers. They add color and taste without meat. This makes your snack healthy and fun.
Spicy Variants of Potato Skins
For spice lovers, add some heat! Mix jalapeños or chili flakes in your cheese topping. You can also drizzle hot sauce over the sour cream. This adds a tasty kick. For an even spicier option, consider using pepper jack cheese. It packs a punch and enhances the flavor of your crispy potato skins.
Storage Info
How to Store Leftover Potato Skins
To keep your crispy potato skins fresh, let them cool completely. Place them in an airtight container. You can store them in the fridge for up to three days. Make sure to separate layers with parchment paper to avoid sticking.
Reheating Tips for Best Results
When you’re ready to enjoy the leftovers, reheat them in the oven. Set your oven to 350°F (175°C). Place the potato skins on a baking sheet and heat for about 10-15 minutes. This method keeps them crispy. Avoid using a microwave, as it can make them soggy.
Freezing Instructions
You can freeze these potato skins if you want to save them for later. First, let them cool completely. Wrap each skin tightly in plastic wrap, then place them in a freezer bag. They will stay good for up to two months. When you’re ready to eat them, thaw in the fridge overnight before reheating.
FAQs
What type of potatoes are best for this recipe?
I recommend using medium russet potatoes. They have a thick skin and a fluffy inside. This makes them perfect for holding toppings. Their texture gives you that nice crispiness after baking.
Can I make these potato skins in advance?
Yes, you can prepare the potato skins ahead of time. Bake the potatoes and scoop out the insides. Store the skins in the fridge. When you’re ready, add your toppings and bake them. This saves time when you need a quick snack.
How long do Crispy Parmesan Ranch Potato Skins stay fresh?
These potato skins are best enjoyed fresh. However, they can last in the fridge for up to three days. Just store them in an airtight container. Reheat them in the oven for the best results.
Is it possible to make these potato skins in an air fryer?
Absolutely! You can use an air fryer for a quicker option. After preparing the potato skins, air fry them at 375°F for about 10-15 minutes. This gives you that crispy texture you love without using the oven.
Crispy Parmesan Ranch Potato Skins are a winning snack choice. We covered essential ingredients, step-by-step baking, and tips for maximum crispiness. Don’t forget to explore tasty variations and proper storage methods.
These skins are easy to make and will impress your friends. Enjoy your delicious creations!

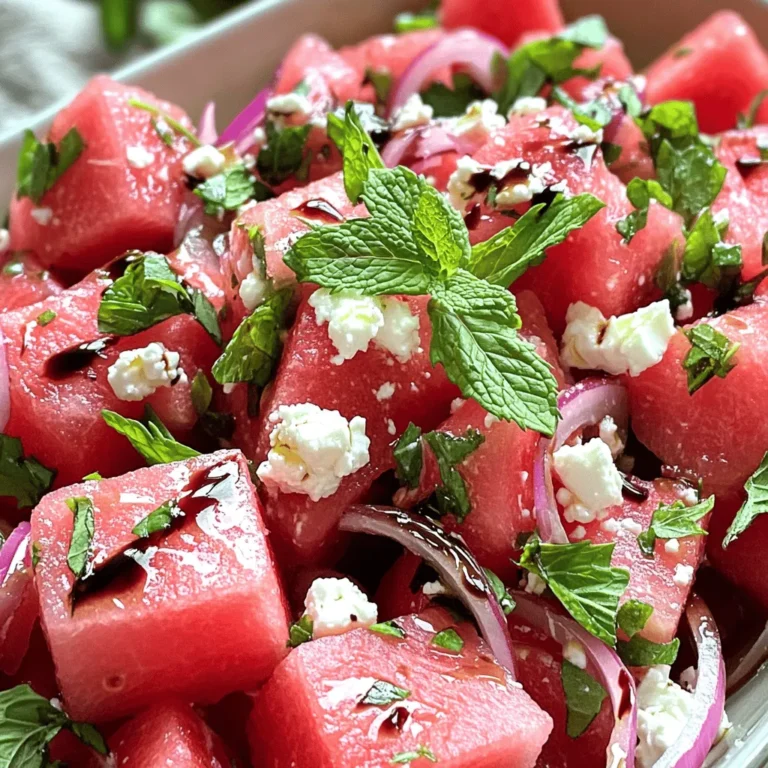
![To make a tasty and healthy crispy chickpea salad, you need these main ingredients: - 1 can (15 oz) chickpeas, drained and rinsed - 2 tablespoons olive oil - 1 teaspoon smoked paprika - 1/2 teaspoon garlic powder - 1/2 teaspoon ground cumin - Salt and freshly ground pepper to taste - 4 cups mixed greens (spinach, arugula, and lettuce blend) - 1 cup cherry tomatoes, halved - 1/2 cucumber, diced - 1/4 red onion, thinly sliced Add some optional ingredients to enhance the flavor and texture of your salad: - 1/4 cup feta cheese, crumbled (optional) - A handful of fresh parsley, chopped (for garnish) You will also need a few kitchen tools to make this salad: - A medium-sized mixing bowl for the chickpeas - A large bowl for the salad - A baking sheet lined with parchment paper - A whisk for the dressing - A separate small bowl for mixing the tahini dressing Using these ingredients and tools, you can create a delicious crispy chickpea salad. Try the full recipe for a step-by-step guide! First, preheat your oven to 400°F (200°C). This makes sure the chickpeas get crispy. Line a baking sheet with parchment paper. This helps with easy cleanup later. In a bowl, mix the drained chickpeas with olive oil. Add smoked paprika, garlic powder, ground cumin, salt, and pepper. Make sure each chickpea is well coated. This blend gives them a tasty kick. Spread the seasoned chickpeas evenly on the baking sheet. Don’t crowd them; they need space to get crispy. Bake for 25-30 minutes. Shake the pan halfway through to help them cook evenly. They should turn golden and crunchy. While the chickpeas bake, prepare the salad base. In a large bowl, toss together mixed greens, halved cherry tomatoes, diced cucumber, and thinly sliced red onion. Mixing them now lets the flavors combine as you assemble. In a small bowl, whisk tahini, fresh lemon juice, and a pinch of salt and pepper. If you want a thinner dressing, add a splash of water. This dressing ties the salad together, adding a rich flavor. Once the chickpeas are crispy, take them out and let them cool for a minute. Top your salad with these warm chickpeas. Drizzle the tahini dressing over everything. Add crumbled feta cheese for creaminess, if you like. Finish with fresh parsley for color. Enjoy your Crispy Chickpea Delight Salad! For the complete recipe, check the [Full Recipe]. To make your chickpeas extra crispy, dry them well before cooking. Drain and rinse the canned chickpeas, then lay them on a paper towel. Pat them gently to remove excess moisture. The drier the chickpeas, the crunchier they will be. Toss them with olive oil and spices right before baking. Spread them out on your baking sheet. Avoid crowding them; it helps with airflow and crispiness. Bake at 400°F for 25 to 30 minutes, shaking the pan halfway through. This step ensures even cooking and crispiness. If you have leftovers, store the salad and chickpeas separately. Place the salad in an airtight container in the fridge. Keep the chickpeas in another container. This will help prevent sogginess. When you want to eat the leftovers, reheat the chickpeas in the oven for a few minutes. This will revive their crisp texture. The salad will stay fresh for about two days in the fridge. For the best taste, serve the salad immediately after assembling. The warm chickpeas add a nice contrast to the cool greens. Drizzle the tahini dressing right before serving. This way, it coats the ingredients nicely. You can also sprinkle some feta cheese on top for extra creaminess. Fresh herbs like parsley can brighten the dish. Try adding avocado for creaminess or nuts for crunch. Each addition enhances the flavor and texture of your salad. Enjoy experimenting! {{image_4}} You can swap out greens to change the salad's taste. Try using kale for a hearty crunch. Baby spinach offers a soft, mild flavor. You can even mix in some crunchy cabbage for more texture. Each option adds its unique twist while still pairing well with crispy chickpeas. If you want to make the salad more filling, add protein. Grilled chicken works great with the chickpeas. You can also try adding sliced hard-boiled eggs for richness. For a vegetarian option, toss in some quinoa or black beans. These choices will help boost the meal's nutrients. While tahini dressing is fantastic, don’t be afraid to experiment. A lemon vinaigrette adds a bright zing. You could also try a yogurt-based dressing for creaminess. If you like a kick, a spicy harissa dressing works wonders too. Each dressing brings a new flavor that can change your salad experience. For the full recipe, check out the Crispy Chickpea Delight Salad 🥗. To store leftover salad, first, let it cool down. Place it in an airtight container. This keeps the salad fresh. Add the crispy chickpeas on top only when serving. This way, they stay crunchy. If you mix them in, they can get soggy. If you have leftover crispy chickpeas, you can reheat them. Preheat your oven to 350°F (175°C). Spread the chickpeas on a baking sheet. Bake them for about 10 minutes. This brings back their crunch. You can also use an air fryer for a quicker option. The salad can last up to three days in the fridge. Chickpeas stay good for about a week if stored well. Fresh veggies have a shorter shelf life. Use them within three to five days. Always check for freshness before eating. For a detailed recipe, refer to the Full Recipe. Yes, you can use dried chickpeas. They need soaking and cooking first. To prepare, soak them overnight in water. Cook them until they are tender. This can take about 1 to 2 hours. Then, follow the same steps as with canned chickpeas in the recipe. This salad is packed with nutrients. Chickpeas provide protein and fiber. Mixed greens bring vitamins A and C. Tomatoes offer antioxidants, while cucumbers add hydration. Olive oil is a healthy fat. Feta cheese, if used, adds calcium. Overall, it is a well-balanced meal. To make this salad vegan, skip the feta cheese. The rest of the ingredients are already plant-based. You can also add more veggies or nuts for extra flavor and nutrition. Try adding avocado for creaminess or nuts for crunch. Yes, you can prep it ahead of time. Store the crispy chickpeas in an airtight container. Keep the salad ingredients separate until you are ready to eat. This keeps everything fresh and crispy. Just assemble when you want to enjoy your meal. This salad pairs well with many dishes. Serve it alongside grilled chicken or fish for protein. It also goes great with a warm pita or flatbread. If you want a lighter meal, enjoy it as a stand-alone dish. You can find the Full Recipe for more details. In summary, this blog post covered how to make a crispy chickpea salad. We explored the main ingredients and added options to boost flavor. I shared step-by-step cooking instructions and tips for the perfect crunch. You learned about storage methods and how to customize the dish. Enjoy this salad any time for a tasty and healthy meal. With its simple steps, you can make it again and again!](https://dishtreats.com/wp-content/uploads/2025/06/a0161600-1d29-449f-a743-39fb8b2e717a-768x768.webp)

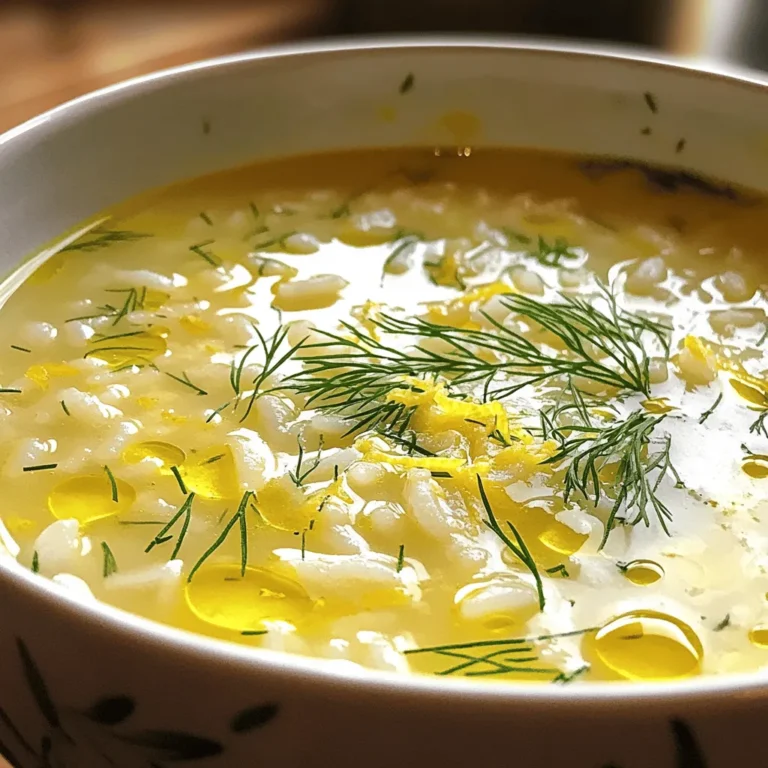
![- 1 cup plain Greek yogurt - 1/4 cup creamy mayonnaise - 1 tablespoon freshly squeezed lemon juice - 1 teaspoon garlic powder - 1 teaspoon onion powder - 1 teaspoon dried dill weed - 1 teaspoon dried parsley - 1/2 teaspoon sea salt - 1/4 teaspoon freshly ground black pepper - 1/4 teaspoon smoked paprika - Assorted fresh vegetables (carrots, celery, bell peppers, cucumber) To make a delicious Creamy Greek Yogurt Ranch Dip, you need a few simple ingredients. Start with the main trio: Greek yogurt, creamy mayonnaise, and lemon juice. The yogurt gives the dip its rich and tangy base. The mayonnaise adds a smooth, creamy texture, while the lemon juice brightens the flavors. Next, you’ll want to gather your seasonings. Garlic powder and onion powder add a savory punch. Dried dill weed and parsley bring in that classic ranch flavor. Salt, black pepper, and smoked paprika round out the taste, adding depth and a hint of spice. Finally, think about what to dip. Fresh veggies like carrots, celery, bell peppers, and cucumber work perfectly. They add crunch and freshness, creating a balanced snack. For the full recipe, check out the details above. First, grab a medium-sized mixing bowl. In this bowl, add 1 cup of plain Greek yogurt and 1/4 cup of creamy mayonnaise. These two ingredients create a rich base for our dip. Use a whisk or spatula to blend them well until smooth. It should look creamy and inviting. Next, squeeze in 1 tablespoon of freshly squeezed lemon juice. This adds a nice tang to the dip. Now, sprinkle in the seasonings: 1 teaspoon each of garlic powder, onion powder, dried dill weed, and dried parsley. Add 1/2 teaspoon of sea salt, 1/4 teaspoon of freshly ground black pepper, and 1/4 teaspoon of smoked paprika. These flavors will come together beautifully. Now it's time to whisk everything together. Vigorously mix the ingredients until the dip is fully combined. It should be smooth and creamy, with a lovely thickness. Take a taste and adjust the seasonings as needed. If you want more flavor, feel free to add a pinch of salt or a few more herbs. Your taste buds will guide you. Once you're happy with the flavor, it's time to chill the dip. Cover the bowl with plastic wrap or transfer the dip to an airtight container. Place it in the refrigerator for at least 30 minutes. This step allows the flavors to meld and deepen. When you're ready to enjoy, take the dip out of the fridge. Serve it chilled with an assortment of fresh vegetables for dipping, like carrots, celery, bell peppers, and cucumber. This adds a vibrant touch and makes for a fun snack! For the complete recipe, check out the [Full Recipe]. To make your Creamy Greek Yogurt Ranch Dip even tastier, try using fresh herbs. Fresh chives, dill, or parsley can add great flavor. You can also adjust the lemon juice for more tanginess. A little extra juice can brighten the dip. If you want a thicker dip, add more Greek yogurt. It will make the dip creamier. You can also cut back on the mayonnaise for a lighter version. This keeps the flavor while reducing calories. This dip is perfect for parties and gatherings. It pairs well with crackers or pita chips. Serve it with an array of fresh veggies, like carrots or cucumbers. They make great dippers, adding crunch to your snack. For the full recipe, check the earlier sections. {{image_4}} You can easily change the herbs in this dip. Fresh herbs like chives or basil work great. They add a nice twist to the flavor. Dried herbs can also give you different tastes. Think about using oregano or thyme for a unique touch. If you love some heat, add a spicy twist. Incorporate hot sauce or cayenne pepper. This will give your dip a zesty kick. You can also add chopped jalapeños for extra spice. Just be careful with the amount; you want to enjoy the heat, not overpower it! For a vegan version, swap the yogurt and mayonnaise. Use a plant-based yogurt and vegan mayo. Make sure all seasonings are plant-based too. This way, you can enjoy the same creamy dip without any animal products. It's delicious and fits many diets! For the full recipe, check out the link above. To keep your creamy Greek yogurt ranch dip fresh, store it in an airtight container. This helps prevent any odors from other foods in your fridge. You can enjoy the dip for up to one week. Just make sure to seal it tightly. Freezing this dip is not recommended. The texture may change after thawing, making it watery. Only freeze if it is necessary. If you must, use a freezer-safe container. If you freeze the dip, place it in the refrigerator to thaw. This method gives you the best results. Once thawed, stir it well before serving again. This helps bring back the creamy texture. Yes, non-fat can be used for a lighter version. This choice keeps the dip creamy while cutting down on fat. The flavor remains rich and satisfying. The dip lasts up to one week in the refrigerator. Store it in an airtight container to keep it fresh. I find it gets even better after a day. Fresh veggies, crackers, pita chips, or pretzels are great options. Carrots, celery, and bell peppers work well. You can get creative with your dippers! Yes, all ingredients are gluten-free; verify brands to be sure. This makes it a perfect snack for anyone with gluten sensitivities. Yes, it’s recommended to make it a few hours ahead to enhance flavors. The longer it sits, the more the flavors blend. I often prepare it the night before. This blog post shared a tasty Greek yogurt dip recipe. We covered the key ingredients, easy steps, and tips to make it even better. You learned how to customize the dip, try vegan options, and store it correctly. Think of this dip for your next party or snack. It’s healthy, easy to make, and perfect with fresh veggies or chips. Enjoy your tasty dip and feel good about sharing it with friends!](https://dishtreats.com/wp-content/uploads/2025/07/4dca82da-d028-43ac-94fd-c211b04a114a-768x768.webp)