
Pickle Ranch Chicken Salad Croissants for Easy Lunch
![- Cooked chicken - Creamy mayonnaise - Dill pickle relish - Ranch seasoning mix - Green onions - Celery - Salt and black pepper - Buttery croissants - Lettuce leaves - Dill pickle slices To make the Pickle Ranch Chicken Salad Croissants, you need a few simple ingredients. Start with cooked chicken. Shredded chicken works best, and you can use leftover rotisserie chicken if you like. Next, grab creamy mayonnaise, which adds richness and binds everything together. You will also need some dill pickle relish. This gives the salad a tangy kick. For flavor, add a packet of ranch seasoning mix. It brings a burst of taste to the dish. Then, you will need green onions and celery. They add crunch and freshness to the chicken salad. Don’t forget salt and black pepper to season your salad to your liking. For the base, use buttery croissants. They are soft and flaky, perfect for holding the chicken salad. You’ll also need lettuce leaves to line the croissants and keep them from getting soggy. Lastly, you can add dill pickle slices on the side for extra crunch and flavor. You can find the full recipe [Full Recipe] in the next section. First, we mix the chicken salad. Start with two cups of cooked chicken, shredded. Add half a cup of creamy mayonnaise and a quarter cup of dill pickle relish. Then, mix in one tablespoon of ranch seasoning. Stir until everything is well combined. Next, we season the mixture. Taste your chicken salad and add salt and black pepper to your liking. This step is key for great flavor. Now, we assemble the croissants. Carefully slice each croissant in half. Place a lettuce leaf on the bottom half. This keeps the croissant from getting soggy. Let’s combine the base ingredients. In a large bowl, mix the chicken, mayonnaise, relish, and ranch seasoning. Use a spatula to blend well. Now, we add vegetables for crunch. Toss in a quarter cup of finely chopped green onions and celery. Mix until all the veggies are evenly spread throughout. Finally, we make the chicken salad shine. After seasoning, ensure everything is properly mixed. This is the moment when you can adjust the flavor if needed. For the finishing touch, scoop the chicken salad onto the lettuce-covered croissant halves. Pile it high for a tasty bite! Don't forget to garnish with extra dill pickle slices for added flavor. For the full recipe, refer to the beginning section. To get the best texture for your chicken salad, start with shredded chicken. It's key to keep the pieces small and evenly shredded. This helps each bite feel tender and smooth. Use cooked chicken that’s still warm, as it mixes better with the other ingredients. When it comes to seasoning, don’t hold back. The ranch seasoning mix adds a great taste. I always suggest starting with a tablespoon. You can adjust to your liking. Taste as you mix. Add salt and pepper, a little at a time, until it’s just right. Presentation can make your croissants stand out. Arrange them neatly on a platter. You can serve them whole or cut in half for easy grabbing. Place a small bowl of extra dill pickles next to them. This adds a nice touch and makes it easy for guests. For sides, consider serving fresh fruit or a light salad. A simple green salad pairs nicely. You can even add some crunchy chips for texture. This makes for a fun and tasty meal that everyone will enjoy. {{image_4}} You can change this recipe to suit your taste. Here are some ideas. - Alternative proteins to try: Instead of chicken, use turkey or canned tuna. Both work well and give a new twist. For a meat-free option, try chickpeas or tofu for a healthy plant-based salad. - Different seasoning blends: Swap the ranch mix for other blends, like garlic or lemon pepper. You can also add some hot sauce for a spicy kick. If you seek healthier choices, here are some easy swaps. - Low-calorie alternatives: Use Greek yogurt instead of mayonnaise. This keeps the creamy texture but cuts calories. You can also use less chicken or add more veggies to lighten it up. - Gluten-free options for croissants: Look for gluten-free croissants at your local store. You can also use lettuce wraps or gluten-free bread for a crunchy and satisfying meal. Explore these variations to make your Pickle Ranch Chicken Salad Croissants even more exciting. For the full recipe, check the recipe section above. To keep your pickle ranch chicken salad croissants fresh, store any leftovers in an airtight container. This helps prevent drying out. You can place a paper towel in the container to absorb moisture. The best time to eat them is within three days for optimal taste. After that, the croissants may become soggy or lose flavor. You might want to enjoy your croissants warm. To reheat them, use an oven or toaster oven. Heat at 350°F for about 5-7 minutes. This keeps the croissants crisp. Avoid using a microwave, as it can make them chewy. If you have extra chicken salad, you can use it in wraps or on a bed of greens. This way, you can create a new meal with the leftovers that is just as tasty! Can I use rotisserie chicken? Yes, rotisserie chicken works great in this recipe. It saves time and adds flavor. Simply shred the chicken and mix it in. How do I make this salad ahead of time? You can make the salad a day in advance. Store it in an airtight container in the fridge. Just assemble the croissants when you’re ready to serve. What are some good sides to serve with these croissants? Some tasty sides include fresh fruit, chips, or a simple green salad. These pair well and add color to your plate. Where can I buy ready-made chicken salad? You can find ready-made chicken salad at grocery stores or deli counters. Look for local options for the freshest taste. Can I substitute the croissants with other bread? Yes, you can use any bread you like. Try using bagels, pita, or even lettuce wraps for a low-carb option. This blog post covered how to make a tasty chicken salad for croissants. You learned the key ingredients and the steps for mixing and assembling. I shared tips to get the best flavors and textures. You can also try different proteins or seasonings to make it your own. Store any leftovers properly to keep them fresh. This dish is great for gatherings or a simple meal at home. Enjoy making your delicious chicken salad and impress your friends and family!](https://dishtreats.com/wp-content/uploads/2025/07/dff408d1-932c-47c7-977b-b0a9332b2143.webp)
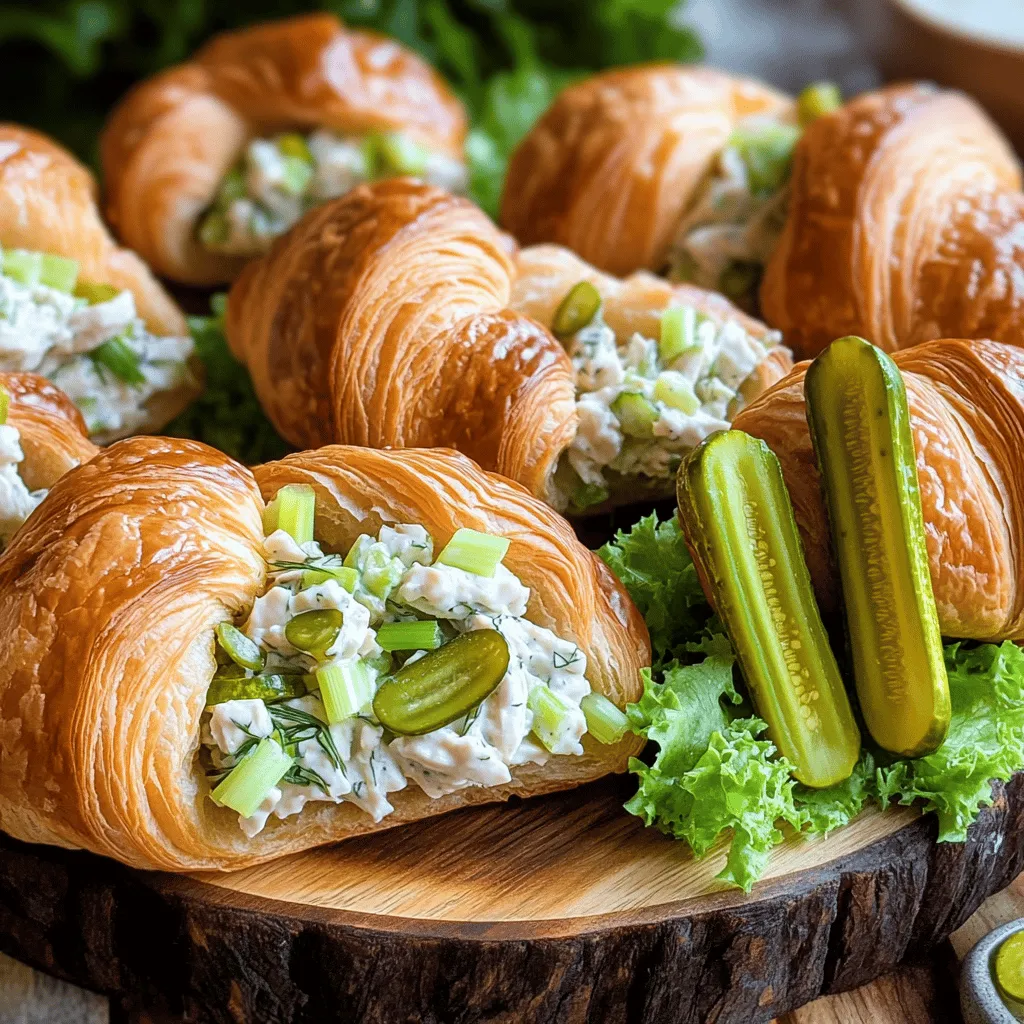
Want a simple yet delicious lunch that impresses? Try these Pickle Ranch Chicken Salad Croissants! They are packed with flavor and super easy to make. With just a few ingredients, you can whip up a creamy chicken salad and serve it in buttery croissants. Follow my guide for quick tips, creative variations, and storage tricks. Trust me, you’ll want these croissants in your lunch rotation!
Ingredients
List of Required Ingredients
- Cooked chicken
- Creamy mayonnaise
- Dill pickle relish
- Ranch seasoning mix
- Green onions
- Celery
- Salt and black pepper
- Buttery croissants
- Lettuce leaves
- Dill pickle slices
To make the Pickle Ranch Chicken Salad Croissants, you need a few simple ingredients. Start with cooked chicken. Shredded chicken works best, and you can use leftover rotisserie chicken if you like. Next, grab creamy mayonnaise, which adds richness and binds everything together. You will also need some dill pickle relish. This gives the salad a tangy kick.
For flavor, add a packet of ranch seasoning mix. It brings a burst of taste to the dish. Then, you will need green onions and celery. They add crunch and freshness to the chicken salad. Don’t forget salt and black pepper to season your salad to your liking.
For the base, use buttery croissants. They are soft and flaky, perfect for holding the chicken salad. You’ll also need lettuce leaves to line the croissants and keep them from getting soggy. Lastly, you can add dill pickle slices on the side for extra crunch and flavor.
Step-by-Step Instructions
Preparation Overview
First, we mix the chicken salad. Start with two cups of cooked chicken, shredded. Add half a cup of creamy mayonnaise and a quarter cup of dill pickle relish. Then, mix in one tablespoon of ranch seasoning. Stir until everything is well combined.
Next, we season the mixture. Taste your chicken salad and add salt and black pepper to your liking. This step is key for great flavor.
Now, we assemble the croissants. Carefully slice each croissant in half. Place a lettuce leaf on the bottom half. This keeps the croissant from getting soggy.
Detailed Cooking Steps
Let’s combine the base ingredients. In a large bowl, mix the chicken, mayonnaise, relish, and ranch seasoning. Use a spatula to blend well.
Now, we add vegetables for crunch. Toss in a quarter cup of finely chopped green onions and celery. Mix until all the veggies are evenly spread throughout.
Finally, we make the chicken salad shine. After seasoning, ensure everything is properly mixed. This is the moment when you can adjust the flavor if needed.
For the finishing touch, scoop the chicken salad onto the lettuce-covered croissant halves. Pile it high for a tasty bite! Don’t forget to garnish with extra dill pickle slices for added flavor.
Tips & Tricks
Perfecting Your Chicken Salad
To get the best texture for your chicken salad, start with shredded chicken. It’s key to keep the pieces small and evenly shredded. This helps each bite feel tender and smooth. Use cooked chicken that’s still warm, as it mixes better with the other ingredients.
When it comes to seasoning, don’t hold back. The ranch seasoning mix adds a great taste. I always suggest starting with a tablespoon. You can adjust to your liking. Taste as you mix. Add salt and pepper, a little at a time, until it’s just right.
Serving Suggestions
Presentation can make your croissants stand out. Arrange them neatly on a platter. You can serve them whole or cut in half for easy grabbing. Place a small bowl of extra dill pickles next to them. This adds a nice touch and makes it easy for guests.
For sides, consider serving fresh fruit or a light salad. A simple green salad pairs nicely. You can even add some crunchy chips for texture. This makes for a fun and tasty meal that everyone will enjoy.
Variations
Customization Options
You can change this recipe to suit your taste. Here are some ideas.
- Alternative proteins to try: Instead of chicken, use turkey or canned tuna. Both work well and give a new twist. For a meat-free option, try chickpeas or tofu for a healthy plant-based salad.
- Different seasoning blends: Swap the ranch mix for other blends, like garlic or lemon pepper. You can also add some hot sauce for a spicy kick.
Dietary Modifications
If you seek healthier choices, here are some easy swaps.
- Low-calorie alternatives: Use Greek yogurt instead of mayonnaise. This keeps the creamy texture but cuts calories. You can also use less chicken or add more veggies to lighten it up.
- Gluten-free options for croissants: Look for gluten-free croissants at your local store. You can also use lettuce wraps or gluten-free bread for a crunchy and satisfying meal.
Explore these variations to make your Pickle Ranch Chicken Salad Croissants even more exciting.
Storage Info
Keeping Your Croissants Fresh
To keep your pickle ranch chicken salad croissants fresh, store any leftovers in an airtight container. This helps prevent drying out. You can place a paper towel in the container to absorb moisture. The best time to eat them is within three days for optimal taste. After that, the croissants may become soggy or lose flavor.
Reheating Tips
You might want to enjoy your croissants warm. To reheat them, use an oven or toaster oven. Heat at 350°F for about 5-7 minutes. This keeps the croissants crisp. Avoid using a microwave, as it can make them chewy. If you have extra chicken salad, you can use it in wraps or on a bed of greens. This way, you can create a new meal with the leftovers that is just as tasty!
FAQs
Common Questions
Can I use rotisserie chicken?
Yes, rotisserie chicken works great in this recipe. It saves time and adds flavor. Simply shred the chicken and mix it in.
How do I make this salad ahead of time?
You can make the salad a day in advance. Store it in an airtight container in the fridge. Just assemble the croissants when you’re ready to serve.
What are some good sides to serve with these croissants?
Some tasty sides include fresh fruit, chips, or a simple green salad. These pair well and add color to your plate.
Additional Queries
Where can I buy ready-made chicken salad?
You can find ready-made chicken salad at grocery stores or deli counters. Look for local options for the freshest taste.
Can I substitute the croissants with other bread?
Yes, you can use any bread you like. Try using bagels, pita, or even lettuce wraps for a low-carb option.
This blog post covered how to make a tasty chicken salad for croissants. You learned the key ingredients and the steps for mixing and assembling. I shared tips to get the best flavors and textures. You can also try different proteins or seasonings to make it your own. Store any leftovers properly to keep them fresh. This dish is great for gatherings or a simple meal at home. Enjoy making your delicious chicken salad and impress your friends and family!
![- Cooked chicken - Creamy mayonnaise - Dill pickle relish - Ranch seasoning mix - Green onions - Celery - Salt and black pepper - Buttery croissants - Lettuce leaves - Dill pickle slices To make the Pickle Ranch Chicken Salad Croissants, you need a few simple ingredients. Start with cooked chicken. Shredded chicken works best, and you can use leftover rotisserie chicken if you like. Next, grab creamy mayonnaise, which adds richness and binds everything together. You will also need some dill pickle relish. This gives the salad a tangy kick. For flavor, add a packet of ranch seasoning mix. It brings a burst of taste to the dish. Then, you will need green onions and celery. They add crunch and freshness to the chicken salad. Don’t forget salt and black pepper to season your salad to your liking. For the base, use buttery croissants. They are soft and flaky, perfect for holding the chicken salad. You’ll also need lettuce leaves to line the croissants and keep them from getting soggy. Lastly, you can add dill pickle slices on the side for extra crunch and flavor. You can find the full recipe [Full Recipe] in the next section. First, we mix the chicken salad. Start with two cups of cooked chicken, shredded. Add half a cup of creamy mayonnaise and a quarter cup of dill pickle relish. Then, mix in one tablespoon of ranch seasoning. Stir until everything is well combined. Next, we season the mixture. Taste your chicken salad and add salt and black pepper to your liking. This step is key for great flavor. Now, we assemble the croissants. Carefully slice each croissant in half. Place a lettuce leaf on the bottom half. This keeps the croissant from getting soggy. Let’s combine the base ingredients. In a large bowl, mix the chicken, mayonnaise, relish, and ranch seasoning. Use a spatula to blend well. Now, we add vegetables for crunch. Toss in a quarter cup of finely chopped green onions and celery. Mix until all the veggies are evenly spread throughout. Finally, we make the chicken salad shine. After seasoning, ensure everything is properly mixed. This is the moment when you can adjust the flavor if needed. For the finishing touch, scoop the chicken salad onto the lettuce-covered croissant halves. Pile it high for a tasty bite! Don't forget to garnish with extra dill pickle slices for added flavor. For the full recipe, refer to the beginning section. To get the best texture for your chicken salad, start with shredded chicken. It's key to keep the pieces small and evenly shredded. This helps each bite feel tender and smooth. Use cooked chicken that’s still warm, as it mixes better with the other ingredients. When it comes to seasoning, don’t hold back. The ranch seasoning mix adds a great taste. I always suggest starting with a tablespoon. You can adjust to your liking. Taste as you mix. Add salt and pepper, a little at a time, until it’s just right. Presentation can make your croissants stand out. Arrange them neatly on a platter. You can serve them whole or cut in half for easy grabbing. Place a small bowl of extra dill pickles next to them. This adds a nice touch and makes it easy for guests. For sides, consider serving fresh fruit or a light salad. A simple green salad pairs nicely. You can even add some crunchy chips for texture. This makes for a fun and tasty meal that everyone will enjoy. {{image_4}} You can change this recipe to suit your taste. Here are some ideas. - Alternative proteins to try: Instead of chicken, use turkey or canned tuna. Both work well and give a new twist. For a meat-free option, try chickpeas or tofu for a healthy plant-based salad. - Different seasoning blends: Swap the ranch mix for other blends, like garlic or lemon pepper. You can also add some hot sauce for a spicy kick. If you seek healthier choices, here are some easy swaps. - Low-calorie alternatives: Use Greek yogurt instead of mayonnaise. This keeps the creamy texture but cuts calories. You can also use less chicken or add more veggies to lighten it up. - Gluten-free options for croissants: Look for gluten-free croissants at your local store. You can also use lettuce wraps or gluten-free bread for a crunchy and satisfying meal. Explore these variations to make your Pickle Ranch Chicken Salad Croissants even more exciting. For the full recipe, check the recipe section above. To keep your pickle ranch chicken salad croissants fresh, store any leftovers in an airtight container. This helps prevent drying out. You can place a paper towel in the container to absorb moisture. The best time to eat them is within three days for optimal taste. After that, the croissants may become soggy or lose flavor. You might want to enjoy your croissants warm. To reheat them, use an oven or toaster oven. Heat at 350°F for about 5-7 minutes. This keeps the croissants crisp. Avoid using a microwave, as it can make them chewy. If you have extra chicken salad, you can use it in wraps or on a bed of greens. This way, you can create a new meal with the leftovers that is just as tasty! Can I use rotisserie chicken? Yes, rotisserie chicken works great in this recipe. It saves time and adds flavor. Simply shred the chicken and mix it in. How do I make this salad ahead of time? You can make the salad a day in advance. Store it in an airtight container in the fridge. Just assemble the croissants when you’re ready to serve. What are some good sides to serve with these croissants? Some tasty sides include fresh fruit, chips, or a simple green salad. These pair well and add color to your plate. Where can I buy ready-made chicken salad? You can find ready-made chicken salad at grocery stores or deli counters. Look for local options for the freshest taste. Can I substitute the croissants with other bread? Yes, you can use any bread you like. Try using bagels, pita, or even lettuce wraps for a low-carb option. This blog post covered how to make a tasty chicken salad for croissants. You learned the key ingredients and the steps for mixing and assembling. I shared tips to get the best flavors and textures. You can also try different proteins or seasonings to make it your own. Store any leftovers properly to keep them fresh. This dish is great for gatherings or a simple meal at home. Enjoy making your delicious chicken salad and impress your friends and family!](https://dishtreats.com/wp-content/uploads/2025/07/dff408d1-932c-47c7-977b-b0a9332b2143-300x300.webp)
 and [Tzatziki Recipe 2](#). Serve gyros with crispy fries or a fresh Greek salad. You can also add pickled vegetables for extra crunch. A glass of refreshing lemonade pairs well too. In this post, we explored making Greek Chicken Gyros. We looked at key ingredients like chicken thighs and fresh toppings. Following easy steps, you learned how to marinate and cook chicken perfectly. We shared tips for grilling and serving for the best taste. You can even try different proteins or vegetarian options. Now, you’re ready to make delicious gyros. Enjoy sharing this tasty dish with others!](https://dishtreats.com/wp-content/uploads/2025/07/f3d3865c-0788-4b9a-9d14-bf25eefe6fbb-768x768.webp)
. - Preheat to 350°F (175°C). - Prepare muffin tin by lining with muffin liners or greasing it lightly. - In a medium bowl, combine: - 1 cup rolled oats - 1 cup whole wheat flour - 1 teaspoon baking powder - 1/2 teaspoon baking soda - 1/2 teaspoon salt - Whisk these until they mix well. Set the bowl aside for now. - In a large bowl, add: - 2 ripe bananas, mashed until smooth - 1/2 cup honey or maple syrup - 1/4 cup unsweetened applesauce - 2 large eggs - 1 teaspoon pure vanilla extract - Use a whisk to blend these ingredients. Make sure it is smooth and creamy. - Gradually add the dry mix to the wet mix. - Stir gently until just combined. It’s okay if a few lumps remain. - Carefully fold in: - 1 cup fresh or frozen cherries, pitted and chopped - Optional: 1/2 cup chopped walnuts or pecans - Ensure they are spread out in the batter without overmixing. - Spoon the batter into the muffin cups. Fill each about two-thirds full. - Place the muffin tin in the oven and bake for 18-20 minutes. - Check for doneness with a toothpick. It should come out clean. - Once done, let them cool for about 5 minutes in the tin. - After that, move them to a cooling rack. For the full recipe, refer to the main section. Enjoy your tasty Cherry Banana Oat Muffins! To get the best texture in your muffins, avoid overmixing. When you combine wet and dry ingredients, stir gently. You want some lumps in the batter. Overmixing can lead to tough muffins. Using ripe bananas is important too. The sweeter and softer they are, the better your muffins will taste. Look for bananas with brown spots; those are perfect for baking. To test for doneness, use a toothpick. Insert it into the center of a muffin. If it comes out clean, the muffins are ready. If it has batter on it, bake for a few more minutes. If you live at a high altitude, you may need to adjust the bake time. Muffins may bake faster, so keep an eye on them. Serve your muffins warm for the best flavor. A light dusting of powdered sugar makes them look nice. You can also add fresh mint leaves for a pop of color. These muffins pair well with your favorite tea or coffee. Enjoy them as a snack or breakfast treat! For the full recipe, check out the details above. {{image_4}} You can easily change the flavor of these muffins. Adding spices like cinnamon or nutmeg gives them a warm touch. Just sprinkle in about a teaspoon of cinnamon for a cozy flavor. Nutmeg is great too, but use less, about 1/4 teaspoon. You can also try different fruits. Swap cherries for blueberries or apples. Each fruit gives a new taste and keeps things fun. If you want a vegan option, you can replace the eggs. Use flax eggs instead. Mix 1 tablespoon of ground flaxseed with 2.5 tablespoons of water. Let it sit for 5 minutes. For a low-sugar option, cut the honey or maple syrup in half. You can also use a sugar substitute like stevia. This way, you still enjoy the muffins without too much sugar. You can change the size of your muffins. Make mini muffins by using a mini muffin tin. Fill each cup halfway and bake for about 10-12 minutes. If you prefer standard-sized muffins, stick to the original recipe. Just remember, baking time changes with size. Keep an eye on them to avoid overbaking. For the full recipe, check out the details above. To keep your Cherry Banana Oat Muffins fresh, store them in an airtight container. This way, they stay moist and tasty. You can keep them at room temperature for up to three days. If you live in a warm area, use the fridge. Muffins can last about a week in the refrigerator. Just be aware that cold storage may change their texture slightly. If you want to save muffins for later, freezing is the best option. To freeze, allow the muffins to cool completely. Then, wrap each one in plastic wrap. Place them in a freezer-safe bag or container. They can stay frozen for up to three months. When you want to eat them, take a muffin out and thaw it in the fridge overnight. For the best texture, you can also microwave the muffin for about 20 seconds after thawing. To enjoy your muffins warm, use the oven or microwave. For the oven, preheat to 350°F (175°C). Place the muffin on a baking sheet and heat for about 5 to 10 minutes. This warms them through and helps regain moisture. If you use the microwave, heat for about 10 to 15 seconds. Just be careful not to overheat, as this can make them dry. Warm muffins taste best and are a perfect treat! Yes, you can use frozen cherries. They will soften during baking. This may change the texture a bit. The flavor will still be great. Just make sure to chop them before adding to the mix. If you use frozen cherries, you do not need to thaw them first. To ripen bananas fast, place them in a paper bag. This traps the ethylene gas they emit. You can also add an apple to the bag for even faster results. If you are in a hurry, you can bake bananas at 300°F (150°C) for about 15-20 minutes. This will soften them quickly. If you want to swap honey, maple syrup is a great choice. Agave nectar or brown sugar also works well. Each option will give a different taste, but they will all be sweet. Use the same amount as honey in the recipe. Each muffin has about 140 calories. This can change based on your ingredients. If you use nuts or different sweeteners, check those values. These muffins are a tasty, healthy treat you can enjoy without guilt. When stored well, these muffins last about 3 days at room temperature. Keep them in an airtight container to maintain freshness. You can store them in the fridge for up to a week. For longer storage, freeze them for up to 3 months. Just thaw them before enjoying! You now have a simple yet tasty recipe for cherry banana oat muffins. You learned about ingredients, from oats to cherries, and how to mix them. We covered important tips for getting the right texture and bake time. You also have ideas for variations and storage. These muffins are a great snack or breakfast option. Enjoy making them your way!](https://dishtreats.com/wp-content/uploads/2025/07/f958d702-06c5-46b3-af8d-5861eadc8c12-768x768.webp)
![When you make cheesy sheet pan chicken quesadillas, you need the right ingredients for the best taste. Here’s what you will need: - Shredded chicken options - 2 cups cooked chicken, shredded (rotisserie chicken works wonderfully) - Cheese varieties - 1 cup shredded cheddar cheese - 1 cup shredded Monterey Jack cheese - 1/2 cup cream cheese, softened - 1/4 cup sour cream - Vegetables and other mix-ins - 1 medium red bell pepper, diced - 1 medium green bell pepper, diced - 1 small red onion, finely chopped - 1 tablespoon taco seasoning - 8 large flour tortillas - 1 tablespoon olive oil - Fresh cilantro, chopped (for garnish) - Salsa, for serving - Avocado or guacamole, for serving These ingredients blend together to create a flavor-packed meal. Using rotisserie chicken saves time and adds great taste. The mix of cheddar and Monterey Jack gives a creamy, melty texture. Adding bell peppers and onions adds crunch and freshness. The taco seasoning gives it that extra kick. Feel free to experiment with your favorite veggies and cheese. This recipe is versatile and allows you to customize it to your liking. For the full recipe, check out the details above. Set your oven to 400°F (200°C). This heat helps the quesadillas cook evenly. Grab a large baking sheet and line it with parchment paper. This step is key because it keeps the quesadillas from sticking. Plus, it makes clean-up a breeze. In a big bowl, mix your ingredients well. You will need cooked chicken, cheddar cheese, Monterey Jack cheese, cream cheese, sour cream, diced red and green bell peppers, chopped red onion, and taco seasoning. The mixture should be smooth and creamy. Look for a texture that is spreadable but not runny. This helps keep the filling inside the tortillas. On a flat surface, lay down four tortillas. Spread the chicken mixture evenly on each one. Make sure to reach the edges so every bite is tasty. Then, place another tortilla on top of each filled one. Press down gently. This helps them stick together and hold the filling in. Once your quesadillas are ready, move them to the baking sheet. Brush the tops with olive oil. This adds flavor and helps them turn golden brown. Bake in your preheated oven for 15-20 minutes. Look for a nice golden color and melted cheese inside. These signs tell you they are done. After baking, take the quesadillas out and let them cool for a few minutes. This makes slicing easier. Cut each quesadilla into quarters for serving. Aim for about 4-6 servings, depending on your crowd. These quesadilla wedges are perfect for sharing! Avoiding Soggy Tortillas To keep your tortillas crisp, avoid overfilling them. Less is more! Also, use the right amount of olive oil on top. This will help them brown nicely. Always make sure to bake them until they are golden brown. Best Types of Tortillas to Use For the best texture, I recommend using large flour tortillas. They hold the filling well and become soft when baked. Corn tortillas can work too, but they may crack more easily. Pairing with Dipping Sauces Serve your quesadillas with a variety of dips. Salsa is a classic choice. You can also offer guacamole and sour cream. These add creaminess and flavor. Garnishes for Presentation To make your dish look great, sprinkle fresh cilantro on top. You can also add sliced jalapeños for a pop of color. This makes your quesadillas look fancy and appetizing. Adjusting the Recipe If you have a big group, you can easily double the recipe. Just make sure to use a larger baking sheet. This way, you can cook more quesadillas at once. Time-Saving Tips Use rotisserie chicken for quick prep. It saves time and adds great flavor. You can also chop your veggies ahead of time. This keeps the cooking quick and easy. To see the full recipe, check out the [Full Recipe]. {{image_4}} Alternative Proteins You can switch the chicken for other proteins. Try shredded beef or cooked shrimp. For a lighter option, use turkey. If you prefer plant-based meals, chickpeas or tofu work well too. Different Cheese Combos Cheese is key to quesadillas. You can mix different cheeses for fun flavors. Pepper Jack adds spice, while gouda gives a smoky touch. Experiment with cream cheese and feta for creamy bites. Adding Spices or Herbs Spice up your quesadillas! Add chili powder or cumin for warmth. Fresh herbs like cilantro or parsley brighten flavors. A squeeze of lime gives a fresh zing. Incorporating Beans or Corn Beans and corn boost nutrition and flavor. Black beans add protein, while corn brings sweetness. Mix them into your filling for a hearty twist. Gluten-Free Options To make this dish gluten-free, swap flour tortillas for corn ones. Always check labels to ensure they meet your needs. You can also serve the filling on lettuce wraps. Vegetarian Adjustments For a vegetarian version, skip the chicken. Use mushrooms or zucchini for a meaty texture. Add more beans and veggies to keep it filling. For the full recipe, check the [Full Recipe]. To store your cheesy sheet pan chicken quesadillas, let them cool first. Wrap them tightly in plastic wrap or foil. You can also place them in an airtight container. This keeps them fresh and tasty. - Shelf Life: When stored properly, quesadillas last up to 3 days in the fridge. After that, they may lose flavor and freshness. If you want to save some for later, freezing is great! - How to Freeze Quesadillas: First, cool them completely. Then, wrap each quesadilla in plastic wrap. Place them in a freezer-safe bag or container. This helps prevent freezer burn. - Reheating Tips for Best Results: To reheat, thaw overnight in the fridge. Then, bake them at 350°F (175°C) for about 10 minutes. This makes them warm and crispy again. Don't let any filling go to waste! - Creative Ways to Use Leftovers: You can add leftover filling to salads or burritos. Mix it with scrambled eggs for a tasty breakfast. - Recipes Using Leftover Filling: Try using the filling in omelets or as a topping for nachos. You can also use it in stuffed peppers for a fun twist. For more details on making this dish, check out the [Full Recipe]. To make this dish gluten-free, swap out regular flour tortillas for gluten-free ones. Many brands offer great taste and texture. You can also check for taco seasoning that is gluten-free. This way, you keep all the flavor without the gluten. Yes, you can use raw chicken. Just make sure to cook it first. You can bake or grill the chicken until it reaches 165°F (75°C). Shred the cooked chicken before mixing it with the other ingredients. This keeps your quesadillas safe and tasty. To reheat quesadillas, use the oven or a skillet. Preheat the oven to 350°F (175°C) and bake for about 10 minutes. If using a skillet, heat it over medium heat. Cook for 2-3 minutes on each side until warm and crispy. This way, you keep the texture nice. Look for a golden brown color on the outside. You should also see melted cheese oozing out from the edges. A crispy texture means they are ready to enjoy. Let them cool for a few minutes after baking before slicing. Quesadillas pair well with many sides. You can serve them with salsa or guacamole for dipping. A fresh salad or some Mexican rice adds a nice touch too. Black beans are another great side option. These sides enhance your meal and make it even more fun to eat. You now have all the tools to make great chicken quesadillas. We covered essential ingredients and step-by-step instructions. Use the tips to avoid soggy tortillas and serve with tasty dips. Don’t forget to explore variations to suit your taste. Store any leftovers properly for future meals. Whether for a quiet dinner or a crowd, you’re ready to impress. Enjoy your cooking and have fun creating delicious quesadillas!](https://dishtreats.com/wp-content/uploads/2025/07/9e515845-1856-4bb5-82ee-80ca33afd87d-768x768.webp)