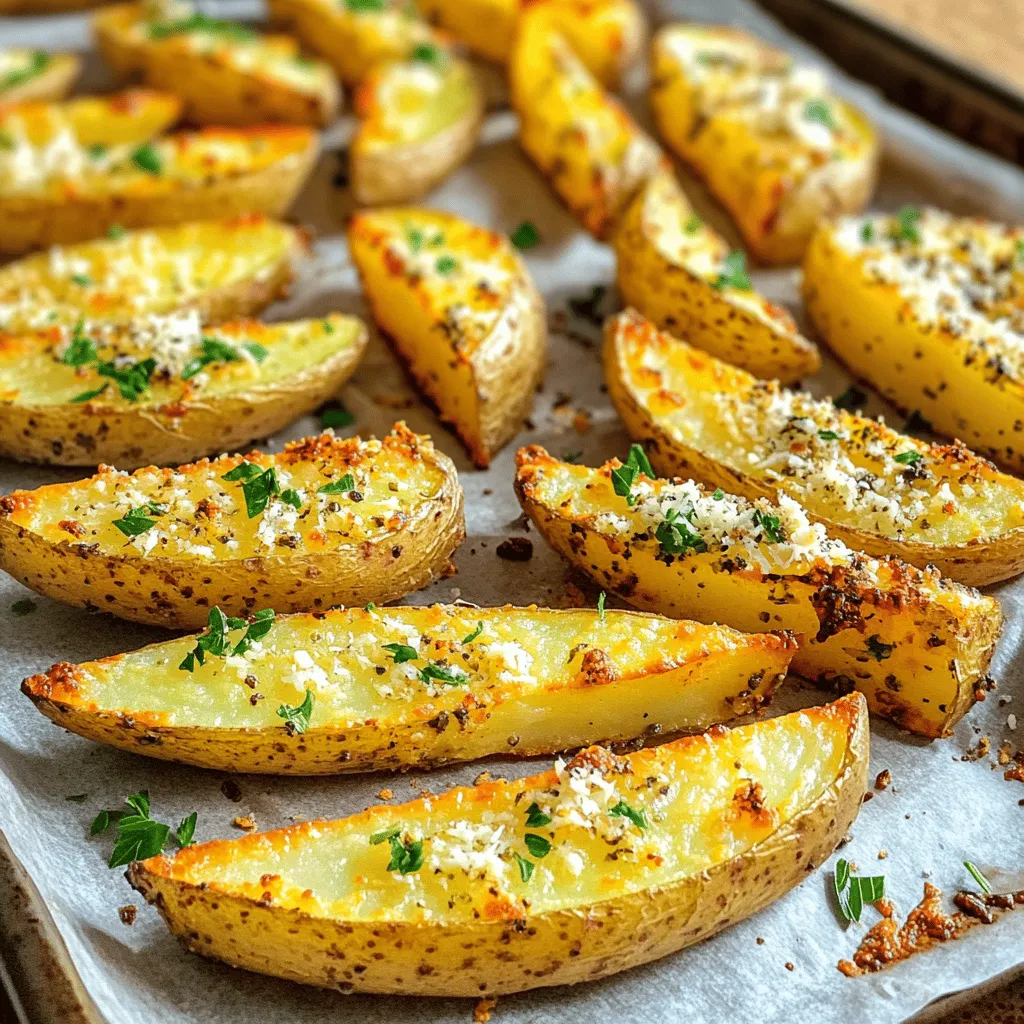
Garlic Parmesan Potato Wedges Crispy and Flavorful Treat

If you’re looking for a tasty side dish that’s simple to make, you’ve found it! My Garlic Parmesan Potato Wedges are crispy, flavorful, and perfect for any meal. With just a handful of ingredients, you can whip up this delicious treat that everyone will love. I invite you to explore the mouthwatering details and step-by-step instructions in this guide. Let’s get started on making your new favorite potato wedges!
Ingredients
List of Ingredients
- 4 large russet potatoes
- 4 tablespoons extra virgin olive oil
- 4 cloves garlic, finely minced
- 1 teaspoon garlic powder
- 1 teaspoon dried oregano
- 1 teaspoon smoked paprika
- ½ teaspoon sea salt
- ½ teaspoon freshly ground black pepper
- ½ cup freshly grated Parmesan cheese
- Fresh parsley, finely chopped (for garnish)
When you gather your ingredients, quality matters. I always choose large russet potatoes for their great texture. The olive oil adds richness, while the garlic brings bold flavor. Using fresh garlic makes a big difference. The dried oregano and smoked paprika give depth to each bite. Salt and pepper balance the taste, and the Parmesan adds a savory finish.
Nutritional Information
- Calories per serving: Approximately 230
- Carbs: 34g
- Fats: 10g
- Proteins: 5g
Knowing the nutritional info helps you enjoy these wedges in a healthy way. Each serving packs a satisfying crunch, with just enough carbs to fuel your day. The fats come from olive oil and cheese, making these wedges a tasty treat.
Step-by-Step Instructions
Preparation Steps
- Preheat oven to 425°F (220°C).
- Wash and scrub potatoes.
Start by heating your oven. It needs to be hot for crispy potato wedges. Clean the russet potatoes well. Use cold water and scrub them until they shine. This step is key for great flavor and texture.
Cooking Steps
- Mixing the seasoning.
- Coating the potato wedges.
- Baking instructions.
In a big bowl, mix the olive oil, minced garlic, garlic powder, dried oregano, smoked paprika, sea salt, and black pepper. Whisk until it looks smooth. Next, add the potato wedges. Toss them gently in the bowl. Make sure each wedge gets coated well in that tasty mix.
Now, place the wedges on a baking sheet. Give them space so they can crisp up. Bake them for 25-30 minutes. Flip the wedges halfway through to get an even brown color. Watch for that golden crunch!
Finishing Touch
- Adding Parmesan cheese.
- Garnishing with parsley.
When the wedges are done, take them out of the oven. Right away, sprinkle the grated Parmesan cheese over the hot wedges. This step melts the cheese perfectly. Put them back in the oven for 5 more minutes.
After that, take them out again. Grab some fresh parsley and chop it finely. Sprinkle it on top for a fresh look and taste. Serve these Garlic Parmesan Potato Wedges hot. They are sure to impress!
Tips & Tricks
Achieving the Perfect Crispiness
To get crispy potato wedges, you need to bake them right. First, preheat your oven to 425°F (220°C). This high heat helps the wedges turn golden and crispy.
When you cut the potatoes, aim for even sizes. This way, they cook at the same time. Spread the wedges out on the baking sheet. Give them space. This allows hot air to flow around each wedge, making them crispier.
Flavor Enhancements
Want to kick up the flavor? Add fresh herbs like rosemary or thyme. They add great taste. You can also try spices like cayenne pepper for some heat. Mix and match to create your perfect flavor.
Cheese is another fun option. Try mixing Parmesan with cheddar or feta. Each cheese brings its own flavor to the dish.
Cooking Equipment
For baking, use a sturdy baking sheet. A dark, non-stick pan works best for crispiness. It helps the wedges brown evenly.
Also, get some good tools for prep. A sharp knife makes cutting easier. A large bowl helps you mix the wedges well with the seasoning.
With these tips, you’ll make the best Garlic Parmesan Potato Wedges.
Variations
Different Flavor Profiles
You can play with flavors to make your garlic Parmesan potato wedges even better. One fun option is to make spicy garlic Parmesan potato wedges. Just add some cayenne pepper or chili flakes to the seasoning mix. This gives your dish a nice kick that spice lovers will enjoy.
Another idea is to create herb-infused variations. You can try adding fresh herbs like rosemary or thyme to the mix. These herbs add a lovely aroma and taste that pairs well with the garlic and cheese.
Alternative Cooking Methods
If you want a quicker way to cook, try the air fryer. Air frying gives you that crispy outside without using a lot of oil. Just coat the wedges as usual, then place them in the air fryer basket. Cook them at 400°F for about 20 minutes, shaking halfway through.
Grilling is another fun option. It adds a smoky flavor that is hard to resist. Just marinate the wedges in the garlic mix, then place them on the grill. Cook until they are tender and have nice grill marks.
Dietary Substitutions
If you need vegan alternatives, you can swap the Parmesan cheese for a dairy-free option. Nutritional yeast is a great choice. It has a cheesy flavor and packs in some nutrients. You can also use coconut oil instead of olive oil for a vegan-friendly fat.
For gluten-free variations, you don’t need to change much. All the ingredients are naturally gluten-free! Just make sure to check the labels on any pre-made spices you use to ensure they don’t contain gluten.
Storage Info
Storing Leftovers
To keep your garlic parmesan potato wedges fresh, store them in the fridge. Place them in an airtight container. This method helps prevent sogginess. They will stay good for about 3-4 days. If you want to keep them longer, consider freezing.
Reheating Instructions
For the best crispiness, reheat in the oven. Preheat your oven to 375°F (190°C). Spread the wedges on a baking sheet. Bake for about 10-15 minutes. Flip them halfway for even heating.
If you need a quicker option, you can use the microwave. However, be aware that this method may make them softer. Place the wedges on a microwave-safe plate and heat in short bursts of 30 seconds. This ensures they don’t get too hot.
Freezing Guidelines
Yes, you can freeze garlic parmesan potato wedges! To do this, let them cool completely first. Then, place them in a single layer on a baking sheet. Freeze until solid, then transfer to a freezer bag. This helps prevent them from sticking together.
To thaw, move them to the fridge overnight. You can also bake them straight from the freezer. Just add a few extra minutes to the bake time. This way, you can enjoy them later!
FAQs
How long do garlic parmesan potato wedges last?
Garlic parmesan potato wedges can last up to four days in the fridge. To store them, let them cool completely. Then, place them in an airtight container. Keep the container in the fridge to keep them fresh. For the best taste, eat them within two days.
Can I use sweet potatoes instead?
Yes, you can use sweet potatoes! They will give a different flavor and sweetness. Sweet potatoes add a nice twist to the dish. Just follow the same steps to cut and coat them. You may need to adjust the baking time since sweet potatoes can cook faster.
What dipping sauces pair well?
Some popular dipping sauces for garlic parmesan potato wedges include ranch, ketchup, and garlic aioli. Each sauce adds its own flavor. For a homemade garlic aioli, mix mayonnaise, minced garlic, and lemon juice. This adds a creamy and tangy touch.
For more ideas, try spicy mayo or BBQ sauce. These sauces can enhance the taste of your wedges and make them even more enjoyable!
This blog post covered how to make crispy garlic Parmesan potato wedges. We discussed the ingredients you need, like russet potatoes and olive oil. I shared step-by-step instructions for preparation and baking, ensuring flavor and texture.
You learned tips for the perfect crispiness and ideas for variations. Whether stored, reheated, or frozen, these wedges are a versatile snack.
Enjoy this tasty recipe, and don’t hesitate to experiment! Your guests will love it.

![- 1 cup uncooked jasmine rice - 1 pound shrimp, peeled and deveined - 2 tablespoons vegetable oil - 3 tablespoons soy sauce - 1 tablespoon sesame oil - Salt and pepper, to taste - 1 cup mixed vegetables - 2 cloves garlic, minced - Fresh green onions, for garnish When I make Easy Shrimp Fried Rice, I always start with the main ingredients. The jasmine rice gives a lovely aroma and texture. For the shrimp, I prefer fresh, peeled, and deveined ones. They cook quickly and taste great. Seasonings are key to this dish. Soy sauce adds umami, while sesame oil gives a nutty flavor. Always remember to season with salt and pepper to bring out the taste. I love adding optional ingredients for extra flavor and color. Mixed veggies like peas and carrots add a nice crunch. Minced garlic gives it a punch, and fresh green onions on top make it look beautiful. For the full recipe, check out the details. Enjoy cooking! - First, rinse 1 cup of jasmine rice under cold water. Use your hands to stir the rice as you rinse. This helps remove excess starch. Keep rinsing until the water runs clear. Drain the rice well. - Next, take a medium saucepan. Add the rinsed rice along with 2 cups of water or low-sodium chicken broth. Bring it to a boil over high heat. Once it boils, lower the heat. Cover the pot with a lid and let it simmer for 15 minutes. The rice will absorb the liquid and become tender. When done, fluff the rice with a fork and set it aside to cool. - Now, heat 2 tablespoons of vegetable oil in a large skillet or wok over medium-high heat. Add 2 cloves of minced garlic and 1 small finely chopped onion. Sauté them for 2-3 minutes. The garlic should smell nice, and the onion will turn clear. - Then, add 1 pound of peeled and deveined shrimp to the skillet. Spread them out evenly. Cook for 2-3 minutes, until the shrimp turn pink and opaque. Once cooked, take them out and set them aside on a plate. - In the same skillet, toss in 1 cup of mixed vegetables. Stir-fry them for 2-3 minutes. They should soften but stay colorful. - Next, push the cooked vegetables to one side of the skillet. Pour in 2 large lightly beaten eggs on the other side. Scramble them until fully cooked and a bit golden. - Now, add the cooled jasmine rice to the skillet. Mix it in with the scrambled eggs and vegetables. Gently fold in the cooked shrimp, ensuring everything combines well. - Drizzle 3 tablespoons of soy sauce and 1 tablespoon of sesame oil over the rice mixture. Stir everything well. Season with salt and freshly ground black pepper to taste. Cook for another 2-3 minutes to let the flavors mix. - Finally, take the skillet off the heat. Garnish with sliced green onions for a fresh touch before serving. This is how you create a delicious shrimp fried rice. For the full recipe, check the section above! - Rinse rice for fluffiness: Rinsing jasmine rice helps remove excess starch. This keeps the rice from becoming sticky. Rinse it until the water runs clear. - Avoid overcooking shrimp: Cook shrimp until they turn pink and opaque. Overcooked shrimp can become rubbery. Remove them from heat as soon as they are done. - Use low-sodium soy sauce: This allows you to control salt levels. It makes your fried rice taste good without too much sodium. - Add extra vegetables for nutrition: Toss in broccoli, peas, or bell peppers. This boosts fiber and vitamins, making your meal healthier. - Recommended garnishes: Fresh green onions add color and taste. You can also sprinkle sesame seeds for a fun crunch. - Pairing options for a complete meal: Serve with a side of steamed veggies or a light salad. This makes your meal balanced and tasty. If you want to dive deeper into the recipe, check out the Full Recipe. {{image_4}} You can easily switch out shrimp in this dish. Try using chicken or tofu instead. Both options work great. For chicken, use bite-sized pieces and cook until golden. For tofu, press it to remove water and then cube it. Sauté until crispy. These changes keep the meal tasty and fun! If you want a vegetarian dish, just leave out the shrimp. Increase the number of vegetables instead. You can add more peas, carrots, bell peppers, or even broccoli. This makes the dish colorful and healthy. Plus, you still get a yummy meal that fills you up! Want to make your fried rice pop with flavor? Add spices like chili or ginger. These spices add heat and depth. You can also mix in some citrus zest, like lemon or lime. This adds a fresh, bright taste that enhances the dish. These little changes make a big difference! Check out the Full Recipe for more ideas. To store shrimp fried rice, let it cool first. Place it in an airtight container. This keeps the rice fresh and prevents it from drying out. You can refrigerate it for up to three days. When you want to eat it, check for any off smells or changes in texture. If you want to freeze shrimp fried rice, portion it into small containers. Make sure to leave some space at the top for expansion. This dish can last in the freezer for about one month. When ready to eat, thaw it in the fridge overnight for best results. For reheating, the stovetop is ideal. Add a splash of water or broth to keep it moist. Heat over medium heat, stirring often. You can also use the microwave. Heat in 30-second intervals, stirring in between. This way, your shrimp fried rice will taste fresh and full of flavor. For more cooking tips, you can check the [Full Recipe]. To boost flavor, use fresh ingredients. Fresh garlic, ginger, and green onions add depth. Try adding a splash of fish sauce for umami. A sprinkle of lime juice brightens the dish. For heat, add chili flakes or sriracha. Lastly, use low-sodium soy sauce to control saltiness. These tips help create a tasty, vibrant meal. Yes, you can prepare shrimp fried rice ahead of time. Cook the rice and shrimp, then store them separately. Keep everything in airtight containers in your fridge. When ready to eat, combine and reheat in a skillet. Add a splash of water or broth to keep it moist. This method ensures your dish stays fresh and delicious. You can use many veggies to add color and crunch. Consider bell peppers, broccoli, or snap peas. Zucchini and mushrooms also work well. Toss in some corn for sweetness or spinach for extra greens. Feel free to mix and match based on your taste. This allows for fun, creative variations. Yes, shrimp fried rice can be gluten-free. Use tamari instead of soy sauce. Check labels on other sauces to ensure they are gluten-free. Most vegetables are naturally gluten-free too. By choosing the right ingredients, you can enjoy this dish without worry. It makes for a tasty option for everyone! You learned how to make shrimp fried rice from scratch. We covered the key ingredients, step-by-step cooking instructions, and helpful tips. You can easily customize this dish with different proteins and veggies. Remember to store leftovers properly for future meals. Enjoying this dish should be fun and easy. With these steps, you can impress your family and friends. Happy cooking!](https://dishtreats.com/wp-content/uploads/2025/06/9ac088a4-5695-4856-8853-65ac7e0439f3-768x768.webp)

![- 1 cup rolled oats - 2 cups almond milk (or your preferred milk) - 1 medium sweet apple, diced (suggestions: Fuji or Gala) - 1 teaspoon ground cinnamon - 2 tablespoons maple syrup (or honey if you prefer) - 1/2 teaspoon vanilla extract - 1/4 cup plain Greek yogurt (optional) - Pinch of salt - Chopped nuts for topping - Extra apple slices and cinnamon for garnish Apple cinnamon overnight oats are easy to make and full of flavor. The oats soak overnight, making them creamy and delicious. You can customize this recipe based on your taste. For the base, I use rolled oats and almond milk, but feel free to pick any milk you like. The diced apple brings sweetness and crunch. I suggest using Fuji or Gala apples since they are sweet and juicy. Ground cinnamon adds warmth and a cozy touch. Maple syrup gives the oats a natural sweetness. If you want a little creaminess, add Greek yogurt. Don’t forget the pinch of salt; it enhances all the flavors. Chopped nuts add a nice crunch on top. You can use walnuts, pecans, or any nuts you enjoy. Finally, garnish with extra apple slices and a dusting of cinnamon for a pretty finish. - Different types of milk (coconut, oat, etc.) - Sweeteners (agave syrup, stevia, etc.) - Additional fruit (berries, bananas, etc.) If you want to try something different, there are many options. Swap almond milk for coconut or oat milk if you prefer. You can change sweeteners too; agave syrup or stevia work well. Add in more fruits like berries or sliced bananas for extra flavor. This makes each serving unique and fun. The best part? You can make it just how you like it! For the full recipe, check out Apple Cinnamon Overnight Oats Delight. - Step 1: Combine rolled oats with milk and yogurt. In a large bowl, mix 1 cup of rolled oats with 2 cups of almond milk. If you like, add 1/4 cup of Greek yogurt for creaminess. Stir until mixed well. - Step 2: Add apples, cinnamon, sweetener, vanilla, and salt. Fold in 1 diced apple, 1 teaspoon of ground cinnamon, and 2 tablespoons of maple syrup. Add 1/2 teaspoon of vanilla extract and a pinch of salt. Mix until everything is evenly distributed. - Step 3: Transfer mixture into jars and refrigerate. Spoon the oat mix into jars. Make sure each jar has some apple pieces. Close the lids and place them in the fridge overnight. - Evenly distribute diced apples among jars. This ensures each jar has the same amount of apple flavor. - Layer ingredients for visual appeal. Create a pretty look by layering oats and apples. This makes your breakfast even more inviting. - Stir before serving and adjust consistency. When you take the jars out, give them a good stir. If they feel too thick, add a splash of milk. - Top with nuts and additional apple slices. Finish with a sprinkle of chopped nuts and a few apple slices for crunch. A dash of cinnamon adds warmth and flavor. For full details, check the [Full Recipe]. To get the best texture, always use rolled oats. They soak up the liquid well. Steel-cut oats take longer to soften. You might want to avoid them for overnight oats. Adjust the sweetness by adding more or less maple syrup. Taste as you mix to find your perfect balance. Make a big batch of oats for quick breakfasts. You can prepare up to five jars at once. Store them in the refrigerator for up to five days. This way, you’ll have a quick meal ready on busy mornings. Feel free to experiment with spices like nutmeg or cardamom. Just a pinch can add a warm kick. You can also add seeds like chia or flaxseed. These add fiber and make your oats even better for you. {{image_4}} You can easily make apple cinnamon overnight oats vegan. Just swap the Greek yogurt for a plant-based yogurt. Use almond, coconut, or oat milk for a creamy base. These changes keep the flavor rich and tasty while being dairy-free. If you need gluten-free options, choose certified gluten-free oats. Many brands offer oats that are safe for those with gluten sensitivities. This way, you can enjoy your oats without worry. You can mix in other fruits to change the taste. Try berries like strawberries or blueberries for a fresh twist. Bananas also work well, adding sweetness and creaminess. For toppings, nuts and seeds add crunch. Chopped almonds, walnuts, or sunflower seeds all taste great. You can also sprinkle chia seeds for extra fiber and health benefits. In fall, add pumpkin spice to your oats for a cozy taste. Just mix in a teaspoon or two for that warm, spiced flavor. It pairs perfectly with apples. In summer, think about fresh fruits like peaches or mangoes. These fruits add a bright, juicy flavor. You can mix them in or use them as a topping for a colorful and tasty breakfast. For the complete recipe, check out the [Full Recipe]. To keep your apple cinnamon overnight oats fresh, use jars or airtight containers. Glass jars work great. They seal well and let you see the yummy layers. Make sure to refrigerate them right after you prepare them. This keeps the oats safe to eat. You can freeze individual servings of overnight oats. First, pour the oats into freezer-safe containers or jars. Leave some space at the top, as they will expand. To enjoy later, thaw them in the fridge overnight. Once thawed, stir well. You might want to add a splash of milk to make them creamy again. Apple cinnamon overnight oats can stay fresh in the fridge for up to five days. Check for any signs of spoilage before eating. If the oats smell sour or have a strange color, throw them away. Always trust your nose and eyes! For the best taste, enjoy them within the first few days. Apple cinnamon overnight oats are a tasty breakfast. They combine oats, milk, apples, and cinnamon. The mixture sits in the fridge overnight. This soaking makes the oats soft and creamy. You get a nice blend of flavors. It’s a quick way to enjoy a healthy meal. Yes, you can use quick oats. However, they have a different texture. Quick oats cook faster and become mushy. If you use them, soak for less time. Rolled oats keep a firmer bite and work better for overnight oats. Overnight oats last about 5 days in the fridge. Store them in airtight jars or containers. Check for bad smells or changes in texture. If they look or smell off, toss them out. Yes, kids love apple cinnamon overnight oats! They are sweet and fun to eat. Serve in small jars for a cute look. You can also add toppings like nuts or more fruit for variety. This makes it a family-friendly dish everyone can enjoy. Apple cinnamon overnight oats offer a delightful and easy breakfast option. You can prepare them quickly with just a few simple steps. This meal not only fills you up but also lets you customize flavors to your taste. Experiment with different fruits, sweeteners, and spices to keep it fun. Remember to store your oats correctly for freshness. Enjoy this nutritious dish throughout the week! Your mornings can be bright and delicious with this recipe.](https://dishtreats.com/wp-content/uploads/2025/06/6eb7544b-1d16-4ecc-8a32-decb7f29ee21-768x768.webp)