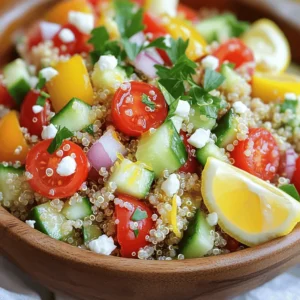
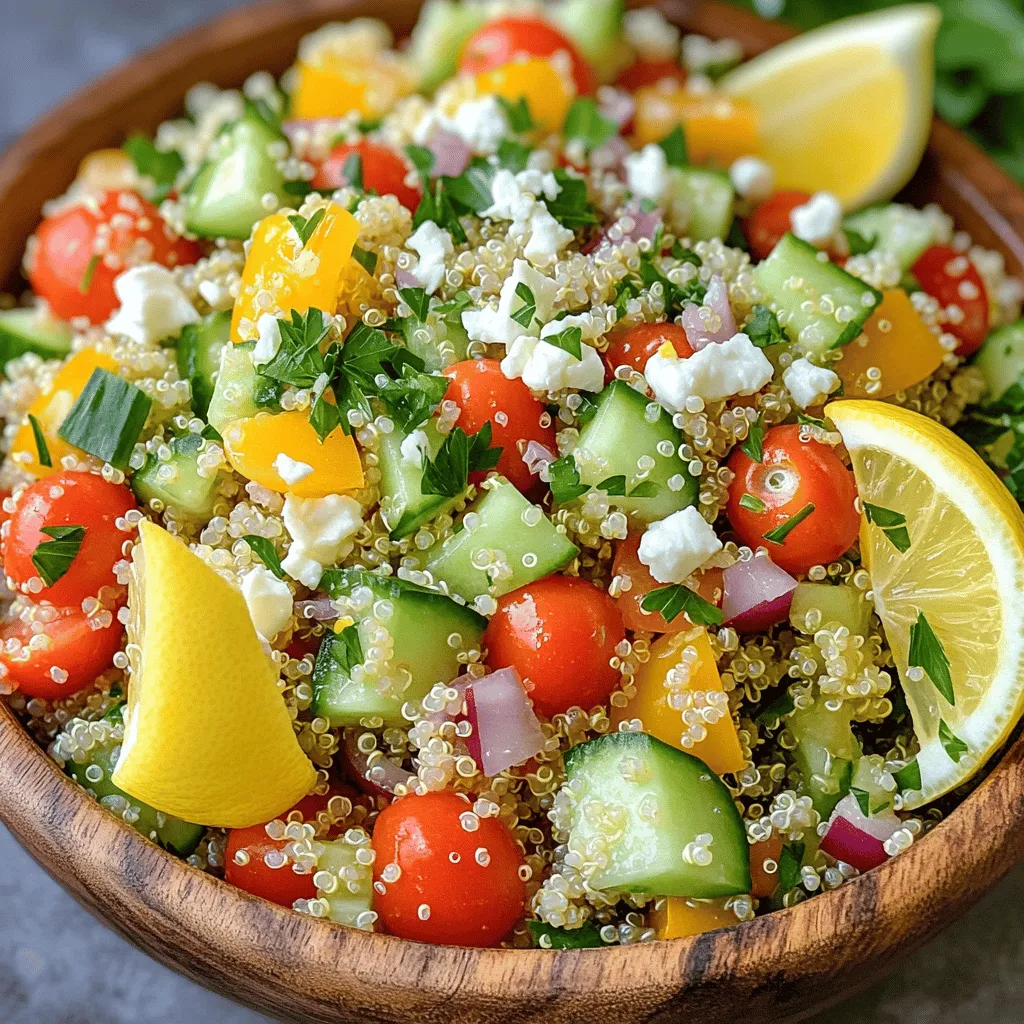
Lemon Garlic Quinoa Salad Fresh and Healthy Delight

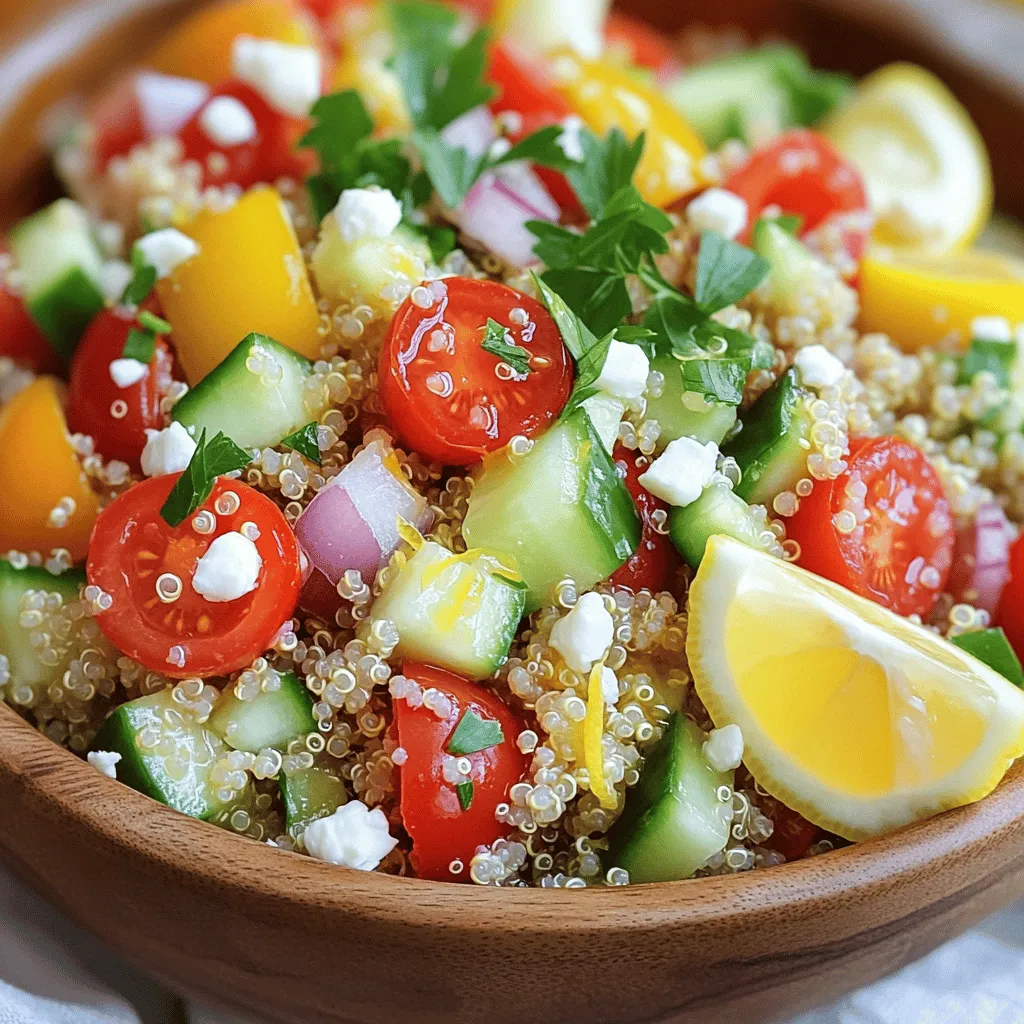
Are you looking for a fresh, healthy dish that bursts with flavor? My Lemon Garlic Quinoa Salad combines nutritious quinoa with vibrant veggies and a zesty dressing. It’s perfect as a side or a main dish. Easy to make and packed with goodness, this salad is a delightful addition to any meal. Let’s dive into the tasty ingredients and simple steps to prepare this delightful recipe!
Ingredients
Main Ingredients
- 1 cup quinoa, thoroughly rinsed
- 2 cups vegetable broth or water
- 1 cup cherry tomatoes, halved
- 1 medium cucumber, diced
- 1 bell pepper, diced
- 1/4 red onion, finely chopped
- 1/4 cup fresh parsley, chopped
- 1/4 cup feta cheese, crumbled (optional)
Dressing Ingredients
- 3 tablespoons extra virgin olive oil
- 2 tablespoons freshly squeezed lemon juice
- 2 cloves garlic, minced
- Salt and pepper to taste
Optional Additions
- Ingredients for added protein (chickpeas, grilled chicken)
- Seasonal vegetables or herbs
- Nuts or seeds for crunch
When I make this salad, I focus on fresh and healthy ingredients. Quinoa is a great base because it’s full of protein and fiber. Rinsing it well helps remove any bitter taste. I love using vegetable broth for cooking quinoa; it adds extra flavor.
I often choose colorful veggies like cherry tomatoes, cucumbers, and bell peppers. They add crunch and brightness. The red onion gives a sharp taste, while parsley adds a fresh touch. If you want creaminess, sprinkle in feta cheese.
For the dressing, I use extra virgin olive oil and fresh lemon juice. The minced garlic gives it a nice kick. I adjust the salt and pepper to my taste.
You can also add protein, like chickpeas or grilled chicken, to make it more filling. Seasonal veggies or nuts add a lovely crunch. Feel free to mix and match based on what you love!
Step-by-Step Instructions
Cooking Quinoa
- First, rinse 1 cup of quinoa under cold water in a fine mesh strainer. This step helps remove bitterness.
- Next, combine the rinsed quinoa with 2 cups of vegetable broth in a medium saucepan.
- Bring the mixture to a rolling boil over medium-high heat.
- Once boiling, reduce the heat to low, cover, and let it simmer for about 15 minutes.
- The quinoa should be fluffy when all the liquid has been absorbed.
- After cooking, remove it from heat and let it sit for an extra 5 minutes, covered.
Preparing the Salad Veggies
- While the quinoa cooks, prepare the salad veggies.
- Dice 1 cup of cherry tomatoes, 1 medium cucumber, 1 bell pepper, and 1/4 red onion.
- Chop 1/4 cup of fresh parsley to add flavor and color.
- Mix all these ingredients in a large bowl. This keeps them fresh and crisp.
Making the Dressing
- In a separate small bowl, whisk together 3 tablespoons of extra virgin olive oil and 2 tablespoons of fresh lemon juice.
- Add 2 cloves of minced garlic, salt, and pepper to taste.
- This dressing will give the salad a bright and zesty flavor.
Assembling the Salad
- Once the quinoa has cooled for about 10 minutes, fluff it gently with a fork to separate the grains.
- Transfer this fluffed quinoa to the bowl with your prepared veggies.
- Drizzle the zesty dressing over everything and toss gently to mix.
- If you want, fold in 1/4 cup of crumbled feta cheese for a creamy touch.
This Lemon Garlic Quinoa Salad is fresh and full of flavor.Enjoy your healthy delight!
Tips & Tricks
Achieving Fluffiness in Quinoa
To get fluffy quinoa, start by rinsing it well. Rinsing removes the saponins, which can make quinoa taste bitter. It only takes a few minutes under cold water to do this. After cooking, let the quinoa sit covered for five minutes. This step allows steam to finish cooking the grains, giving them a light and airy texture.
Enhancing Flavor
To boost flavor, add fresh herbs like basil or cilantro. These herbs add a pop of taste and color. You can also experiment with spices like cumin or paprika for a unique twist. For the dressing, try mixing in a dash of honey or a splash of apple cider vinegar. These changes will give your salad a delightful zing.
Serving Suggestions
Serve your salad chilled or at room temperature. Both options taste great and keep the ingredients fresh. Pair this salad with grilled chicken or fish for a balanced meal. It also works well as a side dish for barbecues or picnics. Enjoy this vibrant salad on its own or as a tasty addition to any meal.

Variations
Protein-Packed Options
You can easily boost the protein in your Lemon Garlic Quinoa Salad. Adding chickpeas is a great choice. They are tasty and filling. You can also grill chicken or shrimp for a hearty meal. Just cook them separately, then mix them in with the salad. Both options add flavor and make the dish more satisfying.
Vegetarian & Vegan Alternatives
For a dairy-free option, skip the feta or use a plant-based cheese. You can also try using tahini or avocado for creaminess. Other veggies can enhance the salad too. Think about adding spinach, carrots, or even roasted sweet potatoes. These will add color and more nutrition.
Seasonal Variations
Using seasonal fruits and vegetables can make this salad shine. In summer, add some fresh corn or peaches. In fall, consider diced apples or roasted squash. Adjusting the recipe based on what’s available keeps it fresh and exciting. This way, you can enjoy the flavors of each season while keeping your meal healthy.
Feel free to get creative with the ingredients!
Storage Info
Storing Leftovers
To keep your Lemon Garlic Quinoa Salad fresh, store it in an airtight container. Place it in the fridge right after serving. This helps maintain its taste and texture. The salad lasts about 3 to 5 days in the refrigerator. Always check for any signs of spoilage before eating.
Freezing the Salad
You can freeze this salad, but it may change the texture. To freeze, pack it tightly in a freezer-safe container. Make sure to remove as much air as possible. When you’re ready to eat, thaw it overnight in the fridge. Keep in mind that some veggies may become mushy after thawing.
Best Ways to Reheat (if needed)
If you want to enjoy your quinoa salad warm, gently heat it in a pan over low heat. Stir often to avoid sticking. This keeps the quinoa fluffy and the veggies crisp. However, many people love this salad cold. It’s refreshing straight from the fridge. You can also add a splash of lemon juice to brighten it up!
FAQs
How do I prepare quinoa properly?
To prepare quinoa, first rinse it well. Rinsing removes the bitter coating called saponin. Use a fine mesh strainer for best results. After rinsing, combine 1 cup of quinoa with 2 cups of vegetable broth in a saucepan. Bring it to a boil over medium-high heat. Once boiling, lower the heat and cover it. Let it simmer for about 15 minutes. When done, the quinoa should be fluffy and absorb all the liquid. After cooking, let it sit covered for 5 more minutes to steam. This step helps achieve perfect texture.
Can I make Lemon Garlic Quinoa Salad in advance?
Yes, you can make this salad ahead of time. Prepare it and store it in an airtight container. It stays fresh in the fridge for about 3 days. To keep the flavors bright, add the dressing just before serving. If you mix in the dressing too early, the veggies may become soggy. For meal prep, chop your vegetables in advance. Store them separately to maintain crispness. This way, you can enjoy a quick and healthy meal any time.
What other ingredients pair well with quinoa salads?
Many ingredients work well with quinoa salads. You can add protein like chickpeas, grilled chicken, or shrimp. These options boost nutrition and make the salad more filling. Seasonal vegetables also add freshness. Try adding roasted sweet potatoes, or steamed broccoli for variety. Nuts and seeds can give a nice crunch, too. Almonds or sunflower seeds are great choices. Fresh herbs like basil or mint can enhance flavor, making your salad even more exciting.
Is this salad gluten-free?
Yes, this Lemon Garlic Quinoa Salad is gluten-free. Quinoa is a naturally gluten-free grain. However, be careful of cross-contamination. Always check labels when buying packaged quinoa. Some brands process quinoa in facilities that also handle gluten products. To avoid this, choose certified gluten-free quinoa for peace of mind. This way, you can enjoy your salad safely, whether you have gluten sensitivities or not.
This blog post covered the key components for a delicious Lemon Garlic Quinoa Salad. We discussed the main ingredients, dressing, and optional additions to enhance your meal. I shared step-by-step instructions and tips for achieving fluffy quinoa. You can customize this salad to fit your taste and dietary needs.
In summary, this recipe offers flexibility and flavor. Whether you enjoy it for lunch or dinner, you’ll love how simple it is to make.


![To make a delicious Vegan Lentil Shepherd's Pie, you will need: - 1 cup green or brown lentils, thoroughly rinsed - 3 cups vegetable broth - 1 medium onion, finely diced - 2 cloves garlic, minced - 2 medium carrots, diced into small cubes - 2 celery stalks, finely diced - 1 cup peas (fresh or frozen) - 2 tablespoons tomato paste - 1 tablespoon soy sauce or tamari - 1 teaspoon dried thyme - 1 teaspoon dried rosemary - Salt and freshly cracked pepper to taste - 4 large potatoes, peeled and chopped into chunks - 1/4 cup unsweetened plant-based milk (such as almond or soy) - 2 tablespoons vegan butter or olive oil You can enhance your shepherd's pie with these optional ingredients: - 1 teaspoon smoked paprika for a hint of smokiness - 1 tablespoon nutritional yeast for a cheesy flavor - 1 cup mushrooms, diced, for a hearty texture - A splash of red wine for depth of flavor This recipe serves 4-6 and is a healthy choice. Each serving has: - Approximately 300 calories - 14 grams of protein - 10 grams of fiber - Low in saturated fat - Rich in vitamins A and C from the veggies When you make this Vegan Lentil Shepherd’s Pie, you enjoy a meal that is tasty, filling, and good for you. For the complete cooking details, check out the Full Recipe. To cook the lentils, start by rinsing 1 cup of green or brown lentils. Next, place them in a medium pot with 3 cups of vegetable broth. Bring this mix to a boil, then reduce the heat. Let it simmer for 20-25 minutes. You want the lentils to be tender but not mushy. Drain any leftover liquid and put the lentils aside. In a large skillet, heat a drizzle of olive oil over medium heat. Add 1 diced onion and sauté for about 5 minutes until soft. Then, include 2 minced garlic cloves, 2 diced carrots, and 2 diced celery stalks. Cook this mix for another 5-7 minutes until all the veggies are tender. Now, stir in the cooked lentils, 1 cup of peas, 2 tablespoons of tomato paste, and 1 tablespoon of soy sauce. Add 1 teaspoon of dried thyme, 1 teaspoon of dried rosemary, and some salt and pepper. Let this simmer for about 5 minutes. While the lentil mix simmers, you can prepare the potatoes. Bring a large pot of salted water to a boil. Add 4 large, peeled, and chopped potatoes. Cook them until fork-tender, about 15-20 minutes. Drain the potatoes and return them to the pot. Mash them using a potato masher. Mix in 1/4 cup of plant-based milk and 2 tablespoons of vegan butter. Keep mashing until smooth and creamy. Adjust the seasoning with salt and pepper. Preheat your oven to 375°F (190°C). Grease a baking dish and spoon the lentil mixture into the bottom. Spread the creamy mashed potatoes over the top. Use a fork to create peaks for texture. Bake the pie for 25-30 minutes until the top is golden and crispy. This dish is now ready to enjoy! For the full recipe, check out the detailed instructions above. To make creamy mashed potatoes, start with hot potatoes. Use a potato masher or ricer for the best texture. Gradually add unsweetened plant-based milk and vegan butter for creaminess. Mix until smooth, but avoid over-mixing. A pinch of salt enhances the flavor. Use fresh ingredients for depth. Start by sautéing onions until soft. Add garlic, carrots, and celery for sweetness. Cook them until tender. Incorporate the lentils with herbs like thyme and rosemary. This step brings out the flavors. Don't forget to season with salt and pepper. Let it simmer briefly to blend all the tastes. Serve your Vegan Lentil Shepherd’s Pie hot. Pair it with a crisp green salad for balance. You can also add crusty bread for a hearty touch. For extra flair, sprinkle fresh parsley on top before serving. This adds color and freshness to your meal. Explore different side dishes like roasted vegetables or quinoa for variety. Enjoy your delightful and wholesome dinner! For the full recipe, check the [Full Recipe]. {{image_4}} You can make this lentil shepherd's pie gluten-free. Simply replace soy sauce with coconut aminos. This swap keeps the flavor but avoids gluten. Always check labels to ensure all ingredients are gluten-free. If you're avoiding lentils, try chickpeas or black beans as protein sources. For a nut-free version, skip the plant-based milk and use vegetable broth for mashing. You can also use cauliflower instead of potatoes for a low-carb twist. Incorporate seasonal vegetables to boost flavor and nutrition. Fresh spinach or zucchini works great in the filling. Mushrooms add a nice umami taste, too. Don't be afraid to mix it up based on what's in season. This keeps your dish fresh and exciting. For the full recipe, refer to the beginning of this article. To store your Vegan Lentil Shepherd's Pie, let it cool first. Once cooled, cover it tightly with plastic wrap or foil. You can also use an airtight container. Store it in the fridge for up to four days. This keeps the flavors intact and helps maintain the pie's texture. If you want to save some pie for later, freezing is a great option. Cut the pie into individual portions. Wrap each piece in plastic wrap and then in foil. This prevents freezer burn. Place the wrapped pieces in a freezer bag. You can freeze them for up to three months. When you are ready to enjoy, just thaw it in the fridge overnight. To reheat your shepherd's pie, use the oven for the best results. Preheat your oven to 350°F (175°C). Remove the pie from the fridge or freezer and unwrap it. Place it in a baking dish. Cover the dish with foil to keep it moist. Heat it for about 25-30 minutes if cold. If it’s frozen, it might take up to 45 minutes. Remove the foil for the last 5-10 minutes to crisp the top. Enjoy your delicious meal just like it was fresh! Yes, you can use canned lentils. Just drain and rinse them first. They cook faster. This saves time. For this recipe, use about 1.5 cups of canned lentils. You can serve it with a fresh salad or steamed vegetables. A side of crusty bread also works well. The pie is hearty, so keep sides light. It lasts for 3 to 5 days in the fridge. Store it in an airtight container. Reheat it in the oven or microwave. Yes, you can prepare it a day in advance. Assemble the pie, then cover it and chill. Bake it just before serving for the best taste. Check out the Full Recipe for more details! This blog post covered how to make a tasty vegan lentil shepherd's pie. We explored essential and optional ingredients, plus nutritional info. I provided clear, step-by-step cooking methods. You learned tips for creamy mashed potatoes and flavorful lentils. We noted variations for different diets and the best ways to store leftovers. In closing, I hope you enjoy making this dish! It’s a great meal for everyone.](https://dishtreats.com/wp-content/uploads/2025/06/9ba9e126-74d7-4f69-86a8-52952e7f4e77-768x768.webp)


![- 2 cups cooked chicken, shredded - 1 cup black beans, rinsed and drained - 1 cup corn kernels (fresh or frozen) - 2 cups shredded Mexican cheese blend - 1 cup salsa (mild or spicy) - 8 large flour tortillas - 1 teaspoon ground cumin - 1 teaspoon chili powder - 1/2 teaspoon garlic powder - 1/2 teaspoon onion powder - Salt and pepper, to taste - 1/4 cup fresh cilantro, chopped - Sour cream and diced avocado for serving When I prepare this Chicken and Cheese Quesadilla Casserole, I love the bold flavors in every bite. The main ingredients create a hearty meal that feels special. Shredded chicken adds protein, while black beans and corn give it a nice texture. The Mexican cheese blend brings everything together with its melty goodness. I often choose salsa based on my mood. A mild salsa suits those who prefer less heat, while a spicy option adds an exciting kick. The seasonings are key to making this dish flavorful. Ground cumin and chili powder add warmth and depth. Garlic and onion powders give it that savory touch. Don’t forget to season with salt and pepper to elevate the taste. For garnishes, fresh cilantro brightens the dish. I like to add a dollop of sour cream and diced avocado on the side. They balance the flavors and add a creamy texture. This meal is so satisfying, and you can find the full recipe to make it yourself! - Preheat the oven to 350°F (175°C). - In a large bowl, mix the chicken, black beans, corn, cheese, salsa, cumin, chili powder, garlic powder, onion powder, salt, and pepper. Stir well until all ingredients are combined. - Grease a 9x13 inch baking dish with cooking spray or olive oil. - Place one tortilla at the bottom of the dish. Spoon some of the chicken and cheese mixture on top. Add another tortilla and repeat this layering. Finish with a tortilla and sprinkle remaining cheese on top. - Cover the dish with foil. Bake for 20 minutes. - After 20 minutes, remove the foil. Bake again for 10-15 minutes, until the top is golden and bubbling. For the full recipe, check out the detailed ingredients and tips! To boost the taste, pick a salsa that fits your spice level. For a kick, go for spicy salsa. If you prefer mild, a smooth, mild salsa works well. You can also mix salsas for layered flavors. For cheese, try different blends. While a Mexican cheese blend is great, cheddar or pepper jack adds unique taste. Mixing cheeses can create a delightful texture and flavor. Letting your casserole rest is key. This step helps the layers set. Cutting too soon can cause a messy serving. Wait about 5 minutes for the best results. To get a perfectly melted cheese crust, cover with foil while baking. Remove the foil near the end to let the cheese brown. This creates a crunchy top that contrasts the soft filling. Serving on colorful plates makes a big difference. Bright colors enhance the meal's appeal. After cutting the casserole, place each piece on a vibrant dish. For garnishing, fresh cilantro adds a pop of green. Diced avocado gives a creamy touch. A dollop of sour cream on the side adds a lovely finish. Try these tips for a beautiful and tasty presentation! For the full recipe, refer to [Full Recipe]. {{image_4}} You can easily make this dish fit your taste. For a vegetarian twist, try adding more veggies. Bell peppers, zucchini, or spinach work great. They add color and nutrients. You still get a hearty meal without meat. If you want more protein, use ground beef or turkey instead of chicken. Cook the meat first, then mix it into the filling. This change adds a different flavor. It's a fun way to switch things up! Cheese makes this casserole even better. While I love using a Mexican cheese blend, feel free to change it. Cheddar adds a sharp taste. Pepper jack gives a spicy kick. You can even mix different types for a rich flavor. Try combining mozzarella for creaminess and a touch of parmesan for depth. These options create layers of taste. The cheese pulls are so satisfying! You can adapt this recipe to a slow cooker. Just layer the ingredients as you would in the oven. Set it on low for about 4 hours. This method yields a warm, hearty casserole with a different texture. If you own an Instant Pot, you're in luck! Use the sauté function to cook your meat and veggies. Then add the rest of the ingredients. Seal the lid and cook on high pressure for 10 minutes. Quick and easy, this method saves time without losing flavor. For more details, check out the Full Recipe! To keep your Chicken and Cheese Quesadilla Casserole fresh, store it properly. First, let it cool down to room temperature. Then, place the leftovers in an airtight container. This helps lock in moisture and flavor. Use shallow containers for quicker cooling. I recommend glass or sturdy plastic containers. These work well for storage and reheating. You can freeze this casserole before or after baking. For freezing before baking, assemble the casserole in a freezer-safe dish. Cover it tightly with plastic wrap and aluminum foil. When you're ready to bake it, remove the wrap, and bake from frozen. It may take longer to cook. For freezing after baking, let it cool, then slice it into portions. Wrap each slice in plastic wrap and place in a freezer bag. For the best results, consume it within three months. Leftovers can last in the fridge for about 3-4 days. Always check for signs of spoilage before eating. Look for changes in color or texture. If it smells off, it’s best to discard it. When stored properly, frozen portions can stay safe for about three months. Always label the containers with the date for easy tracking. This way, you can enjoy your delicious casserole without worries. You can use low-carb tortillas if you want fewer carbs. Corn tortillas are also a great option. They add a nice flavor and texture to the dish. Yes, you can prep this casserole in advance. Just assemble it and cover it tightly. Store it in the fridge for up to 24 hours. When you are ready to bake, just add extra time if it's cold from the fridge. Look for bubbling cheese and a golden crust on top. You can also insert a knife in the center. If it comes out hot, the casserole is ready to serve. This blog post guides you through making a delicious chicken casserole. We covered the main ingredients, seasonings, and the steps to prepare and bake your dish. I shared tips and tricks for perfect results and ideas for variations based on your taste. Remember, cooking is about creativity. Don't hesitate to make this recipe your own! Enjoy the process, and savor every bite. Happy cooking!](https://dishtreats.com/wp-content/uploads/2025/06/5fb0e458-6070-46a1-b713-1d8a90ab3212-768x768.webp)