Roasted Veggie Tacos Flavorful Plant-Based Delight
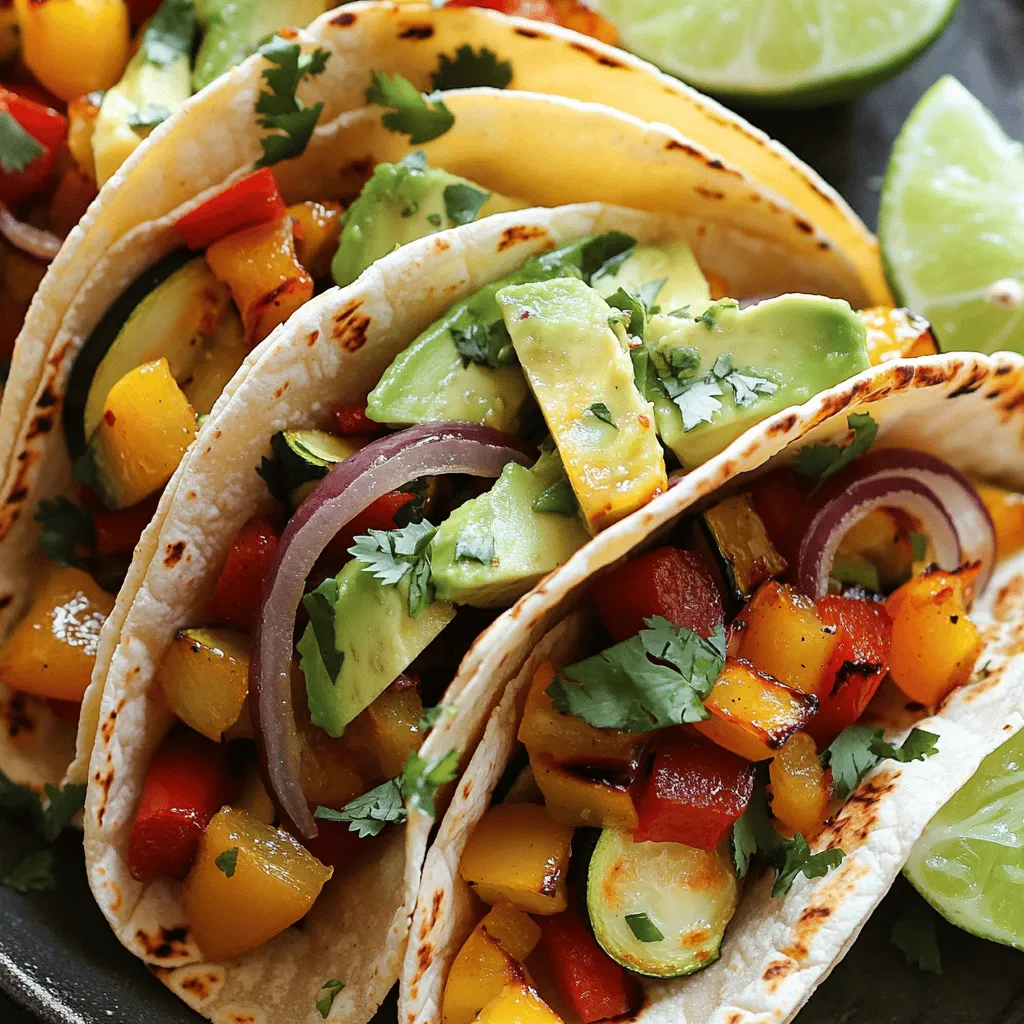
If you crave a vibrant, tasty meal, you’ll love these Roasted Veggie Tacos! Packed with fresh zucchini, bell peppers, and tomatoes, every bite bursts with flavor. Whether you’re plant-based or just looking to enjoy more veggies, these tacos do not disappoint. Let’s dive into the ingredients and tips to create this delightful dish that’s perfect for any meal! Ready to elevate taco night?
Ingredients
Main Ingredients for Roasted Veggie Tacos
The heart of my roasted veggie tacos lies in fresh and colorful produce. Here’s what you need:
- 1 medium zucchini, diced into bite-sized pieces
- 1 red bell pepper, diced
- 1 yellow bell pepper, diced
- 1 large red onion, diced
- 1 cup cherry tomatoes, halved
- 8 small corn tortillas
- 1 ripe avocado, sliced
These veggies bring vibrant flavors and textures. They roast to perfection, adding a satisfying crunch.
Seasonings and Oils
Seasonings make a big difference in taste. Here’s what I use:
- 2 tablespoons extra virgin olive oil
- 1 teaspoon ground cumin
- 1 teaspoon smoked paprika
- Sea salt and freshly ground black pepper to taste
The olive oil helps the veggies caramelize. Cumin and smoked paprika add depth and warmth. A sprinkle of salt and pepper ties all the flavors together.
Serving Suggestions
Garnishing elevates your tacos. I suggest:
- Fresh cilantro leaves, for garnish
- Lime wedges, for serving
The cilantro adds a burst of freshness. Squeezing lime over the tacos brightens every bite.
Step-by-Step Instructions
Preparing the Vegetables
Start by washing all your vegetables. I love using fresh produce for the best taste.
- Zucchini: Dice it into bite-sized pieces. This helps it cook evenly.
- Bell Peppers: Use both red and yellow for color and sweetness. Dice them small.
- Red Onion: Chop it finely. This adds great flavor to the tacos.
- Cherry Tomatoes: Halve them. They’ll burst with juice when roasted.
Next, combine all the veggies in a large mixing bowl. Drizzle with extra virgin olive oil. This helps with roasting. Then, season with ground cumin and smoked paprika.
- Tips for Seasoning: Use sea salt and freshly ground black pepper to taste. Toss everything gently, so each piece is coated. This makes every bite flavorful.
Roasting the Vegetables
Preheat your oven to 425°F (220°C). This high heat helps to caramelize the veggies. Spread your seasoned veggies out on a baking sheet.
Make sure they are not crowded. This allows them to roast properly. Roast them for about 20-25 minutes. Stir halfway through to ensure even cooking.
- How to Know When Done: They should be tender and slightly browned. Look for that golden color. If they are soft and sweet, they are ready!
Assembling the Tacos
While the veggies roast, warm your corn tortillas. Heat a dry skillet over medium heat. Place a tortilla in the skillet for about 30 seconds.
- Best Texture: Flip it to warm the other side. You want them soft and pliable. Repeat this step for all tortillas.
Once the veggies are ready, take them out of the oven carefully. Now, it’s time to assemble your tacos.
- Layering Ingredients: Place a spoonful of roasted veggies on each tortilla. Add creamy avocado slices on top. Don’t forget to sprinkle fresh cilantro for extra flavor.
Serve your tacos with lime wedges on the side. Squeezing lime juice over the tacos brightens the taste. Enjoy every bite!
Tips & Tricks
Enhancing Flavor and Texture
To boost flavor, try adding cheese. A sprinkle of crumbled feta or cotija cheese adds a nice touch. You can also use different spices. A pinch of chili powder or cayenne pepper will give your tacos a kick.
Achieving the perfect roast is essential. Make sure to cut your veggies into similar sizes. This helps them cook evenly. Spread them out on the baking sheet without crowding. Overcrowded veggies steam instead of roast.
Presentation Tips
Arranging your tacos attractively can make a big difference. Place them on a colorful platter. Add lime wedges and extra cilantro for a pop of color. You can also serve them with a refreshing salsa verde on the side.
For a fun twist, consider using small bowls for toppings. Guests can build their own tacos. This makes meal time interactive and engaging.
Making Ahead and Storage
Prepping veggies in advance saves time. Chop and season your vegetables the night before. Store them in an airtight container in the fridge. When you’re ready, just roast them.
Storing leftovers properly is key to maintaining quality. Keep any extra roasted veggies in a sealed container. They last for about three days in the fridge. To keep tortillas fresh, wrap them in foil or plastic wrap.

Variations
Different Protein Options
You can switch up the protein in your roasted veggie tacos. Black beans or chickpeas add a hearty touch. They both bring great flavor and protein. Just add a cup of cooked beans to the veggies before roasting.
If you want something different, try grilled chicken or tofu. Grilled chicken adds a nice texture. Tofu is a great plant-based choice. Marinate the tofu in your favorite sauce before grilling for extra taste.
Flavor Variations
The spices you use can change the whole dish. Try different spices like chili powder or oregano. You can also add sauces like salsa or hot sauce for a kick. These changes can make your tacos exciting every time you make them.
You can also explore various tortilla types. Corn tortillas are classic, but flour tortillas work well too. You could even try whole wheat or spinach tortillas for a twist.
Dietary Adjustments
These tacos fit many diets. They are vegetarian and can easily be made vegan. Just skip any cheese and use extra veggies.
If you’re gluten-free, choose corn tortillas. For low-carb options, use lettuce wraps instead of tortillas. This keeps the flavors while cutting carbs.
Storage Info
Storing Leftovers
To store leftover roasted veggies, cool them first. Place them in a sealed container. This keeps them fresh for up to four days. For tortillas, wrap them in a clean kitchen towel. Store in a zip-top bag to prevent them from drying out. They can last a few days in the fridge, too.
Reheating Tips
To reheat your tacos, the oven works best. Preheat it to 350°F (175°C). Place the tacos on a baking sheet for about 10 minutes. This keeps them crispy. If you use the microwave, heat for 30 seconds. Check to see if they are warm. Add more time if needed.
Freezing Options
Yes, you can freeze roasted veggie tacos! First, let them cool completely. Wrap each taco tightly in plastic wrap. Then, place them in a freezer bag. They can last up to three months in the freezer. To thaw, place them in the fridge overnight. Reheat as mentioned for a tasty meal.
FAQs
How can I make roasted veggie tacos spicier?
To add heat, try these tips:
- Use jalapeños or serrano peppers.
- Add a pinch of cayenne pepper.
- Drizzle with hot sauce before serving.
These options give your tacos a nice kick. Adjust the heat level to match your taste.
Can I make Roasted Veggie Tacos ahead of time?
Yes, you can prepare these tacos ahead of time. Here’s how:
- Roast the veggies and store them in the fridge.
- Warm the tortillas just before serving.
- Assemble tacos right before eating.
This way, you save time and enjoy fresh tacos.
What are the best types of tortillas to use?
Corn tortillas work best for roasted veggie tacos. They are:
- Gluten-free.
- Flavorful.
- Slightly chewy.
You could also try flour tortillas for a softer texture. Choose what you like best!
Roasted veggie tacos are simple and fun to make. We covered key ingredients like zucchini and bell peppers, plus spices like cumin. I shared step-by-step directions for prepping and roasting the veggies. Remember to layer the ingredients in warm tortillas for the best taste.
Final thoughts: These tacos are not only tasty but also easy to customize. Mix and match veggies and proteins to suit your needs. Enjoy using your new taco skills, and have fun experimenting with flavors!

![- 2 cups watermelon, diced into bite-sized cubes - 1 cup fresh pineapple, diced - 1 cup ripe mango, peeled and diced - 1 cup strawberries, hulled and sliced - 1 cup plump blueberries - 1 tablespoon pure honey - 2 tablespoons freshly squeezed lime juice - 1 teaspoon finely grated lime zest - Fresh mint leaves, for a lovely garnish When picking fruits, look for bright colors and firm textures. Choose watermelon that feels heavy for its size. Make sure the skin is smooth and free from blemishes. For pineapple, smell the base; a sweet scent means it's ripe. Ripe mangoes should yield slightly when you press them. Strawberries should be bright red, without white tips. Pick blueberries that are firm and plump, with a deep color. This fruit salad is not just tasty; it’s also packed with nutrients. Watermelon is hydrating and low in calories. Pineapple provides vitamin C and enzymes that aid digestion. Mango is rich in antioxidants and vitamins A and C. Strawberries boost heart health due to their high fiber and vitamin C content. Blueberries are known for their powerful antioxidants. The honey adds a natural sweetness, while lime juice helps with vitamin C and adds a zesty kick. Each bite not only delights your taste buds but also nourishes your body. First, gather all your fruits. You will need watermelon, pineapple, mango, strawberries, and blueberries. Wash each fruit well to remove any dirt. Dice the watermelon into cubes. Cut the pineapple and mango into small pieces. Hull and slice the strawberries. Finally, add the blueberries. Place all the fruit into a large mixing bowl. Be gentle while mixing to keep the fruit intact. In a separate small bowl, combine one tablespoon of honey with two tablespoons of freshly squeezed lime juice. Add one teaspoon of finely grated lime zest for extra flavor. Whisk the mixture together until it is smooth and well-blended. This honey lime dressing will add a sweet and tangy flavor to your salad. Now, drizzle the honey lime dressing over the fruit. Make sure to cover every piece of fruit for the best taste. Use a gentle motion to toss the salad. This helps the dressing coat all the fruit without mashing it. Let the salad sit for about 10 minutes. This resting time allows the flavors to blend well. When ready to serve, garnish with fresh mint leaves. This adds a lovely touch to your fruit salad. Enjoy your Honey Lime Fruit Salad Delight! For a full recipe, visit the [Full Recipe]. Cutting fruit can be fun and easy. Start with a sharp knife for safety. For watermelon, slice it in half. Then, cut each half into thick wedges. Remove the rind and dice the flesh into cubes. Pineapple is best peeled and cored first. Cut the fruit into thick slices, then dice. For strawberries, remove the green tops and slice them. Keep your cuts even for a pretty look. You can add more fun to the salad. Try adding a splash of orange juice. This will give it a citrus twist. You can also mix in a pinch of cinnamon for warmth. Chopped nuts like almonds or walnuts add crunch. If you like creamy, add a dollop of yogurt. These extra flavors make the salad pop! Make your fruit salad shine with great presentation. Use a clear glass bowl to show off the colors. You can layer the fruits for a rainbow effect. Garnish with mint leaves on top for a fresh touch. A few extra blueberries scattered around add visual flair. Serve with colorful spoons for added fun. Remember, we eat with our eyes first! {{image_4}} You can switch up fruits in your Honey Lime Fruit Salad. Try using peaches or nectarines for a juicy twist. Grapes add a nice pop, and kiwi brings a tart flavor. You might also add oranges for an extra citrus kick. Mix and match based on your taste! Change your fruit salad with the seasons. In summer, use berries and stone fruits for freshness. Fall is great for apples and pears, while winter calls for citrus fruits like clementines and grapefruits. Spring gives you the chance to add strawberries and rhubarb for a bright taste. Add nuts or seeds for a crunchy texture. Almonds and walnuts are perfect options. If you prefer seeds, sprinkle in some pumpkin or sunflower seeds. These additions not only improve texture, but they also boost the nutrition of your salad. Enjoy the added flavor and health benefits! Store leftover honey lime fruit salad in an airtight container. This keeps the fruit fresh and tasty. If you can, eat it within a day or two. The longer it sits, the softer the fruit may get. I recommend using glass or plastic containers with tight-fitting lids. These help lock in moisture and prevent spills. If you have smaller portions, use smaller containers for easy access. The salad stays fresh for about two days in the fridge. Keep it away from foods with strong odors. To refresh the taste, add a little more honey or lime juice before serving. If you notice any browning, remove those pieces before enjoying. For the full recipe, make sure to check the main article! Yes, you can make Honey Lime Fruit Salad a few hours ahead. However, I recommend serving it fresh. If you prepare it too early, the fruit may get soft and lose its crunch. If you decide to make it ahead, store it in the fridge. This keeps it cool and fresh. Just remember to add the dressing right before serving to keep the fruit juicy. The best fruits for Honey Lime Fruit Salad are those that are ripe and sweet. I love using: - Watermelon - Pineapple - Mango - Strawberries - Blueberries These fruits blend well together, creating a vibrant and tasty mix. You can also try using kiwi or grapes for extra flavor. The key is to choose fruits that you enjoy and that are in season. Yes, you can use another sweetener if you prefer. Options include agave syrup or maple syrup. These sweeteners work great in the dressing. Just keep in mind that the flavor may change slightly. I suggest starting with the same amount as the honey. You can always adjust it to your taste. For a sugar-free option, consider using a sugar substitute that you like. In this blog post, we explored how to make a tasty Honey Lime Fruit Salad. We discussed the key ingredients, tips for selecting fresh fruits, and the nutritional benefits they offer. You learned step-by-step instructions for preparation, dressing, and serving. We also shared tips for cutting fruits and enhancing flavor. Plus, variations for using different fruits and tips for storage were provided. Creating this salad is simple and rewarding. Enjoy it yourself or share it with friends. It’s a fun and healthy treat everyone will love.](https://dishtreats.com/wp-content/uploads/2025/07/a7fe8aa9-0619-4c4c-8a63-94d099c8a4d2-768x768.webp)
. - Ensure even space on the baking sheet for optimal roasting. - Toss halfway through cooking for uniform caramelization. Roasting carrots and chickpeas makes them sweet and crunchy. When you spread them out, they cook evenly. If they touch, they steam instead of roast. This can make them soggy and less tasty. Tossing the mixture halfway is key. It helps to brown all sides well. This step adds more flavor and a lovely texture. - Experiment with different citrus juices like lime or orange. - Substitute tahini with Greek yogurt for a creamy dressing. The dressing can change the whole dish. Use lime juice for a zesty twist. Orange juice gives a sweet touch. Both add freshness and brightness. If you want a creamy option, use Greek yogurt instead of tahini. It makes the dressing rich and smooth. This swap gives a fun flavor change too. - Serve in individual bowls for a refined presentation. - Add a lemon wedge for guests to use. Presenting this salad in bowls looks nice. It makes each serving feel special. Guests can enjoy their own portion. Adding a lemon wedge on the side is a great idea. It lets everyone add a splash of fresh juice. This brightens the salad even more. For the full recipe, check the details above. Enjoy your cooking! {{image_4}} You can make this salad even better. Try adding other roasted veggies. Bell peppers bring sweetness. Sweet potatoes add creaminess. Both enhance flavor and texture. You can also toss in nuts or seeds. Almonds or sunflower seeds add a nice crunch. They make the salad more filling and fun. If you want more protein, try grilled chicken or tofu. Both options work well with roasted carrots and chickpeas. Grilled chicken adds a savory touch, while tofu keeps it plant-based. You can also use canned tuna. It gives the salad a different flavor and makes it heartier. Want to boost flavor? Experiment with fresh herbs. Cilantro or mint can brighten the taste. They add freshness that complements the roasted veggies. You can also spice it up with hot sauce. Just a dash gives the salad a nice kick. It’s a fun way to change the flavor profile. For the complete recipe, check out the Full Recipe section above. Store leftovers in an airtight container in the fridge. They are best consumed within 2-3 days. After that, the carrots may lose their crunch, and the flavors fade. Freezing this salad is not recommended. The dressing may separate when frozen. This can change the texture and taste of your salad. You can enjoy this salad cold or at room temperature. If you prefer, reheat in the oven. This helps retain the texture of the roasted carrots and chickpeas. Yes, use maple syrup instead of honey and omit the feta cheese. This keeps the flavors rich and plant-based. You won’t miss the cheese, trust me. The roasted carrots and chickpeas bring enough taste and texture to satisfy everyone. You can use black beans or white beans as alternatives. Both options provide protein and fiber. They also add a nice twist to the taste. Black beans bring a bit of earthiness, while white beans offer a creamier texture. Serve the dressing on the side to keep the greens crisp until serving. This way, they stay fresh and crunchy. Drizzle the dressing just before you eat for the best taste and texture. Spinach, arugula, or chopped kale work well for base greens. Each option adds a different flavor. Spinach is mild, arugula is peppery, and kale adds a hearty bite. Choose what you like best! This blog post shares a tasty recipe featuring roasted carrots and chickpeas on fresh greens. It walks through each step, from prep to assembly, and includes tips for perfect results. You can even tweak the dressing and add your favorite proteins. Don’t hesitate to make this salad your own. Experimenting with flavors makes cooking fun! Enjoy your healthy, vibrant salad that brings flavor and nutrition to your table.](https://dishtreats.com/wp-content/uploads/2025/07/15b40619-46f3-4baf-96e6-94c974b2a42a-768x768.webp)