
Spicy Zucchini Relish Flavorful and Easy Recipe Guide
Are you ready to spice up your meals? This easy Spicy Zucchini Relish recipe will tickle your taste buds and add a zesty kick to your dishes. With fresh ingredients and simple steps, I’ll guide you through making this flavorful relish. Whether you’re a cooking novice or a kitchen pro, you’ll find tips and tricks to elevate your relish game. Let’s dive into this delicious journey together!
Ingredients
Complete Ingredient List for Spicy Zucchini Relish
To make spicy zucchini relish, you need:
- 4 medium zucchinis, thoroughly washed and finely chopped
- 1 large onion, finely minced
- 1 red bell pepper, finely diced
- 2 cloves garlic, finely minced
- 1 tablespoon fresh ginger, grated
- 1 cup apple cider vinegar
- ¾ cup granulated sugar
- 1 tablespoon mustard seeds
- 1 tablespoon chili flakes (adjust based on your preferred spice level)
- 1 teaspoon turmeric powder
- 1 teaspoon salt
- ¼ cup fresh cilantro, finely chopped
Importance of Fresh Ingredients
Fresh ingredients make a big difference in how your relish tastes. They bring out the flavors and make every bite enjoyable. Using fresh zucchinis, peppers, and herbs means you get a crunch and vibrancy in every spoonful. When you choose fresh, you also ensure your relish stays bright and zesty, perfect for summer meals or cozy winter gatherings.
Tips for Selecting the Best Zucchini
Choosing the right zucchini can elevate your dish. Here are some tips:
- Look for firmness: The best zucchinis feel firm and are free of soft spots.
- Check the skin: A shiny, smooth skin indicates freshness. Dull skin may mean it’s past its prime.
- Size matters: Smaller zucchinis tend to be sweeter and more tender. Aim for ones that are about 6-8 inches long for the best taste.
- Color is key: Look for a rich green color. Avoid any that have yellowing, as this can signal overripeness.
Using these tips will help you find the best zucchinis for your spicy zucchini relish, ensuring a dish full of flavor and freshness.
Step-by-Step Instructions
Preparation of the Vegetables
Start by washing the zucchinis under cold water. This step removes dirt and debris. Cut off both ends of the zucchinis. Next, finely chop them into small, even pieces. This helps them cook evenly.
In a large mixing bowl, combine the chopped zucchinis with the minced onion, diced red bell pepper, minced garlic, and grated ginger. Mix well until everything is evenly distributed. This blend of vegetables adds depth to your relish.
Cooking Process for Spicy Zucchini Relish
In a large pot, heat the apple cider vinegar over medium heat. Add sugar, mustard seeds, chili flakes, turmeric powder, and salt. Stir well until the sugar dissolves and the mixture starts to simmer.
Carefully add the vegetable mix into the pot. Stir to combine and bring it to a gentle boil. Once boiling, reduce the heat to low and let it simmer for 30 to 40 minutes. Stir occasionally to keep anything from sticking to the bottom.
Checkpoints for Consistency and Flavor
Watch the relish as it cooks. You want it to thicken to your liking. Once it thickens, remove the pot from heat. Fold in the chopped cilantro for extra flavor and freshness. Let the relish cool in the pot for a bit.
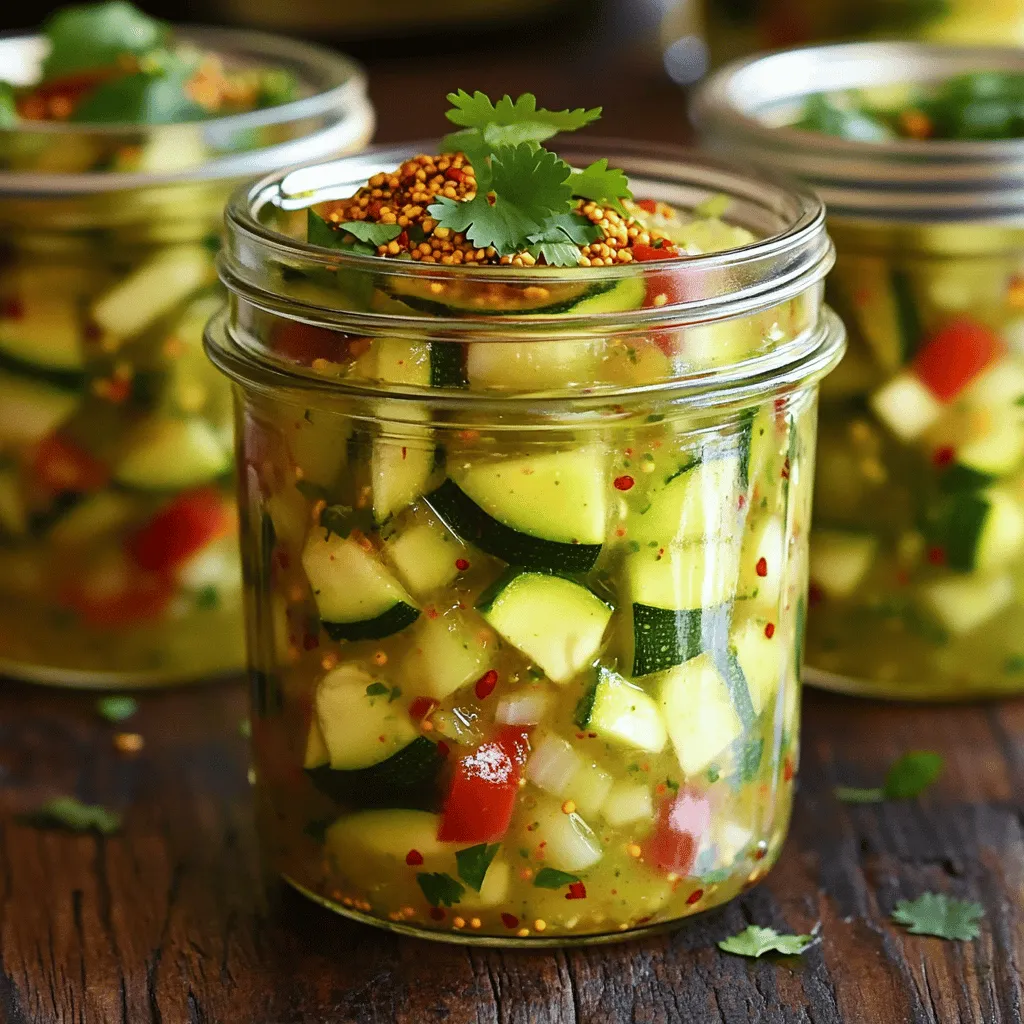
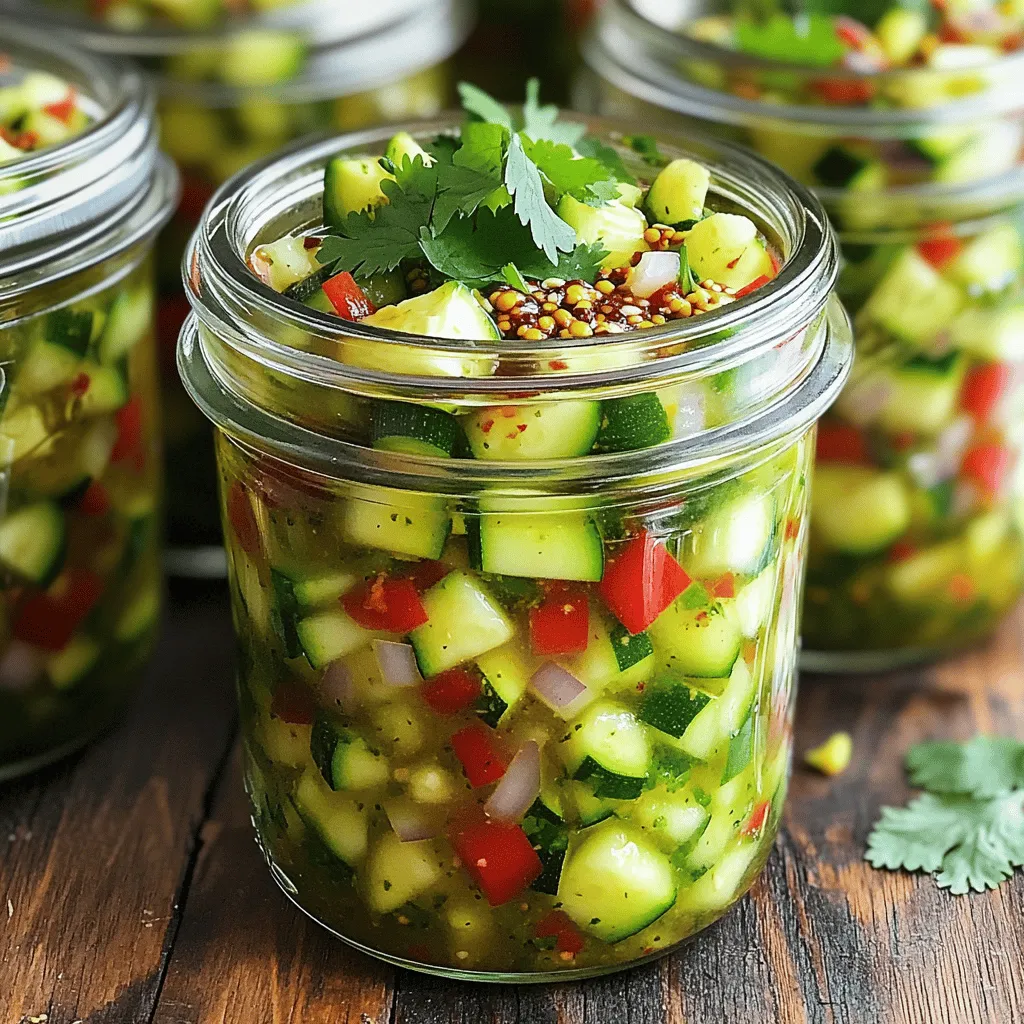
When it’s slightly cool, use a funnel to transfer it into sterilized jars. Seal the jars tightly. Allow them to cool completely at room temperature before placing them in the fridge. This recipe yields about 4 cups of spicy zucchini relish. You can enjoy it with crackers, grilled meats, or sandwiches. For the complete recipe, refer to the earlier section.
Tips & Tricks
Common Mistakes to Avoid
When making spicy zucchini relish, avoid chopping your veggies too large. Small pieces cook evenly and blend well. Don’t skip the salt; it helps to draw out moisture. If your relish is too watery, it won’t have the right texture. Stir often while it simmers; this keeps it from sticking to the pot. Finally, remember to let it cool before sealing the jars. This helps preserve the flavor and prevents spoilage.
Enhancing Flavor with Additional Ingredients
Want to amp up the flavor? Consider adding diced jalapeños for more heat or fresh herbs like dill for a unique twist. You can also try a splash of lemon juice for brightness. If you love a bit of sweetness, throw in some diced mango or peaches. Each of these additions can change the flavor profile, making your relish special every time.
Presentation and Serving Suggestions
To impress your guests, serve the relish in a colorful bowl. Pair it with crisp crackers or toasted bread for a tasty appetizer. You can also use it as a zesty condiment with grilled meats or sandwiches. For a fun twist, try it in tacos or as a topping for burgers. With its bright colors and bold flavors, spicy zucchini relish will always stand out on your table.
Variations
Alternative Ingredients for Unique Flavors
You can switch up the flavors in spicy zucchini relish easily. Try using yellow squash instead of zucchini for a different texture. Red onions add a sweeter taste than regular onions. You can also mix in diced jalapeños for an extra kick. If you enjoy sweetness, add some diced peaches or mango. These fruits will balance the heat well. For a smoky flavor, try adding smoked paprika. This small change can make a big impact on taste.
Adjusting Spice Levels to Taste
Want to change the heat? Start with less chili flakes if you prefer milder relish. You can always add more spice later. For those who love heat, consider using fresh chopped chili peppers. Thai chilies or serranos can bring intense heat. Remember, the cooking process will mellow the flavors, so taste as you go. Adjusting the spice level makes this relish work for anyone.
Ideas for Serving with Different Dishes
Spicy zucchini relish is very versatile. Use it as a topping for grilled meats like chicken or pork. It also pairs well with fish tacos for a fresh twist. Spread it on sandwiches or burgers for added zest. For a unique appetizer, serve it with cream cheese and crackers. You can even mix it into salads for a flavorful boost. No matter how you serve it, the relish adds excitement to any dish.
Storage Info
Proper Jar Sealing Techniques
To keep your spicy zucchini relish fresh, sealing jars correctly is key. First, use clean, sterilized jars. Fill each jar with relish, leaving about half an inch of space at the top. Wipe the rim of the jar to remove any residue. Then, place the lid on top and screw it on tightly. This helps create a vacuum seal. You can also process jars in a hot water bath for extra safety. This process ensures your relish stays fresh longer.
Best Practices for Refrigeration
After sealing your jars, store them in the fridge. The cool temperature will help maintain flavor and texture. Make sure to keep the jars upright to avoid leaks. Always allow the relish to cool fully before placing it in the fridge. If you plan to eat the relish within a few weeks, refrigeration is perfect. Just remember to use clean utensils when scooping out the relish.
Shelf Life and Freezing Options
Homemade spicy zucchini relish can last in the fridge for about 2-3 weeks. If you want to save it for longer, freezing is a great option. Pour the relish into freezer-safe containers, leaving some space at the top for expansion. Seal them tightly and label with the date. You can freeze the relish for up to six months. When you’re ready to use it, thaw it overnight in the fridge. Enjoy your delicious relish anytime!
FAQs
How long does homemade spicy zucchini relish last?
Homemade spicy zucchini relish lasts about 2 to 3 weeks in the fridge. Make sure to store it in a clean, airtight jar. If you want to keep it longer, you can freeze it. Just remember to leave some space in the jar for expansion.
Can I use other vegetables in this recipe?
Yes, you can use other vegetables! Carrots, cucumbers, or even bell peppers work great. Just ensure you chop them finely. This way, they blend well in the relish. Mixing different veggies can give your relish a unique twist.
What dishes pair well with spicy zucchini relish?
Spicy zucchini relish pairs well with many dishes. It adds a kick to grilled meats, sandwiches, or burgers. You can also serve it with cheese and crackers for a tasty appetizer. For a fun twist, try it on tacos or mixed in with rice.We covered fresh ingredients, step-by-step cooking, and tips to enhance your relish. Also, we discussed variations and storage methods to keep your relish tasty.
I believe you can now create a delicious batch that suits your taste. Enjoy experimenting with flavors, and remember to share your creations. Happy cooking!

![- 1 large zucchini, sliced into thick rounds - 1 red bell pepper, cut into 1-inch squares - 1 yellow bell pepper, cut into 1-inch squares - 1 red onion, cut into large chunks - 8 cherry tomatoes, whole - 1 cup mushrooms, halved - 3 tablespoons extra virgin olive oil - 2 teaspoons dried oregano - 1 teaspoon garlic powder - Salt and black pepper to taste - Fresh parsley, finely chopped (for garnish) - 8 skewers (if using wooden skewers, soak in water for 30 minutes prior to use) Choosing the right ingredients is key to making these grilled Mediterranean veggie skewers shine. Fresh, colorful vegetables not only taste better but also look great on the plate. I love using seasonal veggies for the best flavor. You can mix and match as you like. The extra virgin olive oil adds richness and helps the spices stick. Dried oregano gives that classic Mediterranean taste. Garlic powder adds depth without the hassle of fresh garlic. Don't forget to season with salt and black pepper. This simple step makes a big difference in flavor. Fresh parsley as a garnish not only adds color but also a fresh taste that brightens up the dish. When preparing the skewers, remember to soak wooden skewers in water first. This prevents them from burning on the grill. If you use metal skewers, you can skip this step. For the full recipe, check out the details above. Enjoy preparing these delicious veggie skewers! - Preheat grill to medium-high heat. - In a bowl, combine the vegetables: zucchini, bell peppers, onion, tomatoes, and mushrooms. - In a small bowl, mix olive oil, oregano, garlic powder, salt, and pepper. - Drizzle the marinade over the veggies. Toss until all pieces are coated. - Thread the marinated vegetables onto skewers. Alternate colors for a bright look. - Place the skewers on the hot grill. Grill for 10-12 minutes. - Turn the skewers occasionally. This helps them cook evenly. - Remove skewers from the grill and let them cool slightly. - Just before serving, sprinkle fresh parsley on top for a nice finish. For the complete details, check the [Full Recipe]. For the best grilled Mediterranean veggie skewers, pick seasonal vegetables. Fresh veggies taste better and add more flavor. Look for zucchini, bell peppers, and red onions. They offer great colors and textures. When you shop, choose firm, bright vegetables. Avoid any that feel soft or look dull. You can spice up your marinade. Try adding fresh herbs like basil or thyme. They add a nice touch. You can also use lemon juice for a zesty flavor. For oils, consider using avocado or sesame oil. Each type brings a unique taste to the skewers. To get those perfect grill marks, heat your grill well. A hot grill helps sear the veggies. Place the skewers at an angle for better marks. Turn them every few minutes. This promotes even cooking and prevents burning. To stop veggies from sticking, oil the grill grates lightly. You can also brush oil on the skewers before grilling. For the full recipe, check the details above! {{image_4}} You can mix up your veggie skewers with many different vegetables. Try adding eggplant, asparagus, or zucchini for a tasty twist. Each vegetable brings its unique flavor and texture. Think about color too! Using red, yellow, green, and purple veggies makes your skewers look bright and fun. This also helps to attract kids and picky eaters. More colors usually mean more vitamins and minerals, too! Want to add protein? Try tofu or tempeh for a plant-based option. Marinate them just like the veggies for great flavor. If you prefer meat, chicken or shrimp works well. Marinate your choice of meat in olive oil, herbs, and spices. This adds depth to your skewers. It’s an easy way to make a filling meal. Don’t be afraid to play with flavors! Try different marinades. A simple lemon juice and herb mix can brighten the dish. You can also use spicy sauces for a kick. Before serving, drizzle some fresh dressing on top. This adds a burst of flavor and makes the dish even more appealing. For the full recipe, check out the complete guide. To store leftover skewers, let them cool down first. Place them in an airtight container. You can use glass or plastic containers. Make sure the lid seals well to keep the flavors fresh. For freezing skewers safely, wrap each skewer in plastic wrap. Then, place them in a freezer bag. This keeps them from getting freezer burn. When you reheat, take them out and thaw in the fridge overnight. To warm them up, place them on a grill or in the oven. Heat them until they are hot, about 5 to 10 minutes. These skewers can last up to 4 days in the refrigerator. After that, they may start to lose flavor and texture. Watch for signs that the skewers have gone bad. If they smell off or look slimy, it’s best to toss them. Always trust your senses when it comes to food safety. For the full recipe, check the section above. Yes, you can prep these skewers in advance. Start by cutting the vegetables. Place them in a bowl. Drizzle with olive oil and spices. Toss until coated. Cover the bowl and refrigerate. This keeps them fresh and ready to grill. I recommend marinating for at least 30 minutes. This allows the flavors to soak in well. Grill these skewers on medium-high heat. This ensures even cooking. Aim for a temperature of about 400°F (200°C). Grill for 10-12 minutes. Turn the skewers every few minutes. This will give you nice grill marks. Check the veggies for tenderness. They should be soft but still slightly firm. You can use wooden, metal, or bamboo skewers. Each has its benefits. Wooden skewers need soaking in water for 30 minutes. This prevents burning on the grill. Metal skewers are reusable and sturdy. They can handle heavy vegetables well. Bamboo skewers are lightweight and easy to find. Choose what works best for you! For the full recipe, refer to the earlier section. In this blog post, I shared a simple way to make tasty vegetable skewers. We covered the ingredients, preparation steps, and grilling techniques. You learned tips to choose fresh veggies, add flavors, and create fun variations. Remember, you can customize skewers to suit your taste. Enjoy the grilling process and share your creations with friends and family. Happy grilling!](https://dishtreats.com/wp-content/uploads/2025/07/4b70700e-9f85-4317-b9e4-a855a04e592b-768x768.webp)
![- 1 French baguette, cut into 1/2-inch thick slices - 4 ripe tomatoes, diced into small pieces - 1 cup fresh basil leaves, roughly chopped - 2 cloves garlic, finely minced - 3 tablespoons extra-virgin olive oil - 1 tablespoon balsamic vinegar - Salt and freshly cracked black pepper, to taste - Fresh mozzarella balls, halved (optional) When making tomato basil bruschetta, fresh ingredients matter. Ripe tomatoes burst with flavor. Look for bright color and a firm touch. Fresh basil should smell sweet and aromatic. It adds a lovely green touch to the dish. To enhance flavor, consider adding: - A pinch of red pepper flakes for heat. - A sprinkle of dried oregano for depth. - A dash of lemon zest for brightness. These small additions can elevate your bruschetta, making it more exciting and unique. How to choose ripe tomatoes: Select tomatoes that are firm, smooth, and free of blemishes. They should feel slightly heavy for their size. A sweet smell is a good sign of ripeness. Choosing the best basil: Look for bright green leaves without brown spots. Fresh basil should feel soft and fragrant. Avoid wilted or discolored leaves. This will ensure your bruschetta is fresh and flavorful. For the full recipe, check out [Full Recipe]. It will guide you through each step to create this fresh and flavorful delight! - Preheat the oven to 400°F (200°C). - Arrange baguette slices on a baking sheet in a single layer. - Brush both sides of each slice with olive oil for best toasting. - Toast the bread for 5-7 minutes until golden. Watch closely to avoid burning. - In a bowl, combine diced tomatoes, chopped basil, minced garlic, olive oil, balsamic vinegar, salt, and pepper. - Mix well to blend all the flavors together for the best taste. - Generously pile the tomato basil mixture onto each slice of toasted bread. - For a delicious twist, add one half of a fresh mozzarella ball on top of each bruschetta. - Serve immediately to enjoy the crunchy texture and fresh flavors! You can find the [Full Recipe] for a complete guide to this delightful dish. To keep your bread from getting soggy, toast it well. Brush both sides of each slice with olive oil. This helps create a barrier against moisture. Bake them until they are golden and crisp. Serve your bruschetta right after making it. This keeps the bread crunchy and the topping fresh. Letting it sit too long can cause sogginess. So, plan to serve it quickly after assembly for the best taste. You can add a variety of toppings to your bruschetta. Try adding olives or capers for a salty kick. A sprinkle of feta cheese can also add a creamy touch. If you like heat, consider diced jalapeños. To infuse extra flavor, marinate your tomatoes. Mix them with olive oil, balsamic vinegar, and a pinch of salt before adding to your bread. This gives a burst of taste with every bite. Arrange your bruschetta on a serving platter. Keep them in a neat row for a clean look. You can stack them or place them in a circle for flair. For garnishing, add fresh basil leaves on top. This adds color and enhances the dish's aroma. A light drizzle of balsamic reduction can elevate the look, too. It makes your bruschetta not only tasty but also beautiful. {{image_4}} You can switch up the bread for bruschetta. Try using sourdough or ciabatta. Both add a unique crunch. You can also use gluten-free bread for a lighter option. For toppings, think seasonal. In summer, ripe peaches or heirloom tomatoes shine. In fall, try roasted butternut squash or figs. Want to mix it up? Add avocado to your bruschetta for creaminess. It pairs well with tomatoes. You can also try strawberries for a sweet twist. Adding roasted vegetables gives depth. Bell peppers or zucchini can bring a savory note. Bruschetta is not just Italian. In Italy, you might find toppings like prosciutto or different cheeses. Adding spices like za'atar or harissa gives it an international flair. Each region has its own style. Embrace the flavors of the world in your bruschetta! To keep your bruschetta fresh, store it properly. You should separate the bread and topping. Place the bread in an airtight container. This helps it stay crisp. For the tomato mixture, use a different container. Glass or plastic works well. Both should be stored in the fridge. Consume leftovers within two days for the best taste. When reheating bruschetta, avoid sogginess. The oven is best for this. Preheat your oven to 350°F (175°C). Place the toasted bread on a baking sheet. Heat for about 5 minutes. This keeps the crunch. You can use a microwave, but it makes the bread soft. If you must use the microwave, heat it for only 10-15 seconds. You can freeze bruschetta, but it changes the texture. It's best to freeze the bread alone. Once cooled, place the slices in a freezer bag. Remove as much air as possible before sealing. For the topping, freeze it in a separate container. To thaw, leave it in the fridge overnight. Reheat the bread in the oven for the best results. Enjoy this fresh and flavorful delight! Traditional bruschetta is a simple Italian dish. It features grilled bread topped with fresh ingredients. The classic topping includes tomatoes, garlic, basil, and olive oil. This dish highlights ripe tomatoes and bright flavors. It is often enjoyed as an appetizer or snack. Yes, you can prepare bruschetta ahead of time. You can make the tomato mixture a few hours before serving. Just keep it in the fridge to maintain freshness. However, do not assemble it too early. The bread can get soggy if topped too soon. Bruschetta is not gluten-free if made with traditional bread. However, you can use gluten-free bread as a substitute. This way, you can enjoy the same delicious flavors without gluten. Always check the labels to ensure all ingredients are gluten-free. Making bruschetta vegan is easy! Just skip any cheese toppings, like mozzarella. Use a mix of tomatoes, basil, garlic, olive oil, and vinegar. This simple recipe is full of flavor and perfect for everyone. Serve bruschetta fresh from the oven for the best taste. Arrange it on a beautiful platter to impress your guests. Garnish with extra basil for color. You can also drizzle balsamic reduction for a touch of sweetness. For detailed instructions on making this delightful dish, check out the [Full Recipe]. Bruschetta is a simple and tasty dish made with fresh ingredients. We covered the best ingredients and how to prepare them. I shared tips for toasting bread and mixing flavors. You learned how to serve and store bruschetta, plus creative variations to try. Enjoy making this dish for your next gathering. With fresh ingredients and great flavors, it’s sure to impress!](https://dishtreats.com/wp-content/uploads/2025/06/57f66ce1-94e1-4d75-a2ed-e361941a89c2-768x768.webp)
![- 1 cup plain Greek yogurt - 1/4 cup creamy mayonnaise - 1 tablespoon freshly squeezed lemon juice - 1 teaspoon garlic powder - 1 teaspoon onion powder - 1 teaspoon dried dill weed - 1 teaspoon dried parsley - 1/2 teaspoon sea salt - 1/4 teaspoon freshly ground black pepper - 1/4 teaspoon smoked paprika - Assorted fresh vegetables (carrots, celery, bell peppers, cucumber) To make a delicious Creamy Greek Yogurt Ranch Dip, you need a few simple ingredients. Start with the main trio: Greek yogurt, creamy mayonnaise, and lemon juice. The yogurt gives the dip its rich and tangy base. The mayonnaise adds a smooth, creamy texture, while the lemon juice brightens the flavors. Next, you’ll want to gather your seasonings. Garlic powder and onion powder add a savory punch. Dried dill weed and parsley bring in that classic ranch flavor. Salt, black pepper, and smoked paprika round out the taste, adding depth and a hint of spice. Finally, think about what to dip. Fresh veggies like carrots, celery, bell peppers, and cucumber work perfectly. They add crunch and freshness, creating a balanced snack. For the full recipe, check out the details above. First, grab a medium-sized mixing bowl. In this bowl, add 1 cup of plain Greek yogurt and 1/4 cup of creamy mayonnaise. These two ingredients create a rich base for our dip. Use a whisk or spatula to blend them well until smooth. It should look creamy and inviting. Next, squeeze in 1 tablespoon of freshly squeezed lemon juice. This adds a nice tang to the dip. Now, sprinkle in the seasonings: 1 teaspoon each of garlic powder, onion powder, dried dill weed, and dried parsley. Add 1/2 teaspoon of sea salt, 1/4 teaspoon of freshly ground black pepper, and 1/4 teaspoon of smoked paprika. These flavors will come together beautifully. Now it's time to whisk everything together. Vigorously mix the ingredients until the dip is fully combined. It should be smooth and creamy, with a lovely thickness. Take a taste and adjust the seasonings as needed. If you want more flavor, feel free to add a pinch of salt or a few more herbs. Your taste buds will guide you. Once you're happy with the flavor, it's time to chill the dip. Cover the bowl with plastic wrap or transfer the dip to an airtight container. Place it in the refrigerator for at least 30 minutes. This step allows the flavors to meld and deepen. When you're ready to enjoy, take the dip out of the fridge. Serve it chilled with an assortment of fresh vegetables for dipping, like carrots, celery, bell peppers, and cucumber. This adds a vibrant touch and makes for a fun snack! For the complete recipe, check out the [Full Recipe]. To make your Creamy Greek Yogurt Ranch Dip even tastier, try using fresh herbs. Fresh chives, dill, or parsley can add great flavor. You can also adjust the lemon juice for more tanginess. A little extra juice can brighten the dip. If you want a thicker dip, add more Greek yogurt. It will make the dip creamier. You can also cut back on the mayonnaise for a lighter version. This keeps the flavor while reducing calories. This dip is perfect for parties and gatherings. It pairs well with crackers or pita chips. Serve it with an array of fresh veggies, like carrots or cucumbers. They make great dippers, adding crunch to your snack. For the full recipe, check the earlier sections. {{image_4}} You can easily change the herbs in this dip. Fresh herbs like chives or basil work great. They add a nice twist to the flavor. Dried herbs can also give you different tastes. Think about using oregano or thyme for a unique touch. If you love some heat, add a spicy twist. Incorporate hot sauce or cayenne pepper. This will give your dip a zesty kick. You can also add chopped jalapeños for extra spice. Just be careful with the amount; you want to enjoy the heat, not overpower it! For a vegan version, swap the yogurt and mayonnaise. Use a plant-based yogurt and vegan mayo. Make sure all seasonings are plant-based too. This way, you can enjoy the same creamy dip without any animal products. It's delicious and fits many diets! For the full recipe, check out the link above. To keep your creamy Greek yogurt ranch dip fresh, store it in an airtight container. This helps prevent any odors from other foods in your fridge. You can enjoy the dip for up to one week. Just make sure to seal it tightly. Freezing this dip is not recommended. The texture may change after thawing, making it watery. Only freeze if it is necessary. If you must, use a freezer-safe container. If you freeze the dip, place it in the refrigerator to thaw. This method gives you the best results. Once thawed, stir it well before serving again. This helps bring back the creamy texture. Yes, non-fat can be used for a lighter version. This choice keeps the dip creamy while cutting down on fat. The flavor remains rich and satisfying. The dip lasts up to one week in the refrigerator. Store it in an airtight container to keep it fresh. I find it gets even better after a day. Fresh veggies, crackers, pita chips, or pretzels are great options. Carrots, celery, and bell peppers work well. You can get creative with your dippers! Yes, all ingredients are gluten-free; verify brands to be sure. This makes it a perfect snack for anyone with gluten sensitivities. Yes, it’s recommended to make it a few hours ahead to enhance flavors. The longer it sits, the more the flavors blend. I often prepare it the night before. This blog post shared a tasty Greek yogurt dip recipe. We covered the key ingredients, easy steps, and tips to make it even better. You learned how to customize the dip, try vegan options, and store it correctly. Think of this dip for your next party or snack. It’s healthy, easy to make, and perfect with fresh veggies or chips. Enjoy your tasty dip and feel good about sharing it with friends!](https://dishtreats.com/wp-content/uploads/2025/07/4dca82da-d028-43ac-94fd-c211b04a114a-768x768.webp)
