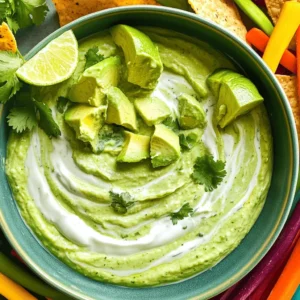
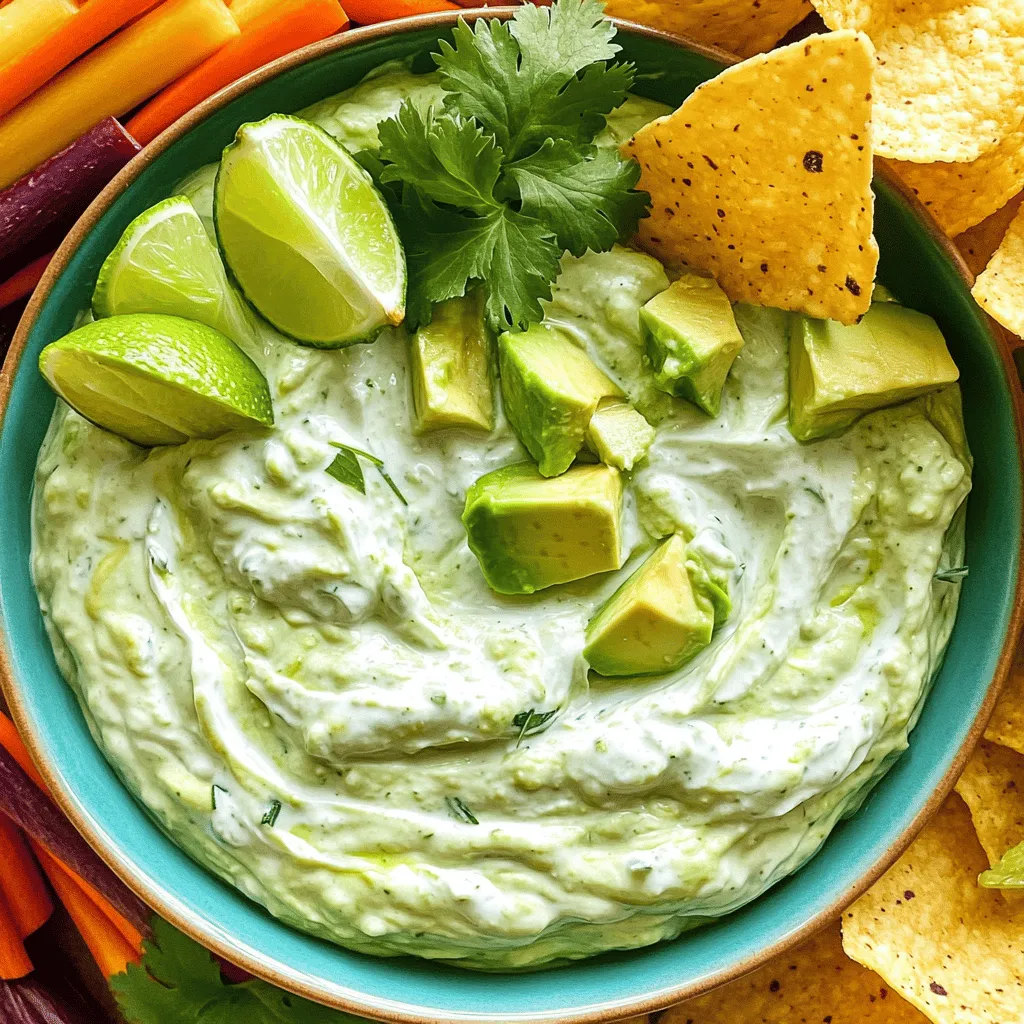
Creamy Avocado Ranch Dip Savory and Flavorful Recipe

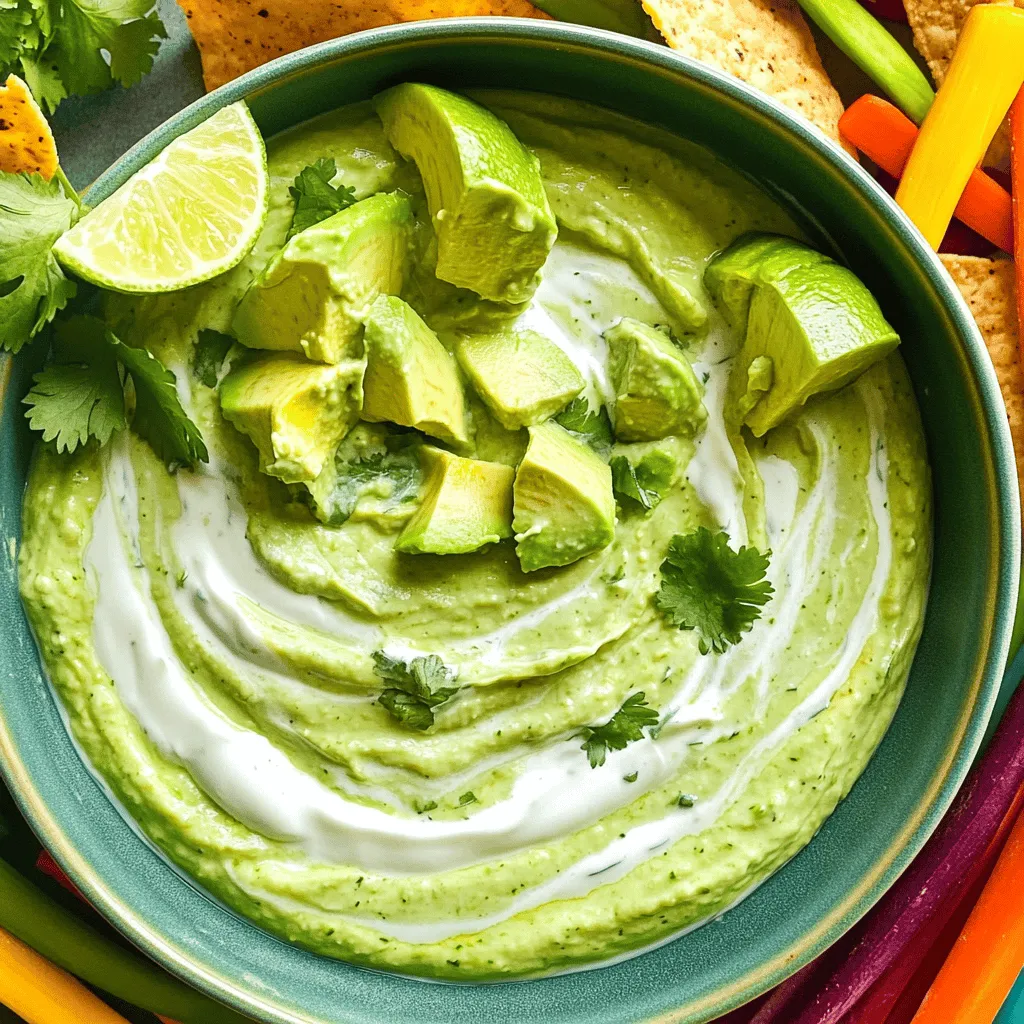
Looking for a dip that packs a punch of flavor? This Creamy Avocado Ranch Dip is just what you need! With ripe avocados, tangy Greek yogurt, and zesty ranch seasoning, this recipe is simple and satisfying. Perfect for parties or snacking at home, this dip pairs great with fresh veggies or crunchy chips. Follow me as I guide you through making this savory delight that everyone will love!
Ingredients
Here are the tasty ingredients you’ll need for your Creamy Avocado Ranch Dip:
- 2 ripe avocados, peeled and pitted
- 1 cup Greek yogurt
- 1 packet ranch seasoning mix
- 1 tablespoon fresh lime juice
- 1 clove garlic, minced
- 1/4 cup fresh cilantro, chopped
- Salt and pepper to taste
- Optional accompaniments: assorted veggie sticks (carrots, celery, bell peppers) or crispy tortilla chips for serving
This dip is not just easy to make; it’s also packed with flavor. The ripe avocados give it a creamy texture, while the Greek yogurt adds a tangy taste. The ranch seasoning mix brings in that familiar flavor that everyone loves. Don’t forget the fresh lime juice; it adds a nice zing!
You can use fresh cilantro to brighten the dip up, and the minced garlic gives it a savory kick. Adjust the salt and pepper based on your taste.
Feel free to serve this dip with crunchy vegetable sticks or crispy tortilla chips. Both pair perfectly, making your snack time fun and healthy.
Step-by-Step Instructions
Creating the perfect creamy avocado ranch dip is easy and fun. Let’s break down each step.
- Mash the avocados: Start with two ripe avocados. Cut them in half, remove the pits, and scoop the green flesh into a bowl. Use a fork or potato masher and mash until smooth.
- Combine with Greek yogurt: Next, add one cup of Greek yogurt to the mashed avocado. Stir gently. This forms a rich and creamy base that balances the flavor.
- Add ranch seasoning and lime juice: Sprinkle the ranch seasoning mix over the avocado and yogurt blend. Then, squeeze in one tablespoon of fresh lime juice. Mix well until everything is blended.
- Mix in garlic and cilantro: Take one clove of minced garlic and 1/4 cup of chopped cilantro. Fold these into the mixture. This adds a fresh taste and lovely aroma.
- Taste and season with salt and pepper: Give your dip a taste. Add salt and pepper as desired. Adjust these to make the flavor pop.
- Chill the dip before serving: For the best flavor, let the dip chill in the refrigerator for about an hour. This helps all the flavors mix well.
- Transfer to a serving bowl and garnish: When you’re ready to serve, scoop the dip into a nice bowl. You can garnish with extra cilantro and lime wedges for a bright look.
Now you’re all set to enjoy this delicious dip!
Tips & Tricks
Perfecting Your Dip
To make your dip great, use ripe avocados. Ripe avocados create a smooth and creamy texture. You can tell if they are ripe by gently squeezing them. If they yield slightly, they are ready.
Adjust the seasoning to fit your taste. Start with the ranch seasoning mix, then add salt and pepper. Taste as you go. This step helps you create a dip that you love.
Chill the dip for at least an hour. Chilling lets the flavors blend well, making it taste even better. It also gives the dip a nice, cool texture.
Using a food processor can make your dip creamier. Blend the avocados, yogurt, and seasoning until smooth. This method saves time and enhances the dip’s texture.
Serving Suggestions
Pairing your dip with veggie sticks adds crunch. Carrots, celery, and bell peppers work well. They add freshness and color to your plate.
Choose the best crackers and chips for dipping. Tortilla chips are a great choice because they are sturdy. They hold up well and add an extra crunch to each bite.

Variations
Spicy Avocado Ranch Dip
To make a spicy avocado ranch dip, add jalapeños or hot sauce. This twist gives the dip a nice kick. Start by chopping fresh jalapeños. You can adjust the amount based on your heat preference. Stir these into your creamy base after mixing in the ranch seasoning. If you prefer hot sauce, just add a few drops to taste. This variation works great for those who love bold flavors.
Dairy-Free Version
If you want a dairy-free option, substitute Greek yogurt with a plant-based alternative. Look for unsweetened coconut yogurt or almond yogurt. Both options create a creamy texture. Use the same amount as the Greek yogurt in the recipe. This way, you keep the rich taste while meeting dietary needs. It’s a simple swap that makes the dip accessible to more people.
Adding Other Flavors
You can also enhance the dip by adding other flavors. Diced tomatoes or green onions work well in this recipe. For tomatoes, chop them finely and mix them in. They add a fresh taste and colorful look. Green onions can be sliced thin and stirred in for a hint of sharpness. Feel free to experiment with different herbs too. The goal is to make the dip your own.
Storage Info
Best Practices for Storing
To keep your creamy avocado ranch dip fresh, you must store it well. Use an airtight container to prevent air from getting in. This helps keep the dip creamy and tasty. When you’re not using the dip, always store it in the refrigerator. The cold will help maintain its flavor and texture.
Shelf Life
This dip is best enjoyed fresh, but you can store it for 2 to 3 days. After this time, the avocados may start to brown, and the flavors can fade. Make sure to check the dip before serving. If it looks or smells off, it’s best to toss it.
FAQs
How do I make Creamy Avocado Ranch Dip vegan?
To make this dip vegan, swap Greek yogurt for a plant-based yogurt. Look for unsweetened options to keep it savory. You can also use vegan ranch seasoning. This keeps the creamy texture and tangy flavor intact.
Can I use mayonnaise instead of Greek yogurt?
Yes, you can use mayonnaise. It will change the flavor slightly. Mayonnaise adds richness, but the dip may be less tangy than with Greek yogurt. If you want a lighter dip, Greek yogurt is better.
What can I serve with this dip besides chips?
You can serve this dip with fresh veggie sticks. Carrots, celery, and bell peppers work great. Pita chips or crackers are also good options. You can even use it as a spread on sandwiches or wraps.
Can I freeze Creamy Avocado Ranch Dip?
I do not recommend freezing this dip. The avocado may change texture when thawed. It’s best to enjoy it fresh or store it in the fridge for a few days.
How long does it take to prepare this dip?
This dip is quick to make. It only takes about 10 minutes to prepare. You can enjoy it right away or chill it for better flavor.
This blog post covered the tasty Creamy Avocado Ranch Dip. You learned the easy steps to make it and the best ingredients to use. We also explored tips for making it even better and offered fun variations. Finally, we discussed how to store it for freshness. Enjoying this dip with veggie sticks or chips makes it a hit at any gathering. I hope you feel ready to whip up this delicious dip and impress your friends!


![- 1 pound boneless, skinless chicken breast, thinly sliced - 1 tablespoon extra virgin olive oil - 1 teaspoon chili powder - 1 teaspoon ground cumin - ½ teaspoon smoked paprika - ½ teaspoon garlic powder - ½ teaspoon onion powder - Sea salt and freshly cracked black pepper, to taste - 1 red bell pepper, sliced into thin strips - 1 yellow bell pepper, sliced into thin strips - 1 medium onion, sliced - 1 head of iceberg or romaine lettuce, leaves carefully separated I always choose organic chicken when I can. It tastes better and is healthier. Good seasoning transforms chicken into a flavorful dish. Chili powder and cumin bring warmth, while smoked paprika adds depth. Keep your vegetables fresh! Use bright, crisp bell peppers and onions. They add color and crunch to your wraps. For the lettuce, iceberg or romaine works best. Their sturdy leaves hold the filling well. - 1 ripe avocado, sliced - Fresh cilantro leaves, for garnish - Lime wedges, for drizzling Avocado adds creaminess and balances the spiciness. Cilantro brings a fresh burst of flavor. Lime juice brightens the dish and enhances all the tastes. For sauces, you can use salsa for a zesty kick. A yogurt sauce makes a cool contrast to the spicy chicken. These toppings and dips elevate your chicken fajita lettuce wraps. You can find the Full Recipe for more details on preparation and cooking. Enjoy making these fresh and flavorful meals! To make your chicken fajita lettuce wraps burst with flavor, seasoning is key. Start by mixing the chicken with olive oil and spices. Use chili powder, cumin, smoked paprika, garlic powder, onion powder, sea salt, and black pepper. This mix will coat the chicken well and enhance its taste. Next, let’s slice the vegetables correctly. For even cooking, cut the bell peppers and onion into thin strips. This helps them cook through while keeping a nice crunch. Remember, uniform slices ensure they cook at the same rate. Now, prepare the lettuce leaves. Rinse them gently under cold water. Pat them dry with a towel to avoid soggy wraps. Choose firm leaves that can hold the filling well. Iceberg or romaine works best for this recipe. Heat your skillet to medium-high. This temperature is perfect for cooking the chicken. When it's hot, add the seasoned chicken and cook for about 5-7 minutes. Stir occasionally to get an even golden-brown color. Make sure the chicken is fully cooked and no longer pink inside. After the chicken is done, add your sliced vegetables. Cook for an extra 4-5 minutes. Stir frequently to keep the veggies bright and tender-crisp. This technique ensures they maintain great texture and taste. Now, it's time to assemble your wraps. Take a lettuce leaf and spoon in a generous amount of the chicken and vegetable mix. Add a few slices of creamy avocado on top. Finish with fresh cilantro for extra flavor. For presentation, arrange the wraps on a nice platter. Serve with lime wedges to add a zesty touch. A squeeze of lime juice brightens the flavors and makes each bite pop. Enjoy this fresh and flavorful meal from the full recipe! To avoid overcooking the chicken, use a meat thermometer. Chicken should reach 165°F. Remove it from the heat the moment it's done. This keeps the meat juicy and tender. Let the chicken rest for 5 minutes before serving. This helps the juices redistribute, making each bite full of flavor. To add heat, include diced jalapeños or cayenne pepper. Start with a small amount, then taste as you go. You can also try chipotle powder for a smoky kick. To balance flavors, squeeze fresh lime juice over the wraps. The acidity brightens the dish and complements the spices. Pair your chicken fajita wraps with a fresh side salad. A simple mix of greens, tomatoes, and cucumbers works well. You can also serve them with corn on the cob or seasoned rice. These wraps are perfect for casual gatherings or family dinners. They are also great for a fun weeknight meal! For the full recipe, check the earlier section. {{image_4}} You can swap out chicken for other proteins. Shrimp works great and cooks fast. Tofu is a perfect choice for a plant-based option. Both give you tasty results. If you need gluten-free or low-carb wraps, try using collard greens or cabbage leaves instead of lettuce. These options hold up well and add a nice crunch. You can change the spice blend to suit your taste. Try adding cayenne for heat or smoked paprika for a deeper flavor. You can also use a store-bought fajita seasoning if you're short on time. Seasonal veggies can make your wraps pop. In summer, throw in fresh corn and zucchini. In fall, use roasted butternut squash for a sweet twist. For parties, serve the wraps on a large platter. Arrange the lettuce leaves and filling bowls in a fun way. This lets guests build their own wraps, making it interactive and fun. If you want to prepare these wraps for lunch, pack the filling and lettuce separately. This keeps the lettuce crisp and fresh. You can also use small containers for dips like salsa or guacamole. For the full recipe, visit [Full Recipe]. To keep your chicken fajita lettuce wraps fresh, follow these steps: - Separate the filling and lettuce: Store the chicken and veggies in one container, and the lettuce in another. This keeps the lettuce crisp. - Use airtight containers: Choose containers that seal tightly to prevent air from getting in. - Cool before storing: Let the filling cool to room temperature before sealing. This helps avoid condensation, which can make the chicken soggy. When it's time to enjoy your leftovers, here are some tips: - Reheat in a skillet: Place the chicken fajita filling back in a skillet over medium heat. Stir often to warm evenly without drying it out. - Add a splash of water: If the filling seems dry, add a little water or broth. This keeps it moist and flavorful. - Refresh the lettuce: Rinse the lettuce leaves again under cold water. This helps them feel crisp and fresh. If you want to save your chicken fajitas for later, follow these guidelines: - Freeze the filling: Place cooled chicken and veggies in a freezer-safe bag. Remove as much air as possible before sealing. - Label and date: Write the date on the bag. Use within three months for best taste. - Thaw safely: When ready to eat, thaw the filling overnight in the fridge. Reheat it as mentioned earlier. Prepare fresh lettuce just before serving. For the full recipe, check out the spicy chicken fajita lettuce wraps. To add heat, try these spices and sauces: - Red pepper flakes - Jalapeños, diced - Hot sauce of your choice - Chipotle powder - Fresh diced chili peppers Mix these into your chicken or drizzle on top. You can adjust the heat based on your taste. If you want a smoky flavor, chipotle powder works great. Yes, you can prep ingredients in advance. - Slice the chicken and veggies the night before. - Store them in airtight containers in the fridge. - Cook the chicken and veggies just before serving. This way, you can save time and still enjoy fresh flavors. Absolutely! They are low in carbs and high in protein. - One serving contains lean chicken and fresh veggies. - You get vitamins from the peppers and lettuce. - Avocado adds healthy fats. This meal is tasty and supports a balanced diet. Yes, you can use other greens. Here are some ideas: - Butter lettuce for a softer wrap - Green leaf lettuce for extra crunch - Collard greens for a sturdy option These alternatives can change the taste and feel of your wraps. These sides complement your wraps nicely: - Fresh corn salad - Quinoa salad with lime - Black bean salsa - Grilled veggies These options add color and variety to your meal. For the full recipe, check the main section of this article. Chicken fajita lettuce wraps are a great way to enjoy fresh ingredients and bold flavors. We covered the key ingredients, from quality chicken to perfect seasoning. I shared step-by-step instructions for preparation and cooking, plus tips to avoid common mistakes. You can also explore fun variations and creative ways to serve these wraps. Don't forget about storage options to keep your leftovers fresh. With this guide, you can easily create a tasty and healthy meal anytime. Enjoy experimenting with flavors and serving styles!](https://dishtreats.com/wp-content/uploads/2025/07/3ff26f4d-3e29-49ec-9670-a4271fb272fb-768x768.webp)
![- 2 cups diced apples - 1 cup celery, thinly sliced - 1 cup red grapes, halved - 1/2 cup walnuts, chopped - 1/2 cup raisins or dried cranberries - 1 cup plain Greek yogurt - 1 tablespoon honey - 1/2 teaspoon fresh lemon juice - Salt and pepper to taste - Lettuce leaves for serving Fresh produce makes this salad shine. I love using crisp apples, like Granny Smith, for their tartness. They add a nice crunch. The celery brings a refreshing snap, while juicy red grapes add sweetness. Nuts and dried fruits give texture and flavor. Chopped walnuts are my go-to. Toast them for even more flavor. Raisins or dried cranberries add a touch of sweetness, balancing the dish well. For the dressing, I use plain Greek yogurt. It’s creamy and healthy. Honey adds sweetness, and a bit of lemon juice brightens the flavors. Season with salt and pepper to enhance everything. Finally, serve on fresh lettuce leaves. They make a great base and add color. This combination of ingredients creates a delightful Waldorf salad. You can find the full recipe at [Full Recipe]. - Start by adding 2 cups of diced apples to a large bowl. - Drizzle the apples with 1/2 teaspoon of fresh lemon juice. This keeps them fresh and bright. - Next, slice 1 cup of celery into thin pieces. Add this to the bowl. - Halve 1 cup of red grapes and toss them in too. - In the same bowl, mix the fruit with 1/2 cup of chopped walnuts. - Add 1/2 cup of raisins or dried cranberries for sweetness. Gently toss the mixture. - In a separate bowl, combine 1 cup of plain Greek yogurt with 1 tablespoon of honey. Stir until smooth. - Carefully fold the yogurt dressing into the fruit mixture. Make sure everything is coated. - Season with salt and pepper to taste, folding gently to mix. - Cover the bowl and chill it in the fridge for at least 30 minutes. This helps the flavors blend. - When ready, serve on fresh lettuce leaves for a beautiful presentation. Enjoy your Waldorf salad! - For the complete recipe, check out the Full Recipe. You can swap out fruits and nuts to suit your taste. Try pears or oranges for a fresh twist. For nuts, almonds or pecans work well, too. If you want a creamier texture, use Greek yogurt instead of mayonnaise. The yogurt adds protein and keeps the salad light. Toasting walnuts really boosts their flavor. Just place them in a dry pan over medium heat. Stir them until they smell nutty and are lightly browned. You can also adjust sweetness or tartness. If the salad is too sweet, add a dash of lemon juice. For more sweetness, drizzle in extra honey. Serve your Waldorf salad on crisp lettuce leaves for a vibrant look. Arrange the salad in a large bowl or individual cups. Garnish with mint leaves for a fresh pop of color. You can also sprinkle extra toasted walnuts on top for added crunch. These simple touches make your dish stand out. For the full recipe, refer to the Waldorf Wonderland Salad 🥗. {{image_4}} The classic Waldorf salad uses simple, fresh ingredients. It combines apples, celery, grapes, and walnuts in a creamy dressing. Modern twists can add new flavors. You might see variations like adding chicken or swapping yogurt for mayonnaise. These changes keep the dish fresh and fun. You can experiment with spices, too. A hint of cinnamon or nutmeg can add warmth. If you want a vegan Waldorf salad, swap Greek yogurt for a plant-based option. Silken tofu blended with lemon juice makes a great dressing. For a gluten-free version, check your nuts and dried fruits. Most are safe, but some brands add gluten. You can also cut calories by using low-fat yogurt. This keeps the creaminess while reducing fat. Seasonal fruits can enhance the Waldorf salad. In fall, add sliced pears for sweetness. In winter, pomegranate seeds add color and crunch. Fresh berries in summer create a bright, juicy contrast. Each season brings a new twist to this classic salad. Try different fruits to match the season and your taste. The full recipe allows you to mix and match as you please. To store leftover Waldorf salad, place it in an airtight container. This keeps the salad fresh. Use a lid or plastic wrap to seal it well. The salad can last up to 3 days in the fridge. After that, the texture and flavor may change. If you see any browning apples, it’s best to toss them out. You can prepare some ingredients in advance. Chop your apples, celery, and grapes a day before. Keep them in separate containers in the fridge. This saves time when you want to make the salad. If you want to freeze Waldorf salad, I suggest not freezing it whole. The fruits will lose their crunch. Instead, freeze just the nuts or dried fruits. This keeps them fresh longer. When you are ready, mix them in fresh, chilled salad. You can enjoy that fresh taste even after storage! For the full recipe, check out the Waldorf Wonderland Salad. Waldorf Salad dates back to the late 1800s. A chef at the Waldorf Astoria Hotel in New York created it. The original recipe had only apples, celery, and mayonnaise. Over time, people added more ingredients, like walnuts and grapes. This salad became popular at formal dinners and events. It has a classic, timeless appeal that many enjoy today. Yes, you can prepare Waldorf Salad ahead of time. Make it a few hours before serving for best results. Just follow the steps of mixing everything and keep it in the fridge. This helps the flavors blend well. If you plan to serve it the next day, be careful with the apples. They can brown, so use lemon juice to keep them fresh. Waldorf Salad is quite healthy! It features fresh fruits and nuts, which offer great nutrients. Apples provide fiber and vitamins, while walnuts add healthy fats. The Greek yogurt dressing gives protein and a creamy texture. This salad is a great choice for a light meal or side dish. Eating it can help you feel full and satisfied. You can find the full recipe for this delightful salad [here](#). Waldorf salad combines fresh produce, nuts, and a creamy dressing. You learned how to prepare it step-by-step. I shared tips to enhance flavor and presentation. Feel free to adjust ingredients based on your taste. You can also explore various dietary options and seasonal fruits. This salad is not only tasty but also healthy. With proper storage methods, you’ll enjoy it for days. Now, it's time to create your own delicious version!](https://dishtreats.com/wp-content/uploads/2025/06/24fb7af7-5454-4649-a19f-39fd463a867f-768x768.webp)
