
Chicken and Veggie Sheet Pan Dinner Easy and Healthy
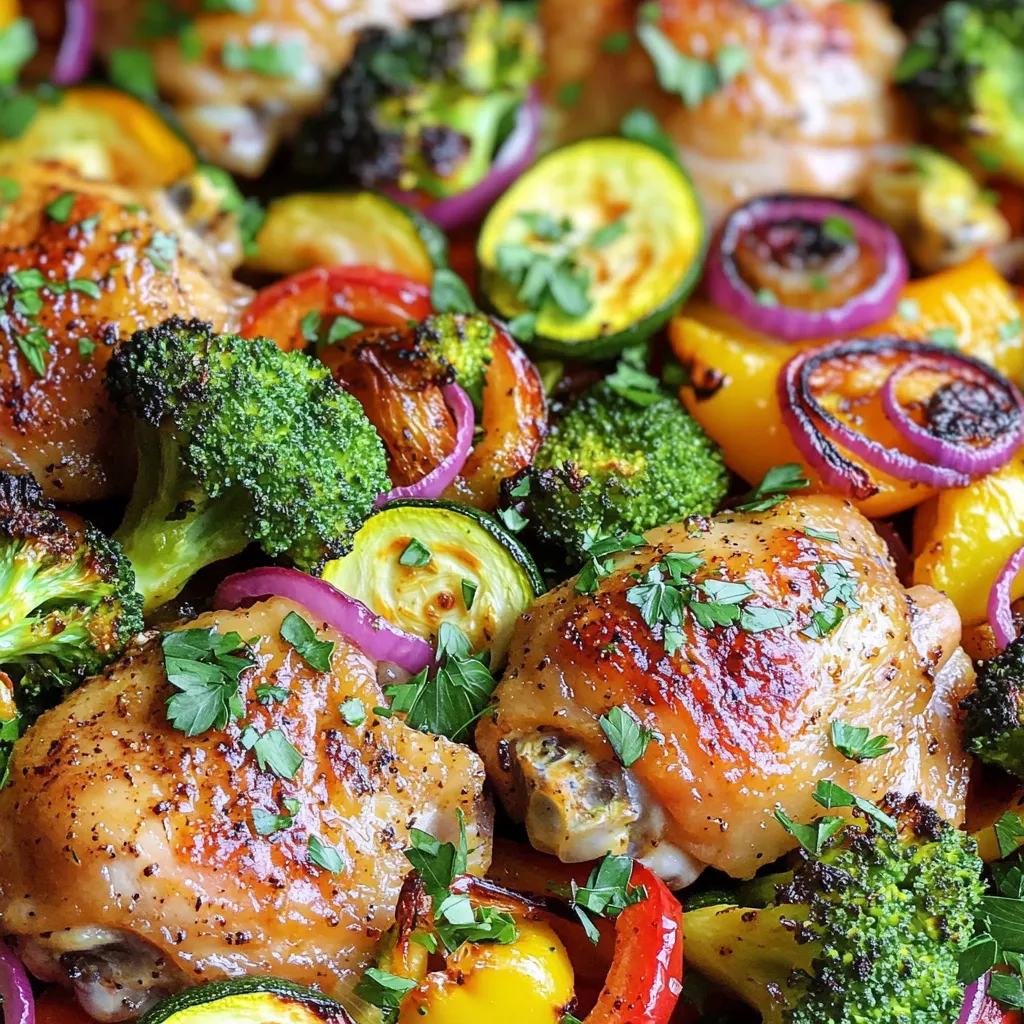
Are you looking for a quick and healthy dinner option? This Chicken and Veggie Sheet Pan Dinner is your answer! It’s packed with flavor, easy to make, and requires minimal cleanup. With just a few ingredients and simple steps, you’ll have a nutritious meal on the table in no time. Join me as I share my tried-and-true tips for making this delightful dish that’s perfect for busy weeknights!You can prepare it in just one pan, making clean-up easy. The mix of chicken and colorful veggies creates a balanced meal. The marinade gives the chicken great flavor, while the oven does all the work.
List of Ingredients
- 4 chicken thighs, skin-on or skinless
- 2 cups broccoli florets
- 1 red bell pepper, sliced into strips
- 1 yellow zucchini, sliced into half-moons
- 1 medium red onion, cut into wedges
- 3 cloves garlic, minced
- 2 tablespoons extra-virgin olive oil, plus more for drizzling
- 1 tablespoon fresh lemon juice
- 1 teaspoon smoked paprika
- 1 teaspoon dried oregano
- Salt and freshly ground black pepper, to taste
- Fresh parsley, chopped for garnish
This recipe combines fresh ingredients for a tasty dish. The chicken thighs provide protein, while the veggies add vitamins and minerals. The marinade components enhance the chicken’s flavor and tenderize it.Try this easy and healthy meal tonight!
Step-by-Step Instructions
Preparation Steps
Prepping the Chicken
Start by rinsing the chicken thighs under cold water. Pat them dry with paper towels. This step helps the marinade stick and keeps the skin crispy.
Marinating Process
In a big bowl, mix olive oil, lemon juice, minced garlic, smoked paprika, oregano, salt, and pepper. Stir it well. Add the chicken to the bowl, making sure it gets coated. Let it sit for 15-20 minutes. This helps the chicken soak up all the flavors.
Preparing the Vegetables
Take another bowl and throw in your broccoli, red bell pepper, yellow zucchini, and red onion. Drizzle with olive oil, then sprinkle salt and pepper. Toss everything well so the veggies get a nice coat of oil and seasoning.
Cooking Method
Arranging on the Sheet Pan
Line a large baking sheet with parchment paper. This makes clean-up easy. Place the marinated chicken in the center of the pan. Spread the vegetables around the chicken. Make sure not to crowd them, so they all roast evenly.
Roasting Time and Temperature
Preheat your oven to 425°F (220°C). Slide the baking sheet into the oven and roast for 25-30 minutes. You want the chicken to reach 165°F (75°C), and the veggies should be fork-tender.
Final Touches (Broiling, Resting)
If you like a crunchy top, switch on the broiler for the last 2-3 minutes. Watch it closely to avoid burning. Take the sheet out when done and let it rest for 5 minutes. This helps keep the chicken juicy. Finish with chopped parsley for a pop of color.
Tips & Tricks
Cooking Tips
- Optimal Oven Settings: Set your oven to 425°F (220°C). This heat cooks chicken while making veggies tender.
- How to Ensure Crispy Skin: Use skin-on chicken. Pat the skin dry before baking. This helps it crisp up nicely.
- Importance of Resting Time: Let the chicken rest for 5 minutes after cooking. This keeps the juices inside.
Flavor Enhancement
- Additional Marinade Ideas: Try adding honey or mustard for a sweet twist. You can also mix in soy sauce for a savory touch.
- Spice Substitutions: If you don’t have smoked paprika, use regular paprika or chili powder. Each gives a unique flavor.
- Vegetable Variations: Mix in carrots, green beans, or sweet potatoes. They all roast well and add color to your meal.
Variations
Ingredient Swaps
You can easily switch up the proteins in this recipe. Turkey works just as well as chicken. If you prefer a plant-based option, try tofu. Both options taste great and soak up the marinade.
When it comes to vegetables, the sky’s the limit. You can use green beans, carrots, or even sweet potatoes. Pick your favorite veggies to make it your own. Just ensure they roast well and cook at a similar time as the chicken.
If you need a gluten-free option, this recipe fits the bill nicely. All the ingredients are naturally gluten-free. Just double-check any sauces or spices you use.
Cuisine Twists
To give this dinner a Mediterranean twist, add olives, artichokes, and feta cheese. A sprinkle of oregano and a drizzle of balsamic vinegar can enhance the flavors.
For an Asian-inspired meal, swap out the veggies for snap peas and bok choy. Use soy sauce and ginger in your marinade for a fresh taste.
Want a Mexican flair? Add corn, black beans, and diced tomatoes. A touch of cumin and chili powder in the marinade will really amp up the flavor.
Explore these variations to keep your meals exciting. Each twist adds a unique flavor profile that makes this sheet pan dinner a versatile go-to.
Storage Info
How to Properly Store Leftovers
After enjoying your chicken and veggie sheet pan dinner, store leftovers right away. This helps keep the food fresh.
- Refrigeration Guidelines: Place the chicken and veggies in an airtight container. They can last in the fridge for up to three days. Make sure to cool them to room temperature first. This prevents moisture buildup, which can make them soggy.
- Freezing Techniques: If you want to keep leftovers longer, freezing is a great option. Use freezer-safe bags or containers. Split the meal into smaller portions for quick thawing later. Leftovers can last up to three months in the freezer.
Reheating Instructions
When it’s time to enjoy your leftovers, reheating is key.
- Oven vs. Microwave Methods: The oven is best for reheating. Preheat it to 350°F (175°C). Place the chicken and veggies on a baking sheet for about 15-20 minutes. This helps restore crispiness. If using a microwave, heat in short bursts of 1-2 minutes, checking often.
- Tips for Retaining Texture: To keep the chicken juicy, cover it with a damp paper towel in the microwave. For oven reheating, you can cover with foil to prevent drying out. Avoid reheating on high heat to keep the veggies from getting mushy.
By following these steps, you can enjoy your chicken and veggie sheet pan dinner again without losing flavor!
FAQs
Common Questions
How long to cook chicken thighs in the oven?
Cook chicken thighs in the oven for 25-30 minutes at 425°F (220°C). Use a meat thermometer to check if the internal temperature is 165°F (75°C). This ensures the chicken is safe to eat and juicy.
Can you use frozen vegetables?
Yes, you can use frozen vegetables. They work well in this recipe. Just add a few more minutes to the cooking time. Frozen veggies often cook faster than fresh ones because they are pre-blanched.
Can this recipe be made ahead of time?
Absolutely! You can marinate the chicken and chop the veggies a day before. Store them in the fridge, then roast them when you’re ready to eat. This saves time on busy nights.
Ingredient-Specific Inquiries
What can be used instead of olive oil?
If you need a substitute for olive oil, try avocado oil or canola oil. Both have a high smoke point and will work well. You can also use melted coconut oil for a different flavor.
How to choose the best chicken for this recipe?
Look for chicken thighs that are plump and have a nice color. Skin-on thighs add flavor, but skinless will work too. If possible, buy organic or free-range chicken for better taste and health benefits.
Are there any low-sodium options for seasoning?
Yes, you can use herbs and spices instead of salt. Try garlic powder, onion powder, or lemon zest for flavor. Fresh herbs like rosemary or thyme also add great taste without extra sodium.
This blog post covered everything you need to make a delicious sheet pan chicken meal. We explored the key ingredients, detailed cooking steps, and shared helpful tips to enhance flavor. You also learned how to store and reheat leftovers for maximum enjoyment.
This method offers simplicity and taste. Experimenting with variations can keep meals exciting. Use what you learned to create your own tasty dishes, and enjoy the process. Happy cooking!
![To make crispy cauliflower tacos, gather these key ingredients: - 1 head of cauliflower, separated into bite-sized florets - 1 cup panko breadcrumbs - 1 teaspoon smoked paprika - 1 teaspoon garlic powder - 1 teaspoon onion powder - 1/2 teaspoon cayenne pepper (adjust to your spice level) - Salt and pepper to taste - 1 cup all-purpose flour - 1 cup plant-based milk (or regular milk) - Corn tortillas (for assembling the tacos) - 1 ripe avocado, sliced - 1 cup shredded red cabbage - Fresh cilantro, for garnishing - Lime wedges, for serving You can swap some ingredients based on your needs. Here are some ideas: - Use gluten-free flour instead of all-purpose flour. - Replace panko with crushed cornflakes for a different crunch. - Try almond milk or oat milk instead of plant-based milk. - Use different spices, like chili powder or cumin, for a unique flavor. To make your tacos even more delicious, consider these toppings: - Fresh salsa for a burst of flavor. - Pickled onions for a tangy kick. - Crumbled feta or queso for creaminess. - Radish slices for added crunch. - A drizzle of hot sauce for some heat. For the full recipe, refer back to the earlier section. Enjoy creating your crispy cauliflower tacos! Start by preheating your oven to 425°F (220°C). This ensures even cooking and crispiness. Next, take your head of cauliflower and separate it into bite-sized florets. Make sure the pieces are not too big. Smaller florets cook faster and get crispier. Now, let’s set up your breading station. Get three bowls in a row. In the first bowl, add one cup of all-purpose flour. In the second bowl, pour one cup of plant-based milk (or regular milk). In the third bowl, mix one cup of panko breadcrumbs with one teaspoon of smoked paprika, one teaspoon of garlic powder, one teaspoon of onion powder, and half a teaspoon of cayenne pepper. Add salt and pepper to taste. Stir the breadcrumbs well to spread the spices evenly. Once your cauliflower is ready and your breading station is set, it’s time to coat the florets. Dip each floret into the flour first. Make sure it’s fully coated, then shake off the excess. Next, dip the floret into the plant-based milk, letting any extra drip off. Finally, roll it in the breadcrumb mixture, pressing gently. Place the breaded florets on a lined baking sheet, leaving space between them. Now, slide the baking sheet into your preheated oven. Bake for 25-30 minutes. Flip the florets halfway through to ensure they brown evenly. When they turn golden and crispy, they’re ready! Enjoy your crispy cauliflower tacos with all the tasty toppings from the Full Recipe. To get that crunch, the key is the panko breadcrumbs. They create a light and crispy coating. Make sure to coat each cauliflower floret well. When you bake them, place them evenly on the sheet. This allows hot air to circulate, making them crispier. Spice up your tacos with smoked paprika and cayenne pepper. They add a nice kick. You can also mix in herbs like cumin or oregano for extra depth. Don't forget to season with salt and pepper. Taste the breadcrumbs before coating the cauliflower to ensure they are flavorful. For the best serving experience, warm your corn tortillas before filling them. This makes them pliable and tasty. Layer your tacos with fresh avocado and shredded cabbage. Top with chopped cilantro and a squeeze of lime for brightness. For an extra treat, serve with a side of salsa or hot sauce. If you want the full recipe, check out the Crispy Cauliflower Tacos section. {{image_4}} You can easily make these tacos vegan. Use plant-based milk instead of regular milk. For the breading, stick to vegan-friendly panko breadcrumbs. This keeps the flavor and crunch you want. To make these tacos gluten-free, swap regular flour with a gluten-free all-purpose blend. Gluten-free panko will also work well for the breading. This way, everyone can enjoy these tasty tacos. You can change the flavor of your tacos. For a spicy kick, add more cayenne pepper or some chili powder. If you prefer sweet, try adding a drizzle of agave syrup or honey. For a savory twist, consider using smoked paprika or a dash of soy sauce in the batter. Each variation brings a new taste adventure to your table. To store leftover tacos, place them in an airtight container. Separate the crispy cauliflower and tortillas if you can. This keeps the tortillas from getting soggy. Store in the fridge for up to three days. When you are ready to eat, you can reheat them for the best taste. To reheat, place the cauliflower on a baking sheet. Preheat your oven to 350°F (175°C). Bake for about 10-15 minutes until crispy again. For the tortillas, heat them in a dry pan for a minute on each side. This helps to keep them warm and flexible. If you want to freeze the tacos, wrap each taco tightly in plastic wrap. Place them in a freezer-safe bag to avoid freezer burn. They can last up to a month in the freezer. When ready to eat, thaw them overnight in the fridge and reheat as mentioned above. Enjoy the great taste even after storage! For the full recipe, refer back to the beginning of the article. To make your cauliflower tacos crispier, follow these tips: - Use Panko Breadcrumbs: They are lighter and create a better crunch than regular breadcrumbs. - Double Coat: For extra crunch, dip the florets in flour, then milk, and roll in breadcrumbs twice. - Bake at High Heat: Ensure your oven is at 425°F (220°C) for that golden finish. - Don’t Crowd the Pan: Space the florets on the baking sheet. This helps them crisp all over. - Flip Regularly: Halfway through baking, flip the florets to cook evenly. By using these steps, you'll achieve a wonderfully crispy texture every time. Yes, you can use different tortillas! Here are some options: - Flour Tortillas: These are soft and great for holding fillings. - Whole Wheat Tortillas: A healthier choice with more fiber. - Lettuce Wraps: For a low-carb option, try using large lettuce leaves. - Taco Shells: Crunchy taco shells add a fun twist. Choose the tortilla that fits your taste and dietary needs. Pair your crispy cauliflower tacos with these delicious side dishes: - Mexican Rice: Fluffy rice with spices complements the tacos well. - Black Beans: A protein-rich side that adds flavor and nutrition. - Guacamole: Creamy and fresh, it’s always a hit. - Corn Salad: A sweet and tangy salad brightens the meal. - Grilled Vegetables: Charred veggies bring a smoky flavor that pairs nicely. These sides will enhance your taco experience and create a full, flavorful feast. For the complete recipe, check out the [Full Recipe]. This blog covered ingredients, steps, tips, variations, and storage for cauliflower tacos. You learned how to prep, bread, and bake for that perfect crunch. I shared useful flavor boosts and serving ideas. You can explore vegan and gluten-free options to suit your needs. Finally, I provided storage tips to keep leftovers fresh. Cauliflower tacos are fun and flexible. Enjoy making them your own!](https://dishtreats.com/wp-content/uploads/2025/07/b9e73b78-f0ec-4a59-80bf-257d8f9aee98-768x768.webp)

![To make the best pumpkin spice muffins, you need the following key ingredients: - 1 cup pumpkin puree - 1/2 cup brown sugar - 1/2 cup granulated sugar - 1/3 cup vegetable oil - 2 large eggs - 1 teaspoon vanilla extract - 1 1/2 cups all-purpose flour - 1 teaspoon baking soda - 1 teaspoon baking powder - 2 teaspoons pumpkin pie spice - 1/2 teaspoon salt These ingredients create a fluffy, moist muffin that bursts with autumn flavor. The pumpkin puree adds natural sweetness and moisture. Brown sugar gives a rich, caramel taste, while the spices bring warmth and comfort to each bite. You can make your muffins even better with these optional ingredients: - 1/2 cup chopped walnuts or pecans - 1/2 cup chocolate chips Adding nuts gives a nice crunch, while chocolate chips add sweetness. Feel free to mix and match based on your taste. You can even leave them out for a classic muffin. Accurate measurement is key to great baking. Here’s how to measure your ingredients correctly: - Flour: Use a spoon to fill your measuring cup, then level it off with a knife. - Brown Sugar: Pack it firmly into the cup for proper measurement. - Liquid Ingredients: Use a liquid measuring cup and check at eye level for accuracy. Following these tips ensures your muffins turn out perfectly every time. For the full recipe, check out the details above and get ready to bake your delicious pumpkin spice muffins! Start by preheating your oven to 350°F (175°C). This step is key for even baking. Next, prepare a standard muffin tin. You can use paper liners or spray each cup with non-stick spray. This will make it easy to remove the muffins later. In a large bowl, combine the pumpkin puree, brown sugar, granulated sugar, and vegetable oil. Add in the eggs and vanilla extract. Whisk these together until smooth. Make sure there are no lumps. This mix gives your muffins their rich flavor. In another bowl, sift together the all-purpose flour, baking soda, baking powder, pumpkin pie spice, and salt. Sifting helps to mix and aerate the flour. It makes for a lighter muffin. This mix is important for texture. If you want to add some extra texture, gently fold in chopped walnuts or pecans. You can also add chocolate chips for a sweet touch. Be careful not to overmix; just combine until they’re evenly spread in the batter. Now, spoon the muffin batter into the prepared tin. Fill each cup about 3/4 full. This allows room for the muffins to rise. Bake for 18-20 minutes. Check if they’re ready by inserting a toothpick in the center. If it comes out clean, they’re done! Let them cool in the tin for 5 minutes before moving them to a wire rack. This cooling step is essential for the best texture. For the complete recipe, check out the [Full Recipe]. To keep muffins light and fluffy, don’t overmix the batter. When you combine wet and dry ingredients, mix just until you see no dry flour. A few lumps are okay. Overmixing makes muffins tough. Also, ensure your baking powder and baking soda are fresh. Old leavening agents won't help the muffins rise. Store your pumpkin spice muffins in an airtight container. This keeps them soft and moist. You can keep them at room temperature for up to three days. For longer storage, place them in the fridge for a week. If you want to save them for later, freeze them. Wrap each muffin in plastic wrap before placing them in a freezer-safe bag. They can last for up to three months in the freezer. Presentation makes any dish more inviting. For a lovely touch, sprinkle powdered sugar on top of each muffin. Serve them on a pretty platter. You can also add a small bowl of softened butter for easy spreading. This makes your muffins look even more delicious and inviting. {{image_4}} You can make gluten-free pumpkin spice muffins easily. To do this, swap regular flour with gluten-free flour. Look for blends that work well in baking. These blends often include almond flour or coconut flour. Check the package to ensure it has a good flavor. The muffins will still taste great! The texture may vary slightly, but they will remain soft and delicious. If you want vegan muffins, you can make some simple changes. Replace eggs with flax eggs. To make a flax egg, mix 1 tablespoon of ground flaxseed with 2.5 tablespoons of water. Let it sit for about 5 minutes until it thickens. Use plant-based oil instead of vegetable oil. You can also use almond milk or another plant-based milk instead of regular milk. These muffins will be light and fluffy, just like the classic recipe. You can jazz up your pumpkin spice muffins with extra flavors. Try adding maple syrup for a sweet twist. Just reduce the sugar a little to balance it out. You can also add orange zest for a fresh, bright taste. A teaspoon of orange zest will give the muffins a nice citrus kick. Feel free to get creative! You can mix and match these flavors to find your favorite combination. These variations can make your pumpkin spice muffins even more special. Check out the full recipe to get started! To keep your pumpkin spice muffins fresh, store them in an airtight container. Place a paper towel in the container to absorb moisture. This helps prevent sogginess. Store them at room temperature for up to three days. If you want to keep them longer, consider freezing. Freezing is a great way to save your muffins. Start by letting them cool completely. Then, wrap each muffin in plastic wrap. Place the wrapped muffins in a freezer-safe bag. Label the bag with the date. You can freeze them for up to three months. To enjoy your muffins warm, reheat them in the oven. Preheat your oven to 350°F (175°C). Place the muffins on a baking sheet. Heat for 10 to 15 minutes. You can also use a microwave for quick reheating. Just warm them for 15 to 20 seconds. Enjoy your pumpkin spice muffins fresh! Yes, you can use canned pumpkin. It saves time and gives great flavor. Make sure to choose 100% pure pumpkin, not pumpkin pie filling. This keeps the taste just right. Canned pumpkin is often smoother, which helps in mixing. It also has a longer shelf life. So, if you have a can, use it! For eggs, you can use several substitutes. Common options include: - 1/4 cup unsweetened applesauce - 1/4 cup mashed banana - 1 tablespoon ground flaxseed mixed with 2.5 tablespoons water These options keep your muffins moist and fluffy. They also add a hint of flavor. Choose what fits your taste best! Check your muffins after 18 minutes. Insert a toothpick into the center. If it comes out clean or with a few crumbs, they are done. If the toothpick is wet, bake for 1-2 more minutes. Keep an eye on them to avoid overbaking. Perfect muffins should be soft and lightly golden. Absolutely! To make mini muffins, use a mini muffin tin. Fill each cup about halfway. Bake them for 10-12 minutes. Keep checking with a toothpick until they are done. Mini muffins are great for snacks and sharing. They are just as tasty and fun! For the full recipe, check out the details above. In this post, we explored how to make delicious pumpkin spice muffins. I covered the essential and optional ingredients, along with measuring them for great results. The step-by-step instructions guide you through prepping, mixing, and baking. I also shared tips for light muffins and ways to store them well. Finally, I offered tasty variations like gluten-free and vegan options. Now you’re ready to enjoy these warm, flavorful treats any time! Your perfect pumpkin spice muffin awaits.](https://dishtreats.com/wp-content/uploads/2025/06/e45c4b1d-a4d2-42b5-b442-a33a757785ba-768x768.webp)

![- 4 cups fresh spinach - 1 cup mixed berries - 1/2 cup feta cheese - 1/4 cup sliced almonds or walnuts - 1/4 red onion - 1 tablespoon honey - 2 tablespoons balsamic vinegar - 2 tablespoons extra virgin olive oil - Salt and pepper to taste The heart of a great Summer Berry Spinach Salad lies in its fresh ingredients. Start with 4 cups of fresh spinach. Choose vibrant, crisp leaves for the best flavor. Next, add 1 cup of mixed berries. I love using strawberries, blueberries, and raspberries together. They add sweetness and color. For creaminess, include 1/2 cup of feta cheese. Crumble it into small pieces for easy mixing. You can also try goat cheese if you prefer. Then, toss in 1/4 cup of sliced almonds or walnuts for crunch. Toasting them adds extra flavor. Finally, slice 1/4 of a red onion. Its sharpness balances the sweetness of the berries. Now, let’s move to the dressing. Combine 1 tablespoon of honey with 2 tablespoons of balsamic vinegar. This mix gives a sweet and tangy kick. Add 2 tablespoons of extra virgin olive oil for richness. Season with salt and pepper to taste. This dressing brings all the flavors together. For the full recipe, check the details above. Each ingredient plays a role in making this salad a fresh and tasty delight! - First, wash and dry the spinach. Make sure it's clean and free of dirt. - Next, add the spinach to a large mixing bowl. This is your fresh salad base. - Rinse the mixed berries under cool water. This helps keep them fresh and tasty. - Slice the strawberries if needed. Halve or quarter them to match other berries. - Gently add the berries to the bowl with the spinach. - Finely slice the red onion. Sprinkle it over the salad for a nice crunch. - In a small bowl, combine honey, balsamic vinegar, olive oil, salt, and pepper. - Whisk until the mixture is smooth. This dressing will bring the salad to life. - Carefully drizzle the dressing over the salad. Make sure every part gets a light coat. - Top with crumbled feta cheese and toasted sliced almonds or walnuts. This adds creaminess and crunch. - Gently toss the salad. Be careful not to mush the berries; you want them whole. For the full recipe, check out the vibrant Summer Berry Spinach Salad. Enjoy every bite! For this salad, I love using strawberries, blueberries, and raspberries. They add sweet flavors and vibrant colors. Choose berries that are firm and bright. Avoid any that feel squishy or have dark spots. In summer, you’ll find these berries at their best. They are fresh and full of flavor. If you can, buy them locally for the best taste. To make your salad stand out, serve it in a wide, shallow bowl. This lets the colors shine. Arrange the spinach first, then place the berries artistically on top. A sprinkle of feta cheese adds a touch of white. You can even drizzle a bit of extra dressing on top for a glossy finish. This makes the dish look fancy and appetizing. When mixing the salad, be gentle. You don’t want to squish the berries. Use your hands or two large spoons. Lift the spinach from the bottom and turn it over. This way, all the ingredients blend well. Toss just enough to coat everything with the dressing. It should look fresh and colorful, not mushy. Enjoy the beautiful mix of flavors! {{image_4}} You can change the nuts or cheese in this salad to suit your taste. If you want a creamier texture, try goat cheese instead of feta. For nuts, walnuts add a rich flavor, while pecans give a sweet crunch. You can also skip the nuts if you have a nut allergy. If you prefer different greens, kale or arugula work well. Kale adds a hearty bite, while arugula brings a peppery flavor. Both options will keep your salad fresh and exciting. While the balsamic dressing is tasty, many other dressings pair well. A lemon vinaigrette adds brightness. A poppy seed dressing can bring a sweet touch. You can also try a yogurt-based dressing for creaminess without the extra calories. You can make your dressing at home or buy it from the store. Homemade dressings let you control the flavor. Store-bought options save time and still taste great. Always check the labels for added sugars or preservatives. You can adapt this salad for fall or winter by changing the ingredients. In the fall, swap out berries for roasted apples or pears. Add some crumbled blue cheese for a bold taste. For winter, add sliced citrus fruits like oranges or grapefruits. They add a lovely color and refreshing taste during cold months. For a heartier salad, consider adding roasted butternut squash or cooked quinoa. This gives you a filling meal while keeping it seasonal and delicious. For the full recipe, click [Full Recipe]. To store leftovers, place the salad in an airtight container. This keeps it fresh and crisp. Avoid mixing the dressing in if you plan to eat it later. The dressing can make the salad soggy. Instead, store the dressing in a separate small jar. Use glass or BPA-free plastic containers. They help keep flavors intact and prevent leaks. If you have extra berries or nuts, store them in separate bags. This way, they stay fresh for longer. Serve the salad within two hours after making it. This keeps the greens bright and the berries juicy. If you need to hold it longer, store it in the fridge. Just remember to add the dressing right before serving. To keep ingredients fresh, cover the salad tightly. Use plastic wrap or a lid. You can also place a damp paper towel on top. This helps maintain moisture without making everything soggy. You cannot freeze the entire salad. Freezing will ruin the texture of the spinach and berries. However, you can freeze some components. For example, freeze extra berries for smoothies later. To freeze components separately, wash and dry the berries first. Spread them out on a baking sheet and freeze until solid. After that, transfer them to a freezer bag. This way, you can enjoy them later without losing flavor. You can easily add protein to your salad. Here are some great ideas: - Grilled chicken, sliced thin - Shrimp, cooked and peeled - Quinoa, cooked and cooled - Chickpeas, drained and rinsed - Hard-boiled eggs, sliced or quartered These additions make the salad heartier. They also give you extra nutrients. Adding protein turns a light dish into a full meal. Yes, you can prepare this salad ahead of time. Here are some tips for meal planning: - Wash and dry the spinach one day before serving. - Store it in a sealed bag with a paper towel to absorb moisture. - Prepare the berries and onion. Keep them separate in the fridge. - Make the dressing a day ahead and store it in a jar. Just mix everything together when you're ready to eat. This keeps the salad fresh and crunchy. This salad is packed with nutrition. Here are some key benefits: - Spinach is rich in vitamins A, C, and K. - Berries are full of antioxidants, which help fight free radicals. - Feta cheese adds calcium and protein. - Nuts provide healthy fats and fiber. Eating this salad supports good health. It boosts your energy and keeps you feeling full. Get creative with your toppings! Here are some fun ideas: - Croutons for added crunch - Avocado slices for creaminess - Sunflower seeds for a nutty flavor - Fresh herbs like basil or mint for a fresh twist - Dried fruits like cranberries or apricots for sweetness Feel free to mix and match. You can make each salad unique! This salad is best when fresh. Here’s how to store it: - Keep it in the fridge for up to two days. - Store the dressing separately to prevent sogginess. - Use an airtight container for the salad. If you want to keep it longer, avoid adding wet ingredients. This helps maintain freshness. This blog post covers how to make a delicious Summer Berry Spinach Salad. We explored the fresh ingredients, simple steps, and helpful tips for making it special. You learned how to pick the best berries, create an easy dressing, and suggest variations. Remember, this salad is not just tasty; it's also packed with nutrients. Whether you serve it fresh or store leftovers, it's a dish you can enjoy many ways. Try it out and make it your own!](https://dishtreats.com/wp-content/uploads/2025/07/5f6f3c08-a552-4e10-ab55-3c96ca32b52c-768x768.webp)