
Lemon Basil Chickpea Salad Fresh and Flavorful Dish
![- 1 can (15 oz) chickpeas, thoroughly drained and rinsed - 1 cup cherry tomatoes, halved - 1 cucumber, diced into bite-sized pieces - 1 bell pepper (any color), diced - 1/4 red onion, finely chopped - 1/4 cup fresh basil leaves, roughly chopped - Juice of 1 large lemon (about 2 tablespoons) - 3 tablespoons high-quality extra-virgin olive oil - Salt and black pepper to taste - 1/4 teaspoon garlic powder - 1/4 teaspoon red pepper flakes (optional, for a bit of heat) In this Lemon Basil Chickpea Salad, the key ingredients make all the difference. Chickpeas are the star of the show. They add protein and a nice bite. The fresh produce items like cherry tomatoes, cucumbers, and bell peppers bring color and crunch. The red onion adds a mild zing. Fresh basil gives that lovely aroma and flavor. The dressing components are just as important. The lemon juice adds brightness, while the olive oil provides richness. Garlic powder adds depth, and the optional red pepper flakes can give it a kick. This mix creates a delightful balance of flavors. - Additional vegetables - Herbs and spices You can easily customize this salad. Feel free to add more vegetables. Some great options are carrots, radishes, or even avocado. These extras can add different textures and flavors. You can also play with herbs and spices. Try adding cilantro for a fresh twist or cumin for an earthy note. The beauty of this salad lies in its versatility. You can make it your own while keeping it fresh and vibrant. For the full recipe, check out the details above. First, gather your ingredients. Grab a large mixing bowl. Add the chickpeas that you drained and rinsed. Next, toss in the halved cherry tomatoes. After that, add the diced cucumber, diced bell pepper, and finely chopped red onion. Now, it's time for the fresh basil. Gently mix the chopped basil leaves into the bowl. This adds a bright, fresh flavor. For the dressing, take a small bowl. Combine the lemon juice, extra-virgin olive oil, garlic powder, salt, and black pepper. If you like heat, add red pepper flakes. Whisk these together until smooth. This zesty dressing will tie everything together nicely. Drizzle the dressing over your salad in the mixing bowl. Now, use clean hands or a large spoon to toss everything together. Make sure all the ingredients get coated with the dressing. After tossing, taste your salad. Adjust the seasoning if needed. You might want more salt, pepper, or lemon juice for extra flavor. Let the salad sit for at least 10 minutes. This resting time helps the flavors blend. You can serve it chilled or at room temperature, whichever you prefer. For presentation, serve your salad in a large, shallow bowl. You can also use individual plates if you like. Garnish with a sprinkle of chopped basil and a few whole cherry tomatoes. This makes a beautiful display. Consider pairing this salad with crusty bread or pita chips. These sides add nice texture and balance to the meal. For the full recipe, check the earlier section. Enjoy! To keep your Lemon Basil Chickpea Salad fresh, store it in an airtight container. This helps prevent air from spoiling the flavors. Place it in the fridge right after serving. It will stay good for about three days. If you notice extra liquid forming, drain it before serving again. This keeps the salad from getting soggy. To maintain the crispness of the veggies, avoid mixing in the dressing until you're ready to eat. Prepping this salad ahead of time is easy and smart. You can chop the veggies and rinse the chickpeas a day before. Just store them separately in the fridge. This saves time when you're ready to serve. Allowing the salad to rest for at least 10 minutes before serving enhances the flavors. Letting the chickpeas soak up the lemon dressing makes each bite burst with taste. For the best results, try to make it a few hours in advance. The flavors will only get better! For the Full Recipe, visit the main article. {{image_4}} You can make your Lemon Basil Chickpea Salad even better with protein. For vegetarians, great options include: - Tofu: Firm tofu adds a nice texture. - Quinoa: This grain packs protein and adds a nutty taste. - Edamame: These young soybeans give a pop of color and flavor. If you want to add meat or seafood, here are some ideas: - Grilled Chicken: Slice it thin for easy mixing. - Shrimp: Cooked shrimp adds a sweet and savory twist. - Tuna: Canned tuna is a quick and tasty option. You can change the flavor of your salad with different dressings. Try these options: - Balsamic Vinaigrette: Sweet and tangy, it pairs well with veggies. - Honey Mustard: Adds a sweet zing that brightens the salad. - Avocado Dressing: Creamy and rich, it makes the salad feel special. Consider adding seasonal ingredients too. Use: - Corn: Fresh corn is sweet and crunchy in summer. - Avocado: Creamy avocados add richness in spring. - Roasted Squash: Perfect for fall, it adds warmth and flavor. For more recipes, check out the Full Recipe! The Lemon Basil Chickpea Salad packs a punch of nutrients. Each serving has about 200 calories. Most of these calories come from healthy fats and proteins. The salad offers: - Protein: Chickpeas are a great source. You get about 10 grams per serving. - Carbohydrates: The salad contains around 25 grams, mostly from chickpeas and veggies. - Fats: With olive oil, you’ll find about 9 grams of healthy fats. This dish also shines with vitamins and minerals: - Vitamin A: From bell peppers and tomatoes, good for your vision. - Vitamin C: The lemon juice and tomatoes boost your immune system. - Iron: Chickpeas provide iron, helping with blood health. This salad is very friendly for many diets. - Vegan-friendly attributes: The recipe uses no animal products. All ingredients are plant-based. This makes it perfect for vegans. - Gluten-free status: All the ingredients are gluten-free. You can enjoy this salad without worry if you have gluten sensitivity. Enjoy this fresh and colorful salad knowing it supports a healthy lifestyle! For the complete recipe, check out the [Full Recipe]. Lemon Basil Chickpea Salad lasts about 3 to 5 days in the fridge. To store it, place it in an airtight container. This keeps the salad fresh and safe to eat. Make sure to check for any changes in smell or color before eating leftovers. Yes, you can use dried chickpeas! First, soak 1 cup of dried chickpeas in water for 8 hours or overnight. After soaking, drain and rinse them. Then, cook them in a pot with water for about 1 to 1.5 hours, or until tender. Drain and let them cool before adding to your salad. This salad pairs well with many dishes. Consider serving it with grilled chicken or fish for protein. You can also add pita bread or crusty bread for a complete meal. For a lighter option, enjoy it with a fresh fruit salad. To add some heat, mix in red pepper flakes. Start with 1/4 teaspoon, then taste and adjust. You can also add diced jalapeños or hot sauce for extra kick. This will give your salad a nice spicy twist! For the full recipe, check the [Full Recipe]. This blog post covered how to make a Lemon Basil Chickpea Salad. We discussed key ingredients like chickpeas and fresh veggies, plus optional add-ins. You learned step-by-step instructions for mixing and tossing the salad. I shared storage tips and variations to suit your taste. In closing, this salad is simple, healthy, and flexible. Enjoy experimenting with flavors and combinations to make it your own!](https://dishtreats.com/wp-content/uploads/2025/07/d3747d36-0043-45e0-9a82-fe789303a34f.webp)
Looking for a fresh and tasty salad that packs a punch? My Lemon Basil Chickpea Salad is a winner! With bright flavors and simple ingredients, it’s perfect for lunch or dinner. In this post, I’ll share everything you need to know—like handy tips, fun variations, and how to keep your salad fresh. Ready to make this vibrant dish? Let’s dive in!
Ingredients
List of Key Ingredients
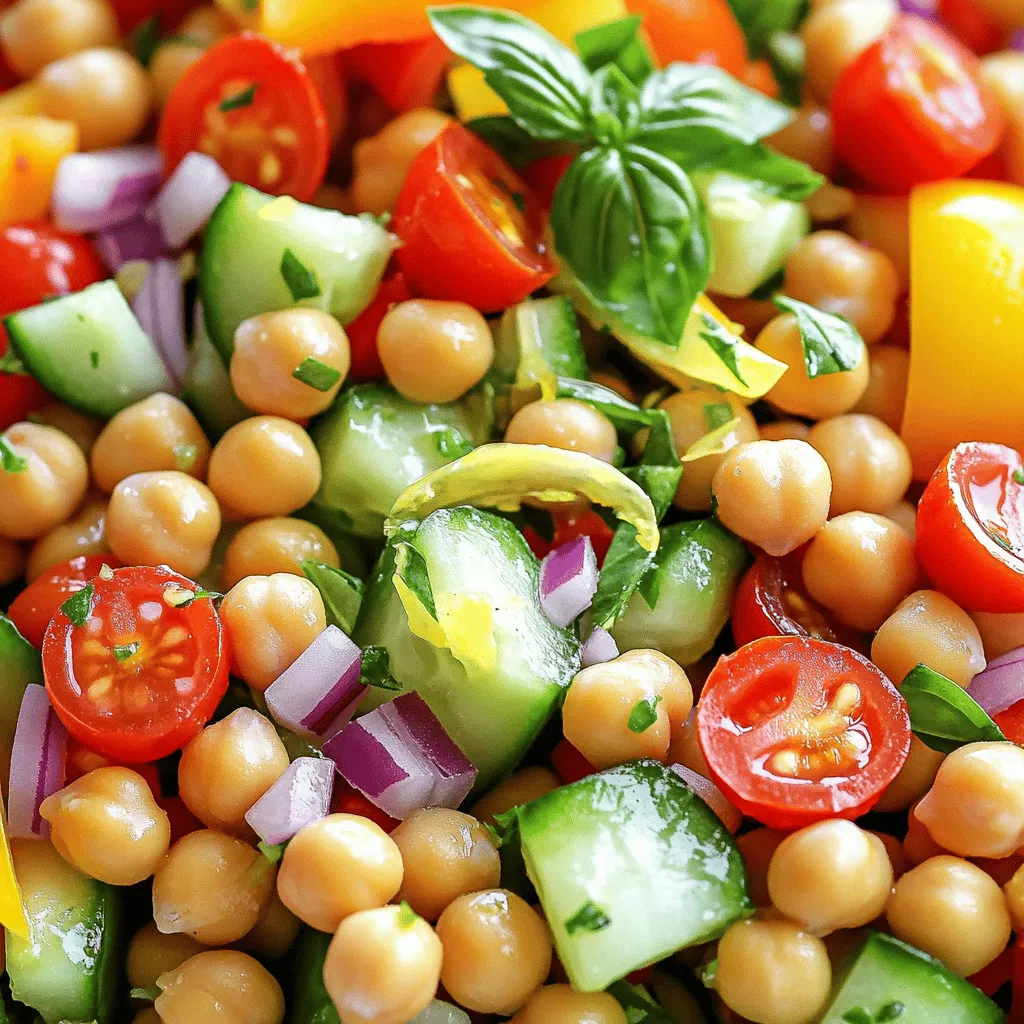
- 1 can (15 oz) chickpeas, thoroughly drained and rinsed
- 1 cup cherry tomatoes, halved
- 1 cucumber, diced into bite-sized pieces
- 1 bell pepper (any color), diced
- 1/4 red onion, finely chopped
- 1/4 cup fresh basil leaves, roughly chopped
- Juice of 1 large lemon (about 2 tablespoons)
- 3 tablespoons high-quality extra-virgin olive oil
- Salt and black pepper to taste
- 1/4 teaspoon garlic powder
- 1/4 teaspoon red pepper flakes (optional, for a bit of heat)
In this Lemon Basil Chickpea Salad, the key ingredients make all the difference. Chickpeas are the star of the show. They add protein and a nice bite. The fresh produce items like cherry tomatoes, cucumbers, and bell peppers bring color and crunch. The red onion adds a mild zing. Fresh basil gives that lovely aroma and flavor.
The dressing components are just as important. The lemon juice adds brightness, while the olive oil provides richness. Garlic powder adds depth, and the optional red pepper flakes can give it a kick. This mix creates a delightful balance of flavors.
Optional Ingredients
- Additional vegetables
- Herbs and spices
You can easily customize this salad. Feel free to add more vegetables. Some great options are carrots, radishes, or even avocado. These extras can add different textures and flavors. You can also play with herbs and spices. Try adding cilantro for a fresh twist or cumin for an earthy note.
The beauty of this salad lies in its versatility. You can make it your own while keeping it fresh and vibrant.
Step-by-Step Instructions
Preparation Process
First, gather your ingredients. Grab a large mixing bowl. Add the chickpeas that you drained and rinsed. Next, toss in the halved cherry tomatoes. After that, add the diced cucumber, diced bell pepper, and finely chopped red onion.
Now, it’s time for the fresh basil. Gently mix the chopped basil leaves into the bowl. This adds a bright, fresh flavor.
For the dressing, take a small bowl. Combine the lemon juice, extra-virgin olive oil, garlic powder, salt, and black pepper. If you like heat, add red pepper flakes. Whisk these together until smooth. This zesty dressing will tie everything together nicely.
Combining Ingredients
Drizzle the dressing over your salad in the mixing bowl. Now, use clean hands or a large spoon to toss everything together. Make sure all the ingredients get coated with the dressing.
After tossing, taste your salad. Adjust the seasoning if needed. You might want more salt, pepper, or lemon juice for extra flavor.
Let the salad sit for at least 10 minutes. This resting time helps the flavors blend. You can serve it chilled or at room temperature, whichever you prefer.
Serving Suggestions
For presentation, serve your salad in a large, shallow bowl. You can also use individual plates if you like. Garnish with a sprinkle of chopped basil and a few whole cherry tomatoes. This makes a beautiful display.
Consider pairing this salad with crusty bread or pita chips. These sides add nice texture and balance to the meal.Enjoy!
Tips & Tricks
Storage and Freshness
To keep your Lemon Basil Chickpea Salad fresh, store it in an airtight container. This helps prevent air from spoiling the flavors. Place it in the fridge right after serving. It will stay good for about three days.
If you notice extra liquid forming, drain it before serving again. This keeps the salad from getting soggy. To maintain the crispness of the veggies, avoid mixing in the dressing until you’re ready to eat.
Making Ahead
Prepping this salad ahead of time is easy and smart. You can chop the veggies and rinse the chickpeas a day before. Just store them separately in the fridge. This saves time when you’re ready to serve.
Allowing the salad to rest for at least 10 minutes before serving enhances the flavors. Letting the chickpeas soak up the lemon dressing makes each bite burst with taste. For the best results, try to make it a few hours in advance. The flavors will only get better!
Variations
Adding Protein
You can make your Lemon Basil Chickpea Salad even better with protein. For vegetarians, great options include:
- Tofu: Firm tofu adds a nice texture.
- Quinoa: This grain packs protein and adds a nutty taste.
- Edamame: These young soybeans give a pop of color and flavor.
If you want to add meat or seafood, here are some ideas:
- Grilled Chicken: Slice it thin for easy mixing.
- Shrimp: Cooked shrimp adds a sweet and savory twist.
- Tuna: Canned tuna is a quick and tasty option.
Flavor Combinations
You can change the flavor of your salad with different dressings. Try these options:
- Balsamic Vinaigrette: Sweet and tangy, it pairs well with veggies.
- Honey Mustard: Adds a sweet zing that brightens the salad.
- Avocado Dressing: Creamy and rich, it makes the salad feel special.
Consider adding seasonal ingredients too. Use:
- Corn: Fresh corn is sweet and crunchy in summer.
- Avocado: Creamy avocados add richness in spring.
- Roasted Squash: Perfect for fall, it adds warmth and flavor.
Nutritional Information
Caloric and Nutritional Breakdown
The Lemon Basil Chickpea Salad packs a punch of nutrients. Each serving has about 200 calories. Most of these calories come from healthy fats and proteins. The salad offers:
- Protein: Chickpeas are a great source. You get about 10 grams per serving.
- Carbohydrates: The salad contains around 25 grams, mostly from chickpeas and veggies.
- Fats: With olive oil, you’ll find about 9 grams of healthy fats.
This dish also shines with vitamins and minerals:
- Vitamin A: From bell peppers and tomatoes, good for your vision.
- Vitamin C: The lemon juice and tomatoes boost your immune system.
- Iron: Chickpeas provide iron, helping with blood health.
Dietary Considerations
This salad is very friendly for many diets.
- Vegan-friendly attributes: The recipe uses no animal products. All ingredients are plant-based. This makes it perfect for vegans.
- Gluten-free status: All the ingredients are gluten-free. You can enjoy this salad without worry if you have gluten sensitivity.
Enjoy this fresh and colorful salad knowing it supports a healthy lifestyle!
FAQs
How long does Lemon Basil Chickpea Salad last in the fridge?
Lemon Basil Chickpea Salad lasts about 3 to 5 days in the fridge. To store it, place it in an airtight container. This keeps the salad fresh and safe to eat. Make sure to check for any changes in smell or color before eating leftovers.
Can I use dried chickpeas instead of canned?
Yes, you can use dried chickpeas! First, soak 1 cup of dried chickpeas in water for 8 hours or overnight. After soaking, drain and rinse them. Then, cook them in a pot with water for about 1 to 1.5 hours, or until tender. Drain and let them cool before adding to your salad.
What can I serve with Lemon Basil Chickpea Salad?
This salad pairs well with many dishes. Consider serving it with grilled chicken or fish for protein. You can also add pita bread or crusty bread for a complete meal. For a lighter option, enjoy it with a fresh fruit salad.
How do I make the salad spicier?
To add some heat, mix in red pepper flakes. Start with 1/4 teaspoon, then taste and adjust. You can also add diced jalapeños or hot sauce for extra kick. This will give your salad a nice spicy twist!
This blog post covered how to make a Lemon Basil Chickpea Salad. We discussed key ingredients like chickpeas and fresh veggies, plus optional add-ins. You learned step-by-step instructions for mixing and tossing the salad. I shared storage tips and variations to suit your taste.
In closing, this salad is simple, healthy, and flexible. Enjoy experimenting with flavors and combinations to make it your own!
![- 1 can (15 oz) chickpeas, thoroughly drained and rinsed - 1 cup cherry tomatoes, halved - 1 cucumber, diced into bite-sized pieces - 1 bell pepper (any color), diced - 1/4 red onion, finely chopped - 1/4 cup fresh basil leaves, roughly chopped - Juice of 1 large lemon (about 2 tablespoons) - 3 tablespoons high-quality extra-virgin olive oil - Salt and black pepper to taste - 1/4 teaspoon garlic powder - 1/4 teaspoon red pepper flakes (optional, for a bit of heat) In this Lemon Basil Chickpea Salad, the key ingredients make all the difference. Chickpeas are the star of the show. They add protein and a nice bite. The fresh produce items like cherry tomatoes, cucumbers, and bell peppers bring color and crunch. The red onion adds a mild zing. Fresh basil gives that lovely aroma and flavor. The dressing components are just as important. The lemon juice adds brightness, while the olive oil provides richness. Garlic powder adds depth, and the optional red pepper flakes can give it a kick. This mix creates a delightful balance of flavors. - Additional vegetables - Herbs and spices You can easily customize this salad. Feel free to add more vegetables. Some great options are carrots, radishes, or even avocado. These extras can add different textures and flavors. You can also play with herbs and spices. Try adding cilantro for a fresh twist or cumin for an earthy note. The beauty of this salad lies in its versatility. You can make it your own while keeping it fresh and vibrant. For the full recipe, check out the details above. First, gather your ingredients. Grab a large mixing bowl. Add the chickpeas that you drained and rinsed. Next, toss in the halved cherry tomatoes. After that, add the diced cucumber, diced bell pepper, and finely chopped red onion. Now, it's time for the fresh basil. Gently mix the chopped basil leaves into the bowl. This adds a bright, fresh flavor. For the dressing, take a small bowl. Combine the lemon juice, extra-virgin olive oil, garlic powder, salt, and black pepper. If you like heat, add red pepper flakes. Whisk these together until smooth. This zesty dressing will tie everything together nicely. Drizzle the dressing over your salad in the mixing bowl. Now, use clean hands or a large spoon to toss everything together. Make sure all the ingredients get coated with the dressing. After tossing, taste your salad. Adjust the seasoning if needed. You might want more salt, pepper, or lemon juice for extra flavor. Let the salad sit for at least 10 minutes. This resting time helps the flavors blend. You can serve it chilled or at room temperature, whichever you prefer. For presentation, serve your salad in a large, shallow bowl. You can also use individual plates if you like. Garnish with a sprinkle of chopped basil and a few whole cherry tomatoes. This makes a beautiful display. Consider pairing this salad with crusty bread or pita chips. These sides add nice texture and balance to the meal. For the full recipe, check the earlier section. Enjoy! To keep your Lemon Basil Chickpea Salad fresh, store it in an airtight container. This helps prevent air from spoiling the flavors. Place it in the fridge right after serving. It will stay good for about three days. If you notice extra liquid forming, drain it before serving again. This keeps the salad from getting soggy. To maintain the crispness of the veggies, avoid mixing in the dressing until you're ready to eat. Prepping this salad ahead of time is easy and smart. You can chop the veggies and rinse the chickpeas a day before. Just store them separately in the fridge. This saves time when you're ready to serve. Allowing the salad to rest for at least 10 minutes before serving enhances the flavors. Letting the chickpeas soak up the lemon dressing makes each bite burst with taste. For the best results, try to make it a few hours in advance. The flavors will only get better! For the Full Recipe, visit the main article. {{image_4}} You can make your Lemon Basil Chickpea Salad even better with protein. For vegetarians, great options include: - Tofu: Firm tofu adds a nice texture. - Quinoa: This grain packs protein and adds a nutty taste. - Edamame: These young soybeans give a pop of color and flavor. If you want to add meat or seafood, here are some ideas: - Grilled Chicken: Slice it thin for easy mixing. - Shrimp: Cooked shrimp adds a sweet and savory twist. - Tuna: Canned tuna is a quick and tasty option. You can change the flavor of your salad with different dressings. Try these options: - Balsamic Vinaigrette: Sweet and tangy, it pairs well with veggies. - Honey Mustard: Adds a sweet zing that brightens the salad. - Avocado Dressing: Creamy and rich, it makes the salad feel special. Consider adding seasonal ingredients too. Use: - Corn: Fresh corn is sweet and crunchy in summer. - Avocado: Creamy avocados add richness in spring. - Roasted Squash: Perfect for fall, it adds warmth and flavor. For more recipes, check out the Full Recipe! The Lemon Basil Chickpea Salad packs a punch of nutrients. Each serving has about 200 calories. Most of these calories come from healthy fats and proteins. The salad offers: - Protein: Chickpeas are a great source. You get about 10 grams per serving. - Carbohydrates: The salad contains around 25 grams, mostly from chickpeas and veggies. - Fats: With olive oil, you’ll find about 9 grams of healthy fats. This dish also shines with vitamins and minerals: - Vitamin A: From bell peppers and tomatoes, good for your vision. - Vitamin C: The lemon juice and tomatoes boost your immune system. - Iron: Chickpeas provide iron, helping with blood health. This salad is very friendly for many diets. - Vegan-friendly attributes: The recipe uses no animal products. All ingredients are plant-based. This makes it perfect for vegans. - Gluten-free status: All the ingredients are gluten-free. You can enjoy this salad without worry if you have gluten sensitivity. Enjoy this fresh and colorful salad knowing it supports a healthy lifestyle! For the complete recipe, check out the [Full Recipe]. Lemon Basil Chickpea Salad lasts about 3 to 5 days in the fridge. To store it, place it in an airtight container. This keeps the salad fresh and safe to eat. Make sure to check for any changes in smell or color before eating leftovers. Yes, you can use dried chickpeas! First, soak 1 cup of dried chickpeas in water for 8 hours or overnight. After soaking, drain and rinse them. Then, cook them in a pot with water for about 1 to 1.5 hours, or until tender. Drain and let them cool before adding to your salad. This salad pairs well with many dishes. Consider serving it with grilled chicken or fish for protein. You can also add pita bread or crusty bread for a complete meal. For a lighter option, enjoy it with a fresh fruit salad. To add some heat, mix in red pepper flakes. Start with 1/4 teaspoon, then taste and adjust. You can also add diced jalapeños or hot sauce for extra kick. This will give your salad a nice spicy twist! For the full recipe, check the [Full Recipe]. This blog post covered how to make a Lemon Basil Chickpea Salad. We discussed key ingredients like chickpeas and fresh veggies, plus optional add-ins. You learned step-by-step instructions for mixing and tossing the salad. I shared storage tips and variations to suit your taste. In closing, this salad is simple, healthy, and flexible. Enjoy experimenting with flavors and combinations to make it your own!](https://dishtreats.com/wp-content/uploads/2025/07/d3747d36-0043-45e0-9a82-fe789303a34f-300x300.webp)

. It will guide you through each step with details and tips. Enjoy cooking! In summary, we explored how to make delicious Roasted Garlic Parmesan Brussels Sprouts. I shared a full list of ingredients and options for substitutions. Fresh ingredients elevate taste and nutrition. You learned step-by-step instructions for perfect roasting, along with tips for flavor and presentation. Variations and storage tips help you customize and save leftovers. Remember to check FAQs for any lingering questions. Enjoy this simple yet tasty dish at your next meal!](https://dishtreats.com/wp-content/uploads/2025/08/f224f6d0-5adb-4fa1-b176-de066c43a5f2-3-768x768.webp)
