Honey Garlic Shrimp Skewers Flavorful and Simple Recipe

If you’re looking for a quick, tasty meal, I’ve got the perfect recipe for you: Honey Garlic Shrimp Skewers. These skewers are easy to make and packed with flavor. With just a few simple ingredients, you’ll enjoy a dish that’s great for any occasion. Join me as we dive into this delightful recipe that will impress your family and friends. Let’s get started on making a dish everyone will love!
Ingredients
Main Ingredients for Honey Garlic Shrimp Skewers
To make honey garlic shrimp skewers, you need:
- 1 pound large shrimp, peeled and deveined
- Skewers (soaked in water if using wooden ones)
These shrimp are the star of your dish. Choose fresh, large shrimp for the best flavor and texture.
Marinade Ingredients
The marinade brings out the shrimp’s taste. Gather these:
- 1/4 cup honey
- 3 cloves garlic, minced
- 2 tablespoons soy sauce
- 1 tablespoon fresh lemon juice
- 1 tablespoon olive oil
- 1 teaspoon crushed red pepper flakes (adjust according to your heat preference)
- Salt and pepper to taste
Mixing these ingredients creates a sweet and savory blend. The garlic gives it a nice kick.
Garnishing Ingredients
For a beautiful finish, you will need:
- Lemon wedges
- Fresh parsley
These add color and freshness. The lemon brightens the dish, while parsley adds a nice touch.
Step-by-Step Instructions
Preparing the Marinade
To make the marinade, grab a large mixing bowl. Add 1/4 cup of honey, 3 cloves of minced garlic, 2 tablespoons of soy sauce, 1 tablespoon of fresh lemon juice, and 1 tablespoon of olive oil. Mix in 1 teaspoon of crushed red pepper flakes, along with salt and pepper to taste. Whisk all the ingredients together until smooth. This mixture gives your shrimp a sweet and savory flavor that you will love.
Marinating the Shrimp
Next, you need to marinate the shrimp. Take 1 pound of peeled and deveined shrimp and place them in the bowl with the marinade. Make sure each shrimp gets a good coat of the mix. Cover the bowl with plastic wrap and put it in the fridge. Let the shrimp marinate for at least 30 minutes. This step lets the shrimp soak up all the tasty flavors.
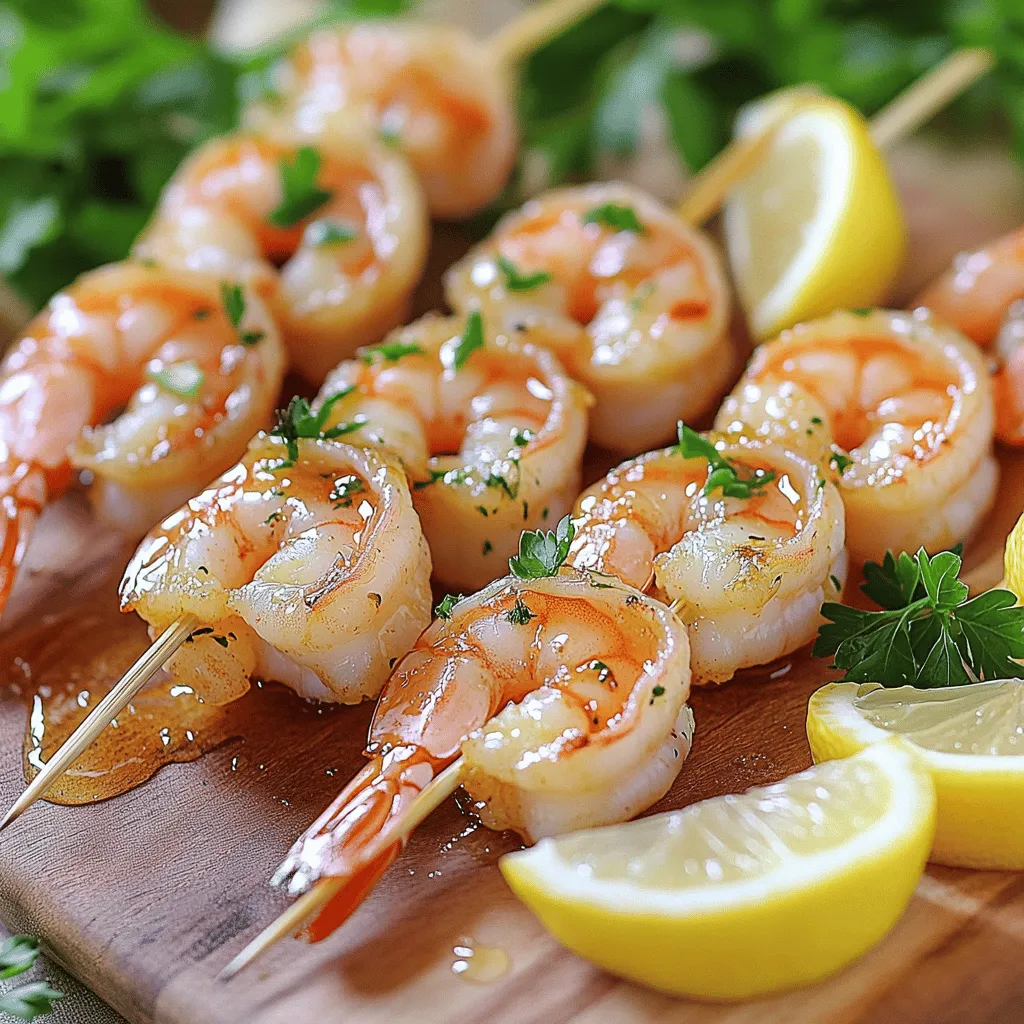
Grilling the Shrimp Skewers
While the shrimp marinates, preheat your grill to medium-high heat. If you use wooden skewers, soak them in water for at least 30 minutes. This helps keep them from burning. After marinating, take the shrimp out of the fridge. Thread the shrimp onto the skewers, leaving space between each one. This helps them cook evenly. Place the skewers on the hot grill. Cook the shrimp for about 2-3 minutes on each side. They should turn bright pink and opaque.
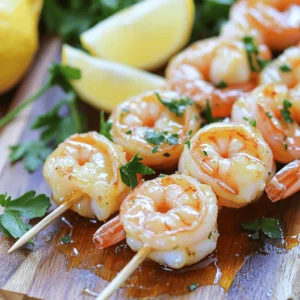
Resting and Serving Suggestions
Once done cooking, take the skewers off the grill. Let them rest for a minute. This helps keep the shrimp juicy and full of flavor. Serve the honey garlic shrimp skewers with lemon wedges and a sprinkle of fresh parsley. The colors make the dish look great and add a fresh touch.
Tips & Tricks
Ensuring Perfectly Cooked Shrimp
To get perfectly cooked shrimp, watch the cooking time. Cook them for only 2-3 minutes on each side. The shrimp should turn pink and opaque. If you overcook them, they become tough and rubbery. You want them to be juicy and tender. Always keep an eye on them while grilling.
Ideal Grill Temperature for Skewers
For the best results, preheat your grill to medium-high heat. This temperature helps the shrimp cook evenly and quickly. If your grill is too hot, the shrimp may char before they fully cook. If it’s too low, they will take longer, and the texture may suffer. A good rule is to aim for around 375°F to 450°F.
Preventing Wooden Skewers from Burning
If you’re using wooden skewers, soak them in water for at least 30 minutes. This step prevents them from burning on the grill. The water keeps the skewers moist, so they can withstand the heat. You can also use metal skewers, which do not need soaking. Both options work well, but soaking is key for wooden ones.
Variations
Alternative Marinade Ingredients
You can switch up the marinade for your honey garlic shrimp skewers. Here are some ideas:
- Maple syrup: Use this instead of honey for a different sweet taste.
- Ginger: Add fresh ginger for a zesty kick.
- Orange juice: Replace lemon juice with orange juice for a fruity twist.
- Sesame oil: This can add a nutty flavor to your skewers.
Experiment with these options to find your favorite mix!
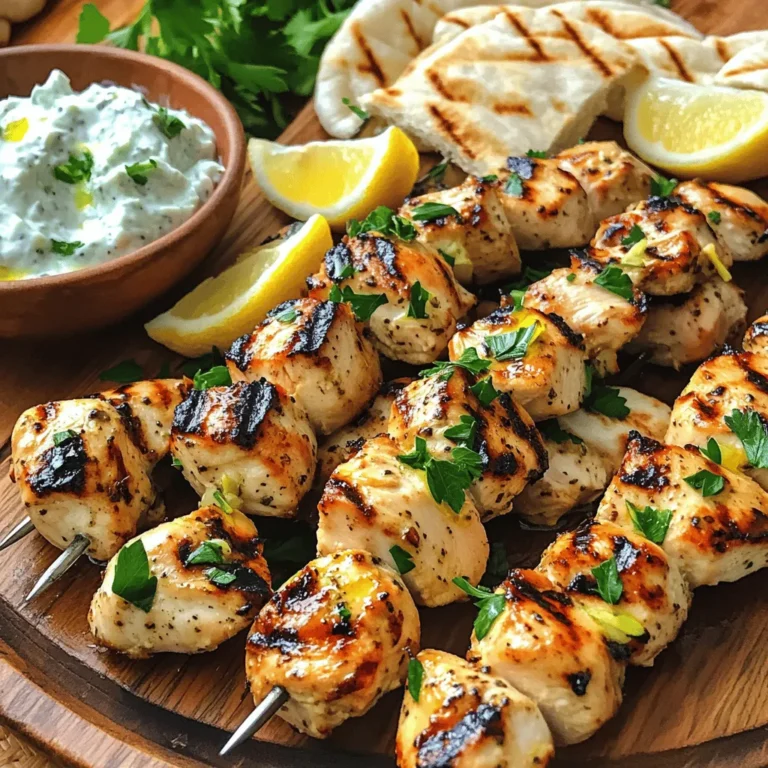
Substituting Shrimp with Other Proteins
If you want to try something new, swap the shrimp for other proteins. Here are some great choices:
- Chicken: Use bite-sized pieces of chicken breast or thighs.
- Tofu: Firm tofu works well for a plant-based option.
- Scallops: These add a rich flavor and cook fast like shrimp.
- Vegetables: Bell peppers, zucchini, and mushrooms are tasty options for a veggie skewers.
Adjust cooking times based on what protein you choose.
Serving Suggestions for Different Occasions
Honey garlic shrimp skewers suit many events. Here are some ideas on how to serve them:
- Barbecues: Grill them on the patio for a fun outdoor feast.
- Appetizers: Serve on small skewers as bite-sized treats at parties.
- Family dinners: Pair them with rice or salad for a complete meal.
- Picnics: Pack them cold in a lunchbox for a flavorful treat on the go.
These ideas help you enjoy your skewers for any occasion!
Storage Info
How to Store Leftover Shrimp Skewers
To store leftover shrimp skewers, let them cool first. Place them in an airtight container. Make sure to keep them in the fridge. They will last for up to three days. If you want to keep them longer, consider freezing them.
Reheating Tips for Leftovers
When you want to eat the leftovers, take them out of the fridge. You can reheat them in a few ways. Use the microwave for quick reheating. Place them on a plate and heat for 30 seconds to one minute. You can also use the oven. Preheat it to 350°F (175°C) and bake them for about 10 minutes. This keeps them juicy.
Freezing Fried Shrimp Skewers for Later
If you want to freeze the shrimp skewers, do it before cooking. Place the marinated shrimp on skewers. Wrap them tightly in plastic wrap. Add them to a freezer-safe bag or container. They can stay frozen for up to two months. When ready to cook, thaw them in the fridge overnight before grilling. This keeps the flavors fresh and tasty.
FAQs
How do I know when the shrimp are cooked?
You can tell shrimp are cooked when they turn bright pink. They should also look opaque. Cooking time is about 2-3 minutes per side on a grill. Use a meat thermometer if you want to be precise. The internal temperature should reach 120°F. Overcooking makes shrimp tough, so keep an eye on them.
Can I make Honey Garlic Shrimp Skewers in the oven?
Yes, you can definitely make these skewers in the oven! Preheat your oven to 400°F. Place the skewers on a baking sheet lined with parchment paper. Bake for about 8-10 minutes, flipping halfway through. This method keeps the shrimp juicy and tender, just like grilling.
What sides pair well with this recipe?
These honey garlic shrimp skewers go well with many sides. Here are a few tasty options:
- Steamed rice
- Quinoa salad
- Grilled vegetables
- Garlic bread
- Mixed green salad
You can mix and match to find your favorite pairings!
What are the nutritional values of Honey Garlic Shrimp Skewers?
Honey garlic shrimp skewers are nutritious and delicious. Here’s a rough breakdown for one serving:
- Calories: 220
- Protein: 24g
- Carbohydrates: 25g
- Fat: 6g
- Sugars: 8g
These values can change based on your specific ingredients.Enjoy every bite!
In this blog post, we explored making Honey Garlic Shrimp Skewers. We covered the main ingredients, marinade, and garnishes. You learned how to prepare, marinate, and grill shrimp perfectly. We shared tips to avoid burned skewers and ensure tasty results. You also discovered fun variations and storage tips for leftovers.
Enjoy these skewers at your next meal or gathering. They are simple and delicious. Happy grilling!
![- 1 cup all-purpose flour - 1 cup whole wheat flour - 1 tablespoon baking powder - 1/2 teaspoon baking soda - 1/4 teaspoon salt I love using both all-purpose and whole wheat flour. The all-purpose flour gives the muffins a light texture. The whole wheat adds a nutty flavor and a bit of extra fiber. Mixing these flours helps balance taste and nutrition. - 1 cup plain Greek yogurt - 1/2 cup granulated sugar - 1/4 cup honey - 2 large eggs - 1 teaspoon vanilla extract - Zest of 1 lemon - Juice of 1 lemon Greek yogurt is key for moisture. It makes the muffins rich and creamy. The combination of sugar and honey gives a nice sweetness. The eggs help bind everything together. Lemon juice and zest brighten the flavor, making each bite fresh and zesty. - 1 cup fresh or frozen blueberries - 2 tablespoons melted coconut oil or butter Blueberries are the star of this recipe. They burst with flavor and add a great texture. You can use fresh or frozen. If you use frozen, they still work well! The melted coconut oil or butter adds richness, but you can skip it if you prefer a lighter muffin. You can find the full recipe for these delightful muffins online. Happy baking! First, preheat your oven to 375°F (190°C). This step is key for even baking. Next, prepare your muffin tin by lining it with paper liners or greasing the cups. This helps with easy muffin removal later. Now, let’s mix the dry ingredients. In a large bowl, combine: - 1 cup all-purpose flour - 1 cup whole wheat flour - 1 tablespoon baking powder - 1/2 teaspoon baking soda - 1/4 teaspoon salt Whisk these dry ingredients well. Make sure there are no lumps. In another bowl, add the wet ingredients. You will need: - 1 cup plain Greek yogurt - 1/2 cup granulated sugar - 1/4 cup honey - 2 large eggs - 1 teaspoon vanilla extract - Zest of 1 lemon - Juice of 1 lemon Whisk these until smooth. This helps blend all the flavors together. Now, it’s time to combine the two mixtures. Gently fold the wet ingredients into the dry ones using a spatula. Stir slowly. This helps keep your muffins light and fluffy. Don’t overmix! Overmixing makes the muffins dense. Once you see a few floury spots, stop mixing. Next, it’s time for the blueberries. Add: - 1 cup fresh or frozen blueberries - 2 tablespoons melted coconut oil or butter Fold these in gently. You want to keep the blueberries whole for bursts of flavor. Now, scoop the batter into your prepared muffin cups. Fill each cup about two-thirds full. This allows space for the muffins to rise. Place the muffin tin in your preheated oven. Bake for 18-20 minutes. To check for doneness, insert a toothpick into the center of a muffin. If it comes out clean, they are ready! After baking, let the muffins cool in the tin for about 5 minutes. This helps them set. Then, move them to a wire rack to cool completely. These steps will lead you to a batch of delicious Blueberry Lemon Yogurt Muffins. For the complete recipe, see [Full Recipe]. To get the best muffins, do not overmix the batter. Mixing too much can make the muffins tough. When you mix, just combine until you see no dry flour. This way, your muffins stay light and fluffy. When folding in the blueberries, do it gently. If you stir too hard, the berries will burst and color the batter. Just use a spatula and fold them in lightly. This keeps the berries whole and gives you lovely pops of flavor in each bite. You can add even more flavor to your muffins. Consider adding lemon zest for a bright taste. You might like to include nuts, like walnuts or pecans, for crunch. When it comes to blueberries, fresh berries taste great, but frozen ones work too. If you use frozen berries, do not thaw them first. This helps keep your batter cold, giving you a better rise. Using the right tools helps a lot. A non-stick muffin tin is your best bet. You can also use paper liners for easy cleanup. For mixing, a large bowl works well. I suggest a sturdy spatula for folding the batter. This combo makes mixing fun and easy. With the right tools, your baking will be smooth and enjoyable. For the full recipe, check out the details above. {{image_4}} You can make these muffins gluten-free. Simply replace the all-purpose flour with a gluten-free flour blend. Many blends work well, so pick one you like. Just ensure it has a good balance of starches and protein to mimic regular flour. This way, you can enjoy the same tasty muffins without the gluten. Want to mix it up? Try adding chocolate chips or walnuts for a delightful twist. They add a nice crunch and richness. You can also use other fruits like raspberries or cranberries. They pair well with the lemon and blueberry flavors. Each fruit adds its own unique taste, making each batch special. You can switch up the yogurt too. Use flavored yogurts like vanilla or lemon for extra taste. If you prefer dairy-free options, there are many great alternatives available. Look for coconut or almond-based yogurts. They keep the muffins moist and tasty, making it fun to experiment with flavors. For the full recipe, check out the details above. To keep your blueberry lemon yogurt muffins fresh, store them in an airtight container. This will keep them moist and tasty. You can keep them at room temperature for up to three days. If you want them to last longer, put them in the fridge. They can stay fresh for about a week in the refrigerator. Freezing muffins is a great way to keep them longer. To freeze, let the muffins cool completely. Then, wrap each muffin in plastic wrap. Place them in a freezer bag or container. This method helps prevent freezer burn. You can enjoy them for up to three months. When you're ready to eat a frozen muffin, take it out and let it sit at room temperature for about 30 minutes. For a warm treat, heat it in the microwave for 15-20 seconds. This will make it soft and delicious again. Blueberry lemon yogurt muffins are perfect for any time of day. I love having them for breakfast or as a snack. They also make a great dessert. To make it even better, try pairing these muffins with yogurt or a drizzle of honey. This adds a nice touch and enhances the flavor. Enjoy your muffins fresh from the oven or at room temperature! If you want to explore more recipes, check out the Full Recipe for even more delicious ideas. Blueberry lemon yogurt muffins stay fresh for about 2 to 3 days at room temperature. Keep them in an airtight container to maintain their moisture. If you store them in the fridge, they can last for up to a week. Just make sure to seal them well to prevent them from drying out. Yes, you can easily swap ingredients. If you want less sugar, use less granulated sugar or honey. For flour, you can mix all-purpose flour with whole wheat flour or use a gluten-free blend. You can also use flavored yogurt instead of plain yogurt for a fun taste twist. If your muffins turn out dense, check your mixing technique. Overmixing can cause this issue. Make sure to mix just until combined. You can also try adding a bit more baking powder or soda to lighten the texture. Lastly, ensure your ingredients are fresh, especially baking powder. To make these muffins healthier, reduce the sugar by a third. You can also replace some all-purpose flour with whole wheat flour to add fiber. Adding oats or ground flaxseed can boost nutrition without changing the flavor much. Enjoy these muffins while keeping health in mind! For the full recipe, refer to the earlier section. This blog post covered how to make delicious Blueberry Lemon Yogurt Muffins. We explored ingredients, step-by-step instructions, and tips for perfect texture. Variations like gluten-free options and different mix-ins add fun twists. Proper storage helps keep your muffins fresh. These muffins are a tasty way to enjoy healthy snacks or breakfast. Remember, baking is about having fun and experimenting. Enjoy every bite!](https://dishtreats.com/wp-content/uploads/2025/06/d36ee35c-287f-4b25-b661-333d5a68e192-768x768.webp)
![For these herb crusted zucchini sticks, you need a few simple yet tasty ingredients. Each one plays a key role in creating the perfect crunch and flavor. - Zucchini and Bread Crumb Base - 2 medium zucchinis, cut into uniform sticks - 1 cup whole wheat breadcrumbs - Seasonings and Cheese - 1/2 cup finely grated Parmesan cheese - 2 tablespoons fresh parsley, finely chopped - 1 tablespoon fresh basil, finely chopped - 1 teaspoon garlic powder - 1/2 teaspoon onion powder - Salt and black pepper, to taste - Egg Wash - 2 large eggs, beaten - Olive oil spray or 2 tablespoons extra virgin olive oil Each ingredient adds a layer of flavor. The zucchini brings a fresh crunch, while the breadcrumbs create that satisfying crisp. The herbs and cheese elevate the taste, making these sticks hard to resist. Don't forget the egg wash! It helps the coating stick, ensuring every bite is packed with flavor. For the full recipe, check out the detailed instructions. Prepping the Oven and Baking Sheet First, preheat your oven to 425°F (220°C). This step ensures the zucchini sticks cook evenly. Next, line a baking sheet with parchment paper. This helps prevent sticking and makes cleanup easy. Making the Breadcrumb Mixture In a shallow dish, combine the following: - 1 cup whole wheat breadcrumbs - 1/2 cup finely grated Parmesan cheese - 2 tablespoons fresh parsley, finely chopped - 1 tablespoon fresh basil, finely chopped - 1 teaspoon garlic powder - 1/2 teaspoon onion powder - Salt and black pepper, to taste Stir these ingredients together until they mix well. This mixture adds flavor and crunch to your zucchini sticks. Coating the Zucchini Sticks In a separate bowl, beat 2 large eggs until they are well mixed. This egg wash helps the coating stick. Take each zucchini stick and dip it in the egg wash. Let any excess egg drip off. Then, roll the stick in the breadcrumb mixture. Press gently to coat all sides evenly. Baking Process Place the coated zucchini sticks on your prepared baking sheet. Make sure to leave space between them. This allows them to cook and crisp up nicely. For extra crunch, spray the tops with olive oil or drizzle some over them. Bake the sticks in the oven for 20-25 minutes. Flip them halfway through to ensure even browning. When they are golden brown and crispy, take them out and let them cool for a few moments before serving. Enjoy your crunchy and flavorful snack! For detailed instructions, check the Full Recipe. To get that perfect crunch, the egg wash is key. The egg helps the coating stick well. Without it, the crumbs may fall off. Dip each zucchini stick fully in the egg, then let the extra drip off. This step makes a big difference. Choosing the right olive oil can also help. You can use extra virgin olive oil or an olive oil spray. Both options add flavor and help the zucchini crisp up in the oven. If you use a spray, make sure to coat the sticks lightly. Baking tips are important for even browning. Make sure to leave space between each zucchini stick on the baking sheet. This allows hot air to circulate. Halfway through baking, flip the sticks for a nice, even brown on both sides. For the full recipe, check out the detailed instructions above. Enjoy your crispy zucchini sticks! {{image_4}} You can switch up the recipe to fit your needs. Here are some ideas: - Alternative Breadcrumbs: If you want a gluten-free option, use crushed cornflakes or almond flour. Both give a nice crunch. Try panko breadcrumbs for a lighter, airier texture. - Vegan Option: Replace eggs with a flaxseed mixture. Mix 1 tablespoon of flaxseed meal with 3 tablespoons of water. Let it sit for five minutes until it thickens. This works well to stick the coating. - Additional Seasoning Ideas: You can add a kick with spices like paprika or cayenne. A sprinkle of Italian seasoning can give it a nice herby flavor. Crushed red pepper flakes can add some heat, too. These substitutes keep your herb crusted zucchini sticks tasty and fun. You can play with flavors to make them your own! If you’re looking for the full recipe, check the detailed instructions. Refrigeration Instructions After enjoying the herb-crusted zucchini sticks, let them cool. Place any leftovers in an airtight container. Store them in the fridge for up to three days. This keeps them fresh and tasty for later snacking. Reheating Tips To get that crunch back, reheat the zucchini sticks in the oven. Set your oven to 375°F (190°C). Bake them for about 10 minutes. This will warm them up and restore their crispiness. Avoid using the microwave, as it can make them soggy. Freezing Zucchini Sticks You can freeze the zucchini sticks for longer storage. First, bake them as directed in the Full Recipe. Let them cool completely. Then, place them in a single layer on a baking sheet and freeze for a few hours until firm. After that, transfer them to a freezer bag. They will keep well for up to two months. When ready to eat, bake from frozen, adding a few extra minutes to the cooking time. To keep your zucchini sticks crispy, follow a few key steps. First, cut the zucchini into even sticks. This helps them cook at the same rate. Second, make sure to pat the zucchini dry before coating. Removing excess moisture is very important. Lastly, use the egg wash to help the crumbs stick well. This will create a nice crispy layer while baking. Yes, you can use other vegetables! Carrots, eggplant, and sweet potatoes work great. Just remember to cut them into similar shapes and sizes. This helps them cook evenly. You might need to adjust the cooking time based on the vegetable you choose. Herb-crusted zucchini sticks taste great with many dips. Marinara sauce gives a nice tangy flavor. You can also try ranch dressing for a cool, creamy taste. If you want something lighter, a yogurt dip with herbs is a good choice. It adds freshness and complements the zucchini well. For the full recipe, check out the [Full Recipe]. You learned how to make crispy zucchini sticks using simple ingredients. I shared tips for perfecting your baking process and variations to suit your taste. Storing leftovers or substituting ingredients can keep things fresh. Remember, the right egg wash and oil play key roles in crispiness. Enjoy experimenting with your flavors. Try new dips and veggies next time to keep things exciting. Now, you have the tools to make this dish your own!](https://dishtreats.com/wp-content/uploads/2025/07/e6e4c2e6-85fe-4d28-829b-ce9ad5e19088-768x768.webp)

. It takes about 20 minutes to cook garlic butter steak bites. You spend 10 minutes prepping the ingredients and another 10 minutes cooking them. This quick cook time makes it easy to enjoy a tasty meal in no time. Yes, you can use other cuts of steak. Ribeye, filet mignon, or flank steak work well. Just remember to adjust the cooking time based on the cut you choose. Each cut has its own flavor and texture, so pick one you like best. You can serve garlic butter steak bites with various sides. Here are some great options: - Creamy mashed potatoes - Sautéed vegetables like green beans or broccoli - Fresh salad with light dressing - Crispy garlic bread These sides add flavor and balance to your meal. You can also use toothpicks for easy serving at parties or gatherings. For more ideas, check out the Full Recipe for garlic butter steak bites. It offers tips on presentation and other serving suggestions. In this post, we covered how to make garlic butter steak bites using simple ingredients. You learned about the key steps, from preparing the steak to combining it with garlic butter. We also shared tips for cooking and presented flavor variations to try. Finally, we discussed storage tricks and answered common questions. Keep this recipe handy for a quick and tasty meal. Enjoy your cooking and the delicious bites you create!](https://dishtreats.com/wp-content/uploads/2025/06/daf37226-e56f-491f-87e9-6665894a306e-768x768.webp)