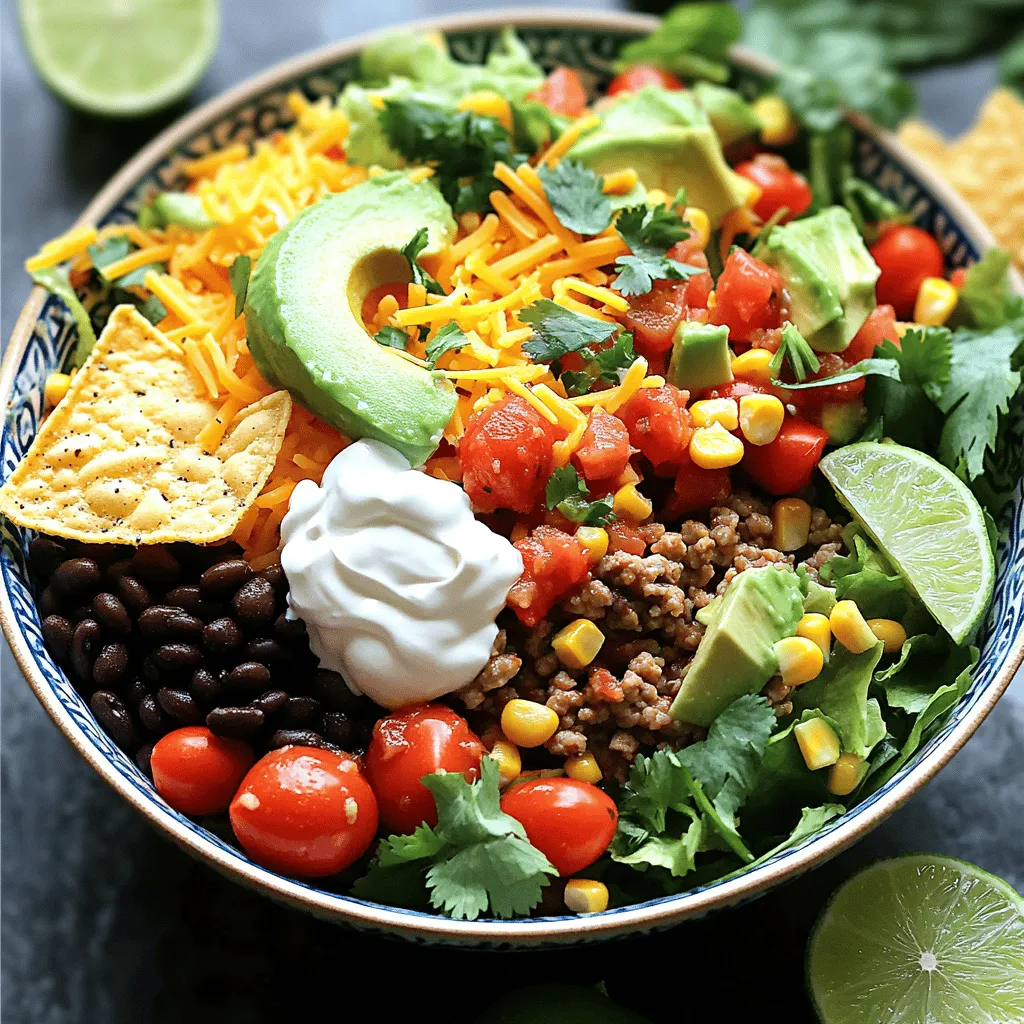
Zesty Fiesta Taco Salad Flavorful and Fresh Meal
![To make a Zesty Fiesta Taco Salad, gather these key ingredients: - 1 lb ground turkey (or beef) - 1 packet taco seasoning - 1 can (15 oz) black beans, rinsed and drained - 1 can (15 oz) sweet corn, drained - 1 large bell pepper, diced (choose your favorite color) - 1 cup cherry tomatoes, halved - 1 ripe avocado, diced - 1 cup shredded lettuce (romaine or iceberg) These fresh ingredients form the base of your salad. The ground meat adds protein, while the beans and corn bring fiber and sweetness. Colorful veggies like bell pepper and tomatoes not only add taste but also make the dish appealing. For a fabulous finish, don’t forget these toppings: - 1/2 cup shredded cheese (cheddar or Mexican blend) - 1/4 cup sour cream - 1/4 cup salsa - 1/4 cup fresh cilantro, chopped - Tortilla chips for garnish These toppings add layers of flavor and texture. The cheese melts slightly over the warm meat. Sour cream and salsa provide creaminess and zest. Fresh cilantro brightens the dish, while tortilla chips offer a delightful crunch. To take your salad to the next level, consider these flavor elements: - Lime wedges for serving - Other optional toppings Lime wedges give a zesty kick that enhances all the flavors. You can also mix in other toppings like jalapeños for heat or olives for brininess. Feel free to customize to fit your taste! For the full recipe, check out the [Full Recipe]. 1. Cooking ground turkey (or beef): Heat a large skillet over medium heat. Add 1 pound of ground turkey or beef. Cook until the meat is brown. Use a spatula to break it apart. This ensures even cooking. 2. Adding taco seasoning and simmering: Once the meat is browned, stir in one packet of taco seasoning. Add 1/2 cup of water. Mix well and bring to a simmer. Let it cook for 5 minutes to thicken. Remove the skillet from heat and let it cool for a bit. 1. Combining salad base ingredients: In a large mixing bowl, add the following: - 1 can (15 oz) black beans, rinsed and drained - 1 can (15 oz) sweet corn, drained - 1 large bell pepper, diced - 1 cup cherry tomatoes, halved - 1 ripe avocado, diced - 1 cup shredded lettuce (romaine or iceberg) Toss these ingredients gently. This helps mix the flavors well. 2. Mixing in the taco meat: After the taco meat cools, add it to the salad bowl. Gently toss everything together. Ensure all ingredients are mixed evenly. 1. Plating the salad: Divide the salad among individual bowls. This makes it easy to serve. 2. Adding garnishes and accompaniments: Top each bowl with: - 1/2 cup shredded cheese (cheddar or Mexican blend) - 1/4 cup sour cream - 1/4 cup salsa For extra flavor, garnish with 1/4 cup freshly chopped cilantro. Add a handful of tortilla chips for crunch. Don’t forget lime wedges on the side for a zesty squeeze! For the full recipe, check out the details above. Enjoy your vibrant Zesty Fiesta Taco Salad! To get the best flavor, you can adjust the taco seasoning. Add more if you want it spicy. Try fresh lime juice to brighten the taste. Use fresh herbs, like cilantro, for a burst of flavor. Combine ingredients wisely by mixing textures and colors. For example, creamy avocado pairs nicely with crunchy veggies. For a beautiful salad, think about how you serve it. Use clear bowls to show off the colors. Layer the ingredients for a feast for the eyes. You can serve it family-style on a big platter or in individual bowls. Individual servings let guests customize their toppings. For perfect meat, cook the turkey or beef until it's browned. Use a wooden spoon to break it up as it cooks. This keeps the meat tender and juicy. For fresh veggies, choose ripe ingredients. Wash them well and chop them right before serving. This keeps them crisp and tasty. For the full recipe, check out the Zesty Fiesta Taco Salad. {{image_4}} You can change the ground turkey or beef in this recipe. Try using ground chicken or pork for a new flavor. If you want a vegetarian dish, replace the meat with lentils or quinoa. These options keep it hearty while adding plant-based protein. You can control the spice in your salad. If you like heat, add diced jalapeños or a pinch of cayenne pepper. For less spice, use mild taco seasoning or skip the hot sauce. You can also switch up the dressings. Try ranch or a creamy avocado dressing for a different taste. Think about how you want to serve your salad. A layered salad looks pretty in a clear bowl. Just stack the ingredients on top of each other. If you want a mixed salad, toss everything in one big bowl. You could also make taco bowls. Serve the salad in taco shells for a fun twist. For the full recipe, check out the [Full Recipe]. To keep your Zesty Fiesta Taco Salad fresh, use these best practices. First, place the salad in an airtight container. This helps maintain texture and flavor. You can use glass or plastic containers with tight-fitting lids. Store it in the fridge right after serving. This keeps it safe to eat later. If you want to reheat the meat, do it gently. Place it in a skillet over low heat. Stir often to heat it evenly. Do not reheat the salad itself. It tastes best fresh. If you have leftover salad, keep the toppings separate to avoid sogginess. Add toppings right before serving to keep everything fresh. Your Zesty Fiesta Taco Salad stays fresh in the fridge for about three days. After that, it may lose taste and texture. Check for signs of spoilage before eating. Look for changes in color or smell. If it smells off or looks different, it’s best to throw it away. Zesty Fiesta Taco Salad stays fresh for about three days in the fridge. Make sure to store it in an airtight container. This helps keep the flavors alive and the veggies crisp. If you see any signs of spoilage, like a funky smell or slimy texture, toss it right away. Yes, you can make this salad ahead. I suggest cooking the meat and prepping the salad base separately. This keeps everything fresh and tasty. You can store the taco meat and salad ingredients in the fridge. When you're ready to eat, just combine them. This salad pairs well with many sides. You can serve tortilla chips for crunch. A side of guacamole adds a creamy touch. For drinks, try a cold lemonade or some iced tea. These options complement the zesty flavors of the salad. Yes, this recipe is great for meal prep. Store the salad and meat in separate containers. When you want to eat, just heat the meat. Mix it into the salad right before serving. This keeps the salad fresh and delicious. Zesty Fiesta Taco Salad combines fresh ingredients, great flavors, and fun options. You learned about the main ingredients, toppings, and how to prepare the perfect salad. Remember, you can easily adjust flavors or swap ingredients to suit your taste. Store leftovers properly to keep them fresh. This salad is not only tasty but also versatile for meal prep. With these tips, you can create a delicious meal your family will love. Try it out and make it your own!](https://dishtreats.com/wp-content/uploads/2025/07/d30f25fa-2b02-4bda-bacb-6859b51385b6.webp)
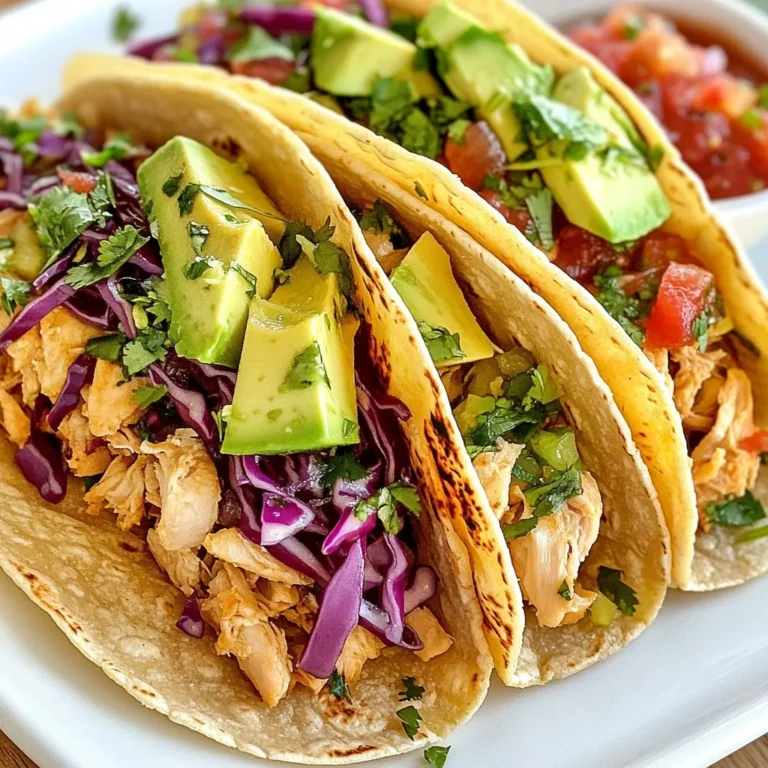
Are you ready to spice up your meal routine? This Zesty Fiesta Taco Salad is packed with flavor and fresh ingredients, making it the perfect dish for any occasion. Whether you want a quick lunch or a colorful dinner, this salad combines seasoned ground turkey, black beans, crisp veggies, and tasty toppings for a winning combination. Let’s dive in and discover how easy it is to create this delicious meal!
Ingredients
Main Ingredients
To make a Zesty Fiesta Taco Salad, gather these key ingredients:
- 1 lb ground turkey (or beef)
- 1 packet taco seasoning
- 1 can (15 oz) black beans, rinsed and drained
- 1 can (15 oz) sweet corn, drained
- 1 large bell pepper, diced (choose your favorite color)
- 1 cup cherry tomatoes, halved
- 1 ripe avocado, diced
- 1 cup shredded lettuce (romaine or iceberg)
These fresh ingredients form the base of your salad. The ground meat adds protein, while the beans and corn bring fiber and sweetness. Colorful veggies like bell pepper and tomatoes not only add taste but also make the dish appealing.
Toppings and Garnishes
For a fabulous finish, don’t forget these toppings:
- 1/2 cup shredded cheese (cheddar or Mexican blend)
- 1/4 cup sour cream
- 1/4 cup salsa
- 1/4 cup fresh cilantro, chopped
- Tortilla chips for garnish
These toppings add layers of flavor and texture. The cheese melts slightly over the warm meat. Sour cream and salsa provide creaminess and zest. Fresh cilantro brightens the dish, while tortilla chips offer a delightful crunch.
Additional Flavor Elements
To take your salad to the next level, consider these flavor elements:
- Lime wedges for serving
- Other optional toppings
Lime wedges give a zesty kick that enhances all the flavors. You can also mix in other toppings like jalapeños for heat or olives for brininess. Feel free to customize to fit your taste!
Step-by-Step Instructions
Preparing the Taco Meat
1. Cooking ground turkey (or beef): Heat a large skillet over medium heat. Add 1 pound of ground turkey or beef. Cook until the meat is brown. Use a spatula to break it apart. This ensures even cooking.
2. Adding taco seasoning and simmering: Once the meat is browned, stir in one packet of taco seasoning. Add 1/2 cup of water. Mix well and bring to a simmer. Let it cook for 5 minutes to thicken. Remove the skillet from heat and let it cool for a bit.
Assembling the Salad
1. Combining salad base ingredients: In a large mixing bowl, add the following:
- 1 can (15 oz) black beans, rinsed and drained
- 1 can (15 oz) sweet corn, drained
- 1 large bell pepper, diced
- 1 cup cherry tomatoes, halved
- 1 ripe avocado, diced
- 1 cup shredded lettuce (romaine or iceberg)
Toss these ingredients gently. This helps mix the flavors well.
2. Mixing in the taco meat: After the taco meat cools, add it to the salad bowl. Gently toss everything together. Ensure all ingredients are mixed evenly.
Serving Suggestions
1. Plating the salad: Divide the salad among individual bowls. This makes it easy to serve.
2. Adding garnishes and accompaniments: Top each bowl with:
- 1/2 cup shredded cheese (cheddar or Mexican blend)
- 1/4 cup sour cream
- 1/4 cup salsa
For extra flavor, garnish with 1/4 cup freshly chopped cilantro. Add a handful of tortilla chips for crunch. Don’t forget lime wedges on the side for a zesty squeeze!Enjoy your vibrant Zesty Fiesta Taco Salad!
Tips & Tricks
Enhancing Flavor
To get the best flavor, you can adjust the taco seasoning. Add more if you want it spicy. Try fresh lime juice to brighten the taste. Use fresh herbs, like cilantro, for a burst of flavor. Combine ingredients wisely by mixing textures and colors. For example, creamy avocado pairs nicely with crunchy veggies.
Presentation Tips
For a beautiful salad, think about how you serve it. Use clear bowls to show off the colors. Layer the ingredients for a feast for the eyes. You can serve it family-style on a big platter or in individual bowls. Individual servings let guests customize their toppings.
Cooking Techniques
For perfect meat, cook the turkey or beef until it’s browned. Use a wooden spoon to break it up as it cooks. This keeps the meat tender and juicy. For fresh veggies, choose ripe ingredients. Wash them well and chop them right before serving. This keeps them crisp and tasty.
Variations
Ingredient Substitutions
You can change the ground turkey or beef in this recipe. Try using ground chicken or pork for a new flavor. If you want a vegetarian dish, replace the meat with lentils or quinoa. These options keep it hearty while adding plant-based protein.
Flavor Profile Adjustments
You can control the spice in your salad. If you like heat, add diced jalapeños or a pinch of cayenne pepper. For less spice, use mild taco seasoning or skip the hot sauce. You can also switch up the dressings. Try ranch or a creamy avocado dressing for a different taste.
Salad Style Variations
Think about how you want to serve your salad. A layered salad looks pretty in a clear bowl. Just stack the ingredients on top of each other. If you want a mixed salad, toss everything in one big bowl. You could also make taco bowls. Serve the salad in taco shells for a fun twist.
Storage Info
Storing Leftovers
To keep your Zesty Fiesta Taco Salad fresh, use these best practices. First, place the salad in an airtight container. This helps maintain texture and flavor. You can use glass or plastic containers with tight-fitting lids. Store it in the fridge right after serving. This keeps it safe to eat later.
Reheating Instructions
If you want to reheat the meat, do it gently. Place it in a skillet over low heat. Stir often to heat it evenly. Do not reheat the salad itself. It tastes best fresh. If you have leftover salad, keep the toppings separate to avoid sogginess. Add toppings right before serving to keep everything fresh.
Shelf Life
Your Zesty Fiesta Taco Salad stays fresh in the fridge for about three days. After that, it may lose taste and texture. Check for signs of spoilage before eating. Look for changes in color or smell. If it smells off or looks different, it’s best to throw it away.
FAQs
How long does Zesty Fiesta Taco Salad last in the fridge?
Zesty Fiesta Taco Salad stays fresh for about three days in the fridge. Make sure to store it in an airtight container. This helps keep the flavors alive and the veggies crisp. If you see any signs of spoilage, like a funky smell or slimy texture, toss it right away.
Can I make Zesty Fiesta Taco Salad ahead of time?
Yes, you can make this salad ahead. I suggest cooking the meat and prepping the salad base separately. This keeps everything fresh and tasty. You can store the taco meat and salad ingredients in the fridge. When you’re ready to eat, just combine them.
What can I serve with Zesty Fiesta Taco Salad?
This salad pairs well with many sides. You can serve tortilla chips for crunch. A side of guacamole adds a creamy touch. For drinks, try a cold lemonade or some iced tea. These options complement the zesty flavors of the salad.
Is this recipe suitable for meal prep?
Yes, this recipe is great for meal prep. Store the salad and meat in separate containers. When you want to eat, just heat the meat. Mix it into the salad right before serving. This keeps the salad fresh and delicious.
Zesty Fiesta Taco Salad combines fresh ingredients, great flavors, and fun options. You learned about the main ingredients, toppings, and how to prepare the perfect salad. Remember, you can easily adjust flavors or swap ingredients to suit your taste. Store leftovers properly to keep them fresh. This salad is not only tasty but also versatile for meal prep. With these tips, you can create a delicious meal your family will love. Try it out and make it your own!
![To make a Zesty Fiesta Taco Salad, gather these key ingredients: - 1 lb ground turkey (or beef) - 1 packet taco seasoning - 1 can (15 oz) black beans, rinsed and drained - 1 can (15 oz) sweet corn, drained - 1 large bell pepper, diced (choose your favorite color) - 1 cup cherry tomatoes, halved - 1 ripe avocado, diced - 1 cup shredded lettuce (romaine or iceberg) These fresh ingredients form the base of your salad. The ground meat adds protein, while the beans and corn bring fiber and sweetness. Colorful veggies like bell pepper and tomatoes not only add taste but also make the dish appealing. For a fabulous finish, don’t forget these toppings: - 1/2 cup shredded cheese (cheddar or Mexican blend) - 1/4 cup sour cream - 1/4 cup salsa - 1/4 cup fresh cilantro, chopped - Tortilla chips for garnish These toppings add layers of flavor and texture. The cheese melts slightly over the warm meat. Sour cream and salsa provide creaminess and zest. Fresh cilantro brightens the dish, while tortilla chips offer a delightful crunch. To take your salad to the next level, consider these flavor elements: - Lime wedges for serving - Other optional toppings Lime wedges give a zesty kick that enhances all the flavors. You can also mix in other toppings like jalapeños for heat or olives for brininess. Feel free to customize to fit your taste! For the full recipe, check out the [Full Recipe]. 1. Cooking ground turkey (or beef): Heat a large skillet over medium heat. Add 1 pound of ground turkey or beef. Cook until the meat is brown. Use a spatula to break it apart. This ensures even cooking. 2. Adding taco seasoning and simmering: Once the meat is browned, stir in one packet of taco seasoning. Add 1/2 cup of water. Mix well and bring to a simmer. Let it cook for 5 minutes to thicken. Remove the skillet from heat and let it cool for a bit. 1. Combining salad base ingredients: In a large mixing bowl, add the following: - 1 can (15 oz) black beans, rinsed and drained - 1 can (15 oz) sweet corn, drained - 1 large bell pepper, diced - 1 cup cherry tomatoes, halved - 1 ripe avocado, diced - 1 cup shredded lettuce (romaine or iceberg) Toss these ingredients gently. This helps mix the flavors well. 2. Mixing in the taco meat: After the taco meat cools, add it to the salad bowl. Gently toss everything together. Ensure all ingredients are mixed evenly. 1. Plating the salad: Divide the salad among individual bowls. This makes it easy to serve. 2. Adding garnishes and accompaniments: Top each bowl with: - 1/2 cup shredded cheese (cheddar or Mexican blend) - 1/4 cup sour cream - 1/4 cup salsa For extra flavor, garnish with 1/4 cup freshly chopped cilantro. Add a handful of tortilla chips for crunch. Don’t forget lime wedges on the side for a zesty squeeze! For the full recipe, check out the details above. Enjoy your vibrant Zesty Fiesta Taco Salad! To get the best flavor, you can adjust the taco seasoning. Add more if you want it spicy. Try fresh lime juice to brighten the taste. Use fresh herbs, like cilantro, for a burst of flavor. Combine ingredients wisely by mixing textures and colors. For example, creamy avocado pairs nicely with crunchy veggies. For a beautiful salad, think about how you serve it. Use clear bowls to show off the colors. Layer the ingredients for a feast for the eyes. You can serve it family-style on a big platter or in individual bowls. Individual servings let guests customize their toppings. For perfect meat, cook the turkey or beef until it's browned. Use a wooden spoon to break it up as it cooks. This keeps the meat tender and juicy. For fresh veggies, choose ripe ingredients. Wash them well and chop them right before serving. This keeps them crisp and tasty. For the full recipe, check out the Zesty Fiesta Taco Salad. {{image_4}} You can change the ground turkey or beef in this recipe. Try using ground chicken or pork for a new flavor. If you want a vegetarian dish, replace the meat with lentils or quinoa. These options keep it hearty while adding plant-based protein. You can control the spice in your salad. If you like heat, add diced jalapeños or a pinch of cayenne pepper. For less spice, use mild taco seasoning or skip the hot sauce. You can also switch up the dressings. Try ranch or a creamy avocado dressing for a different taste. Think about how you want to serve your salad. A layered salad looks pretty in a clear bowl. Just stack the ingredients on top of each other. If you want a mixed salad, toss everything in one big bowl. You could also make taco bowls. Serve the salad in taco shells for a fun twist. For the full recipe, check out the [Full Recipe]. To keep your Zesty Fiesta Taco Salad fresh, use these best practices. First, place the salad in an airtight container. This helps maintain texture and flavor. You can use glass or plastic containers with tight-fitting lids. Store it in the fridge right after serving. This keeps it safe to eat later. If you want to reheat the meat, do it gently. Place it in a skillet over low heat. Stir often to heat it evenly. Do not reheat the salad itself. It tastes best fresh. If you have leftover salad, keep the toppings separate to avoid sogginess. Add toppings right before serving to keep everything fresh. Your Zesty Fiesta Taco Salad stays fresh in the fridge for about three days. After that, it may lose taste and texture. Check for signs of spoilage before eating. Look for changes in color or smell. If it smells off or looks different, it’s best to throw it away. Zesty Fiesta Taco Salad stays fresh for about three days in the fridge. Make sure to store it in an airtight container. This helps keep the flavors alive and the veggies crisp. If you see any signs of spoilage, like a funky smell or slimy texture, toss it right away. Yes, you can make this salad ahead. I suggest cooking the meat and prepping the salad base separately. This keeps everything fresh and tasty. You can store the taco meat and salad ingredients in the fridge. When you're ready to eat, just combine them. This salad pairs well with many sides. You can serve tortilla chips for crunch. A side of guacamole adds a creamy touch. For drinks, try a cold lemonade or some iced tea. These options complement the zesty flavors of the salad. Yes, this recipe is great for meal prep. Store the salad and meat in separate containers. When you want to eat, just heat the meat. Mix it into the salad right before serving. This keeps the salad fresh and delicious. Zesty Fiesta Taco Salad combines fresh ingredients, great flavors, and fun options. You learned about the main ingredients, toppings, and how to prepare the perfect salad. Remember, you can easily adjust flavors or swap ingredients to suit your taste. Store leftovers properly to keep them fresh. This salad is not only tasty but also versatile for meal prep. With these tips, you can create a delicious meal your family will love. Try it out and make it your own!](https://dishtreats.com/wp-content/uploads/2025/07/d30f25fa-2b02-4bda-bacb-6859b51385b6-300x300.webp)
. Can I use dark chocolate instead of semi-sweet? Yes, you can use dark chocolate. It adds a richer flavor. Dark chocolate makes the bars less sweet. This change gives you a nice balance in taste. If you love dark chocolate, go for it! What can I substitute for eggs in this recipe? You can use applesauce or mashed bananas. Use 1/4 cup for each egg. This keeps the bars moist. It also adds a bit of natural sweetness. Another option is flaxseed meal mixed with water. Mix 1 tablespoon of flaxseed meal with 2.5 tablespoons of water. Let it sit for five minutes before using. How do I know when the cookie bars are done baking? Check the edges for a golden brown color. The center should look set but may be soft. Insert a toothpick in the center. If it comes out clean or with a few crumbs, they are done. Let them cool before cutting for the best results. You now know how to make delicious chocolate chip cookie bars from scratch. We covered essential ingredients, step-by-step instructions, and expert tips. You learned about gluten-free and vegan options, plus how to store them well. Remember, measuring accurately and not overmixing are key for the best results. Enjoy your baking journey. Share these tips with friends so everyone can enjoy these tasty treats!](https://dishtreats.com/wp-content/uploads/2025/05/88326a6b-fa01-43d4-bb00-6171d5f3f1c3-768x768.webp)