
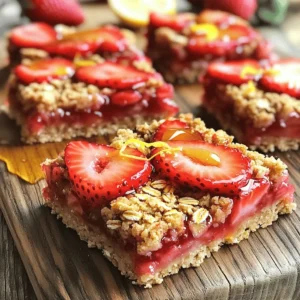
Easy Strawberry Oat Bars Delicious and Simple Snack

Craving a sweet and healthy snack? You’re in the right place! These Easy Strawberry Oat Bars pack a burst of fresh flavor and are a treat everyone will love. With just a few simple ingredients and easy steps, you can whip up a batch in no time. Perfect for kids or a midday pick-me-up, let’s dive into making these delicious bars that are sure to become a family favorite!
Ingredients
Here are the key ingredients you need to make Easy Strawberry Oat Bars. Each one plays a special role in making these bars delicious and healthy.
- 1 ½ cups rolled oats
- ½ cup almond flour
- ½ cup packed brown sugar
- 1 teaspoon baking powder
- ¼ teaspoon sea salt
- ½ teaspoon ground cinnamon
- ½ cup unsalted butter, melted and slightly cooled
- 1 large egg, beaten
- 1 teaspoon pure vanilla extract
- 1 ½ cups fresh strawberries, hulled and roughly chopped
- 2 tablespoons honey or pure maple syrup
- Zest of 1 medium lemon
Each ingredient adds flavor and texture. The oats give the bars their chewy base. Almond flour adds a nice nutty taste. Brown sugar sweetens the mix while the lemon zest brightens it up. Fresh strawberries bring natural sweetness and moisture.
Using unsalted butter helps control saltiness. The egg binds everything together, while honey or maple syrup adds more sweetness. Cinnamon gives a warm spice note.
Step-by-Step Instructions
Preparation Steps
- Preheat the oven and prepare the baking dish.
Begin by heating your oven to 350°F (175°C). Grease an 8×8 inch baking dish lightly. You can also line it with parchment paper for easy removal.
- Combine dry ingredients.
In a large bowl, mix your rolled oats, almond flour, brown sugar, baking powder, sea salt, and ground cinnamon. Stir these dry items well so there are no lumps.
- Mix wet ingredients and combine.
In another bowl, whisk the melted butter, beaten egg, and vanilla extract together. Mix until this is smooth and uniform.
- Prepare the strawberry filling.
In a small skillet on medium heat, add the chopped strawberries, honey or maple syrup, and lemon zest. Cook for about five minutes, stirring often. The strawberries will soften and create a nice sauce.
- Assemble and bake.
Pour the wet mix into the dry mix and stir gently. Take two-thirds of this oat mixture and press it into the bottom of your baking dish. Next, spread the warm strawberry filling over this layer. Crumble the remaining oat mixture on top. Bake for 25-30 minutes. The top should be golden brown and firm.Enjoy making these Easy Strawberry Oat Bars!
Tips & Tricks
Tips for Perfecting the Bars
To make the best strawberry oat bars, keep a few tips in mind. First, to avoid mushy strawberries, use fresh, ripe ones. Cook them lightly to keep their shape. If they become too soft, they can turn your bars soggy.
Next, when mixing the oat mixture, be gentle. Overmixing can make the bars tough. Stir just until everything blends well. A few lumps are okay!
Lastly, cooling time is key. After baking, let the bars cool in the pan for at least 15 minutes. This helps them set properly and makes cutting easier.
Serving Suggestions
For a beautiful presentation, drizzle some honey or maple syrup on top. You can also add fresh strawberry slices for color. This makes the dish pop!
Pair these bars with yogurt or a scoop of ice cream. The creaminess of yogurt or ice cream balances the sweetness and adds a nice touch. Enjoy your delicious snack!

Variations
Customization Options
You can easily change the fruit in these bars. Instead of strawberries, try using blueberries, raspberries, or even peaches. Each fruit brings a new taste and feel to the bars. Fresh fruit works best, but you can use frozen too. Just remember to thaw and drain any excess juice.
If you need a gluten-free option, use gluten-free oats and flour. These swaps keep the bars just as tasty and satisfying. They also work well for friends who have gluten allergies.
To add some crunch, think about adding nuts or seeds. Chopped almonds, walnuts, or pumpkin seeds fit perfectly. Mix them into the oat mixture before pressing it into the pan. This will give your bars a fun texture and healthy boost.
Vegan or Dairy-Free Options
If you want to make these bars vegan or dairy-free, it’s simple. Replace the butter with coconut oil. Melt the coconut oil and mix it in just like you would with butter. This swap keeps the bars rich and tasty.
You can also use a flax egg instead of a regular egg. To make a flax egg, mix 1 tablespoon of ground flaxseed with 2.5 tablespoons of water. Let it sit for a few minutes until it gets thick. Then, use it in place of the egg in the recipe. This change makes the bars plant-based and still delicious.
Storage Info
Proper Storage Techniques
To keep your strawberry oat bars fresh, store them in an airtight container. Place parchment paper between layers to prevent sticking. For best results, store them at room temperature for short-term use. If you want to keep them longer, freezing works great. Wrap each bar in plastic wrap, then place them in a freezer bag. This method helps prevent freezer burn.
How Long They Last
In the refrigerator, these bars can last up to one week. Use a glass or plastic container with a tight lid for storage. If frozen, they can last about three months. Just remember to label your container with the date to track freshness. Enjoy your tasty treats whenever you crave a snack!
FAQs
Common Questions
Can I use frozen strawberries instead of fresh?
Yes, you can use frozen strawberries. Just let them thaw first. Drain any extra juice. This helps keep the bars from getting too soggy.
How can I make these bars more nutritious?
To boost nutrition, add seeds like chia or flax. You can also use whole wheat flour instead of almond flour. This adds fiber and nutrients.
Can I double the recipe?
Absolutely! Just double all the ingredients. Use a larger pan, like a 9×13 inch. Keep an eye on the baking time. It may need a few extra minutes.
What to do if the bars crumble when cut?
If the bars crumble, they may need more binding. Add a bit more butter or honey next time. Let them cool fully before cutting for better results.
Related Questions
Are there nut-free alternatives for almond flour?
Yes, you can use oat flour or all-purpose flour. Both work well and keep the bars soft and tasty.
How to adjust the recipe for different pan sizes?
For a larger pan, increase the recipe by 1.5 times. For a smaller pan, reduce by half. Adjust baking time as needed for size changes.
These tasty strawberry oat bars are easy to make and packed with flavor. You learned about the key ingredients and step-by-step instructions to create them. Tips and tricks helped you avoid common mistakes and enhance presentation. You even explored fun variations and proper storage methods.
Now, you can enjoy these bars as a snack or dessert. Feel free to switch up the fruits or ingredients to suit your taste. With a bit of creativity, your next treat will be a hit! Enjoy your baking journey!


![For these herb crusted zucchini sticks, you need a few simple yet tasty ingredients. Each one plays a key role in creating the perfect crunch and flavor. - Zucchini and Bread Crumb Base - 2 medium zucchinis, cut into uniform sticks - 1 cup whole wheat breadcrumbs - Seasonings and Cheese - 1/2 cup finely grated Parmesan cheese - 2 tablespoons fresh parsley, finely chopped - 1 tablespoon fresh basil, finely chopped - 1 teaspoon garlic powder - 1/2 teaspoon onion powder - Salt and black pepper, to taste - Egg Wash - 2 large eggs, beaten - Olive oil spray or 2 tablespoons extra virgin olive oil Each ingredient adds a layer of flavor. The zucchini brings a fresh crunch, while the breadcrumbs create that satisfying crisp. The herbs and cheese elevate the taste, making these sticks hard to resist. Don't forget the egg wash! It helps the coating stick, ensuring every bite is packed with flavor. For the full recipe, check out the detailed instructions. Prepping the Oven and Baking Sheet First, preheat your oven to 425°F (220°C). This step ensures the zucchini sticks cook evenly. Next, line a baking sheet with parchment paper. This helps prevent sticking and makes cleanup easy. Making the Breadcrumb Mixture In a shallow dish, combine the following: - 1 cup whole wheat breadcrumbs - 1/2 cup finely grated Parmesan cheese - 2 tablespoons fresh parsley, finely chopped - 1 tablespoon fresh basil, finely chopped - 1 teaspoon garlic powder - 1/2 teaspoon onion powder - Salt and black pepper, to taste Stir these ingredients together until they mix well. This mixture adds flavor and crunch to your zucchini sticks. Coating the Zucchini Sticks In a separate bowl, beat 2 large eggs until they are well mixed. This egg wash helps the coating stick. Take each zucchini stick and dip it in the egg wash. Let any excess egg drip off. Then, roll the stick in the breadcrumb mixture. Press gently to coat all sides evenly. Baking Process Place the coated zucchini sticks on your prepared baking sheet. Make sure to leave space between them. This allows them to cook and crisp up nicely. For extra crunch, spray the tops with olive oil or drizzle some over them. Bake the sticks in the oven for 20-25 minutes. Flip them halfway through to ensure even browning. When they are golden brown and crispy, take them out and let them cool for a few moments before serving. Enjoy your crunchy and flavorful snack! For detailed instructions, check the Full Recipe. To get that perfect crunch, the egg wash is key. The egg helps the coating stick well. Without it, the crumbs may fall off. Dip each zucchini stick fully in the egg, then let the extra drip off. This step makes a big difference. Choosing the right olive oil can also help. You can use extra virgin olive oil or an olive oil spray. Both options add flavor and help the zucchini crisp up in the oven. If you use a spray, make sure to coat the sticks lightly. Baking tips are important for even browning. Make sure to leave space between each zucchini stick on the baking sheet. This allows hot air to circulate. Halfway through baking, flip the sticks for a nice, even brown on both sides. For the full recipe, check out the detailed instructions above. Enjoy your crispy zucchini sticks! {{image_4}} You can switch up the recipe to fit your needs. Here are some ideas: - Alternative Breadcrumbs: If you want a gluten-free option, use crushed cornflakes or almond flour. Both give a nice crunch. Try panko breadcrumbs for a lighter, airier texture. - Vegan Option: Replace eggs with a flaxseed mixture. Mix 1 tablespoon of flaxseed meal with 3 tablespoons of water. Let it sit for five minutes until it thickens. This works well to stick the coating. - Additional Seasoning Ideas: You can add a kick with spices like paprika or cayenne. A sprinkle of Italian seasoning can give it a nice herby flavor. Crushed red pepper flakes can add some heat, too. These substitutes keep your herb crusted zucchini sticks tasty and fun. You can play with flavors to make them your own! If you’re looking for the full recipe, check the detailed instructions. Refrigeration Instructions After enjoying the herb-crusted zucchini sticks, let them cool. Place any leftovers in an airtight container. Store them in the fridge for up to three days. This keeps them fresh and tasty for later snacking. Reheating Tips To get that crunch back, reheat the zucchini sticks in the oven. Set your oven to 375°F (190°C). Bake them for about 10 minutes. This will warm them up and restore their crispiness. Avoid using the microwave, as it can make them soggy. Freezing Zucchini Sticks You can freeze the zucchini sticks for longer storage. First, bake them as directed in the Full Recipe. Let them cool completely. Then, place them in a single layer on a baking sheet and freeze for a few hours until firm. After that, transfer them to a freezer bag. They will keep well for up to two months. When ready to eat, bake from frozen, adding a few extra minutes to the cooking time. To keep your zucchini sticks crispy, follow a few key steps. First, cut the zucchini into even sticks. This helps them cook at the same rate. Second, make sure to pat the zucchini dry before coating. Removing excess moisture is very important. Lastly, use the egg wash to help the crumbs stick well. This will create a nice crispy layer while baking. Yes, you can use other vegetables! Carrots, eggplant, and sweet potatoes work great. Just remember to cut them into similar shapes and sizes. This helps them cook evenly. You might need to adjust the cooking time based on the vegetable you choose. Herb-crusted zucchini sticks taste great with many dips. Marinara sauce gives a nice tangy flavor. You can also try ranch dressing for a cool, creamy taste. If you want something lighter, a yogurt dip with herbs is a good choice. It adds freshness and complements the zucchini well. For the full recipe, check out the [Full Recipe]. You learned how to make crispy zucchini sticks using simple ingredients. I shared tips for perfecting your baking process and variations to suit your taste. Storing leftovers or substituting ingredients can keep things fresh. Remember, the right egg wash and oil play key roles in crispiness. Enjoy experimenting with your flavors. Try new dips and veggies next time to keep things exciting. Now, you have the tools to make this dish your own!](https://dishtreats.com/wp-content/uploads/2025/07/e6e4c2e6-85fe-4d28-829b-ce9ad5e19088-768x768.webp)