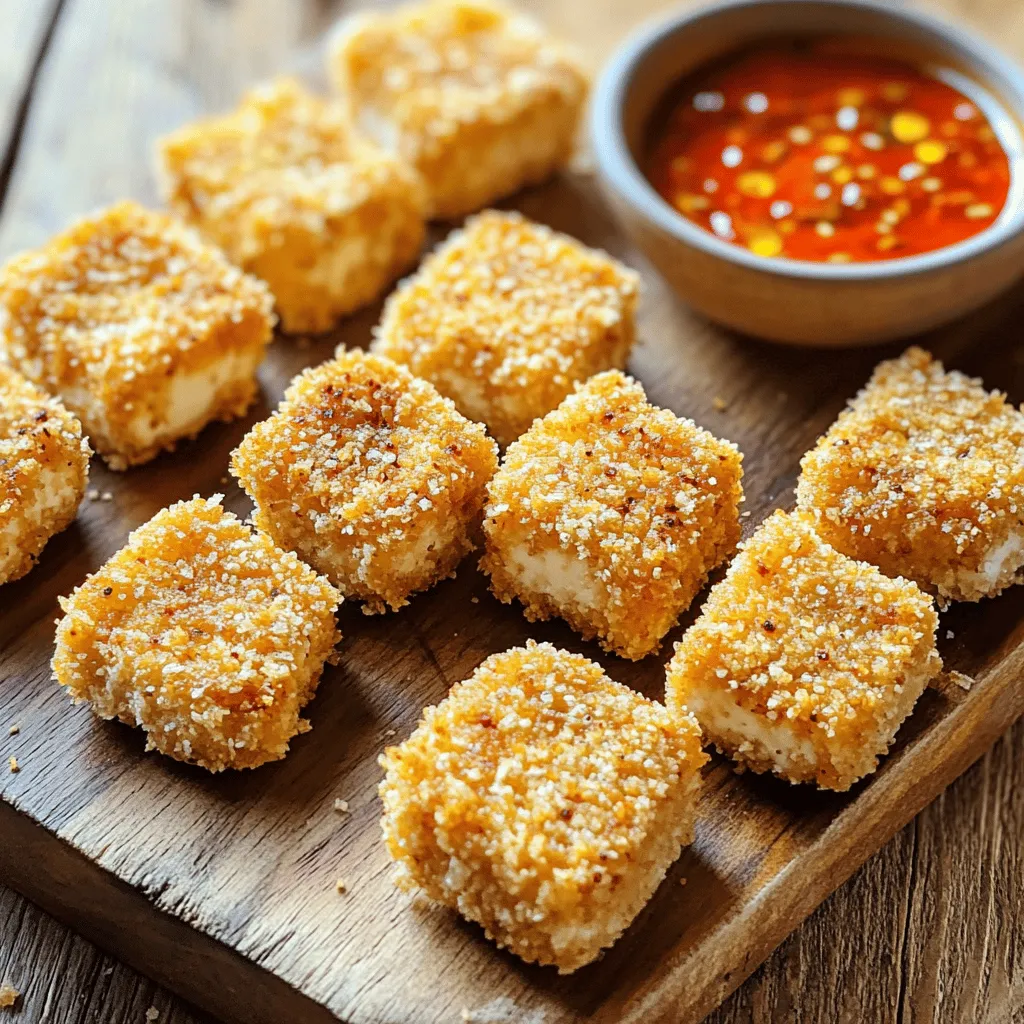
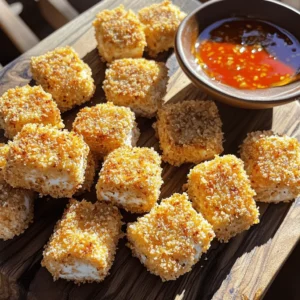
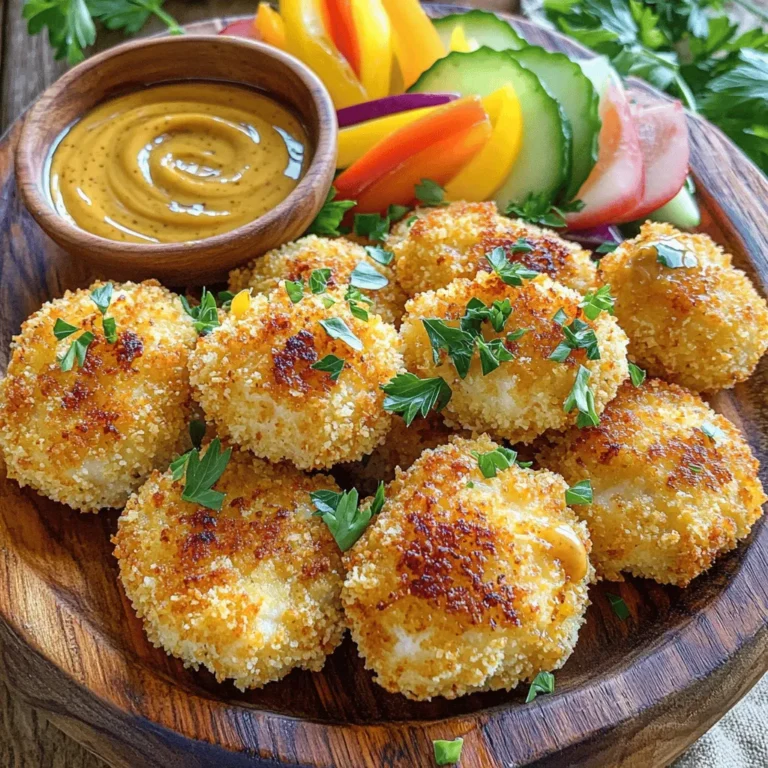
Baked Crispy Tofu Nuggets Healthy and Tasty Snack
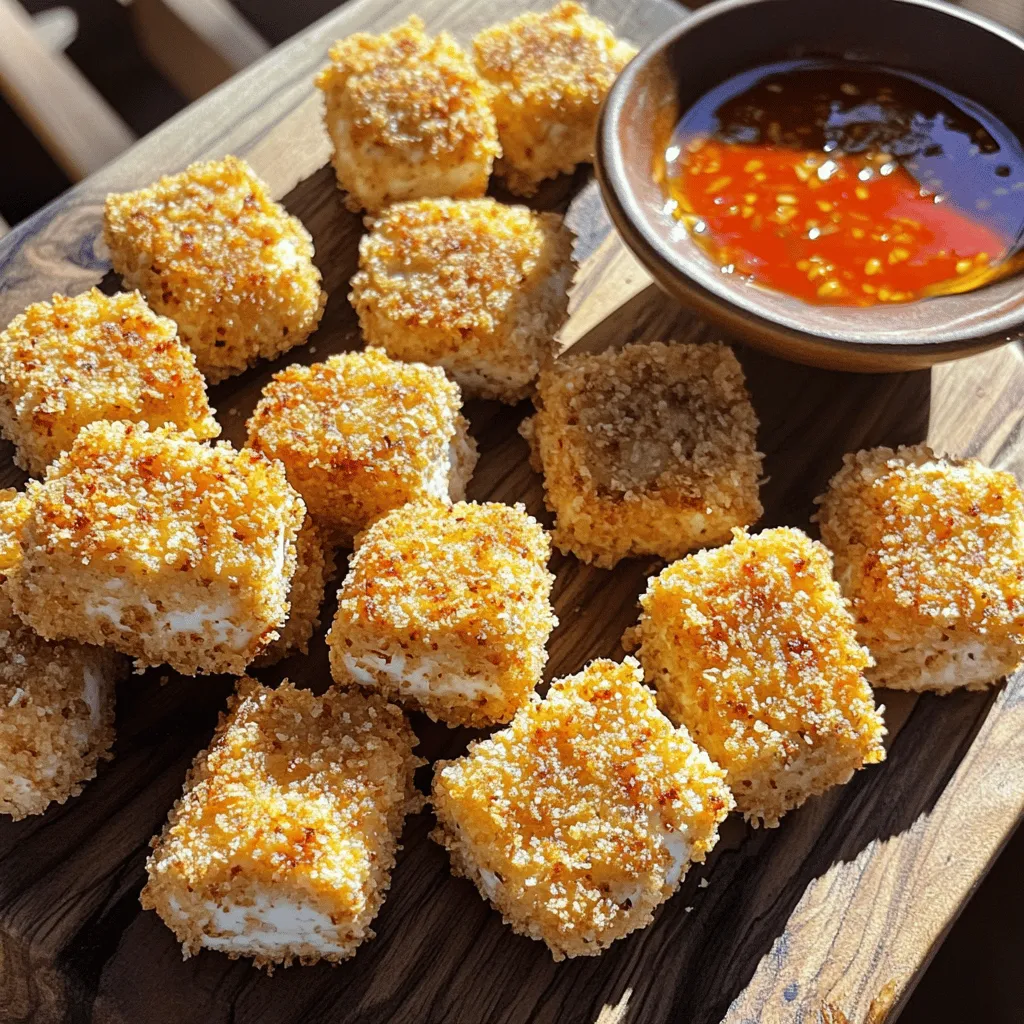
If you’re on the hunt for a fun, healthy snack, you’ve landed in the right place! Baked Crispy Tofu Nuggets are not only tasty but also easy to make. I’ll share simple steps and tips to create the perfect crunch. Plus, you’ll find options for sauces and variations. Whether you’re vegan or just love great snacks, these nuggets are a must-try! Let’s get cooking and enjoy an awesome treat!
Ingredients
Main Ingredients for Baked Crispy Tofu Nuggets
To make baked crispy tofu nuggets, gather these main ingredients:
- 1 block (14 oz) firm tofu, thoroughly pressed and cut into bite-sized cubes
- 1 cup panko breadcrumbs
- 1/2 cup all-purpose flour
- 1/2 cup unsweetened plant milk (choices include almond, soy, or oat)
- 2 tablespoons nutritional yeast
- 1 teaspoon garlic powder
- 1 teaspoon onion powder
- 1 teaspoon smoked paprika
- Salt and pepper to taste
- 2 tablespoons olive oil (for drizzling)
These ingredients create a crunchy and tasty bite. The tofu serves as the main protein source. Panko breadcrumbs give a crispy texture. Nutritional yeast adds a cheesy flavor without dairy.
Optional Ingredients for Dipping Sauces
You can pair your tofu nuggets with fun dipping sauces. Here are some great options:
- Sweet chili sauce
- BBQ sauce
- Ranch dressing
Choosing a sauce can make the meal more exciting. You can switch up flavors and match your mood.
Nutritional Highlights
Baked crispy tofu nuggets are not only delicious but also healthy. Here’s why:
- Tofu provides protein and is low in calories.
- Nutritional yeast is high in B vitamins.
- Panko breadcrumbs are a lighter choice than regular breadcrumbs.
These nuggets offer a good balance of nutrients. They are a smart snack for both kids and adults. Enjoy them without guilt while adding flavor and crunch to your day!
Step-by-Step Instructions
Preparation of Tofu
Start with firm tofu. Press it to remove excess water. Wrap the tofu in a clean towel. Place a heavy object on top, like a pan, for about 15 minutes. After pressing, cut the tofu into bite-sized cubes. This helps the tofu absorb flavors better.
Coating Process
You will need three bowls for coating. In the first bowl, add all-purpose flour, salt, and pepper. Mix well. In the second bowl, pour in the plant milk. This will help the coating stick. In the third bowl, mix panko breadcrumbs with nutritional yeast, garlic powder, onion powder, and smoked paprika. Mix until everything is even.
Now, take one tofu cube. First, dredge it in the flour. Shake off any extra flour. Next, dip it into the plant milk. Let any excess milk drip off. Finally, roll it in the panko mix. Press gently to coat it well. Repeat this for all cubes.
Baking Instructions
Preheat your oven to 400°F (200°C). Line a baking sheet with parchment paper to prevent sticking. Place the coated tofu nuggets on the sheet. Make sure they are spread out. Drizzle olive oil over the nuggets for crispiness. Bake for 25-30 minutes. Flip them halfway through to get golden brown on both sides. When done, let them cool for a few minutes. Now, enjoy your baked crispy tofu nuggets with your favorite dipping sauce!
Tips & Tricks
How to Achieve Extra Crispiness
To make your baked crispy tofu nuggets extra crunchy, follow these steps:
- Use firm tofu. It holds its shape well and crisps up nicely.
- Press the tofu well. Remove as much water as possible to help it crisp.
- Coat the tofu with olive oil. This adds flavor and aids in browning.
- Spread the nuggets out on the baking sheet. Avoid overcrowding to ensure even cooking.
- Flip them halfway through baking. This helps both sides get crispy and golden.
Flavor Enhancements
To boost the flavor of your tofu nuggets, try these tips:
- Add spices to the flour mix. Chili powder or cumin can give a kick.
- Use flavored plant milk. This can add depth to the taste.
- Mix in herbs. Fresh or dried herbs like thyme or basil can elevate the dish.
- Experiment with dipping sauces. Try spicy mayo or zesty lemon aioli for extra zing.
Common Mistakes to Avoid
Here are some common mistakes when making crispy tofu nuggets:
- Not pressing the tofu enough. This can lead to soggy nuggets.
- Skipping the oil. Without it, the nuggets may not brown properly.
- Not seasoning adequately. A pinch of salt and pepper makes a big difference.
- Overcrowding the baking sheet. This can result in steaming instead of baking.
Follow these tips to ensure your baked crispy tofu nuggets turn out perfect every time.
Variations
Gluten-Free Options
You can easily make baked crispy tofu nuggets gluten-free. Just swap out the all-purpose flour and panko breadcrumbs for gluten-free versions. Use gluten-free flour like almond or rice flour. For the breadcrumbs, try gluten-free panko or crushed rice cereal. This way, everyone can enjoy a crispy snack without worry.
Flavor Variants
Want to spice things up? You can create different flavors! For an Asian-inspired twist, add soy sauce or sesame oil to your plant milk. Then, mix in sesame seeds or ginger powder with the breadcrumb coating. For a spicy kick, add cayenne pepper or chili flakes to the seasoning mix. These small changes can take your nuggets to a whole new level!
Different Cooking Methods
You can also try cooking methods beyond baking. An air fryer is a great choice for crispy nuggets. It uses hot air to cook and crisp the tofu. Preheat your air fryer to 375°F (190°C). Arrange the nuggets in a single layer and cook for about 15-20 minutes. Shake the basket halfway through for even cooking. This method can save time and give you an even crispier result.
Storage Info
How to Store Leftovers
To store your leftover baked crispy tofu nuggets, let them cool completely. Place them in an airtight container. Keep them in the fridge for up to three days. Make sure to separate layers with parchment paper to avoid sticking. Keeping them covered helps retain their flavor and moisture.
Reheating Tips for Best Texture
When reheating, use the oven for the best texture. Preheat your oven to 350°F (175°C). Arrange the nuggets on a baking sheet in a single layer. Bake for about 10-15 minutes until they are hot and crispy again. Avoid the microwave, as it can make them soggy.
Freezing Guidelines
You can freeze these nuggets for longer storage. Allow them to cool completely, then place them in a freezer-safe bag. Remove as much air as possible to prevent freezer burn. They can last for up to two months. To cook from frozen, bake directly from the freezer at 400°F (200°C) for about 30-35 minutes. Enjoy your Baked Crispy Tofu Nuggets anytime!
FAQs
How long do baked tofu nuggets last?
Baked tofu nuggets last about 3 to 5 days in the fridge. Store them in an airtight container. This keeps them fresh and tasty. If you want to enjoy them longer, consider freezing.
Can I make these nuggets ahead of time?
Yes, you can make these nuggets ahead of time. Prepare the tofu nuggets and store them in the fridge. Cook them within 24 hours for the best taste and texture. You can also freeze them before baking. Just remember to thaw them in the fridge overnight before cooking.
What can I serve with baked crispy tofu nuggets?
You can serve baked crispy tofu nuggets with many tasty sides. Here are some ideas:
- Fresh veggie sticks like carrots or cucumbers
- A vibrant salad with mixed greens
- Your favorite dipping sauces like BBQ or sweet chili
- Rice or quinoa for a filling meal
Feel free to mix and match to create your perfect plate!
Baked crispy tofu nuggets offer a tasty, healthy snack or meal. We explored the ingredients, preparation, and tips for the best texture. I shared storage and reheating tips to keep leftovers fresh. Feel free to experiment with flavors and cooking methods to suit your taste. This dish is not just good for you; it’s fun to make! Enjoy the crunch and flavor of these nuggets, whether as a main dish or a tasty side.
![- 1 pound boneless, skinless chicken breast, thinly sliced - 1 tablespoon extra virgin olive oil - 1 teaspoon chili powder - 1 teaspoon ground cumin - ½ teaspoon smoked paprika - ½ teaspoon garlic powder - ½ teaspoon onion powder - Sea salt and freshly cracked black pepper, to taste - 1 red bell pepper, sliced into thin strips - 1 yellow bell pepper, sliced into thin strips - 1 medium onion, sliced - 1 head of iceberg or romaine lettuce, leaves carefully separated I always choose organic chicken when I can. It tastes better and is healthier. Good seasoning transforms chicken into a flavorful dish. Chili powder and cumin bring warmth, while smoked paprika adds depth. Keep your vegetables fresh! Use bright, crisp bell peppers and onions. They add color and crunch to your wraps. For the lettuce, iceberg or romaine works best. Their sturdy leaves hold the filling well. - 1 ripe avocado, sliced - Fresh cilantro leaves, for garnish - Lime wedges, for drizzling Avocado adds creaminess and balances the spiciness. Cilantro brings a fresh burst of flavor. Lime juice brightens the dish and enhances all the tastes. For sauces, you can use salsa for a zesty kick. A yogurt sauce makes a cool contrast to the spicy chicken. These toppings and dips elevate your chicken fajita lettuce wraps. You can find the Full Recipe for more details on preparation and cooking. Enjoy making these fresh and flavorful meals! To make your chicken fajita lettuce wraps burst with flavor, seasoning is key. Start by mixing the chicken with olive oil and spices. Use chili powder, cumin, smoked paprika, garlic powder, onion powder, sea salt, and black pepper. This mix will coat the chicken well and enhance its taste. Next, let’s slice the vegetables correctly. For even cooking, cut the bell peppers and onion into thin strips. This helps them cook through while keeping a nice crunch. Remember, uniform slices ensure they cook at the same rate. Now, prepare the lettuce leaves. Rinse them gently under cold water. Pat them dry with a towel to avoid soggy wraps. Choose firm leaves that can hold the filling well. Iceberg or romaine works best for this recipe. Heat your skillet to medium-high. This temperature is perfect for cooking the chicken. When it's hot, add the seasoned chicken and cook for about 5-7 minutes. Stir occasionally to get an even golden-brown color. Make sure the chicken is fully cooked and no longer pink inside. After the chicken is done, add your sliced vegetables. Cook for an extra 4-5 minutes. Stir frequently to keep the veggies bright and tender-crisp. This technique ensures they maintain great texture and taste. Now, it's time to assemble your wraps. Take a lettuce leaf and spoon in a generous amount of the chicken and vegetable mix. Add a few slices of creamy avocado on top. Finish with fresh cilantro for extra flavor. For presentation, arrange the wraps on a nice platter. Serve with lime wedges to add a zesty touch. A squeeze of lime juice brightens the flavors and makes each bite pop. Enjoy this fresh and flavorful meal from the full recipe! To avoid overcooking the chicken, use a meat thermometer. Chicken should reach 165°F. Remove it from the heat the moment it's done. This keeps the meat juicy and tender. Let the chicken rest for 5 minutes before serving. This helps the juices redistribute, making each bite full of flavor. To add heat, include diced jalapeños or cayenne pepper. Start with a small amount, then taste as you go. You can also try chipotle powder for a smoky kick. To balance flavors, squeeze fresh lime juice over the wraps. The acidity brightens the dish and complements the spices. Pair your chicken fajita wraps with a fresh side salad. A simple mix of greens, tomatoes, and cucumbers works well. You can also serve them with corn on the cob or seasoned rice. These wraps are perfect for casual gatherings or family dinners. They are also great for a fun weeknight meal! For the full recipe, check the earlier section. {{image_4}} You can swap out chicken for other proteins. Shrimp works great and cooks fast. Tofu is a perfect choice for a plant-based option. Both give you tasty results. If you need gluten-free or low-carb wraps, try using collard greens or cabbage leaves instead of lettuce. These options hold up well and add a nice crunch. You can change the spice blend to suit your taste. Try adding cayenne for heat or smoked paprika for a deeper flavor. You can also use a store-bought fajita seasoning if you're short on time. Seasonal veggies can make your wraps pop. In summer, throw in fresh corn and zucchini. In fall, use roasted butternut squash for a sweet twist. For parties, serve the wraps on a large platter. Arrange the lettuce leaves and filling bowls in a fun way. This lets guests build their own wraps, making it interactive and fun. If you want to prepare these wraps for lunch, pack the filling and lettuce separately. This keeps the lettuce crisp and fresh. You can also use small containers for dips like salsa or guacamole. For the full recipe, visit [Full Recipe]. To keep your chicken fajita lettuce wraps fresh, follow these steps: - Separate the filling and lettuce: Store the chicken and veggies in one container, and the lettuce in another. This keeps the lettuce crisp. - Use airtight containers: Choose containers that seal tightly to prevent air from getting in. - Cool before storing: Let the filling cool to room temperature before sealing. This helps avoid condensation, which can make the chicken soggy. When it's time to enjoy your leftovers, here are some tips: - Reheat in a skillet: Place the chicken fajita filling back in a skillet over medium heat. Stir often to warm evenly without drying it out. - Add a splash of water: If the filling seems dry, add a little water or broth. This keeps it moist and flavorful. - Refresh the lettuce: Rinse the lettuce leaves again under cold water. This helps them feel crisp and fresh. If you want to save your chicken fajitas for later, follow these guidelines: - Freeze the filling: Place cooled chicken and veggies in a freezer-safe bag. Remove as much air as possible before sealing. - Label and date: Write the date on the bag. Use within three months for best taste. - Thaw safely: When ready to eat, thaw the filling overnight in the fridge. Reheat it as mentioned earlier. Prepare fresh lettuce just before serving. For the full recipe, check out the spicy chicken fajita lettuce wraps. To add heat, try these spices and sauces: - Red pepper flakes - Jalapeños, diced - Hot sauce of your choice - Chipotle powder - Fresh diced chili peppers Mix these into your chicken or drizzle on top. You can adjust the heat based on your taste. If you want a smoky flavor, chipotle powder works great. Yes, you can prep ingredients in advance. - Slice the chicken and veggies the night before. - Store them in airtight containers in the fridge. - Cook the chicken and veggies just before serving. This way, you can save time and still enjoy fresh flavors. Absolutely! They are low in carbs and high in protein. - One serving contains lean chicken and fresh veggies. - You get vitamins from the peppers and lettuce. - Avocado adds healthy fats. This meal is tasty and supports a balanced diet. Yes, you can use other greens. Here are some ideas: - Butter lettuce for a softer wrap - Green leaf lettuce for extra crunch - Collard greens for a sturdy option These alternatives can change the taste and feel of your wraps. These sides complement your wraps nicely: - Fresh corn salad - Quinoa salad with lime - Black bean salsa - Grilled veggies These options add color and variety to your meal. For the full recipe, check the main section of this article. Chicken fajita lettuce wraps are a great way to enjoy fresh ingredients and bold flavors. We covered the key ingredients, from quality chicken to perfect seasoning. I shared step-by-step instructions for preparation and cooking, plus tips to avoid common mistakes. You can also explore fun variations and creative ways to serve these wraps. Don't forget about storage options to keep your leftovers fresh. With this guide, you can easily create a tasty and healthy meal anytime. Enjoy experimenting with flavors and serving styles!](https://dishtreats.com/wp-content/uploads/2025/07/3ff26f4d-3e29-49ec-9670-a4271fb272fb-768x768.webp)

. It takes about 20 minutes to cook garlic butter steak bites. You spend 10 minutes prepping the ingredients and another 10 minutes cooking them. This quick cook time makes it easy to enjoy a tasty meal in no time. Yes, you can use other cuts of steak. Ribeye, filet mignon, or flank steak work well. Just remember to adjust the cooking time based on the cut you choose. Each cut has its own flavor and texture, so pick one you like best. You can serve garlic butter steak bites with various sides. Here are some great options: - Creamy mashed potatoes - Sautéed vegetables like green beans or broccoli - Fresh salad with light dressing - Crispy garlic bread These sides add flavor and balance to your meal. You can also use toothpicks for easy serving at parties or gatherings. For more ideas, check out the Full Recipe for garlic butter steak bites. It offers tips on presentation and other serving suggestions. In this post, we covered how to make garlic butter steak bites using simple ingredients. You learned about the key steps, from preparing the steak to combining it with garlic butter. We also shared tips for cooking and presented flavor variations to try. Finally, we discussed storage tricks and answered common questions. Keep this recipe handy for a quick and tasty meal. Enjoy your cooking and the delicious bites you create!](https://dishtreats.com/wp-content/uploads/2025/06/daf37226-e56f-491f-87e9-6665894a306e-768x768.webp)