
Chicken Pesto Pasta Salad Fresh and Flavorful Dish
![To make Chicken Pesto Pasta Salad, you need fresh and tasty ingredients. Here’s what you will use: - 2 cups penne pasta - 1 cup cooked chicken breast, shredded - 1/2 cup cherry tomatoes, halved - 1/2 cup mozzarella balls, drained - 1/4 cup fresh basil leaves, chopped - 1/4 cup pesto sauce - 2 tablespoons extra virgin olive oil - Juice of 1 fresh lemon - Salt and black pepper to taste - Optional: 1/4 cup pine nuts, toasted Each ingredient brings its own flavor. The penne pasta serves as a great base. The chicken adds protein. Tomatoes give freshness, while mozzarella adds creaminess. You can change things up with add-ins. Here are some great options: - Spinach or arugula for extra greens - Bell peppers for crunch - Grated Parmesan cheese for a salty kick - Cooked bacon for a smoky flavor - Quinoa instead of pasta for a healthier twist Feel free to mix and match. Your salad can be unique each time you make it. When it comes to pesto, you have choices. You can use fresh homemade pesto or store-bought pesto. Fresh pesto tastes bright and bold. You can make it with basil, garlic, pine nuts, cheese, and olive oil. Store-bought pesto saves time but may have preservatives. Both options work well in your salad. I recommend trying fresh pesto if you have the time. It elevates the dish and adds a personal touch. For the full recipe, check out the [Full Recipe]. 1. Cook the Pasta: Start by boiling water in a large pot. Add salt for flavor. When it boils, add 2 cups of penne pasta. Cook until al dente, about 8-10 minutes. Drain the pasta and rinse it with cold water to cool it down. 2. Mix the Ingredients: In a big mixing bowl, add 1 cup of shredded cooked chicken, 1/2 cup of halved cherry tomatoes, and 1/2 cup of drained mozzarella balls. Use a spatula to mix them well. 3. Combine with Pasta: Add the cooled penne pasta to the bowl. Gently mix to combine everything. Be careful not to break the mozzarella balls. 4. Make the Dressing: In a small bowl, whisk together 1/4 cup of pesto sauce, 2 tablespoons of extra virgin olive oil, and the juice from 1 fresh lemon. Add a pinch of salt and black pepper. 5. Dress the Salad: Pour the dressing over the pasta salad. Use a spoon or tongs to toss everything gently. Make sure all the ingredients are coated. 6. Fold in Fresh Herbs: Add 1/4 cup of chopped fresh basil and optional 1/4 cup of toasted pine nuts. Gently fold them into the salad without bruising the basil. 7. Taste and Adjust: Taste your salad. If it needs more flavor, add more salt, pepper, or lemon juice. 8. Chill Before Serving: Cover the salad with plastic wrap. Let it chill in the fridge for at least 30 minutes. This helps the flavors mix well. - Use a large pot to give the pasta room to move. - Salt the water before adding pasta. This makes it taste better. - Stir the pasta often while it cooks to prevent sticking. - Always taste the pasta a minute before the time is up. It should be firm but not hard. Making the dressing is quick and easy. In just a few steps, you can create a burst of flavor. Start with fresh pesto sauce. If you like a creamier dressing, mix in some yogurt or sour cream. Always taste your dressing before adding it to the salad. Adjust the flavors based on your taste. This simple dressing brings the whole dish together and makes it shine. For the full recipe, check out the details above. Mixing ingredients well is key to flavor. Start with the pasta. Make sure it is cold before adding other items. This keeps everything fresh. Next, add the chicken, tomatoes, and mozzarella. Use a spatula to fold gently. This ensures the mozzarella stays whole. It adds nice pops of flavor to each bite. Taste your dish as you cook. Start with a pinch of salt and pepper. The lemon juice adds brightness, so taste it first. If it needs more zing, add another squeeze. Always remember that you can add more, but you can't take it out. This rule helps you control the flavors. For a great look, serve the salad in a big bowl. Layer the salad for a beautiful view. Add extra basil leaves on top. A sprinkle of toasted pine nuts adds crunch. This makes your dish eye-catching and fun. Enjoy serving this colorful salad at any gathering! You can find the full recipe in the main article. {{image_4}} You can boost your Chicken Pesto Pasta Salad with more veggies and proteins. Adding fresh spinach or arugula gives a nice crunch. Bell peppers add color and sweetness. Toss in some peas or zucchini for a nutritious kick. You can also swap chicken for shrimp, tofu, or chickpeas. This way, you can cater to different tastes and dietary needs. When it comes to ingredients, you have choices. Using homemade pesto elevates your dish. It tastes fresh and bright. You can easily make pesto with basil, nuts, olive oil, and garlic. If you’re short on time, store-bought pesto works too. Just pick a brand with simple, quality ingredients. This saves time without losing flavor. You can adjust this recipe for various diets. For a gluten-free option, use gluten-free pasta. Many brands offer great alternatives. If you want a vegan version, replace the chicken with chickpeas or roasted vegetables. Use a vegan pesto made from nuts and nutritional yeast instead of cheese. These swaps keep the dish tasty and satisfying for everyone. To store leftover chicken pesto pasta salad, place it in an airtight container. Make sure the lid seals tightly to keep the salad fresh. You can keep it in the fridge for up to three days. If you notice the salad looking dry, add a splash of olive oil or lemon juice before serving. This will help restore some moisture. Freezing pasta salad is not the best choice since the texture can change. If you do want to freeze it, separate the chicken and pasta from the veggies and dressing. Store each part in a freezer-safe bag or container. You can freeze it for up to one month. When ready, thaw it in the fridge overnight before serving. Reheating chicken pesto pasta salad is simple. If you have stored it in the fridge, serve it cold or at room temperature. If you prefer it warm, place it in a microwave-safe dish. Heat it for about 30 seconds at a time until it reaches your desired warmth. Be careful not to overheat, as it can make the pasta mushy. Always check the seasoning again after reheating and adjust as needed. You can use tofu, shrimp, or chickpeas as great chicken alternatives. Tofu gives a nice texture. Shrimp adds a seafood twist. Chickpeas provide protein and a hearty feel. You can also try cooked turkey or beef for a different taste. The key is to use a protein you enjoy. This salad stays fresh in the fridge for three to five days. Make sure to store it in an airtight container. The flavors will blend nicely as it sits. However, the longer it sits, the softer the pasta becomes. Yes, you can prepare this salad a day in advance. It tastes even better after the flavors meld overnight. Just keep it covered in the fridge. If you use fresh basil, add it right before serving to keep it vibrant. Check out the Full Recipe for complete details! This article covered how to make a tasty Chicken Pesto Pasta Salad. You learned about key ingredients, and how to cook pasta just right. I shared some helpful tips for mixing and serving. Remember, you can add veggies or change spices to fit your taste. Store leftovers well for future meals. This salad is great for lunch or a gathering. Enjoy your cooking and happy eating!](https://dishtreats.com/wp-content/uploads/2025/06/0440c548-7b14-481e-8658-8224512ec7fd.webp)
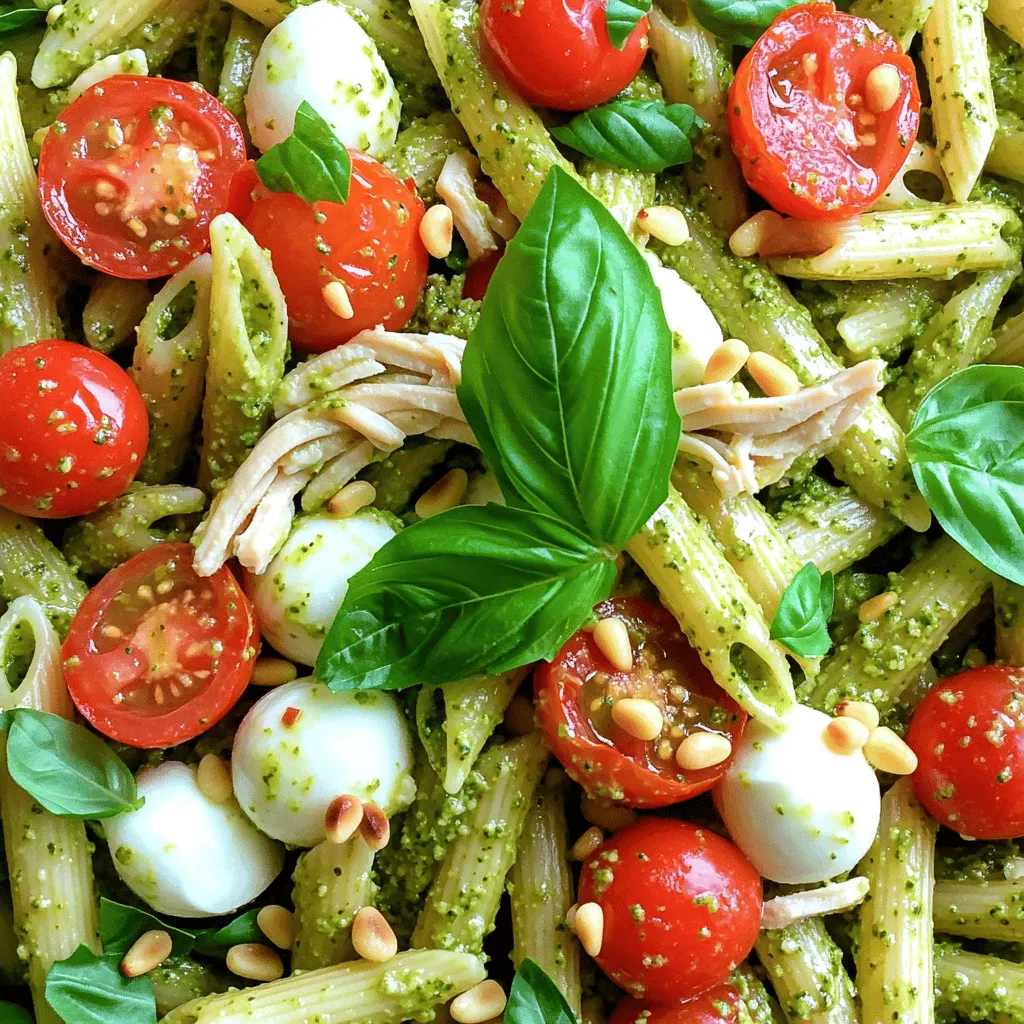
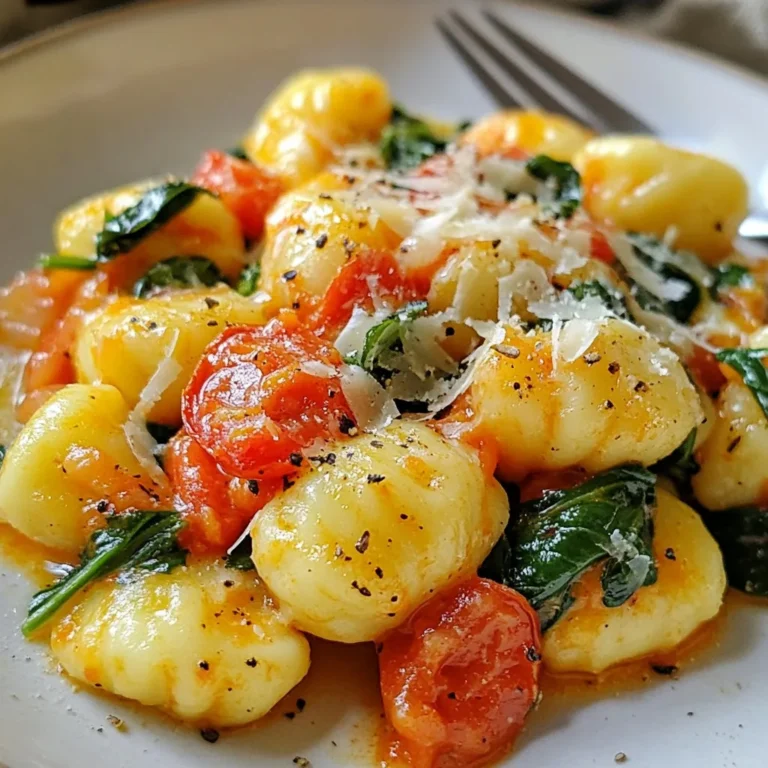
Looking for a fresh and tasty dish that’s simple to make? My Chicken Pesto Pasta Salad is your answer! This meal bursts with flavor, and it’s perfect for lunch or dinner. With just a few key ingredients and easy steps, you can whip up something delightful. Plus, I’ll share tips and tricks to make it your own. Let’s dive into this flavorful recipe that your taste buds will love!
Ingredients
Key Ingredients for Chicken Pesto Pasta Salad
To make Chicken Pesto Pasta Salad, you need fresh and tasty ingredients. Here’s what you will use:
- 2 cups penne pasta
- 1 cup cooked chicken breast, shredded
- 1/2 cup cherry tomatoes, halved
- 1/2 cup mozzarella balls, drained
- 1/4 cup fresh basil leaves, chopped
- 1/4 cup pesto sauce
- 2 tablespoons extra virgin olive oil
- Juice of 1 fresh lemon
- Salt and black pepper to taste
- Optional: 1/4 cup pine nuts, toasted
Each ingredient brings its own flavor. The penne pasta serves as a great base. The chicken adds protein. Tomatoes give freshness, while mozzarella adds creaminess.
Optional Add-ins and Substitutions
You can change things up with add-ins. Here are some great options:
- Spinach or arugula for extra greens
- Bell peppers for crunch
- Grated Parmesan cheese for a salty kick
- Cooked bacon for a smoky flavor
- Quinoa instead of pasta for a healthier twist
Feel free to mix and match. Your salad can be unique each time you make it.
Fresh vs. Store-Bought Pesto
When it comes to pesto, you have choices. You can use fresh homemade pesto or store-bought pesto. Fresh pesto tastes bright and bold. You can make it with basil, garlic, pine nuts, cheese, and olive oil. Store-bought pesto saves time but may have preservatives. Both options work well in your salad. I recommend trying fresh pesto if you have the time. It elevates the dish and adds a personal touch.
Step-by-Step Instructions
Detailed Cooking Instructions
1. Cook the Pasta: Start by boiling water in a large pot. Add salt for flavor. When it boils, add 2 cups of penne pasta. Cook until al dente, about 8-10 minutes. Drain the pasta and rinse it with cold water to cool it down.
2. Mix the Ingredients: In a big mixing bowl, add 1 cup of shredded cooked chicken, 1/2 cup of halved cherry tomatoes, and 1/2 cup of drained mozzarella balls. Use a spatula to mix them well.
3. Combine with Pasta: Add the cooled penne pasta to the bowl. Gently mix to combine everything. Be careful not to break the mozzarella balls.
4. Make the Dressing: In a small bowl, whisk together 1/4 cup of pesto sauce, 2 tablespoons of extra virgin olive oil, and the juice from 1 fresh lemon. Add a pinch of salt and black pepper.
5. Dress the Salad: Pour the dressing over the pasta salad. Use a spoon or tongs to toss everything gently. Make sure all the ingredients are coated.
6. Fold in Fresh Herbs: Add 1/4 cup of chopped fresh basil and optional 1/4 cup of toasted pine nuts. Gently fold them into the salad without bruising the basil.
7. Taste and Adjust: Taste your salad. If it needs more flavor, add more salt, pepper, or lemon juice.
8. Chill Before Serving: Cover the salad with plastic wrap. Let it chill in the fridge for at least 30 minutes. This helps the flavors mix well.
Tips for Cooking Pasta Perfectly
- Use a large pot to give the pasta room to move.
- Salt the water before adding pasta. This makes it taste better.
- Stir the pasta often while it cooks to prevent sticking.
- Always taste the pasta a minute before the time is up. It should be firm but not hard.
How to Prepare the Dressing
Making the dressing is quick and easy. In just a few steps, you can create a burst of flavor. Start with fresh pesto sauce. If you like a creamier dressing, mix in some yogurt or sour cream. Always taste your dressing before adding it to the salad. Adjust the flavors based on your taste. This simple dressing brings the whole dish together and makes it shine.
Tips & Tricks
Best Practices for Mixing Ingredients
Mixing ingredients well is key to flavor. Start with the pasta. Make sure it is cold before adding other items. This keeps everything fresh. Next, add the chicken, tomatoes, and mozzarella. Use a spatula to fold gently. This ensures the mozzarella stays whole. It adds nice pops of flavor to each bite.
Adjusting Seasoning for Flavor
Taste your dish as you cook. Start with a pinch of salt and pepper. The lemon juice adds brightness, so taste it first. If it needs more zing, add another squeeze. Always remember that you can add more, but you can’t take it out. This rule helps you control the flavors.
Serving Suggestions and Presentation
For a great look, serve the salad in a big bowl. Layer the salad for a beautiful view. Add extra basil leaves on top. A sprinkle of toasted pine nuts adds crunch. This makes your dish eye-catching and fun. Enjoy serving this colorful salad at any gathering!
Variations
Adding Vegetables and Proteins
You can boost your Chicken Pesto Pasta Salad with more veggies and proteins. Adding fresh spinach or arugula gives a nice crunch. Bell peppers add color and sweetness. Toss in some peas or zucchini for a nutritious kick. You can also swap chicken for shrimp, tofu, or chickpeas. This way, you can cater to different tastes and dietary needs.
Homemade vs. Pre-made Ingredients
When it comes to ingredients, you have choices. Using homemade pesto elevates your dish. It tastes fresh and bright. You can easily make pesto with basil, nuts, olive oil, and garlic. If you’re short on time, store-bought pesto works too. Just pick a brand with simple, quality ingredients. This saves time without losing flavor.
Dietary Adjustments (gluten-free, vegan)
You can adjust this recipe for various diets. For a gluten-free option, use gluten-free pasta. Many brands offer great alternatives. If you want a vegan version, replace the chicken with chickpeas or roasted vegetables. Use a vegan pesto made from nuts and nutritional yeast instead of cheese. These swaps keep the dish tasty and satisfying for everyone.
Storage Info
How to Store Leftover Pasta Salad
To store leftover chicken pesto pasta salad, place it in an airtight container. Make sure the lid seals tightly to keep the salad fresh. You can keep it in the fridge for up to three days. If you notice the salad looking dry, add a splash of olive oil or lemon juice before serving. This will help restore some moisture.
Freezing Tips for Longer Storage
Freezing pasta salad is not the best choice since the texture can change. If you do want to freeze it, separate the chicken and pasta from the veggies and dressing. Store each part in a freezer-safe bag or container. You can freeze it for up to one month. When ready, thaw it in the fridge overnight before serving.
Reheating Instructions
Reheating chicken pesto pasta salad is simple. If you have stored it in the fridge, serve it cold or at room temperature. If you prefer it warm, place it in a microwave-safe dish. Heat it for about 30 seconds at a time until it reaches your desired warmth. Be careful not to overheat, as it can make the pasta mushy. Always check the seasoning again after reheating and adjust as needed.
FAQs
What can I use instead of chicken in this recipe?
You can use tofu, shrimp, or chickpeas as great chicken alternatives. Tofu gives a nice texture. Shrimp adds a seafood twist. Chickpeas provide protein and a hearty feel. You can also try cooked turkey or beef for a different taste. The key is to use a protein you enjoy.
How long can Chicken Pesto Pasta Salad be kept in the fridge?
This salad stays fresh in the fridge for three to five days. Make sure to store it in an airtight container. The flavors will blend nicely as it sits. However, the longer it sits, the softer the pasta becomes.
Can I make this salad ahead of time?
Yes, you can prepare this salad a day in advance. It tastes even better after the flavors meld overnight. Just keep it covered in the fridge. If you use fresh basil, add it right before serving to keep it vibrant.
This article covered how to make a tasty Chicken Pesto Pasta Salad. You learned about key ingredients, and how to cook pasta just right. I shared some helpful tips for mixing and serving.
Remember, you can add veggies or change spices to fit your taste. Store leftovers well for future meals. This salad is great for lunch or a gathering. Enjoy your cooking and happy eating!
![To make Chicken Pesto Pasta Salad, you need fresh and tasty ingredients. Here’s what you will use: - 2 cups penne pasta - 1 cup cooked chicken breast, shredded - 1/2 cup cherry tomatoes, halved - 1/2 cup mozzarella balls, drained - 1/4 cup fresh basil leaves, chopped - 1/4 cup pesto sauce - 2 tablespoons extra virgin olive oil - Juice of 1 fresh lemon - Salt and black pepper to taste - Optional: 1/4 cup pine nuts, toasted Each ingredient brings its own flavor. The penne pasta serves as a great base. The chicken adds protein. Tomatoes give freshness, while mozzarella adds creaminess. You can change things up with add-ins. Here are some great options: - Spinach or arugula for extra greens - Bell peppers for crunch - Grated Parmesan cheese for a salty kick - Cooked bacon for a smoky flavor - Quinoa instead of pasta for a healthier twist Feel free to mix and match. Your salad can be unique each time you make it. When it comes to pesto, you have choices. You can use fresh homemade pesto or store-bought pesto. Fresh pesto tastes bright and bold. You can make it with basil, garlic, pine nuts, cheese, and olive oil. Store-bought pesto saves time but may have preservatives. Both options work well in your salad. I recommend trying fresh pesto if you have the time. It elevates the dish and adds a personal touch. For the full recipe, check out the [Full Recipe]. 1. Cook the Pasta: Start by boiling water in a large pot. Add salt for flavor. When it boils, add 2 cups of penne pasta. Cook until al dente, about 8-10 minutes. Drain the pasta and rinse it with cold water to cool it down. 2. Mix the Ingredients: In a big mixing bowl, add 1 cup of shredded cooked chicken, 1/2 cup of halved cherry tomatoes, and 1/2 cup of drained mozzarella balls. Use a spatula to mix them well. 3. Combine with Pasta: Add the cooled penne pasta to the bowl. Gently mix to combine everything. Be careful not to break the mozzarella balls. 4. Make the Dressing: In a small bowl, whisk together 1/4 cup of pesto sauce, 2 tablespoons of extra virgin olive oil, and the juice from 1 fresh lemon. Add a pinch of salt and black pepper. 5. Dress the Salad: Pour the dressing over the pasta salad. Use a spoon or tongs to toss everything gently. Make sure all the ingredients are coated. 6. Fold in Fresh Herbs: Add 1/4 cup of chopped fresh basil and optional 1/4 cup of toasted pine nuts. Gently fold them into the salad without bruising the basil. 7. Taste and Adjust: Taste your salad. If it needs more flavor, add more salt, pepper, or lemon juice. 8. Chill Before Serving: Cover the salad with plastic wrap. Let it chill in the fridge for at least 30 minutes. This helps the flavors mix well. - Use a large pot to give the pasta room to move. - Salt the water before adding pasta. This makes it taste better. - Stir the pasta often while it cooks to prevent sticking. - Always taste the pasta a minute before the time is up. It should be firm but not hard. Making the dressing is quick and easy. In just a few steps, you can create a burst of flavor. Start with fresh pesto sauce. If you like a creamier dressing, mix in some yogurt or sour cream. Always taste your dressing before adding it to the salad. Adjust the flavors based on your taste. This simple dressing brings the whole dish together and makes it shine. For the full recipe, check out the details above. Mixing ingredients well is key to flavor. Start with the pasta. Make sure it is cold before adding other items. This keeps everything fresh. Next, add the chicken, tomatoes, and mozzarella. Use a spatula to fold gently. This ensures the mozzarella stays whole. It adds nice pops of flavor to each bite. Taste your dish as you cook. Start with a pinch of salt and pepper. The lemon juice adds brightness, so taste it first. If it needs more zing, add another squeeze. Always remember that you can add more, but you can't take it out. This rule helps you control the flavors. For a great look, serve the salad in a big bowl. Layer the salad for a beautiful view. Add extra basil leaves on top. A sprinkle of toasted pine nuts adds crunch. This makes your dish eye-catching and fun. Enjoy serving this colorful salad at any gathering! You can find the full recipe in the main article. {{image_4}} You can boost your Chicken Pesto Pasta Salad with more veggies and proteins. Adding fresh spinach or arugula gives a nice crunch. Bell peppers add color and sweetness. Toss in some peas or zucchini for a nutritious kick. You can also swap chicken for shrimp, tofu, or chickpeas. This way, you can cater to different tastes and dietary needs. When it comes to ingredients, you have choices. Using homemade pesto elevates your dish. It tastes fresh and bright. You can easily make pesto with basil, nuts, olive oil, and garlic. If you’re short on time, store-bought pesto works too. Just pick a brand with simple, quality ingredients. This saves time without losing flavor. You can adjust this recipe for various diets. For a gluten-free option, use gluten-free pasta. Many brands offer great alternatives. If you want a vegan version, replace the chicken with chickpeas or roasted vegetables. Use a vegan pesto made from nuts and nutritional yeast instead of cheese. These swaps keep the dish tasty and satisfying for everyone. To store leftover chicken pesto pasta salad, place it in an airtight container. Make sure the lid seals tightly to keep the salad fresh. You can keep it in the fridge for up to three days. If you notice the salad looking dry, add a splash of olive oil or lemon juice before serving. This will help restore some moisture. Freezing pasta salad is not the best choice since the texture can change. If you do want to freeze it, separate the chicken and pasta from the veggies and dressing. Store each part in a freezer-safe bag or container. You can freeze it for up to one month. When ready, thaw it in the fridge overnight before serving. Reheating chicken pesto pasta salad is simple. If you have stored it in the fridge, serve it cold or at room temperature. If you prefer it warm, place it in a microwave-safe dish. Heat it for about 30 seconds at a time until it reaches your desired warmth. Be careful not to overheat, as it can make the pasta mushy. Always check the seasoning again after reheating and adjust as needed. You can use tofu, shrimp, or chickpeas as great chicken alternatives. Tofu gives a nice texture. Shrimp adds a seafood twist. Chickpeas provide protein and a hearty feel. You can also try cooked turkey or beef for a different taste. The key is to use a protein you enjoy. This salad stays fresh in the fridge for three to five days. Make sure to store it in an airtight container. The flavors will blend nicely as it sits. However, the longer it sits, the softer the pasta becomes. Yes, you can prepare this salad a day in advance. It tastes even better after the flavors meld overnight. Just keep it covered in the fridge. If you use fresh basil, add it right before serving to keep it vibrant. Check out the Full Recipe for complete details! This article covered how to make a tasty Chicken Pesto Pasta Salad. You learned about key ingredients, and how to cook pasta just right. I shared some helpful tips for mixing and serving. Remember, you can add veggies or change spices to fit your taste. Store leftovers well for future meals. This salad is great for lunch or a gathering. Enjoy your cooking and happy eating!](https://dishtreats.com/wp-content/uploads/2025/06/0440c548-7b14-481e-8658-8224512ec7fd-300x300.webp)

![- 1 cup rolled oats - 1/2 cup canned pumpkin puree - 1/4 cup almond butter (or your choice of nut butter) - 1/4 cup honey or maple syrup - 1/2 teaspoon vanilla extract - 1 teaspoon pumpkin pie spice - Pinch of salt - 1/4 cup chopped nuts (walnuts or pecans) - 1/4 cup mini chocolate chips or raisins - Calories per serving: About 100 - Protein content: 2 grams - Fiber content: 3 grams When you gather these ingredients, you set the stage for a tasty treat. Rolled oats serve as the base, giving each bite a hearty texture. Canned pumpkin puree brings moisture and a rich flavor that screams fall. Almond butter adds creaminess and healthy fats, while honey or maple syrup sweetens the mix. The vanilla extract rounds out the flavors, and pumpkin pie spice makes everything feel festive. Optional ingredients like chopped nuts and chocolate chips offer extra crunch and sweetness. You can mix and match to fit your taste. In terms of nutrition, these bites pack a punch. Each serving gives you about 100 calories, 2 grams of protein, and 3 grams of fiber. This makes them a great snack for energy and fullness. For the complete recipe, you can check out the Full Recipe section. - In a large mixing bowl, combine: - 1 cup rolled oats - 1/2 cup canned pumpkin puree - 1/4 cup almond butter (or your choice of nut butter) - 1/4 cup honey or maple syrup - 1/2 teaspoon vanilla extract - 1 teaspoon pumpkin pie spice - Pinch of salt Mix these ingredients well. Use a spatula to ensure everything blends together. You want a sticky dough. This sticky texture helps the bites hold their shape later. If you like, fold in some extras: - 1/4 cup chopped nuts (like walnuts or pecans) - 1/4 cup mini chocolate chips or raisins Make sure to distribute these evenly. This adds crunch and sweetness. The more you mix, the better the flavors combine. Now, it’s time to shape the bites. - Scoop small portions of the mixture. - Roll each portion into 1-inch balls. Place the balls on a plate or parchment paper. Leave space between them. After shaping, refrigerate the bites for at least 30 minutes. This helps them firm up. Enjoy these tasty bites chilled or at room temperature as a quick snack! For the full recipe, check out the details above. To make great energy bites, size matters. Aim for about 1 inch for each bite. This helps them cook evenly. Use a light touch when mixing the dough. Overworking it can make them tough. Gently blend the ingredients until they come together. Want more flavor? Try making your own pumpkin pie spice. Combine cinnamon, nutmeg, and ginger to find your perfect mix. You can also adjust sweetness. Use honey or maple syrup to make them sweeter or less sweet. Taste as you go! When it's time to serve, make it pretty! Arrange your energy bites on a decorative plate. This makes them look special. Add a sprinkle of pumpkin pie spice on top for a nice touch. It looks great and adds extra flavor. For the full recipe, check out [Full Recipe]. {{image_4}} You can make your pumpkin pie energy bites even more fun with flavor twists. Try adding toasted coconut for a tropical vibe. The sweet and crunchy texture makes each bite delightful. You can also switch your nut butter. Use peanut or cashew butter instead of almond butter. Each nut brings its own taste, making the bites unique. If you need a gluten-free snack, use gluten-free oats in your mix. This small change keeps the bites delicious and safe for those with gluten sensitivities. For a vegan option, swap honey with agave nectar. This keeps your bites sweet while fitting a plant-based diet. You can tailor these bites to fit the seasons. For fall, mix in some spiced apple or cider. This adds a warm, cozy flavor that feels like autumn. For summer, a hint of citrus zest can brighten the bites. It gives them a fresh burst that’s perfect for hot days. For the full recipe, check the details above and make your own tasty energy bites! Store your pumpkin pie energy bites in an airtight container in the refrigerator. This keeps them fresh and tasty. If you plan to eat them soon, you can keep them at room temperature for short durations. Just remember, they may not last as long outside the fridge. These energy bites can last up to one week in the fridge. If you want to keep them longer, freeze them. They can stay fresh for up to three months in the freezer. Just make sure to label the container with the date you froze them. You can enjoy these bites chilled or at room temperature. They make a great snack either way! For a delightful treat, pair them with a cup of tea or coffee. The warm drink complements the tasty flavors of the bites perfectly. If you want to try a fun twist, serve them at a party on a festive plate. You can find the full recipe to make these delicious bites. To make pumpkin pie energy bites, follow these steps: 1. In a large bowl, mix rolled oats, canned pumpkin puree, almond butter, and honey. 2. Add vanilla extract, pumpkin pie spice, and a pinch of salt. 3. Stir until the mixture becomes a sticky dough. 4. Fold in chopped nuts and chocolate chips or raisins. 5. Scoop out small portions and roll them into balls, about 1 inch wide. 6. Place the bites on a plate with space between them. 7. Refrigerate for at least 30 minutes to firm up. Enjoy your tasty and healthy snack! For more details, check the Full Recipe. Yes, you can freeze these energy bites. To do this, place the bites on a baking sheet. Freeze them for about an hour until solid. Then, transfer them to a freezer bag or an airtight container. Label the bag with the date. These bites can last up to three months in the freezer. When you’re ready to eat them, just let them thaw in the fridge. Pumpkin pie energy bites have many health benefits. They are rich in fiber from the oats and pumpkin. Fiber helps with digestion and keeps you full. Almond butter provides healthy fats and protein. Honey or maple syrup adds natural sweetness without refined sugar. Pumpkin is packed with vitamins A and C, which support your immune system. Overall, these bites are a nutritious snack option. Yes, these energy bites are safe and nutritious for kids. They contain wholesome ingredients that provide energy without added sugar. Kids love the sweet taste and chewy texture. You can also let your children help make them. This way, they learn about healthy snacks. Just remember to check for any nut allergies before serving. These pumpkin pie energy bites are easy to make and fun to eat. You mix simple main ingredients like oats, pumpkin, and nut butter. Add some nuts or chocolate chips for a tasty twist. Remember to store them well to enjoy later. Whether for a snack, dessert, or lunchbox treat, these bites pack nutrition in every bite. Get creative with flavors and enjoy the flexible recipes. Healthy eating can be delicious and effortless. Make these energy bites today and see for yourself!](https://dishtreats.com/wp-content/uploads/2025/07/b18c9eee-ac7a-43cf-8a14-33dd9ccff863-768x768.webp)