
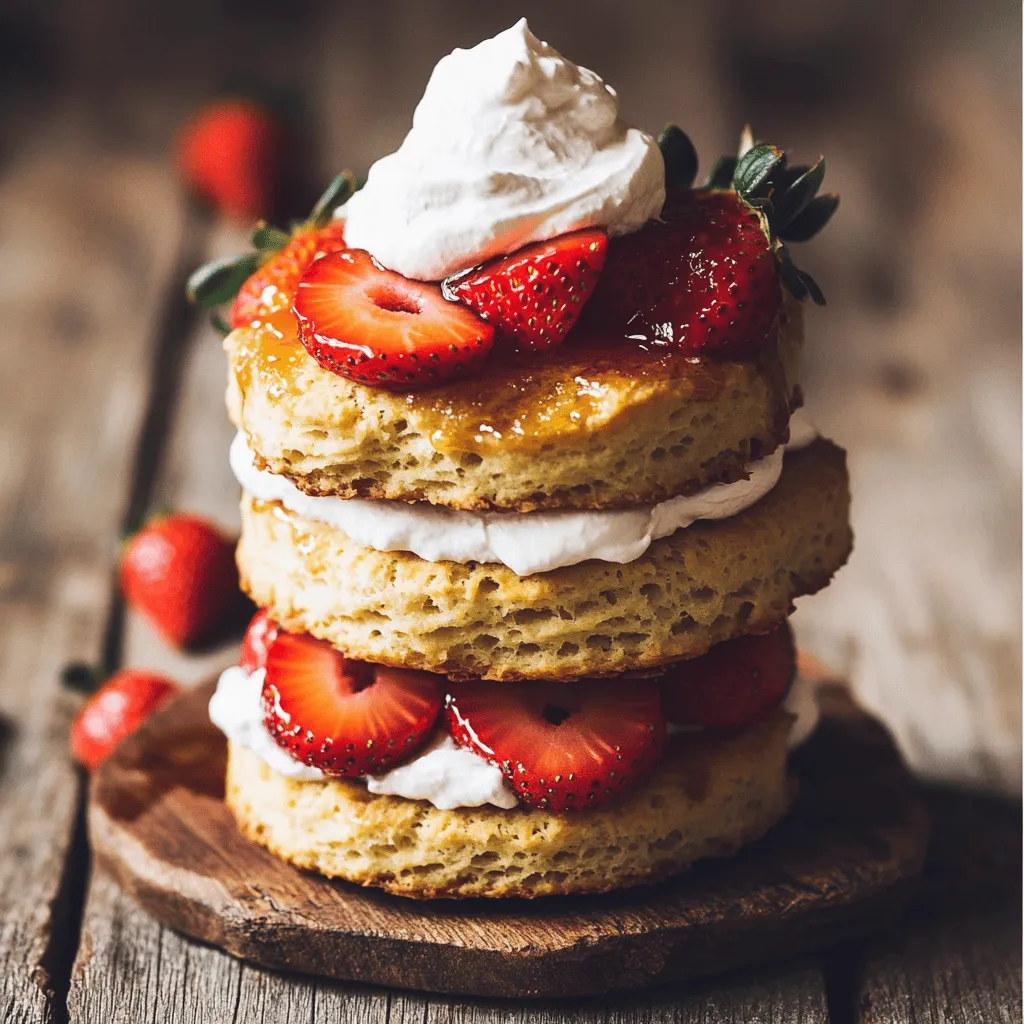
Vegan Strawberry Shortcake Delightful and Simple Treat
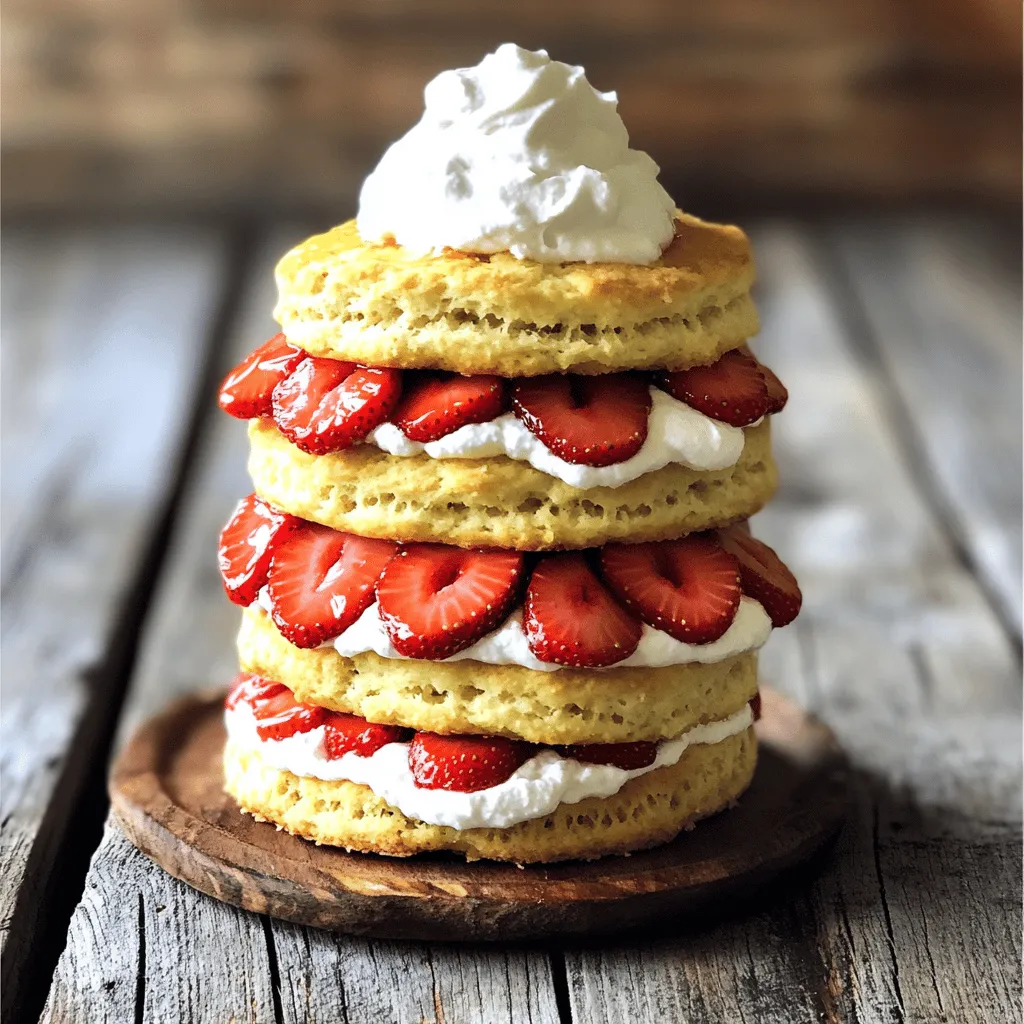
If you’re craving a dessert that’s both delicious and easy to make, look no further! This Vegan Strawberry Shortcake is a bright, refreshing treat that satisfies your sweet tooth without any dairy. In just a few simple steps, you can whip up this delightful dish, perfect for any occasion. Get ready to impress friends and family with a dessert that’s not only tasty but also simple to prepare! Let’s dive into the ingredients and get started!
Ingredients
Let’s dive into the ingredients for your vegan strawberry shortcake. This list keeps it simple and delicious. Each item plays a vital role in creating that perfect treat.
- 2 cups all-purpose flour
- 1/2 cup coconut sugar
- 2 teaspoons baking powder
- 1/2 teaspoon baking soda
- 1/4 teaspoon salt
- 1/3 cup coconut oil, melted
- 1 cup unsweetened almond milk
- 1 tablespoon apple cider vinegar
- 1 teaspoon vanilla extract
- 2 cups fresh strawberries, hulled and sliced
- 2 tablespoons maple syrup (for the strawberries)
- 1 can (14 oz) chilled coconut cream (use solid part only)
- 2 tablespoons powdered sugar (for the whipped cream)
- 1 teaspoon vanilla extract (for the whipped cream)
Each ingredient brings its own charm. Coconut sugar adds a rich flavor, while almond milk keeps it creamy. Fresh strawberries are the star here. They give a fresh sweetness that balances perfectly with the whipped coconut cream. You’ll love how all these flavors blend together in this easy recipe.
Step-by-Step Instructions
Preheating and Preparing the Oven
- Preheat the oven to 400°F (200°C).
- Line a baking sheet with parchment paper.
Start by preheating your oven. This step helps the shortcakes rise well. The parchment paper keeps the biscuits from sticking, making cleanup easy.
Mixing Ingredients
- Whisk together the dry ingredients.
- Combine the wet ingredients and mix until smooth.
In a large bowl, whisk together the flour, coconut sugar, baking powder, baking soda, and salt. This mix is key for a fluffy biscuit. In another bowl, mix the melted coconut oil, almond milk, apple cider vinegar, and vanilla extract until smooth. Combine these wet and dry ingredients carefully. Stir gently until just mixed. Don’t over-mix, as this can make the shortcakes tough.
Forming and Baking the Shortcakes
- Knead the dough gently and form biscuits.
- Cut out circles and place on the baking sheet.
- Bake and cool on a wire rack.
Transfer your dough to a floured surface. Knead it gently for about one minute. This helps the dough hold together. Shape it into a round disk, about 1 inch thick. Use a biscuit cutter to cut out circles. Place these on your prepared baking sheet. Bake for 12-15 minutes, or until golden. After baking, let them cool on a wire rack. This cooling helps keep them soft and fluffy.
Tips & Tricks
Perfecting the Biscuits
To make great biscuits, you need to be gentle. Avoid over-mixing the dough. Mix just until the dry and wet ingredients come together. Over-mixing can make the biscuits tough. When kneading, use a light touch. Knead for only about one minute. You want the dough to hold together, not be overworked.
Enhancing the Strawberry Flavor
Strawberries need some love to shine. Toss them with maple syrup to enhance their sweetness. This process is called macerating. Let them sit for about 10 minutes. This time allows the syrup to soak in. You will see the strawberries release their juices, creating a tasty syrup.
Whipping Coconut Cream
For a fluffy coconut cream, start with cold coconut cream. Chill a can overnight in the fridge. When ready, scoop out only the solid part. Using a hand mixer, whip it until it’s creamy. Add powdered sugar and vanilla extract for sweetness. You want a light and airy texture, perfect for topping your shortcake.
Variations
Alternative Sweeteners
You can change the sweetness of your vegan strawberry shortcake. Instead of coconut sugar, try agave syrup or date sugar. These options add a different taste. They also blend well with the strawberries. Agave syrup is liquid, so use less liquid in your recipe. Date sugar has a rich flavor and gives a nice texture. Both options keep your dessert vegan and tasty.
Gluten-Free Options
If you need a gluten-free shortcake, it’s easy to adapt! Just swap all-purpose flour for a gluten-free flour blend. Many blends work great in baking. Look for one that has xanthan gum for better texture. It helps the shortcake rise and stay soft. Your friends and family will love the gluten-free version just as much!
Seasonal Variations
Why stick with just strawberries? You can mix in other berries for fun! Blueberries and raspberries add new flavors and colors. They bring their own unique sweetness. You can use a mix of berries too! This way, you celebrate the season and keep things fresh. Each bite will be a surprise!
Storage Info
How to Store Leftovers
To keep your vegan strawberry shortcake fresh, store it properly. Place the shortcakes in an airtight container. This helps keep them soft and tasty. Store them in the fridge for up to three days. For the strawberries, you can keep them in a bowl. Cover them with plastic wrap to avoid drying out. They should stay good for about two days. If you want to keep the whipped cream, store it in a separate container. It stays fresh for three days in the fridge.
Freezing Recommendations
If you want to save some shortcakes for later, you can freeze them! First, let the baked shortcakes cool completely. Wrap each one in plastic wrap. Then, place them in a freezer bag. This keeps them safe from freezer burn. You can freeze them for up to three months.
When you are ready to eat, take a shortcake out and let it thaw in the fridge overnight. For a quick method, you can thaw it at room temperature for about an hour. Enjoy your delicious vegan strawberry shortcake anytime!
FAQs
Can I use regular sugar instead of coconut sugar?
Yes, you can use regular sugar. Coconut sugar adds a rich flavor. Regular sugar will work fine, but it lacks the same depth. You can also try other alternatives like brown sugar. Each sweetener changes the taste slightly.
What can I use instead of coconut cream for the whipped topping?
You can use cashew cream or soy whipped cream. Both options give a creamy texture. You can also try whipped aquafaba, which is chickpea water. It whips up nicely and is light. Just make sure to sweeten it a bit.
How long does it take to prepare this vegan strawberry shortcake?
The prep time is about 15 minutes. The total time is around 30 minutes. This makes it a quick and fun dessert. You can easily whip it up for a gathering. Enjoy making this sweet treat!
You now have a clear guide to make delicious vegan strawberry shortcake. We covered key ingredients, step-by-step instructions, and handy tips for success. You learned about variations and how to store leftovers. Remember, avoid over-mixing and let your strawberries soak in flavor. This dessert is simple to make and can be tailored to your taste. Enjoy your tasty creation and share it with family and friends!


 recipe. You learned how to make tasty air fryer apple chips. We covered the ingredients, equipment, and easy steps. I shared tips for the best crispiness and flavor. You can even try sugar-free options or new spices. Store your chips right for lasting crunch. These apple chips are a fun and healthy snack. I hope you enjoy making them as much as I do! Now go ahead and create your own delicious batch.](https://dishtreats.com/wp-content/uploads/2025/08/8a2bfbc3-9f97-452b-a25b-2e6f6cce62ce-768x768.webp)
![To make classic chocolate brownies, you need the following ingredients: - 1 cup (2 sticks) unsalted butter - 2 cups granulated sugar - 4 large eggs, at room temperature - 1 teaspoon pure vanilla extract - 1 cup all-purpose flour - 1 cup unsweetened cocoa powder - ½ teaspoon baking powder - ½ teaspoon sea salt - 1 cup semi-sweet chocolate chips - Optional: ½ cup chopped walnuts or pecans for added crunch You can use margarine if you need a butter alternative. For a deeper flavor, try using dark cocoa powder instead of regular cocoa. If you want to make this recipe gluten-free, swap the all-purpose flour with a gluten-free blend. Feel free to customize your brownies with these fun ideas: - Nuts: Consider using walnuts or pecans for extra texture. Almonds also work great. - Chocolate types: Mix semi-sweet and dark chocolate chips for rich flavor. - Flavor variations: Add a teaspoon of mint extract or some orange zest for a twist. These add-ins can enhance the taste and make your brownies unique. Mixing flavors can lead to exciting new experiences in every bite. To make the brownie batter, follow these steps: 1. Melt the butter: Start by melting 1 cup of unsalted butter in a medium saucepan over low heat. Stir often until it’s fully melted. 2. Add sugar: Once the butter is melted, remove it from the heat. Stir in 2 cups of granulated sugar until it looks smooth. 3. Add eggs: Crack 4 large eggs into the butter-sugar mix. Add them one at a time. Mix well after each egg, so the batter combines nicely. 4. Mix in vanilla: Add 1 teaspoon of pure vanilla extract. This gives the brownies a nice flavor. 5. Combine dry ingredients: In another bowl, sift together 1 cup of all-purpose flour, 1 cup of unsweetened cocoa powder, ½ teaspoon of baking powder, and ½ teaspoon of sea salt. This helps mix the dry ingredients well. 6. Fold dry into wet: Gently fold the dry mix into the wet mix. Use a spatula to combine until just mixed. Do not overmix, or the brownies won’t be fudgy. 7. Add chocolate chips: Toss in 1 cup of semi-sweet chocolate chips. If you like, add ½ cup of chopped walnuts or pecans for crunch. Mix until they are spread evenly in the batter. 8. Prepare the pan: Grease a 9x13-inch baking pan or line it with parchment paper. This makes it easy to remove the brownies later. 9. Pour batter: Pour the brownie batter into the pan. Use a spatula to spread it evenly. Now, it’s time to bake! 1. Preheat oven: Set your oven to 350°F (175°C). This ensures even baking. 2. Bake brownies: Place the pan in the oven. Bake for 30 to 35 minutes. 3. Check for doneness: To check, insert a toothpick into the center. It should come out with a few moist crumbs. If it’s wet, bake a little longer. Avoid overbaking for that perfect fudgy texture. After baking, let’s cool and cut the brownies. 1. Cool in the pan: Allow the brownies to cool in the pan for at least 15 minutes. This helps them firm up. 2. Transfer to wire rack: After 15 minutes, move the brownies to a wire rack. Let them cool completely before cutting. 3. Cutting tips: Use a sharp knife for clean cuts. Wipe the knife after each cut for neat squares. 4. Serving size: Cut into generous squares. Each piece should be a lovely bite of fudgy goodness. For a special touch, dust the brownies with powdered sugar before serving. Enjoy these delightful treats with a scoop of vanilla ice cream for extra indulgence. For the complete recipe, refer to the Full Recipe. To make the best fudgy brownies, focus on mixing. After melting the butter, stir in the sugar until smooth. Add eggs one at a time. Mix well after each egg. This helps create a rich texture. Don't overmix the dry and wet ingredients. Fold them gently just until combined. Common mistakes include overbaking and using too much flour. Overbaking leads to dry brownies. Aim for a toothpick with few moist crumbs. If you use too much flour, your brownies will be cake-like. Measure carefully for the best results. Brownies keep well at room temperature. Store them in an airtight container for up to five days. If you want to keep them longer, the fridge is a good option. Just remember, cold brownies can lose some flavor. To revive leftovers, warm them in the microwave for 10-15 seconds. This restores their fudgy goodness. You can also serve them with a scoop of ice cream for a tasty treat. For the full recipe, check out the [Full Recipe]. {{image_4}} For a gluten-free treat, try flourless brownies. You can use almond flour or ground oats instead of regular flour. These options add a nice texture and flavor. You should also reduce baking time. Check them after 25 minutes to avoid dryness. If you want a lighter version, use less sugar. You can swap half of the sugar with unsweetened applesauce. This keeps the brownies moist. For fats, use avocado or coconut oil. These substitutes make the brownies healthier but still tasty. To spice things up, add a dash of coffee or a pinch of sea salt. These flavors enhance the chocolate taste. You can also use extracts like almond or orange for a lovely twist. Just a little goes a long way in changing the flavor profile. Serving classic chocolate brownies is easy and fun. You can serve them warm with a scoop of ice cream. Vanilla ice cream works great, but try mint or coffee flavors for a twist. You can also top brownies with whipped cream. A sprinkle of chocolate shavings adds a nice touch. For a beautiful presentation, cut the brownies into squares. Place them on a decorative plate. Dust with powdered sugar for a fancy look. Add fresh berries or a sprig of mint beside each brownie. These details make the dish more appealing. Brownies are versatile and can be served in many ways. One fun idea is a brownie sundae. Start with a warm brownie, add a scoop of ice cream, and drizzle chocolate sauce on top. Finish with whipped cream and a cherry for a delightful treat. You can pair brownies with drinks too. A strong cup of coffee complements the rich chocolate flavor. Hot cocoa or milk also works well. For a unique twist, serve brownies with a side of fresh fruit. The sweetness of the fruit balances the rich brownies. For more ideas, check out the Full Recipe to explore all the delicious details! To check if your brownies are done, look for a few signs. The top should look set and slightly shiny. When you insert a toothpick in the center, it should come out with a few moist crumbs. This means your brownies are fudgy and perfect. If the toothpick comes out with wet batter, they need more time. Keep a close watch in the last few minutes of baking to avoid overbaking. Yes, you can freeze brownies! To freeze them, let them cool completely first. Cut your brownies into squares, then wrap each piece in plastic wrap. Place them in a freezer bag or container. They can last up to three months in the freezer. When you're ready to eat them, thaw them in the fridge overnight or at room temperature for a few hours. For neat cuts, use a sharp knife. First, let the brownies cool completely in the pan. For even cleaner cuts, wipe the knife with a damp cloth after each cut. This way, you have smooth edges. You can also use a pizza cutter for quick slicing. If you want, line your baking pan with parchment paper. This makes it easy to lift out the brownies for cutting. You’ve learned how to make classic chocolate brownies, from ingredients to serving tips. Whether you prefer fudgy or flourless, options abound to suit your taste. Remember, small changes can create big flavors. Experiment with add-ins or healthier swaps to make them your own. With these steps, you can enjoy delicious brownies any time. Happy baking!](https://dishtreats.com/wp-content/uploads/2025/07/8475203d-ada8-4920-a61c-065e4c50bd3f-768x768.webp)
![- 2 cups watermelon, diced into bite-sized cubes - 1 cup fresh pineapple, diced - 1 cup ripe mango, peeled and diced - 1 cup strawberries, hulled and sliced - 1 cup plump blueberries - 1 tablespoon pure honey - 2 tablespoons freshly squeezed lime juice - 1 teaspoon finely grated lime zest - Fresh mint leaves, for a lovely garnish When picking fruits, look for bright colors and firm textures. Choose watermelon that feels heavy for its size. Make sure the skin is smooth and free from blemishes. For pineapple, smell the base; a sweet scent means it's ripe. Ripe mangoes should yield slightly when you press them. Strawberries should be bright red, without white tips. Pick blueberries that are firm and plump, with a deep color. This fruit salad is not just tasty; it’s also packed with nutrients. Watermelon is hydrating and low in calories. Pineapple provides vitamin C and enzymes that aid digestion. Mango is rich in antioxidants and vitamins A and C. Strawberries boost heart health due to their high fiber and vitamin C content. Blueberries are known for their powerful antioxidants. The honey adds a natural sweetness, while lime juice helps with vitamin C and adds a zesty kick. Each bite not only delights your taste buds but also nourishes your body. First, gather all your fruits. You will need watermelon, pineapple, mango, strawberries, and blueberries. Wash each fruit well to remove any dirt. Dice the watermelon into cubes. Cut the pineapple and mango into small pieces. Hull and slice the strawberries. Finally, add the blueberries. Place all the fruit into a large mixing bowl. Be gentle while mixing to keep the fruit intact. In a separate small bowl, combine one tablespoon of honey with two tablespoons of freshly squeezed lime juice. Add one teaspoon of finely grated lime zest for extra flavor. Whisk the mixture together until it is smooth and well-blended. This honey lime dressing will add a sweet and tangy flavor to your salad. Now, drizzle the honey lime dressing over the fruit. Make sure to cover every piece of fruit for the best taste. Use a gentle motion to toss the salad. This helps the dressing coat all the fruit without mashing it. Let the salad sit for about 10 minutes. This resting time allows the flavors to blend well. When ready to serve, garnish with fresh mint leaves. This adds a lovely touch to your fruit salad. Enjoy your Honey Lime Fruit Salad Delight! For a full recipe, visit the [Full Recipe]. Cutting fruit can be fun and easy. Start with a sharp knife for safety. For watermelon, slice it in half. Then, cut each half into thick wedges. Remove the rind and dice the flesh into cubes. Pineapple is best peeled and cored first. Cut the fruit into thick slices, then dice. For strawberries, remove the green tops and slice them. Keep your cuts even for a pretty look. You can add more fun to the salad. Try adding a splash of orange juice. This will give it a citrus twist. You can also mix in a pinch of cinnamon for warmth. Chopped nuts like almonds or walnuts add crunch. If you like creamy, add a dollop of yogurt. These extra flavors make the salad pop! Make your fruit salad shine with great presentation. Use a clear glass bowl to show off the colors. You can layer the fruits for a rainbow effect. Garnish with mint leaves on top for a fresh touch. A few extra blueberries scattered around add visual flair. Serve with colorful spoons for added fun. Remember, we eat with our eyes first! {{image_4}} You can switch up fruits in your Honey Lime Fruit Salad. Try using peaches or nectarines for a juicy twist. Grapes add a nice pop, and kiwi brings a tart flavor. You might also add oranges for an extra citrus kick. Mix and match based on your taste! Change your fruit salad with the seasons. In summer, use berries and stone fruits for freshness. Fall is great for apples and pears, while winter calls for citrus fruits like clementines and grapefruits. Spring gives you the chance to add strawberries and rhubarb for a bright taste. Add nuts or seeds for a crunchy texture. Almonds and walnuts are perfect options. If you prefer seeds, sprinkle in some pumpkin or sunflower seeds. These additions not only improve texture, but they also boost the nutrition of your salad. Enjoy the added flavor and health benefits! Store leftover honey lime fruit salad in an airtight container. This keeps the fruit fresh and tasty. If you can, eat it within a day or two. The longer it sits, the softer the fruit may get. I recommend using glass or plastic containers with tight-fitting lids. These help lock in moisture and prevent spills. If you have smaller portions, use smaller containers for easy access. The salad stays fresh for about two days in the fridge. Keep it away from foods with strong odors. To refresh the taste, add a little more honey or lime juice before serving. If you notice any browning, remove those pieces before enjoying. For the full recipe, make sure to check the main article! Yes, you can make Honey Lime Fruit Salad a few hours ahead. However, I recommend serving it fresh. If you prepare it too early, the fruit may get soft and lose its crunch. If you decide to make it ahead, store it in the fridge. This keeps it cool and fresh. Just remember to add the dressing right before serving to keep the fruit juicy. The best fruits for Honey Lime Fruit Salad are those that are ripe and sweet. I love using: - Watermelon - Pineapple - Mango - Strawberries - Blueberries These fruits blend well together, creating a vibrant and tasty mix. You can also try using kiwi or grapes for extra flavor. The key is to choose fruits that you enjoy and that are in season. Yes, you can use another sweetener if you prefer. Options include agave syrup or maple syrup. These sweeteners work great in the dressing. Just keep in mind that the flavor may change slightly. I suggest starting with the same amount as the honey. You can always adjust it to your taste. For a sugar-free option, consider using a sugar substitute that you like. In this blog post, we explored how to make a tasty Honey Lime Fruit Salad. We discussed the key ingredients, tips for selecting fresh fruits, and the nutritional benefits they offer. You learned step-by-step instructions for preparation, dressing, and serving. We also shared tips for cutting fruits and enhancing flavor. Plus, variations for using different fruits and tips for storage were provided. Creating this salad is simple and rewarding. Enjoy it yourself or share it with friends. It’s a fun and healthy treat everyone will love.](https://dishtreats.com/wp-content/uploads/2025/07/a7fe8aa9-0619-4c4c-8a63-94d099c8a4d2-768x768.webp)